
Zucchini Roll Ups: The Ultimate Meal Prep Recipe
Discover how Zucchini Roll Ups transform your weekly meal prep. Batch cook once, enjoy fresh flavors all week. Complete guide with storage tips.
cookwithlucia.com/recipes/zucchini-roll-ups
Picture this: it's Sunday afternoon, and instead of dreading five days of "what's for lunch?" decisions, you're spending just one focused hour creating beautiful, nutritious meals that'll carry you through the entire week. That's the magic of meal prep, and Zucchini Roll Ups are about to become your new best friend in this journey. These elegant little parcels are far more than just pretty food—they're a strategic solution to the daily cooking grind that leaves so many of us reaching for less healthy convenience options by Wednesday afternoon.
The beauty of Zucchini Roll Ups lies in their perfect marriage of convenience and freshness. Unlike heavy casseroles that turn mushy or salads that wilt by day three, these rolls maintain their integrity throughout the week. The zucchini acts as a sturdy vessel that protects the filling while staying tender, and the flavors actually deepen as the components meld together in your refrigerator. Whether you're packing lunch for the office, preparing healthy options for busy weeknights, or simply trying to reclaim your evenings from the kitchen, this recipe delivers.
I've designed this guide specifically for batch cooking success. We're not just making dinner—we're creating a system that respects your time while delivering restaurant-quality results. One Sunday session, five days of satisfaction. No daily chopping, no nightly cleanup marathons, just grab-and-go nutrition that actually tastes incredible. Let's dive into why Zucchini Roll Ups are the meal prep champion you didn't know you needed.
Why This Recipe Is Perfect for Meal Prep
Zucchini Roll Ups check every single box on the meal prep wishlist, starting with their remarkable structural integrity. The zucchini ribbons themselves are sturdy enough to hold fillings securely but tender enough to eat cold or gently reheated. Unlike leafy greens that oxidize or bread-based wraps that get soggy, zucchini maintains its texture for up to five days when properly stored. The vegetable's natural moisture content actually works in your favor here, keeping the filling fresh without making anything waterlogged.
The flavor profile of these rolls is another meal prep superpower. The combination of herbs, creamy filling, and roasted vegetables doesn't just survive refrigeration—it genuinely improves. Those first 24 hours allow the garlic to mellow, the herbs to infuse throughout, and all the components to marry into something more cohesive than what you started with. Day three Zucchini Roll Ups often taste better than day one, which is exactly what you want in a make-ahead meal.
Nutritionally, these rolls deliver complete satisfaction without the afternoon energy crash. Each serving provides quality protein from cheese and nuts, complex carbohydrates from the vegetables, healthy fats from olive oil, and plenty of fiber. This balance keeps you full for hours, which means no 3 PM vending machine raids. The portion control is built right in—each roll is a perfectly sized unit, making it easy to track what you're eating without measuring or weighing anything.
Finally, Zucchini Roll Ups are incredibly forgiving when it comes to reheating. They're delicious cold, which means you can eat them straight from the container if you're short on time or don't have access to heating facilities. If you prefer them warm, they respond beautifully to gentle reheating without turning rubbery or dried out. This flexibility means they work for any eating situation, from desk lunches to picnics to quick dinners at home.
What You'll Need
The ingredient list for batch-prepped Zucchini Roll Ups is refreshingly short, but choosing the right versions of each component makes all the difference. Start with four to five large, firm zucchini—you want specimens that are straight rather than curved, as these will give you the longest, most uniform ribbons. Avoid the enormous baseball bat zucchini, as these tend to be watery and full of seeds. Medium-large zucchini with tight, glossy skin are your ideal choice. When buying for meal prep, purchase an extra zucchini as insurance against any that might be spongy inside.
For the filling, high-quality ricotta cheese forms the creamy base. A fifteen-ounce container will be sufficient for a full batch of twenty rolls. Look for whole milk ricotta rather than part-skim—the fat content helps the filling stay creamy throughout the week rather than becoming grainy. If you can find fresh ricotta from an Italian market or specialty store, it's worth the upgrade. You'll also need eight ounces of shredded mozzarella, preferably a low-moisture variety that won't release excess liquid as the rolls sit.
The flavor builders include fresh herbs, garlic, and sun-dried tomatoes. Fresh basil and parsley are essential—dried herbs simply don't provide the same vibrant flavor that lasts through days of storage. Buy the large clamshell containers rather than those tiny expensive packages. For the sun-dried tomatoes, choose the kind packed in olive oil rather than the completely dried ones, as they're already soft and won't need rehydration. The oil they're packed in can actually be used in your filling for extra flavor.
For storage, invest in glass meal prep containers with compartments. The five-cup rectangular containers with divided sections work perfectly—the main compartment holds three to four Zucchini Roll Ups, while the smaller sections can hold fresh toppings, sauce, or side salads. Glass is superior to plastic for this recipe because it doesn't absorb odors, can go from fridge to oven if needed, and the clear sides let you see your beautiful rolls. If you're bulk buying, look for cases of containers online, which brings the per-unit cost down significantly.
The Batch Cooking Method
The secret to stress-free batch cooking is working in stations rather than trying to complete one roll at a time. Start by setting up your workspace with three distinct zones: slicing, filling, and assembly. This restaurant-style approach might feel overly organized at first, but it's the difference between a chaotic hour and a smooth production line. Begin by preheating your oven to 375°F, as you'll need it ready when your rolls are assembled.
Station one is all about the zucchini ribbons. Using a sharp vegetable peeler or mandoline set to about one-eighth inch thickness, slice your zucchini lengthwise into long ribbons. Discard the first and last slices that are mostly skin, and stop when you hit the seedy center core. Lay all your ribbons on clean kitchen towels and sprinkle them lightly with salt. This draws out excess moisture—let them sit for ten minutes, then pat them thoroughly dry. This step is crucial for meal prep success because it prevents your containers from filling with liquid throughout the week.
While those ribbons drain, prepare your filling at station two. In a large bowl, combine the ricotta, half the mozzarella, minced garlic, chopped herbs, diced sun-dried tomatoes, a generous crack of black pepper, and a pinch of salt. Stir until completely uniform—you want every roll to taste the same. Taste and adjust seasoning now, because this is your only chance. The mixture should be flavorful enough that you'd happily eat it with a spoon. If it tastes bland at this stage, your finished rolls will be disappointing.
Now move to station three for assembly. Lay out a zucchini ribbon on your work surface, place about two tablespoons of filling at one end, and roll it up firmly but gently. Place each completed roll seam-side down in a large baking dish—a 9x13 inch pan typically holds about twenty rolls in a single layer. Once all rolls are assembled, brush the tops with olive oil and sprinkle with the remaining mozzarella. This creates a beautiful golden top during baking and adds an extra layer of flavor.
Bake for twenty-five to thirty minutes until the zucchini is tender and the cheese is melted and starting to brown in spots. The hardest part is waiting—let the pan cool for fifteen minutes before portioning. This cooling period allows the rolls to set up so they hold together when you transfer them to containers. Warm Zucchini Roll Ups are fragile; cooled ones are sturdy and perfect for packing.
The Weekly Game Plan
A successful meal prep week starts with smart timing, and for Zucchini Roll Ups, Sunday afternoon is your golden window. Plan to start around 2 PM, which gives you plenty of time to cook, cool, and portion without rushing. This also means your containers can go into the refrigerator by evening when they've cooled completely, maximizing freshness. The entire process from pulling out your cutting board to sealing the last container takes about ninety minutes, including all the cooling time.
Monday and Tuesday, your Zucchini Roll Ups will taste incredibly fresh—almost like they were just made. Eat these cold if you prefer, or give them just thirty seconds in the microwave to take the chill off. Keep your meals interesting by varying what you serve alongside them. Monday might feature the rolls with a crisp green salad and balsamic vinaigrette. Tuesday, try them with quinoa and roasted vegetables. The rolls themselves stay the same, but the supporting cast changes daily.
Wednesday marks the midweek point, and this is where adding fresh elements becomes key to avoiding meal prep fatigue. Top your rolls with fresh cherry tomatoes, a drizzle of pesto you didn't make in advance, or some toasted pine nuts. These bright, just-added components make the meal feel newly prepared rather than reheated. Consider warming your Wednesday and Thursday portions in a covered dish in the oven at 300°F for ten minutes—this gentle heating method revives the texture beautifully.
Thursday and Friday, you might want to transform your Zucchini Roll Ups into something that feels entirely different. Slice them into rounds and toss with hot pasta and marinara sauce for a deconstructed experience. Or arrange them over a grain bowl with hummus, cucumber, and olives for a Mediterranean-inspired plate. The rolls have now been marinating in their own flavors for four days, making them deeply savory and perfect as a component in a larger dish rather than the star of the plate.
If you're prepping for a family or preparing meals for yourself and a partner, consider making a double batch and freezing half. Freeze the rolls after baking but before they go in the fridge, placing them in a single layer on a baking sheet until solid, then transferring to freezer bags. These frozen Zucchini Roll Ups last three months and can go straight from freezer to oven at 350°F for twenty-five minutes, giving you a second week of easy meals without any additional cooking.
Smart Storage and Reheating
The container you choose directly impacts how well your Zucchini Roll Ups survive the week, and this is one area where it pays to be particular. Glass containers with snap-lock lids provide the best seal against air and odors while being microwave, oven, and dishwasher safe. The ideal size is four to five cups with a divided design—three to four rolls fit comfortably in the main section, leaving room for them to breathe rather than being crammed in. Overpacking creates condensation, which makes everything soggy by midweek.
Proper cooling before storage is non-negotiable for maximum freshness. Never seal warm food in containers, as this creates the perfect environment for bacterial growth and generates condensation that ruins texture. Let your baking dish cool on the counter for fifteen minutes, then transfer rolls to containers and leave them uncovered in the refrigerator for another thirty minutes before snapping on the lids. This two-stage cooling process ensures no moisture gets trapped inside.
In the refrigerator, Zucchini Roll Ups maintain peak quality for five days when stored between 35°F and 38°F. Place them on a middle shelf rather than in the door, where temperature fluctuates with opening and closing. If you notice any liquid accumulating in the bottom of the container by day three or four, simply drain it off—this is normal moisture release and doesn't indicate spoilage. The rolls themselves should still be firm and the cheese should smell fresh and milky.
For reheating, the microwave works perfectly well despite what food snobs might tell you. Remove the container lid, cover loosely with a damp paper towel to prevent drying, and heat on medium power for sixty to ninety seconds. The lower power setting ensures even heating without creating rubbery zucchini or grainy cheese. If you have access to a toaster oven at work, fifteen minutes at 300°F gives you a result very close to fresh-from-the-oven quality with lightly crisped edges.
For those final Thursday and Friday portions, consider the oven reheat method at home. Transfer rolls to a baking dish, add a tablespoon of water to the bottom of the dish, cover tightly with foil, and warm at 325°F for fifteen minutes. This gentle steam-heat method refreshes the texture dramatically. Remove the foil for the last three minutes if you want to re-crisp the top cheese layer. Finish with a scatter of fresh herbs and a drizzle of good olive oil, and these end-of-week rolls taste remarkably revived.
Customization Ideas
The basic Zucchini Roll Ups formula is endlessly adaptable, making it easy to keep meal prep interesting week after week. For protein variations, try adding cooked ground turkey seasoned with cumin and paprika to the ricotta mixture, creating a heartier filling that's perfect for post-workout meals. Alternatively, crumbled feta and chopped spinach make a Greek-inspired version that's lighter but equally satisfying. For plant-based eaters, swap the ricotta for a mixture of mashed white beans and nutritional yeast—it lacks the dairy creaminess but provides excellent protein and holds together beautifully.
Grain alternatives can transform these rolls into complete one-container meals. Serve them over cauliflower rice that you've seasoned with lemon and dill for a low-carb option, or pack them with farro tossed in olive oil and roasted vegetables for something more substantial. Quinoa mixed with sun-dried tomatoes and pine nuts creates a Mediterranean base that complements the Italian flavors in the rolls. These grain additions turn four rolls from a light lunch into a filling dinner-sized portion.
Sauce variations are the easiest way to dramatically change the eating experience without altering your cooking process. Classic marinara is obvious but wonderful, especially if you warm it separately and spoon it on fresh each day. A lemony tahini sauce with garlic and herbs gives Middle Eastern flair. Pesto—whether traditional basil, sun-dried tomato, or arugula-walnut—adds richness and bright flavor that makes day-old rolls taste newly made. Keep small containers of different sauces in your fridge and rotate through them daily.
For family meal prep where you're feeding different preferences and dietary needs, the modular nature of Zucchini Roll Ups is a blessing. Make the basic recipe, then customize individual containers with different toppings and sides. Kids might get theirs with simple marinara and a side of fruit, while adults have theirs with spicy arrabiata sauce and a bitter greens salad. Someone avoiding dairy could have rolls made with the bean filling, while everyone else enjoys the traditional ricotta version. One cooking session, multiple personalized meals.
Meal Prep FAQ
How long do Zucchini Roll Ups actually last in the refrigerator?
When stored properly in airtight containers at consistent refrigerator temperatures, Zucchini Roll Ups maintain excellent quality for five full days after preparation. I've tested them at six and seven days, and while they're still technically safe to eat, the texture of the zucchini becomes softer and the cheese loses its fresh flavor. For absolute peak experience, consume within four days and freeze any extras rather than pushing the refrigerator storage timeline.
What are the absolute best containers for these rolls?
Glass containers with snap-lock lids and compartments are the gold standard for Zucchini Roll Ups meal prep. The Prep Naturals and Bentgo brands both make excellent five-cup rectangular containers with dividers that keep your rolls separated from wet components like sauce or salad. Glass doesn't absorb garlic and herb odors the way plastic does, and you can see exactly what's inside without opening the container. The investment pays for itself within a few weeks compared to disposable containers.
Can I reheat these in a work microwave without making enemies?
Absolutely, and the key is using medium power rather than full blast. High-powered microwaving releases more aromatic compounds quickly, which is what creates strong food smells in shared spaces. Heat your Zucchini Roll Ups at fifty percent power for ninety seconds instead of full power for forty-five seconds—you'll get the same warm meal with significantly less aroma. The damp paper towel technique also helps trap odors inside the container rather than broadcasting them to the entire office.
How do I adapt these for kids' lunchboxes?
Zucchini Roll Ups work wonderfully in children's lunches with a few simple modifications. First, make them slightly smaller using less filling per roll so they're easier for small hands to manage. Pack them cold with a small container of marinara for dipping rather than pouring over top—kids love the interactive element of dipping. Cut each roll in half on an angle to create pretty spirals that look fun and are easier to eat. Add familiar sides like cucumber slices, cherry tomatoes, and crackers to round out the meal.
What's your best tip for avoiding meal prep fatigue with the same recipe every week?
The secret is changing everything around the rolls rather than the rolls themselves. Make the same batch of Zucchini Roll Ups but completely transform the eating experience through different sauces, sides, serving temperatures, and presentations. Monday they're cold with salad, Wednesday they're warm over grains, Friday they're sliced into pasta. This approach gives you the efficiency of batch cooking one recipe while providing the variety your brain craves. Also, rotate between three or four different meal prep recipes month to month rather than committing to Zucchini Roll Ups every single week forever.
Can I make these ahead and freeze them before or after baking?
Freezing after baking yields far superior results compared to freezing raw rolls. Bake the Zucchini Roll Ups completely, let them cool to room temperature, then freeze in a single layer on a parchment-lined baking sheet for two hours until solid. Transfer to freezer bags with as much air pressed out as possible, and they'll keep for three months. Reheat from frozen at 350°F for twenty-five minutes covered with foil, then five minutes uncovered. The texture is remarkably close to fresh, and this method essentially gives you meal prep on demand without the weekly cooking commitment.
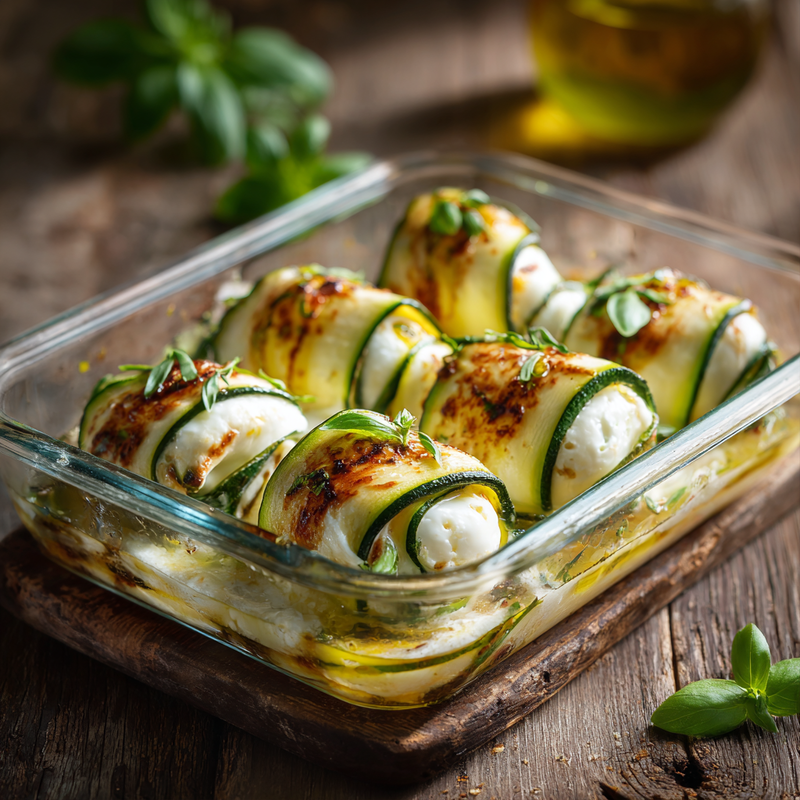
Zucchini Roll Ups
Tender zucchini ribbons filled with creamy ricotta, herbs, and sun-dried tomatoes, baked until golden. Perfect for meal prep with incredible make-ahead flavor.
Prep Time
20 min
Cook Time
30 min
Total Time
50 min
Servings
4 servings
Ingredients
For 4 servings
- 4 large zucchini, sliced lengthwise into 1/8-inch ribbons
- 15 ounces whole milk ricotta cheese
- 8 ounces shredded mozzarella cheese, divided
- 1/4 cup sun-dried tomatoes packed in oil, diced
- 3 cloves garlic, minced
- 1/4 cup fresh basil, chopped
- 2 tablespoons fresh parsley, chopped
- 1/2 teaspoon salt, plus more for sprinkling
- 1/2 teaspoon black pepper
- 2 tablespoons olive oil
Instructions
- 1
Prepare zucchini ribbons
Preheat oven to 375°F. Using a sharp vegetable peeler or mandoline, slice zucchini lengthwise into 1/8-inch thick ribbons, discarding the first and last slices that are mostly skin. Lay ribbons on clean kitchen towels, sprinkle lightly with salt, and let sit for 10 minutes to draw out excess moisture.
- 2
Dry the ribbons
Pat zucchini ribbons thoroughly dry with paper towels or clean kitchen towels. This step is essential for preventing excess liquid in your finished rolls and ensuring they store well throughout the week.
- 3
Make the filling
In a large mixing bowl, combine ricotta cheese, half of the shredded mozzarella, diced sun-dried tomatoes, minced garlic, chopped basil, chopped parsley, salt, and black pepper. Stir until completely uniform and well combined. Taste and adjust seasoning as needed.
- 4
Assemble the rolls
Lay a zucchini ribbon flat on your work surface. Place about 2 tablespoons of filling at one end of the ribbon. Roll up firmly but gently, keeping the filling contained inside. Place seam-side down in a 9x13-inch baking dish.
- 5
Fill the baking dish
Continue rolling all zucchini ribbons with filling, arranging them in a single layer in the baking dish. They should fit snugly but not be crammed together. Typically you'll get about 20 rolls from 4 large zucchini.
- 6
Top and season
Brush the tops of all rolls with olive oil using a pastry brush. Sprinkle the remaining mozzarella cheese evenly over all the rolls. This creates a golden, melted cheese topping during baking.
- 7
Bake the rolls
Place the baking dish in the preheated oven and bake for 25-30 minutes, until the zucchini is tender when pierced with a fork and the cheese is melted and starting to brown in spots. The rolls should be bubbling around the edges.
- 8
Cool before storing
Remove from oven and let cool for 15 minutes in the pan. This cooling period allows the rolls to set up properly so they hold together when transferred. For meal prep, let cool completely to room temperature before portioning into containers.
- 9
Portion for meal prep
Transfer 3-4 rolls to each meal prep container. Leave containers uncovered in the refrigerator for 30 minutes, then seal with lids. This two-stage cooling prevents condensation buildup that can make the rolls soggy.
- 10
Store and reheat
Store sealed containers in the refrigerator for up to 5 days. To reheat, microwave on medium power for 60-90 seconds covered with a damp paper towel, or reheat in a 325°F oven for 15 minutes covered with foil. Serve with marinara sauce, pesto, or your favorite toppings.
Nutrition Facts
Per serving (estimated)
285 calories
Calories
12g
Carbs
18g
Protein
19g
Fat
3g
Fiber
520mg
Sodium
6g
Sugar


