Vintage Cherry Chip Layer Cake Recipe | Nostalgic Dessert
This vintage cherry chip layer cake brings back the classic flavors of the 1950s with tender layers, sweet cherry pieces, and fluffy frosting.
cookwithlucia.com/recipes/vintage-cherry-chip-layer-cake
There's something magical about the scent of vanilla and almond wafting through a warm kitchen, mixing with the sweet aroma of butter and sugar creaming together in a bowl. That combination takes me straight back to the comfort of home baking, where every celebration deserved something special on the dessert table. When I first set out to recreate an authentic vintage cherry chip layer cake, I wanted to capture that nostalgic charm that made this dessert a beloved centerpiece at family gatherings throughout the mid-20th century. The delicate pink hue studded with bright cherry pieces, the tender crumb that practically melts on your tongue, and that cloud-like frosting that makes every bite feel like a celebration—this is what sets this particular cake apart from modern interpretations.
What drew me to perfect this recipe was the challenge of balancing authenticity with modern baking knowledge. I wanted the signature characteristics that made vintage cherry chip layer cake so special while ensuring reliable results in today's kitchens. After numerous tests and adjustments, I've developed a version that delivers on every promise: moist layers that stack beautifully, a subtle cherry flavor that doesn't overwhelm, and a texture so tender it rivals any bakery creation. By the time you finish this guide, you'll have all the knowledge, tips, and confidence to create a stunning vintage cherry chip layer cake that'll have everyone asking for seconds and the recipe.
The Story Behind This Dish
The vintage cherry chip layer cake rose to prominence in American home kitchens during the 1950s and 1960s, when convenience baking was becoming popular but home bakers still took pride in creating beautiful desserts from scratch. This cake represented the perfect marriage of accessibility and elegance—straightforward enough for weeknight baking, yet impressive enough for weekend dinners and special family gatherings. The distinctive pink color and cherry flavor made it particularly popular during spring and summer months, though its appeal quickly became year-round.
What makes the homemade version of vintage cherry chip layer cake superior to any boxed mix is the depth of flavor and the texture you can achieve with real butter, quality extracts, and fresh ingredients. While commercial versions rely heavily on artificial flavoring, a from-scratch cake allows you to control the sweetness, adjust the cherry intensity, and create a crumb that's genuinely tender rather than artificially soft. Home bakers discovered that the slight extra effort of making this cake themselves resulted in a dessert that tasted noticeably better and held up beautifully for layer stacking and decorating.
What Makes This Recipe Special
Authentic Vintage Flavor Profile: This vintage cherry chip layer cake captures the exact taste memory of the original with its delicate balance of vanilla, almond extract, and sweet cherry pieces throughout each layer. The flavors are nostalgic without being overly sweet, letting each component shine through.
Tender, Fine Crumb Structure: The cake achieves that signature soft, fine-grained texture that makes vintage cherry chip layer cake so memorable. Each forkful practically dissolves on your tongue, with a moistness that lasts for days when properly stored.
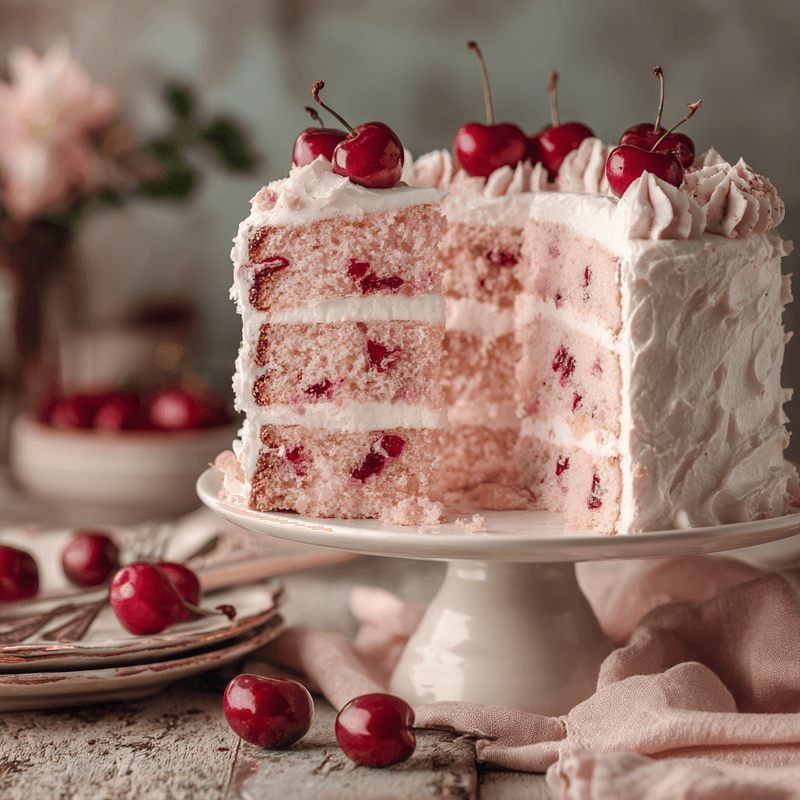
Beautiful Natural Pink Hue: Rather than relying on heavy food coloring, this recipe creates a lovely pale pink color from the maraschino cherry juice and finely chopped cherry pieces distributed throughout the batter. The result is a soft, romantic color that looks stunning when sliced.
Reliable Layering Success: The recipe produces three even layers that bake uniformly, creating the perfect foundation for stacking and frosting. Each layer releases cleanly from the pan and maintains its shape during assembly, ensuring your vintage cherry chip layer cake looks as professional as it tastes.
Crowd-Pleasing Appeal: With its familiar flavors and eye-catching presentation, this cake appeals to multiple generations at any gathering. It's sweet enough to satisfy dessert lovers but balanced enough that even those who prefer less-sweet treats enjoy it.
Versatile Frosting Options: While traditionally paired with a fluffy white frosting, this vintage cherry chip layer cake works beautifully with buttercream, cream cheese frosting, or even a simple glaze, allowing you to customize based on preferences and occasions.
Breaking Down the Ingredients
The foundation of any great vintage cherry chip layer cake starts with quality butter—not margarine or shortening. Real butter contributes both flavor and texture, creating that melt-in-your-mouth quality that defines this classic dessert. When creamed properly with sugar, it incorporates air that helps the cake rise and creates those delicate, tender crumbs we're after. The butter should be at room temperature, soft enough to leave an impression when pressed but not greasy or melted.
Granulated sugar does more than sweeten this vintage cherry chip layer cake; it helps create structure and contributes to the fine crumb texture. During the creaming process, sugar crystals cut into the butter, creating tiny air pockets that expand during baking. This mechanical leavening works alongside the chemical leavening from baking powder to create the cake's characteristic light texture.
Maraschino cherries are the signature ingredient that gives this cake its name and distinctive character. We use both the chopped cherries themselves and a portion of their sweet juice. The juice contributes moisture, a subtle cherry flavor, and that lovely pink tint, while the chopped cherry pieces create little pockets of sweetness and visual interest throughout each slice. Draining them thoroughly before chopping prevents excess moisture from affecting the batter's consistency.
Cake flour is essential for achieving the tender crumb that sets vintage cherry chip layer cake apart from denser cakes. With lower protein content than all-purpose flour, cake flour produces less gluten when mixed, resulting in a more delicate, fine-grained texture. If you don't have cake flour on hand, you can create a substitute by replacing two tablespoons of all-purpose flour per cup with cornstarch.
Almond extract works in harmony with vanilla to create the classic flavor profile of vintage cherry chip layer cake. Just a small amount enhances the cherry flavor without making the cake taste overtly of almonds. This combination of extracts was common in vintage baking and contributes to that nostalgic taste that makes this cake so special.
Whole milk provides the liquid needed to bring the batter together while contributing richness and helping create a moist, tender crumb. The fat in whole milk helps carry flavors throughout the cake and contributes to the soft texture that makes each bite so enjoyable. Room temperature milk incorporates more smoothly into the batter than cold milk, ensuring even mixing.
The Cooking Process Explained
Creating a perfect vintage cherry chip layer cake begins with properly preparing your ingredients and pans. Bringing butter, eggs, and milk to room temperature ensures they'll combine smoothly without curdling or creating a dense batter. Meanwhile, greasing and flouring your cake pans—or lining them with parchment circles—guarantees easy release after baking. This preparation stage sets you up for success before you ever turn on the mixer.
The creaming stage is where the magic begins. Beating butter and sugar together for a full three to four minutes transforms them from separate ingredients into a light, fluffy mixture that's almost doubled in volume and appears pale yellow. This process incorporates air that will help your vintage cherry chip layer cake rise beautifully. You'll know you've creamed long enough when the mixture looks noticeably lighter in color and feels fluffy when you stop the mixer and touch it with a spatula.
Adding eggs one at a time, beating well after each addition, creates a stable emulsion that holds all the ingredients together harmoniously. Each egg needs time to fully incorporate before adding the next, ensuring the batter stays smooth and creamy rather than looking broken or curdled. After the eggs, the extracts go in, filling your kitchen with that wonderful vanilla-almond aroma that defines vintage cherry chip layer cake.
The dry and wet ingredients alternate into the creamed mixture in three additions, starting and ending with the flour mixture. This alternating method prevents overmixing, which would develop too much gluten and create a tough cake. Mix each addition just until the flour streaks disappear, then stop—the batter should look smooth but not overbeaten. Folding in the chopped cherries at the very end distributes them evenly without crushing them or turning the batter an uneven color.
Baking requires attention to temperature and timing. The layers go into a properly preheated oven where they'll bake for twenty-two to twenty-eight minutes, depending on your oven and pan size. You'll know your vintage cherry chip layer cake layers are done when they spring back lightly when touched in the center, pull away slightly from the pan sides, and a toothpick inserted in the center comes out clean or with just a few moist crumbs. Cooling them in the pans for ten minutes before turning out onto racks prevents crumbling while ensuring they don't steam and become soggy.
Mistakes to Avoid
Don't skip the step of thoroughly draining your maraschino cherries before chopping them. Excess liquid will sink to the bottom of your pans during baking, creating dense, gummy spots in your vintage cherry chip layer cake layers. Pat them dry with paper towels after draining, then toss the chopped pieces with a tablespoon of flour from your measured amount—this coating helps suspend them throughout the batter.
Avoid opening the oven door during the first fifteen minutes of baking. That rush of cool air can cause your cake layers to sink in the center, creating an uneven surface that's difficult to frost smoothly. The layers need steady, consistent heat to rise properly and set their structure. If you must check for doneness, do so quickly and gently after the minimum baking time.
Never attempt to frost warm cake layers. Even slightly warm cakes will melt your frosting, causing it to slide off or soak into the cake, creating a messy appearance and overly sweet result. Allow your vintage cherry chip layer cake layers to cool completely on wire racks—this takes at least an hour. For best results, wrap cooled layers in plastic wrap and refrigerate for thirty minutes before frosting, which makes them even easier to handle.
Don't overmix the batter once you add the flour. Overworked batter develops excess gluten, resulting in a tough, chewy cake instead of the tender crumb that makes vintage cherry chip layer cake so special. Mix each addition of flour just until you can't see white streaks anymore, then stop immediately. A few small lumps are fine—they'll disappear during baking.
Resist the urge to increase the almond extract, thinking more will create better cherry flavor. Too much almond extract can overpower the delicate balance of flavors and make your vintage cherry chip layer cake taste medicinal rather than pleasantly nostalgic. The amount specified creates just the right background note that enhances rather than dominates.
How to Serve This
The vintage cherry chip layer cake shines brightest when served with a simple scoop of vanilla ice cream alongside. The cold, creamy ice cream provides a temperature contrast that makes each bite more interesting, while the pure vanilla flavor complements the cake's cherry and almond notes without competing. This pairing works beautifully for weekend dinners when you want something special but not overly complicated.
For a more elegant presentation at family gatherings, serve slices of vintage cherry chip layer cake with fresh whipped cream lightly sweetened and flavored with a hint of vanilla. Add a few fresh cherries or raspberries on the side for a pop of color and a touch of tartness that balances the cake's sweetness. This approach feels refined while still honoring the vintage character of the dessert.
A drizzle of cherry sauce or compote turns this classic cake into something extraordinary. The extra cherry flavor intensifies the vintage cherry chip layer cake experience, and the sauce's slight tartness cuts through the sweetness beautifully. Warm or room temperature sauce works equally well, creating either a comforting or refreshing dessert depending on the season.
For casual afternoon treats, serve smaller slices of vintage cherry chip layer cake with hot tea or coffee. The cake's not-too-sweet profile makes it perfect for this type of serving, where it acts more like a tender, flavorful snack than a heavy dessert. Cut slightly thinner slices than you would for a post-meal dessert, and arrange them prettily on a serving plate.
Make-Ahead and Storage Guide
Unfrosted vintage cherry chip layer cake layers can be baked up to two days in advance and stored in the refrigerator. Once completely cooled, wrap each layer tightly in plastic wrap, ensuring no air pockets remain, then slip them into airtight containers or resealable bags. This method keeps the layers moist and fresh while preventing them from absorbing refrigerator odors. Bring to room temperature before frosting for easiest handling.
For longer storage, freeze the unfrosted layers for up to three months with excellent results. Wrap each cooled layer in plastic wrap, then in aluminum foil, and place in freezer bags with the air pressed out. Label with the date and contents. To thaw, transfer wrapped layers to the refrigerator overnight, then bring to room temperature before unwrapping and frosting. This prevents condensation from forming on the cake surface.
A fully frosted vintage cherry chip layer cake stays fresh at room temperature for up to two days if kept in a cool spot away from direct sunlight, covered with a cake dome or large inverted bowl. The frosting helps seal in moisture and protect the layers. For longer storage, refrigerate the frosted cake for up to five days. Let it sit at room temperature for about thirty minutes before serving to allow the frosting to soften and the flavors to bloom.
Leftover slices can be individually wrapped in plastic wrap and stored in an airtight container in the refrigerator for up to one week. This method makes it easy to grab a single serving whenever a craving strikes. For best texture and flavor, let refrigerated slices come to room temperature for fifteen to twenty minutes before eating. The vintage cherry chip layer cake actually tastes even more flavorful the day after baking, as the flavors have time to meld and develop.
Reader Questions Answered
Can I make this vintage cherry chip layer cake as a sheet cake instead of layers?
Absolutely! Pour the entire batter into a greased and floured 9x13-inch pan and bake at the same temperature for thirty-five to forty-two minutes, until a toothpick inserted in the center comes out clean. The sheet cake version is perfect for casual family gatherings and makes serving easier. You can frost it right in the pan with half the frosting amount, or leave it unfrosted and dust with powdered sugar for a simpler presentation.
What's the best way to get perfectly even layers when baking?
Weigh your batter and divide by the number of pans to ensure equal amounts in each pan—this creates layers that bake at the same rate and end up the same height. Additionally, use an oven thermometer to verify your oven temperature is accurate, and rotate your pans halfway through baking if your oven has hot spots. For the flattest tops, consider using cake strips (wet fabric strips wrapped around the pans) which insulate the edges and promote even rising across the entire vintage cherry chip layer cake layer.
Can I reduce the sugar without affecting the texture?
Sugar plays a structural role in this vintage cherry chip layer cake beyond just sweetness—it contributes to tenderness, moisture retention, and browning. Reducing it by more than twenty-five percent will noticeably affect the texture and may result in a drier, tougher cake. If you prefer less sweetness, keep the sugar amount in the cake the same but choose a less-sweet frosting option, such as a cream cheese frosting or whipped cream, which will balance the overall sweetness of the dessert.
My maraschino cherries sank to the bottom—how do I prevent this?
Toss your drained, dried, and chopped cherries with one tablespoon of the measured flour before folding them into the batter. This light coating helps suspend the cherry pieces throughout the batter as it bakes. Also, chop them quite small—quarter-sized pieces or smaller work best. Larger pieces are heavier and more likely to sink. Finally, ensure your batter has the proper consistency—too thin and the cherries will sink; a properly thick batter holds them in suspension better.
Can I make this dairy-free for someone with dietary restrictions?
While this vintage cherry chip layer cake is built around dairy ingredients, you can experiment with dairy-free substitutes, though results may vary slightly. Use a high-quality dairy-free butter substitute in the same amount, and replace the whole milk with full-fat coconut milk or another creamy plant-based milk. The texture may be slightly different from the original, but you'll still achieve a delicious cake with that characteristic cherry chip flavor and tender crumb.
How far in advance can I assemble and frost the entire cake?
You can fully assemble and frost your vintage cherry chip layer cake up to two days before serving for optimal results. Store it in the refrigerator under a cake dome or covered loosely with plastic wrap (ensure the wrap doesn't touch the frosting). The assembled cake actually benefits from this resting time, as the layers settle and the flavors meld beautifully. Remove from the refrigerator about one hour before serving to allow it to come to room temperature, which brings out the best flavor and texture in both the cake and frosting.
Vintage Cherry Chip Layer Cake
A nostalgic three-layer cake with tender pink layers studded with sweet cherry pieces, classic vanilla-almond flavor, and fluffy frosting that captures the charm of 1950s home baking.
Prep Time
30 min
Cook Time
28 min
Total Time
58 min
Servings
12 servings
Ingredients
For 12 servings
- 1 cup (2 sticks) unsalted butter, room temperature
- 2 cups granulated sugar
- 4 large eggs, room temperature
- 2 teaspoons vanilla extract
- 1/2 teaspoon almond extract
- 3 cups cake flour
- 1 tablespoon baking powder
- 1/2 teaspoon salt
- 1 cup whole milk, room temperature
- 1/4 cup maraschino cherry juice
- 3/4 cup maraschino cherries, drained well, patted dry, and finely chopped
- For frosting: 1 cup (2 sticks) unsalted butter, room temperature
- For frosting: 4 cups powdered sugar
- For frosting: 2 teaspoons vanilla extract
- For frosting: 3-4 tablespoons heavy cream or whole milk
- For frosting: Pinch of salt
Instructions
- 1
Prepare pans and oven
Preheat your oven to 350°F (175°C). Grease three 8-inch or 9-inch round cake pans with butter or cooking spray, then dust with flour, tapping out any excess. Alternatively, line the bottoms with parchment paper circles for easiest release. Set the prepared pans aside while you make the batter.
- 2
Combine dry ingredients
In a medium bowl, whisk together the cake flour, baking powder, and salt until thoroughly combined. Set this mixture aside. Whisking ensures even distribution of the leavening agent, which is crucial for uniform rising and texture in your finished cake layers.
- 3
Cream butter and sugar
In a large mixing bowl or the bowl of a stand mixer, beat the room temperature butter on medium speed for about one minute until smooth. Add the granulated sugar and beat on medium-high speed for three to four minutes, until the mixture is light, fluffy, and pale yellow in color. Scrape down the sides of the bowl as needed to ensure even mixing.
- 4
Add eggs and extracts
Add the eggs one at a time, beating well after each addition until fully incorporated before adding the next. This should take about thirty seconds per egg. Once all eggs are added, mix in the vanilla extract and almond extract, beating until the mixture is smooth and creamy.
- 5
Prepare milk mixture
In a measuring cup or small bowl, combine the whole milk and maraschino cherry juice, stirring briefly to mix. This combined liquid will be added alternately with the dry ingredients to create the perfect batter consistency.
- 6
Alternate dry and wet
With the mixer on low speed, add about one-third of the flour mixture to the butter mixture, mixing just until combined. Add half of the milk-cherry juice mixture, mixing until incorporated. Continue alternating, adding another third of the flour, the remaining milk mixture, and finishing with the final third of flour. Mix each addition only until the flour streaks disappear to avoid overdeveloping gluten.
- 7
Fold in cherries
Toss the finely chopped maraschino cherries with one tablespoon of flour (taken from your measured amount or extra) to coat them lightly. Gently fold the floured cherry pieces into the batter using a rubber spatula, distributing them evenly throughout. This coating helps prevent the cherries from sinking during baking.
- 8
Divide and bake
Divide the batter evenly among the three prepared pans, using a kitchen scale for precision if desired. Spread the batter to the edges and smooth the tops with a spatula. Bake in the preheated oven for twenty-two to twenty-eight minutes, until the cakes spring back when lightly touched and a toothpick inserted in the center comes out clean or with just a few moist crumbs.
- 9
Cool the layers
Remove the pans from the oven and place them on wire racks. Let the cakes cool in the pans for ten minutes, then run a knife around the edges and carefully invert onto the racks to cool completely. This should take about one hour. Cooling completely is essential before frosting to prevent melting.
- 10
Make the frosting
While the cakes cool, prepare your frosting. Beat the room temperature butter in a large bowl until smooth and creamy, about two minutes. Gradually add the powdered sugar, one cup at a time, beating on low speed until incorporated, then increasing to medium-high. Add the vanilla extract, salt, and three tablespoons of heavy cream, beating until light and fluffy. Add more cream if needed to reach your desired consistency.
- 11
Level and layer
Once the cake layers are completely cool, use a long serrated knife to level the tops if they domed during baking, creating flat, even surfaces. Place the first layer on your serving plate or cake stand. Spread about three-quarters of a cup of frosting evenly over the top, leaving a small border around the edge. Add the second layer, more frosting, then the final layer.
- 12
Frost and decorate
Apply a thin layer of frosting all over the assembled cake to create a crumb coat, sealing in any loose crumbs. Refrigerate for fifteen minutes until this layer is firm, then apply the remaining frosting in a thicker, more decorative layer. Smooth the sides and top with an offset spatula, or create swirls and peaks for a more rustic look. Garnish with additional maraschino cherries if desired.
- 13
Chill and serve
For the cleanest slices, refrigerate the frosted cake for at least thirty minutes before cutting. This firms up the frosting and makes slicing much neater. Remove from the refrigerator about thirty minutes before serving to allow the cake to come to room temperature, which brings out the best flavor and creates that perfect tender texture.
Nutrition Facts
Per serving (estimated)
520 calories
Calories
72g
Carbs
5g
Protein
24g
Fat
1g
Fiber
320mg
Sodium
56g
Sugar


