
Ultimate Crispy Chicken Caesar Sandwich Recipe
This crispy chicken Caesar sandwich is ready in 30 minutes with golden breaded chicken, tangy dressing, and fresh romaine. Your new weeknight favorite!
cookwithlucia.com/recipes/the-ultimate-crispy-chicken-caesar-sandwich-recipe
We've all been there—it's 6 PM, the kitchen feels like a marathon you didn't sign up for, and everyone's asking what's for dinner. You need something that feels special but doesn't require a culinary degree or three hours of your evening. That's exactly where this ultimate crispy chicken Caesar sandwich comes in, bridging the gap between fast food convenience and homemade satisfaction.
This isn't just another sandwich. Picture golden-brown chicken cutlets with a satisfying crunch that echoes with every bite, tucked into soft bread with crisp romaine lettuce, sharp Parmesan shavings, and that tangy Caesar dressing that makes everything taste like a celebration. The contrast of textures—crispy coating against tender chicken, crunchy lettuce against pillowy bread—creates something truly memorable.
The best part? You'll have dinner on the table in about 30 minutes, start to finish. No complicated techniques, no specialty equipment you don't already own, and definitely no mountain of dishes waiting for you afterward. This crispy chicken Caesar sandwich transforms a classic salad into handheld comfort food that works for rushed weeknights, weekend gatherings with friends, or those evenings when you want something satisfying without the fuss. Let me show you exactly how to make it happen in your kitchen tonight.
Why This Is Your New Weeknight Go-To
Lightning-fast preparation means you're not trapped in the kitchen while life happens elsewhere. The chicken cooks in just 12-15 minutes, and while it's sizzling away, you can toast your bread and prep your toppings. The whole process moves so efficiently that you'll wonder why you ever ordered takeout.
Minimal cleanup is a game-changer when you're already exhausted. This crispy chicken Caesar sandwich requires just one skillet for the chicken, one small bowl for the breading station, and a cutting board. No baking sheets to scrub, no splattered ovens, no stack of mixing bowls taunting you from the sink.
Pantry-friendly ingredients mean you probably have most of what you need already. The breading uses basic items sitting in your cupboard right now, and the Caesar components are simple staples. No hunting down obscure ingredients at specialty stores or spending a fortune on things you'll use once.
Kid and adult approved is rare but magical. The familiar flavors of Caesar dressing appeal to adventurous eaters, while the crispy chicken and bread combination wins over even picky family members. Everyone sits down happily, which is its own kind of weeknight miracle.
One-pan wonder keeps your stovetop clear and your sanity intact. Everything happens in sequence using the same skillet, building flavors as you go. Less equipment means less stress and more time enjoying your meal instead of dreading the aftermath.
Satisfying without being heavy makes this crispy chicken Caesar sandwich perfect for any season. You get that indulgent crunch and rich flavors without feeling weighed down afterward. It's substantial enough to fuel you through the evening but won't leave you in a food coma on the couch.
Simple Ingredients, Big Flavor
The chicken breasts form your protein foundation, and you'll want to slice them horizontally to create thinner cutlets. This isn't just busywork—thinner pieces cook faster and more evenly, giving you that perfect golden exterior without drying out the inside. If your store sells chicken cutlets already sliced thin, grab those and save yourself five minutes.
All-purpose flour creates the first layer of your breading station, helping everything else stick while adding structure to that crispy coating. Just half a cup does the job beautifully. You could substitute with whole wheat flour if that's what you have, though the texture will be slightly denser.
Breadcrumbs are where the real crunch happens in this crispy chicken Caesar sandwich. I prefer panko-style breadcrumbs because their larger flakes create more surface area and therefore more crispiness, but regular dried breadcrumbs work perfectly fine too. About one cup gives you enough to coat four chicken cutlets generously.
Eggs act as the glue binding your flour and breadcrumbs to the chicken. Two eggs whisked until smooth create that sticky layer necessary for a coating that stays put during cooking and eating. Room temperature eggs whisk more smoothly, but cold ones from the fridge work just fine in a pinch.
Parmesan cheese pulls double duty—mixed into your breadcrumbs for savory depth and shaved over the finished sandwich for that classic Caesar touch. Use the real aged stuff if possible; the flavor difference is noticeable. About three-quarters of a cup total covers both uses beautifully.
Caesar dressing is your flavor powerhouse, and while homemade is wonderful, a quality store-bought version saves precious time on busy evenings. Look for one with anchovies listed in the ingredients for authentic flavor. You'll need about half a cup for four generous sandwiches.
Romaine lettuce provides that essential crunch and freshness that balances the rich, crispy chicken. The sturdy leaves hold up to the dressing without wilting immediately, and their mild flavor lets the other components shine. One large head gives you plenty for four sandwiches with some left for a side salad.
Your bread choice matters more than you might think for this crispy chicken Caesar sandwich. Ciabatta rolls or sturdy sandwich bread provide structure without getting soggy, while softer options like brioche buns add a subtle sweetness. Avoid anything too crusty or you'll struggle to bite through all those textures together.
Step-by-Step in Plain English
Setting up your breading station takes just three minutes but sets you up for success. Arrange three shallow bowls or plates in a row: flour in the first, whisked eggs in the second, and breadcrumbs mixed with grated Parmesan in the third. Season your flour with salt and pepper because seasoning multiple layers creates deeper flavor than salting just the surface. Position this assembly line near your stove so you can move efficiently from breading to cooking.
Preparing and breading the chicken requires a gentle touch and a systematic approach. Pat your chicken cutlets completely dry with paper towels—moisture is the enemy of crispy coatings. Dredge each piece first in flour, shaking off excess, then into the egg, letting extra drip back into the bowl, and finally press firmly into the breadcrumb mixture. Make sure you coat every edge and corner; any bare spots will be obvious once cooked. The whole breading process takes about five minutes for four cutlets.
Cooking the chicken to golden perfection is where your patience pays off in this crispy chicken Caesar sandwich. Heat about a quarter-inch of oil in your largest skillet over medium heat until it shimmers but doesn't smoke. Gently lay your breaded cutlets in the hot oil, giving them space so they don't steam each other. Cook without moving them for 5-6 minutes—resisting the urge to peek or flip is crucial for developing that golden crust. When the edges look golden and set, flip carefully and cook another 5-6 minutes until the internal temperature reaches 165°F. That's it, you're halfway done with dinner!
Building your sandwiches should happen while the chicken is still warm for maximum enjoyment. Toast your bread lightly if you like extra texture, though it's completely optional. Spread a generous layer of Caesar dressing on both sides of your bread—don't be shy here, as the dressing provides moisture and flavor that ties everything together. Layer your romaine leaves to create a bed for the chicken, place your hot crispy cutlet on top, add shaved Parmesan curls, and crown it with the top piece of bread.
Pro Shortcuts and Time-Savers
Weekend prep transforms this crispy chicken Caesar sandwich into a fifteen-minute weeknight miracle. Bread your chicken cutlets on a relaxed afternoon, layer them between parchment paper, and store in the refrigerator for up to 24 hours or freeze for up to a month. When dinner time arrives, you simply cook them straight from the fridge, adding maybe two extra minutes to the cooking time.
Pre-shredded cheese and pre-washed lettuce might cost slightly more, but the time and energy saved on hectic evenings is absolutely worth it. I'm all for doing things from scratch when time allows, but practical shortcuts that don't compromise flavor are smart cooking, not cheating. Keep both in your refrigerator for emergency dinner situations.
Air fryer adaptation works beautifully if you want to avoid stovetop oil altogether. Spray your breaded cutlets lightly with cooking oil and air fry at 400°F for about 12 minutes, flipping halfway through. The texture is slightly different—still crispy but less rich—and you eliminate the oil heating and cleanup entirely.
Batch cooking the chicken makes sense if you're already breading cutlets. Double your recipe, cook everything at once, and store the extra cooked chicken in the refrigerator for up to three days. Later in the week, reheat in a 350°F oven for 8-10 minutes and build fresh sandwiches. You'll thank yourself on that extra-busy evening.
Food processor breading speeds things up if you're making this crispy chicken Caesar sandwich for a crowd. Pulse your bread pieces with Parmesan and seasonings to create fresh breadcrumbs in seconds, giving you better texture than store-bought while saving the time of grating cheese separately.
Ways to Switch It Up
Spicy Caesar version adds excitement for heat lovers without alienating those who prefer milder flavors. Mix red pepper flakes into your breadcrumb coating, add a dash of hot sauce to your Caesar dressing, or tuck sliced jalapeños into the sandwich alongside your lettuce. Start conservative—you can always add more heat, but you can't take it back.
Mediterranean twist transforms this crispy chicken Caesar sandwich into something entirely new while keeping the technique identical. Swap Caesar dressing for tzatziki sauce, add sliced tomatoes and cucumbers, and use feta cheese instead of Parmesan. The crispy chicken remains the star while the supporting players create different flavor memories.
Vegetarian adaptation works surprisingly well using thick slices of firm tofu or halloumi cheese. Press your tofu to remove excess moisture, then bread and cook exactly as you would the chicken. The texture is different but equally satisfying, and the Caesar components work beautifully with either option.
Buffalo Caesar combination merges two beloved flavors into one irresistible sandwich. Toss your cooked crispy chicken in your favorite buffalo sauce before building the sandwich, then proceed with Caesar dressing and toppings as usual. The tangy heat of buffalo sauce plays beautifully against the creamy, savory Caesar components.
Open-faced presentation turns this into a knife-and-fork affair that feels more like a restaurant experience. Use just one slice of toasted bread, pile it high with lettuce, top with your crispy chicken, and drizzle extra dressing and Parmesan over everything. Perfect for evenings when you want to feel a bit fancy without actually doing any extra work.
Storing Leftovers the Right Way
Refrigerator storage keeps your components fresh but requires smart separation. Store cooked chicken cutlets in an airtight container lined with paper towels to absorb moisture—this helps maintain some crispiness. Keep your Caesar dressing, lettuce, and other toppings in separate containers. Properly stored, the chicken stays good for three days, though the coating softens considerably in the refrigerator.
Freezing cooked chicken works better than you might expect for this crispy chicken Caesar sandwich. Let the cutlets cool completely, then freeze in a single layer on a baking sheet before transferring to a freezer bag. This prevents them from sticking together, so you can grab just what you need. Frozen cooked chicken keeps well for up to two months.
Reheating for best results means choosing your method based on your priorities. The oven wins for texture—place chicken on a wire rack over a baking sheet at 350°F for 10-12 minutes until heated through and the coating crisps up again. The stovetop works faster, heating in a dry skillet over medium heat for about four minutes per side. The microwave is quickest but sacrifices all crispiness, leaving you with tender chicken in a soft coating—still tasty, just different.
Repurposing leftovers opens up new meal possibilities throughout the week. Slice leftover crispy chicken over an actual Caesar salad for an effortless lunch. Chop it into bite-sized pieces and toss with pasta, Caesar dressing, and cherry tomatoes for a quick dinner remix. Or wrap it in flatbread with fresh vegetables for a completely different sandwich experience that doesn't feel like you're eating the same meal twice.
Quick Answers to Common Questions
Can I prep this crispy chicken Caesar sandwich ahead for entertaining?
Absolutely, and I highly recommend it for stress-free hosting. Bread your chicken cutlets up to 24 hours in advance and refrigerate them between sheets of parchment paper. Wash and dry your lettuce, store it in the crisper wrapped in paper towels, and prepare your Caesar dressing if making homemade. When guests arrive, you'll only need 15 minutes of active cooking time, leaving you free to actually enjoy their company instead of hiding in the kitchen.
What if I don't have a meat mallet to pound the chicken thin?
No problem—you have options that work equally well. Use a heavy skillet or saucepan as a makeshift mallet, placing the chicken between two sheets of plastic wrap or in a zip-top bag before pounding. Alternatively, skip pounding entirely and slice thick breasts horizontally into thinner cutlets using a sharp knife. This slicing method actually gives you more control over thickness and wastes nothing.
Can I double this recipe for a crowd?
Yes, and the recipe scales beautifully for this crispy chicken Caesar sandwich. The only limitation is your cooking surface—you'll need to work in batches unless you have multiple large skillets going simultaneously. Bread all your chicken at once using the assembly line method, then cook in batches, keeping finished cutlets warm in a 200°F oven while you finish the rest. Everything else—dressing, lettuce, bread—doubles without any adjustments needed.
How do I make this less rich without losing flavor?
Several modifications lighten things up while maintaining the delicious core of this crispy chicken Caesar sandwich. Use an air fryer or bake the breaded chicken on a wire rack instead of pan-frying to eliminate most of the oil. Choose a lighter Caesar dressing or thin your regular version with a bit of lemon juice. Pile extra lettuce onto your sandwich for more vegetable volume, and consider using just one slice of bread for an open-faced version.
What's the best way to keep the coating from falling off?
Coating adherence comes down to three key factors: dry chicken, proper breading technique, and patient cooking. Always pat your chicken completely dry before starting—moisture prevents the flour from sticking. Press the breadcrumbs firmly onto each piece and let the breaded chicken rest for 5-10 minutes before cooking if time allows; this helps everything set. Once cooking, resist the urge to move or flip the chicken before that first side is properly golden and set, usually 5-6 minutes.
Can I use a different type of cheese?
While Parmesan defines traditional Caesar flavor, you can certainly experiment with this crispy chicken Caesar sandwich. Romano cheese offers similar sharpness with slightly different nutty notes. Asiago provides a milder alternative that still brings complexity. For a more budget-friendly option, use a good-quality cheddar, though you'll lose that distinctive Caesar character. Whatever cheese you choose, use it both in the breading and as a topping to reinforce the flavor throughout the sandwich.
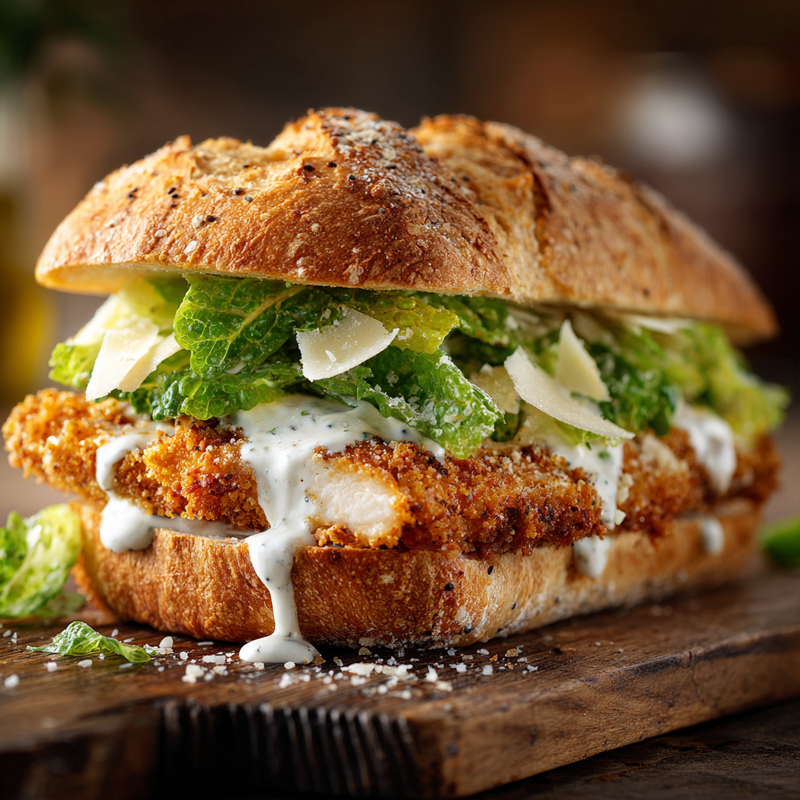
Ultimate Crispy Chicken Caesar Sandwich
Golden breaded chicken cutlets served on toasted bread with crisp romaine lettuce, tangy Caesar dressing, and shaved Parmesan cheese. Ready in just 30 minutes for an elevated weeknight dinner.
Prep Time
15 min
Cook Time
15 min
Total Time
30 min
Servings
4 sandwiches
Ingredients
For 4 sandwiches
- 2 large chicken breasts, sliced horizontally to create 4 thin cutlets
- 1/2 cup all-purpose flour
- 2 large eggs, beaten
- 1 cup panko breadcrumbs
- 1/2 cup grated Parmesan cheese, divided
- 1 teaspoon salt
- 1/2 teaspoon black pepper
- 1/2 teaspoon garlic powder
- 1/4 cup vegetable oil for frying
- 1/2 cup Caesar dressing
- 4 ciabatta rolls or sandwich buns, sliced and lightly toasted
- 2 cups romaine lettuce, chopped
- 1/4 cup shaved Parmesan cheese for topping
Instructions
- 1
Prepare breading station
Set up three shallow bowls in a row. Place flour mixed with salt, pepper, and garlic powder in the first bowl. Beat eggs in the second bowl until smooth. Combine panko breadcrumbs with 1/4 cup grated Parmesan cheese in the third bowl.
- 2
Prepare chicken cutlets
Pat chicken cutlets completely dry with paper towels to remove all moisture. If your chicken breasts are thick, slice them horizontally to create thinner cutlets about 1/2 inch thick. This ensures even cooking and better texture.
- 3
Bread the chicken
Working with one cutlet at a time, dredge in flour and shake off excess. Dip into beaten eggs, letting excess drip back into bowl. Press firmly into breadcrumb mixture, coating both sides completely. Set breaded cutlets on a clean plate.
- 4
Heat the oil
Pour vegetable oil into a large skillet to a depth of about 1/4 inch. Heat over medium heat until the oil shimmers but does not smoke, about 3-4 minutes. Test readiness by dropping in a breadcrumb—it should sizzle immediately.
- 5
Cook the chicken
Carefully place breaded cutlets in hot oil, leaving space between each piece. Cook without moving for 5-6 minutes until golden brown on the bottom. Flip carefully and cook another 5-6 minutes until internal temperature reaches 165°F and coating is crispy and golden.
- 6
Drain and rest
Transfer cooked chicken cutlets to a plate lined with paper towels to drain excess oil. Let rest for 2-3 minutes while you prepare the sandwiches. This resting time helps the coating set and the juices redistribute.
- 7
Toast the bread
While chicken rests, lightly toast your ciabatta rolls or sandwich buns in a dry skillet, toaster, or under the broiler until just golden. This step is optional but adds textural contrast and helps prevent sogginess.
- 8
Assemble the sandwiches
Spread Caesar dressing generously on both cut sides of each toasted bun. Place a layer of chopped romaine lettuce on the bottom bun. Top with a hot crispy chicken cutlet, sprinkle with shaved Parmesan cheese, and crown with the top bun.
- 9
Serve immediately
Serve the sandwiches right away while the chicken is still hot and crispy. The contrast between warm chicken and cool lettuce creates the best eating experience. Cut sandwiches in half if desired for easier handling.
Nutrition Facts
Per serving (estimated)
585 calories
Calories
48g
Carbs
42g
Protein
24g
Fat
3g
Fiber
985mg
Sodium
4g
Sugar


