Edible Macaron Tower: Stunning Rococo Centerpiece
Learn to build a show-stopping rococo macaron tower with elegant French technique. Perfect for celebrations, this edible centerpiece wows every guest.
cookwithlucia.com/recipes/the-edible-christmas-tree-rococo-macaron-tower
Edible Macaron Tower: Stunning Rococo Centerpiece
When you need to create a jaw-dropping centerpiece for your next elegant gathering, the pressure can feel overwhelming. Between managing your everyday responsibilities and trying to impress guests with something truly special, who has time to master complex pastry techniques? That's exactly why I'm thrilled to share this stunning rococo macaron tower with you—a show-stopping edible sculpture that looks like it took days but comes together more simply than you'd imagine.
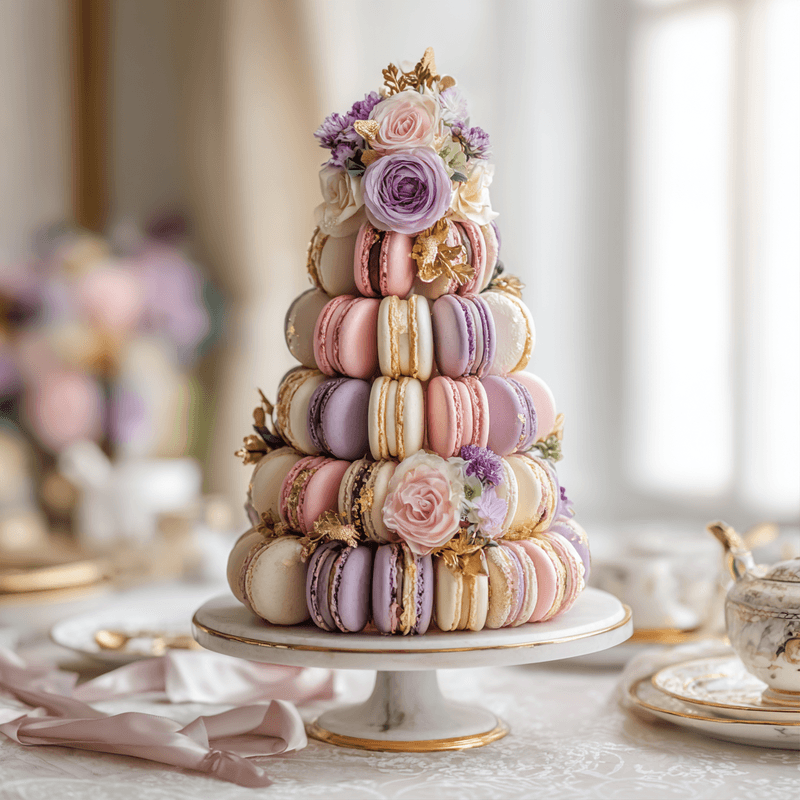
Picture this: layers upon layers of delicate, colorful macarons stacked in a magnificent cone shape, each cookie perfectly piped and filled, creating an architectural marvel that becomes the conversation piece of any celebration. The tower rises gracefully from your table, showcasing jewel-toned shells in coordinating shades, adorned with edible decorations that catch the light and draw every eye in the room. I promise you, from careful planning to final assembly, you can create this masterpiece in stages that fit around your schedule, making professional-level pastry art accessible right in your own kitchen.

Why This Rococo Macaron Tower Is Your Celebration Showstopper
It's Actually More Approachable Than You Think While this rococo macaron tower looks like something from a fancy patisserie window, the technique breaks down into manageable steps you can spread across several days. The macarons themselves follow a reliable French meringue method, and the tower assembly is essentially careful stacking with a sturdy base.
Make-Ahead Friendly Saves Your Sanity Macarons actually improve after 24 hours in the refrigerator, meaning you can bake all your shells days before your event. The filling can be prepared ahead, and even the assembled tower holds beautifully for hours, freeing you to focus on other dishes when guests arrive.
Customizable to Any Color Scheme Whether you're celebrating a wedding, hosting an elegant dinner party, or marking a special achievement, this macaron tower adapts to your aesthetic vision. Choose soft pastels for spring gatherings, rich jewel tones for formal events, or metallic-dusted shells for truly glamorous occasions.
Serves a Crowd Impressively A standard tower uses 60-80 macarons, providing enough sweet bites for 30-40 guests. Each person gets to pluck their own cookie from the tower, creating an interactive dessert experience that guests genuinely love.
Doubles as Décor and Dessert Unlike centerpieces that simply take up table space, this rococo macaron tower pulls double duty. Throughout your gathering, it serves as a stunning focal point, then transforms into dessert without requiring additional plating or serving dishes.
Creates Lasting Memories There's something magical about presenting an edible tower that makes guests reach for their phones to capture the moment. The visual impact creates photo opportunities that keep your celebration memorable long after the last macaron disappears.
Simple Ingredients, Big Impact
The beauty of this rococo macaron tower lies in its foundation of classic ingredients that deliver extraordinary results. Almond flour forms the heart of every macaron shell, providing that signature tender-crisp texture and subtle nutty flavor. Look for finely ground, blanched almond flour rather than almond meal—the fine texture ensures smooth, professional-looking shells without lumps or graininess.
Powdered sugar sweetens the shells while contributing to their delicate structure. I always sift the powdered sugar with the almond flour at least twice to eliminate any clumps that could mar the smooth surface of your macarons. This extra step takes just minutes but makes an enormous difference in the final appearance.
Egg whites are the magical ingredient that transforms simple pantry staples into elegant French cookies. You'll want room-temperature egg whites that have been separated carefully—even a drop of yolk will prevent proper whipping. I typically separate my eggs while cold, then let the whites sit at room temperature for about an hour before beginning.
Granulated sugar gets whipped into the egg whites to create a glossy, stable meringue. The sugar dissolves completely during whipping, creating that shiny finish and stable structure that holds up during piping and baking. Don't substitute superfine sugar here—regular granulated works perfectly.
Gel food coloring allows you to create your tower's color palette without adding excess liquid that would throw off the batter consistency. A tiny amount goes a long way, so start with a toothpick-sized dab and add more gradually until you achieve your desired shade.
Buttercream or ganache fills your macarons and acts as the "glue" holding your tower together. I prefer a sturdy buttercream for construction purposes, as it holds its shape better than softer fillings at room temperature during events.
A styrofoam cone serves as the structural foundation for your rococo macaron tower, providing the shape and support needed for assembly. Look for a cone that's 12-15 inches tall and wrapped in food-safe covering, or wrap it yourself in plastic wrap before beginning.
Optional decorations like edible flowers, gold leaf, or small sugar pearls add those rococo-inspired flourishes that elevate your tower from beautiful to breathtaking. These finishing touches require minimal investment but deliver maximum visual drama.
Step-by-Step in Plain English
Stage One: Creating Perfect Macaron Shells Begin by sifting your almond flour and powdered sugar together twice to ensure no lumps remain. In a separate bowl, whip your room-temperature egg whites until foamy, then gradually add granulated sugar while continuing to beat until stiff, glossy peaks form—this takes about 5-7 minutes with a stand mixer. Add your gel coloring to the meringue, then fold in the almond flour mixture using a rubber spatula, pressing the batter against the bowl's side to deflate it slightly. You're looking for a lava-like consistency that flows in a thick ribbon and settles back into itself within 30 seconds.
Stage Two: Piping and Resting Transfer your batter to a piping bag fitted with a round tip, then pipe circles onto parchment-lined baking sheets, holding the bag straight up and releasing even pressure for uniform size. Tap the sheets firmly on the counter several times to release air bubbles, then let the piped macarons sit at room temperature for 30-60 minutes until they develop a dry skin you can touch without batter sticking to your finger. This resting period is crucial for developing those signature "feet" at the base of each cookie.
Stage Three: Baking to Perfection Bake your macarons in a preheated 300°F oven for 14-16 minutes, rotating the sheet halfway through for even coloring. The shells should feel firm when gently touched, and they should lift cleanly from the parchment when nudged with a spatula. Let them cool completely on the sheets before attempting to remove them—patience here prevents broken shells and frustration.
Stage Four: Filling and Maturing Match up similar-sized shells, then pipe a generous dollop of buttercream onto the flat side of one shell and sandwich with its partner, pressing gently until the filling spreads to the edges. Transfer filled macarons to an airtight container and refrigerate for at least 24 hours, allowing the filling to soften the shells slightly and the flavors to meld. That's it, you're halfway done—the hardest work is behind you!
Stage Five: Tower Assembly Secure your styrofoam cone to a sturdy base or cake board using a dab of buttercream or royal icing. Working from the bottom up, attach macarons to the cone by piping a dot of buttercream on the back of each shell and pressing it firmly against the cone, holding for a few seconds until it adheres. Continue circling the cone, placing macarons close together with minimal gaps, creating neat rows that spiral upward toward the peak.
Stage Six: Finishing Touches Once your rococo macaron tower is fully covered, step back and look for any gaps that need filling with smaller macarons or decorative elements. Tuck fresh edible flowers between macarons, apply tiny dots of edible gold leaf with a clean paintbrush, or nestle sugar pearls in empty spaces for that ornate rococo aesthetic. The final result should feel abundant and luxurious, with every angle offering something beautiful to see.
Pro Shortcuts and Time-Savers
Prepare Your Mise en Place Days Ahead Measure and sift your dry ingredients up to a week before baking, storing them in an airtight container at room temperature. Similarly, separate your eggs several days in advance and keep the whites refrigerated in a covered container—just remember to bring them to room temperature before whipping.
Embrace the Power of Templates Print or draw circles on paper to slide under your parchment as a piping guide, ensuring every macaron is uniform in size. This eliminates guesswork and speeds up the piping process considerably while guaranteeing professional-looking results. Once you've piped a sheet, simply slide the template out and reuse it for the next batch.
Batch Your Baking Sessions Rather than making all your shells in one marathon session, spread the work across two or three days. Make half your shells in one color on day one, then the remaining shells in complementary colors on day two. This approach prevents fatigue and maintains your focus when precision matters most.
Use the Freezer Strategically Unfilled macaron shells freeze beautifully for up to three months in airtight containers with parchment between layers. Bake your shells whenever you have time, freeze them, then defrost and fill them a day or two before assembly. This strategy turns tower-building into a project you can tackle in convenient stages.
Invest in Multiple Piping Bags Having several piping bags ready means you can quickly switch between colors without washing and drying bags mid-process. Disposable bags work wonderfully for this purpose, though reusable bags with multiple tips save money if you plan to make macaron towers regularly.
Ways to Switch It Up
Create a Gradient Effect Next time, try using three or four shades of the same color family, arranging your macarons from darkest at the base to lightest at the peak. This ombré approach adds sophisticated visual interest while maintaining color harmony—particularly stunning with blues, pinks, or purples that create a watercolor effect.
Go Monochromatic with Texture Variation Instead of multiple colors, use a single shade but vary the decorations on each macaron. Pipe some shells with smooth tops, dust others with edible glitter, paint a few with gold accents, and leave some plain. The textural variety creates depth while maintaining elegant simplicity.
Experiment with Flavor Combinations While keeping shells neutral in color, create a rainbow of fillings that surprise guests with each bite. Try raspberry buttercream in some, chocolate ganache in others, and lemon curd in a third batch. Label each tier discreetly so guests can choose their preferred flavor adventure.
Build a Miniature Tower For smaller gatherings, construct a 6-inch tower using just 25-30 macarons. This scaled-down version delivers the same visual impact while requiring less time and fewer ingredients—perfect for intimate dinner parties or when you want to create multiple towers in different color schemes.
Add Fresh Flowers Throughout For spring or summer celebrations, tuck pesticide-free roses, pansies, or lavender sprigs between your macarons throughout the entire tower rather than just at the base. The combination of delicate cookies and fresh blooms creates a garden-inspired rococo masterpiece that feels romantic and abundant.
Storing Leftovers the Right Way
Individual filled macarons keep beautifully in the refrigerator for up to one week when stored in airtight containers with parchment paper between layers to prevent sticking. The shells actually benefit from this storage time, developing a perfect tender texture as the moisture from the filling softens them slightly. Let refrigerated macarons sit at room temperature for 15-20 minutes before serving to allow the filling to soften and the flavors to fully express themselves.
For longer storage, unfilled macaron shells freeze exceptionally well for up to three months. Layer them carefully in rigid containers with parchment between each layer, then seal tightly before freezing. When you're ready to use them, let the shells defrost in their sealed container at room temperature for about an hour—this prevents condensation from forming on the delicate surfaces.
If you've already assembled your rococo macaron tower and have leftovers, carefully remove macarons from the cone and store them individually rather than trying to refrigerate the entire structure. The styrofoam cone can be saved and reused for future towers after cleaning. Reheating macarons is never recommended, as they're meant to be enjoyed at cool room temperature where their texture and flavor shine.
For repurposing leftover macarons, crush any imperfect or broken shells and fold them into vanilla ice cream for a sophisticated dessert, or crumble them over pudding or mousse for added texture. The almond flavor and crispy-chewy texture add wonderful contrast to creamy desserts.
Quick Answers to Common Questions
Can I make the tower completely ahead of time?
Absolutely! Assemble your rococo macaron tower up to 24 hours before your event and store it in a cool, dry area away from humidity. Avoid refrigerating the assembled tower, as condensation can form when you bring it back to room temperature, potentially causing shells to become soggy or decorations to weep. If your event space is particularly warm, assemble the tower the morning of your gathering.
What if my macarons crack or come out imperfect?
Don't worry—those imperfect shells have a purpose! Use any cracked or misshapen macarons on the back side of your tower where they won't be visible, saving your most beautiful specimens for the front-facing areas. Alternatively, sandwich two halves together even if they're cracked, as the filling helps hold them together and hides many imperfections once assembled.
How do I transport this tower to another location?
Transport is tricky but manageable with care. Secure your cone's base to a sturdy board or platter using royal icing or strong buttercream. Place the entire tower in a large box that's tall enough to avoid touching the top, and pad the sides with crumpled parchment or clean kitchen towels to prevent shifting. Drive carefully, avoiding sudden stops, and recruit a helper to steady the box if possible.
Can I use Italian or Swiss meringue instead of French?
You certainly can! Italian meringue macarons, made with hot sugar syrup, create slightly sturdier shells that some bakers find more forgiving. Swiss meringue, where eggs and sugar are heated together before whipping, falls somewhere between French and Italian in terms of stability. All three methods work beautifully for this rococo macaron tower, so use whichever technique you're most comfortable with.
What's the best way to color macarons for a specific theme?
Start by selecting 2-4 colors that complement each other, using gel food coloring to achieve your desired shades. Remember that colors often bake slightly lighter than they appear in the batter, so go a shade deeper than you think you need. Test a small batch first if you're aiming for exact color matching, and keep notes on how many drops of each color you used for consistent results across multiple batches.
How tall should I make my tower for different guest counts?
For 20-30 guests, a 10-12 inch tower works perfectly, using approximately 50-60 macarons. Increase to a 15-inch tower with 80-90 macarons for 40-50 guests. Remember that not every guest will take a macaron, and the tower serves primarily as a stunning visual centerpiece that happens to be edible rather than as the sole dessert for your gathering.
This rococo macaron tower transforms any celebration into an unforgettable occasion, combining French pastry technique with dramatic presentation. The process may seem ambitious at first glance, but breaking it into manageable stages makes this showstopper completely achievable in your home kitchen. From carefully piped shells to the final tower assembly, each step builds your confidence while creating something truly spectacular. The reactions from your guests when they see this edible masterpiece rising from your table make every moment of careful work worthwhile, and knowing you created something so beautiful with your own hands adds a special pride to any gathering. Whether you're marking a milestone, hosting an elegant soirée, or simply want to challenge yourself with an impressive baking project, this macaron tower delivers on every level—stunning to behold, delightful to eat, and surprisingly achievable when you approach it with patience and planning.
Rococo Macaron Tower
A stunning edible centerpiece made of delicate French macarons stacked in an elegant cone shape, perfect for celebrations and special gatherings.
Prep Time
2h
Cook Time
45 min
Total Time
26h
Servings
70 macarons (35 servings)
Ingredients
For 70 macarons (35 servings)
- 300g almond flour, finely ground and blanched
- 300g powdered sugar
- 220g egg whites, room temperature (about 7 large eggs)
- 300g granulated sugar
- Gel food coloring in desired colors
- 450g unsalted butter, room temperature for buttercream
- 600g powdered sugar for buttercream
- 3 tablespoons whole milk for buttercream
- 2 teaspoons vanilla extract for buttercream
- 1 styrofoam cone, 12-15 inches tall, wrapped in food-safe plastic
- Edible decorations such as gold leaf, sugar pearls, or edible flowers
Instructions
- 1
Prepare dry ingredients
Sift the almond flour and 300g powdered sugar together twice through a fine-mesh sieve into a large bowl, discarding any large pieces that don't pass through. This ensures your macaron shells will be perfectly smooth. Set aside while you prepare the meringue.
- 2
Make the meringue
In the bowl of a stand mixer fitted with the whisk attachment, beat the room-temperature egg whites on medium speed until foamy, about 1-2 minutes. Gradually add the granulated sugar one tablespoon at a time while mixing, then increase speed to medium-high and beat for 5-7 minutes until stiff, glossy peaks form. The meringue should be thick, shiny, and hold its shape when you lift the whisk.
- 3
Add color and fold
Add your desired gel food coloring to the meringue using a toothpick or small spatula, mixing briefly to distribute. Add the sifted almond flour mixture all at once, then fold gently with a rubber spatula using a combination of folding and pressing motions against the bowl's side. Continue until the batter flows like thick lava and a ribbon dropped from the spatula settles back into the mixture within 30 seconds.
- 4
Pipe the shells
Transfer the batter to a piping bag fitted with a round tip (about 1/2 inch diameter). Pipe rounds onto parchment-lined baking sheets, holding the bag perpendicular to the sheet and releasing steady pressure to create circles about 1.5 inches in diameter, spacing them 1 inch apart. Tap the sheets firmly on the counter 5-6 times to release air bubbles.
- 5
Rest the shells
Let the piped macarons sit at room temperature uncovered for 30-60 minutes until they develop a dry skin on top that you can touch gently without batter sticking to your finger. This step is crucial for developing the characteristic feet. The time needed depends on humidity levels in your kitchen.
- 6
Bake the macarons
Preheat your oven to 300°F (150°C). Bake the macarons one sheet at a time for 14-16 minutes, rotating the sheet halfway through baking. The shells should be firm when gently touched and should lift cleanly from the parchment. Let them cool completely on the baking sheets before removing, about 15-20 minutes.
- 7
Make the buttercream
Beat the softened butter in a stand mixer on medium-high speed for 3-4 minutes until light and fluffy. Gradually add the 600g powdered sugar, beating on low speed until incorporated, then add milk and vanilla extract. Increase speed to high and beat for 3-4 minutes until the buttercream is smooth, creamy, and holds stiff peaks.
- 8
Fill the macarons
Match up similar-sized shells into pairs. Transfer buttercream to a piping bag fitted with a small round tip and pipe a generous dollop onto the flat side of one shell. Sandwich with its partner, pressing gently until the filling spreads to just the edges. Place filled macarons in an airtight container.
- 9
Age the macarons
Refrigerate the filled macarons in airtight containers for 24 hours before assembling your tower. This maturation period allows the shells to soften slightly and the flavors to meld, creating the perfect texture. Bring to room temperature before assembly.
- 10
Prepare the base
Secure your styrofoam cone to a sturdy cake board or serving platter using a generous dollop of buttercream or royal icing at the base. Press firmly and let it set for 10 minutes. Ensure the cone is stable and won't tip over during assembly.
- 11
Assemble the tower
Working from the bottom of the cone upward, pipe a small dot of buttercream on the back of each macaron and press it firmly against the cone, holding for 5-10 seconds until it adheres. Continue adding macarons in a circular pattern, placing them close together with minimal gaps, creating neat rows that spiral up the cone.
- 12
Add finishing touches
Once the entire cone is covered with macarons, fill any gaps with decorative elements. Tuck edible flowers between shells, apply small pieces of edible gold leaf with a dry brush, or nestle sugar pearls in empty spaces. Step back frequently to ensure the decorations are evenly distributed and the tower looks abundant from all angles.
- 13
Final presentation
Keep the completed tower in a cool, dry location away from direct sunlight and humidity until serving time. The tower can be assembled up to 24 hours ahead and should not be refrigerated once assembled. Transport carefully if needed, securing the base board inside a tall box.
Nutrition Facts
Per serving (estimated)
145 calories
Calories
18g
Carbs
2g
Protein
7g
Fat
1g
Fiber
15mg
Sodium
16g
Sugar


