
The Best Vanilla Cupcake Recipe | Bakery-Perfect Every Time
Master the best vanilla cupcake recipe with tender crumb, sky-high domes, and intense vanilla flavor. Professional techniques made simple for home bakers.
cookwithlucia.com/recipes/the-best-vanilla-cupcake-recipe
There's something profoundly satisfying about mastering a vanilla cupcake that rivals anything you'd find in an upscale bakery. When you understand the foundation of a truly exceptional vanilla cupcake, you unlock the ability to create countless variations, from simple afternoon treats to elaborate celebration centerpieces. The best vanilla cupcake recipe isn't just about following measurements—it's about understanding how butter, eggs, and flour transform into something that's simultaneously light as air and rich with flavor.
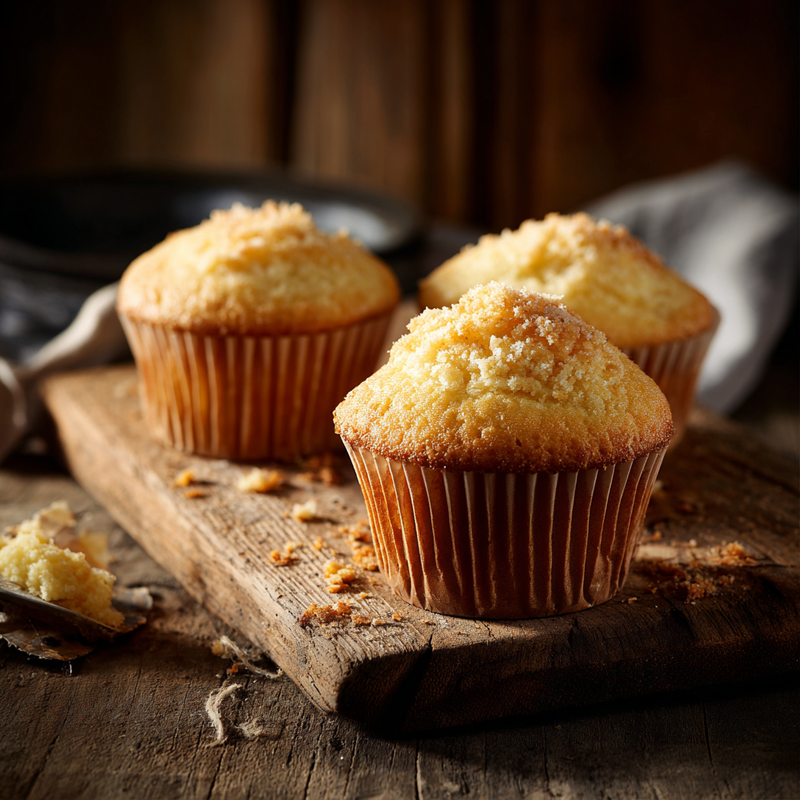
Picture this: a golden dome that springs back when you touch it, giving way to a crumb so tender it practically melts on your tongue. The vanilla flavor isn't just present—it's the star, complex and aromatic, not the flat, one-dimensional taste you might remember from boxed mixes. The texture strikes that perfect balance between sturdy enough to hold a generous swirl of frosting and delicate enough to feel indulgent.
Many home bakers feel intimidated by cupcakes, convinced they need professional equipment or secret techniques to achieve bakery-quality results. I'm here to tell you that's simply not true. Once you understand why each ingredient plays its specific role and how they work together, making the best vanilla cupcake recipe becomes not just achievable but genuinely enjoyable. You'll find yourself reaching for this recipe again and again, whether you're baking for a casual family gathering or preparing dozens for a special celebration.
The Science Behind the Method
The magic of the best vanilla cupcake recipe lies in a beautiful dance of chemistry happening right in your mixing bowl. When you cream butter and sugar together, you're not just combining ingredients—you're incorporating thousands of tiny air bubbles that will expand in the oven's heat, creating that coveted light texture. The sugar crystals literally cut into the butter, creating pockets that trap air and give your cupcakes their rise.
Meanwhile, the proteins in your flour and eggs are forming gluten networks, but here's where technique becomes crucial. Unlike bread, where we want strong gluten development, cupcakes require a gentler touch. Overmixing activates too much gluten, resulting in tough, dense cupcakes instead of the tender crumb we're after. The fat from butter coats those flour proteins, limiting gluten formation and keeping everything soft and delicate.
The leavening agents—baking powder and sometimes baking soda—create carbon dioxide gas when they encounter moisture and heat. This gas expands those air pockets you created during creaming, pushing the batter upward into those beautiful domed tops. The eggs serve triple duty: their proteins set the structure as they cook, their fat adds richness, and their water content creates steam that helps with rise.
Understanding this science transforms you from someone who merely follows a recipe to a baker who knows why each step matters. When you grasp that you're building air pockets, creating structure, and managing gluten development, you'll instinctively know how to adjust when something feels off. This knowledge makes you confident and capable in ways that simply measuring ingredients never could.
Tools and Ingredients You'll Need
Let's talk equipment first, because the right tools make executing the best vanilla cupcake recipe significantly easier. A stand mixer is wonderful, but a handheld electric mixer works beautifully—I've made countless batches with both. If you only have a whisk and strong arms, you can absolutely make this recipe work, though the creaming stage will require genuine effort. A standard muffin tin is essential, and I strongly recommend using paper liners rather than greasing the pan directly. The liners help cupcakes maintain their shape and make cleanup effortless.
An ice cream scoop or cookie scoop ensures every cupcake contains the exact same amount of batter, which means they'll all bake at the same rate and finish simultaneously. Inconsistent sizes lead to some cupcakes being perfectly done while others are overbaked or underdone. A toothpick or cake tester helps you check doneness, though I'll teach you visual and tactile cues that are even more reliable.
For ingredients, quality genuinely matters when you're making something as pure and simple as vanilla cupcakes. Use unsalted butter so you can control the salt level precisely—salted butter varies wildly between brands. The butter should be at true room temperature, around seventy degrees, soft enough that your finger leaves an impression but not so warm that it's greasy or shiny. All-purpose flour works perfectly, though weighing it gives more consistent results than measuring by volume.
The vanilla extract deserves special attention in the best vanilla cupcake recipe. Pure vanilla extract costs more than imitation, but the difference is profound. Real vanilla has complex, almost floral notes with warmth and depth, while imitation tastes flat and one-dimensional. Fresh eggs at room temperature emulsify more easily with the butter, creating a smoother, more stable batter. Whole milk provides the right balance of fat and liquid—don't substitute with skim milk or you'll lose richness.
The Method, Step by Step
Begin by bringing your butter and eggs to room temperature, which typically takes about an hour on the counter. This step seems minor but dramatically affects how well your ingredients combine. Cold butter won't cream properly, and cold eggs can cause the batter to separate or curdle. While those ingredients warm up, preheat your oven to three hundred fifty degrees and line your muffin tin with paper liners. Position the oven rack in the center for the most even heat distribution.
The creaming stage is where the magic begins. Place your room-temperature butter in the mixing bowl and beat it on medium speed for about thirty seconds to soften it further. Add your sugar and increase the speed to medium-high, beating for three to four minutes until the mixture is noticeably paler, fluffy, and increased in volume. This is creating all those crucial air pockets. The mixture should look almost white rather than yellow, with a light, mousse-like texture. Many bakers don't cream long enough—patience here pays enormous dividends in texture.
Add your eggs one at a time, beating well after each addition. The mixture might look slightly curdled after the first egg—don't panic, this is normal and will smooth out. After all eggs are incorporated, add your vanilla extract and beat just until combined. Now you'll add your dry and wet ingredients alternately, and this is where technique becomes crucial for the best vanilla cupcake recipe. Whisk together your flour, baking powder, and salt in a separate bowl to ensure even distribution.
Add about one-third of the flour mixture to the butter mixture and mix on low speed just until the flour disappears—you should still see streaks. Add half the milk, mix until just combined, then repeat: flour, milk, flour. After that final addition of flour, mix only until no dry streaks remain, usually about ten to fifteen seconds. This alternating method keeps gluten development minimal and prevents overmixing. The batter should be smooth and thick, falling from a spoon in ribbons rather than pouring like water.
Fill each cupcake liner about two-thirds full, which is roughly three tablespoons of batter per cup if you're measuring. That ice cream scoop I mentioned earlier makes this incredibly fast and consistent. Tap the filled pan gently on the counter twice to release any large air bubbles, then immediately transfer to your preheated oven. Bake for eighteen to twenty-two minutes, rotating the pan halfway through for even browning. The cupcakes are done when the tops spring back when lightly pressed, the edges are just starting to pull away from the liners, and a toothpick inserted in the center comes out clean or with just a few moist crumbs.
The cooling process matters more than most bakers realize. Let the cupcakes cool in the pan for five minutes, then transfer them to a wire cooling rack. This prevents condensation from forming on the bottoms, which would make them soggy. The cupcakes must cool completely before frosting—warm cupcakes will melt your frosting into a puddle. This takes about forty-five minutes to an hour, and yes, the wait is difficult when your kitchen smells like vanilla heaven.
Troubleshooting Guide
If your cupcakes sink in the center after looking perfect in the oven, you've likely undermixed the batter or your leavening agents are old and have lost potency. Baking powder loses effectiveness after about six months, so check the date on your container. Additionally, opening the oven door too early can cause cupcakes to collapse, as the structure hasn't set enough to withstand the temperature drop. Wait until at least the fifteen-minute mark before peeking.
Dense, heavy cupcakes that taste more like muffins indicate overmixing after adding the flour. When you overwork the batter, you develop too much gluten, creating that tough, chewy texture. Remember, you want to mix just until the flour disappears—a few small lumps are perfectly fine and will dissolve during baking. Using melted butter instead of properly creamed butter will also result in dense cupcakes, as you've missed the critical air incorporation step that creates lift.
Cupcakes with peaked, pointed tops rather than gently rounded domes usually mean your oven temperature is too high. The outside sets and browns before the inside has finished rising, forcing the center to push up dramatically. Invest in an oven thermometer because most home ovens run at least ten to fifteen degrees hotter or cooler than the dial suggests. For the best vanilla cupcake recipe results, accurate temperature is essential.
If the vanilla flavor tastes weak or barely present, you might be using imitation extract or not enough extract overall. Don't be shy with vanilla in this recipe—it's the headline ingredient. Some bakers also find that adding a quarter teaspoon of almond extract alongside the vanilla creates a more complex, bakery-like flavor profile. Just ensure any additional extracts you use are alcohol-free to maintain halal compliance, or seek out specifically labeled halal vanilla extract.
Dry, crumbly cupcakes that fall apart when you try to frost them usually indicate overbaking. Even an extra two to three minutes can take cupcakes from perfectly moist to disappointingly dry. Start checking at the eighteen-minute mark, and remember that cupcakes continue cooking slightly from residual heat even after you remove them from the oven. It's better to slightly underbake than overbake—that extra minute in the hot pan will finish the job.
Taking It to the Next Level
Once you've mastered the basic technique for the best vanilla cupcake recipe, there are numerous ways to elevate your results to professional standards. Try using a combination of vanilla extract and vanilla bean paste, or scrape the seeds from a vanilla bean directly into your batter for those gorgeous flecks and intensified flavor. The visual impact of real vanilla seeds scattered throughout the crumb signals serious quality to anyone who takes a bite.
Experienced bakers often replace a tablespoon or two of the milk with sour cream or plain yogurt, which adds incredible moisture and a subtle tang that makes the vanilla flavor pop even more. The acid in these dairy products also reacts with the leavening agents, contributing to an even lighter texture. Some professional bakers swear by the reverse creaming method, where you coat the flour with butter first, then add liquids. This creates an exceptionally tender crumb, though it produces a slightly denser texture than traditional creaming.
For truly show-stopping presentation, consider filling your cupcakes before frosting. Use a small paring knife to cut a cone-shaped piece from the top of each cooled cupcake, fill the cavity with jam, lemon curd, or pastry cream, then replace the top before frosting. This surprise element delights guests and adds another dimension of flavor and texture. You can also brush the warm cupcakes with a simple syrup infused with vanilla or other complementary flavors to ensure they stay incredibly moist for days.
Temperature control separates good bakers from great ones. Use an instant-read thermometer to check your cupcakes—they're perfectly done at around two hundred to two hundred ten degrees in the center. This takes all the guesswork out of doneness and ensures you never overbake again. Professional bakers also know that room-temperature ingredients emulsify better, so take the extra time to ensure everything from butter to eggs to milk is at the proper temperature before you begin.
Storing Your Results
Unfrosted cupcakes from the best vanilla cupcake recipe stay fresh at room temperature for up to two days when stored in an airtight container. The key word is airtight—exposure to air will dry them out quickly. Layer them carefully to avoid squashing, or store them in a single layer if you have the space. If you've frosted your cupcakes, storage depends on the frosting type. Standard buttercream can stay at room temperature for a day or two, but anything with cream cheese or perishable fillings needs refrigeration.
Refrigerated cupcakes will dry out somewhat, but bringing them back to room temperature before serving helps restore their texture. Remove them from the refrigerator about an hour before you plan to serve them—cold cupcakes don't showcase the tender crumb and full vanilla flavor you worked so hard to achieve. If you must refrigerate frosted cupcakes, place them uncovered in the refrigerator for fifteen minutes to let the frosting set, then cover them loosely with plastic wrap.
For longer storage, vanilla cupcakes freeze beautifully for up to three months. Freeze them unfrosted, wrapped individually in plastic wrap, then placed together in a freezer-safe container or bag. This double wrapping prevents freezer burn and keeps them tasting fresh. Thaw frozen cupcakes on the counter while still wrapped—this prevents condensation from forming on the surface. Once thawed, they'll taste remarkably close to freshly baked.
If you're planning ahead for a gathering, you can bake cupcakes a day or two early and store them properly, then frost them the morning of your event. This actually allows the vanilla flavor to deepen and develop, and the texture often improves slightly as the moisture distributes evenly throughout the crumb. Many professional bakeries prepare cupcakes this way, so you're in good company using this make-ahead strategy.
Common Questions
Can I make these cupcakes without a mixer?
Absolutely, though you'll need some arm strength and patience. Use a wooden spoon or sturdy whisk to cream the butter and sugar together—this will take about eight to ten minutes of vigorous stirring to achieve the light, fluffy texture you need. The key is incorporating as much air as possible during this stage. While it's more labor-intensive than using a mixer, plenty of bakers made perfect cupcakes for generations before electric mixers existed, so it's definitely achievable with the best vanilla cupcake recipe.
Why do my cupcakes stick to the liners?
This frustrating issue usually happens when cupcakes are still slightly warm when people try to peel the liner away. The moisture from the warm cupcake creates a sticky situation where the liner clings stubbornly to the cake. Always let cupcakes cool completely before serving. Additionally, cheaper paper liners tend to stick more than higher-quality ones, so investing in good liners makes a noticeable difference. Some bakers lightly spray liners with cooking spray before filling them, which can help, though it's not usually necessary if you let cupcakes cool properly.
Can I double this recipe to make a large batch?
Yes, the best vanilla cupcake recipe doubles and even triples beautifully, making it perfect when you need to bake for larger gatherings. The only consideration is your mixing bowl capacity—make sure your mixer can handle the increased volume without ingredients flying everywhere. Bake in batches if you don't have enough muffin tins, keeping the remaining batter at room temperature while the first batch bakes. Don't refrigerate batter between batches, as cold batter won't rise as well and may produce denser cupcakes.
How can I make these cupcakes at high altitude?
High altitude baking requires adjustments because lower air pressure affects how cakes rise and set. Generally, reduce your baking powder slightly—try cutting it by about a quarter. Increase your oven temperature by fifteen to twenty-five degrees to help cupcakes set before they over-rise and collapse. You might also need to add an extra tablespoon or two of flour to strengthen the structure, and slightly increase the liquid to compensate for faster evaporation. These adjustments help the best vanilla cupcake recipe succeed regardless of elevation.
Can I substitute ingredients to make these cupcakes suitable for dietary restrictions?
While the classic version delivers the best results, you can make modifications with some trade-offs. For a dairy-free version, use solid coconut oil in place of butter and a plant-based milk, though the flavor will be noticeably different. Gluten-free all-purpose flour blends with xanthan gum can replace regular flour, though the texture will be slightly more delicate and crumbly. Keep in mind that each substitution changes the chemistry, so results may vary. The beauty of mastering the standard best vanilla cupcake recipe first is that you understand what you're aiming for when you experiment.
What's the best frosting to pair with vanilla cupcakes?
Vanilla cupcakes are incredibly versatile and pair beautifully with almost any frosting. Classic choices include vanilla buttercream, which creates a lovely vanilla-on-vanilla experience, or chocolate buttercream for timeless contrast. Cream cheese frosting adds tangy richness that complements the sweet vanilla base perfectly. For something lighter, try a whipped cream frosting, though it requires refrigeration and is best for cupcakes that will be served within a few hours. The neutral canvas of the best vanilla cupcake recipe means you can truly let your creativity shine with frosting flavors and decorations.
Mastering the best vanilla cupcake recipe is about so much more than following a list of ingredients and instructions. It's about understanding the chemistry of creaming butter and sugar, respecting the delicate balance between structure and tenderness, and recognizing the subtle cues that tell you when something is perfectly done. These aren't just cupcakes—they're the foundation for countless celebrations, the centerpiece of weekend baking projects, and the canvas for your creativity in the kitchen. When you invest time in truly understanding this recipe, you're not just learning to bake one thing well. You're developing skills and instincts that will make you a better baker across dozens of other recipes. The confidence that comes from pulling a pan of perfect cupcakes from your oven, knowing you achieved that result through understanding and technique rather than luck, is genuinely empowering. So preheat that oven, pull out your mixing bowl, and get ready to create something wonderful.
The Best Vanilla Cupcake Recipe
Tender, moist vanilla cupcakes with a perfectly domed top and intense vanilla flavor. This bakery-quality recipe delivers consistent results every time with simple techniques and pantry ingredients.
Prep Time
15 min
Cook Time
20 min
Total Time
35 min
Servings
12 cupcakes
Ingredients
For 12 cupcakes
- 1/2 cup (115g) unsalted butter, at room temperature
- 3/4 cup (150g) granulated sugar
- 2 large eggs, at room temperature
- 2 teaspoons pure vanilla extract
- 1 1/2 cups (190g) all-purpose flour
- 1 1/2 teaspoons baking powder
- 1/4 teaspoon fine salt
- 1/2 cup (120ml) whole milk, at room temperature
Instructions
- 1
Prepare equipment and preheat
Position oven rack in the center of your oven and preheat to 350°F (175°C). Line a standard 12-cup muffin tin with paper cupcake liners. Ensure your butter, eggs, and milk have come to room temperature, which takes about one hour on the counter.
- 2
Cream butter and sugar
Place room-temperature butter in the bowl of a stand mixer fitted with the paddle attachment, or use a large mixing bowl with a handheld electric mixer. Beat butter on medium speed for 30 seconds to soften further. Add sugar and increase speed to medium-high, beating for 3 to 4 minutes until the mixture is pale, fluffy, and noticeably increased in volume, scraping down the bowl once or twice.
- 3
Add eggs and vanilla
Reduce mixer speed to medium and add eggs one at a time, beating well after each addition for about 30 seconds. The mixture may look slightly curdled after the first egg, which is normal and will smooth out. Add vanilla extract and beat until fully incorporated.
- 4
Combine dry ingredients
In a separate medium bowl, whisk together the flour, baking powder, and salt until thoroughly combined. This ensures the leavening agent is evenly distributed throughout the flour, which is crucial for consistent rise and texture.
- 5
Alternate adding dry and wet
With mixer on low speed, add one-third of the flour mixture to the butter mixture and mix just until you can no longer see dry flour streaks. Add half the milk and mix until just combined. Repeat with another third of flour, remaining milk, then final third of flour, mixing after each addition only until ingredients disappear. Total mixing time after adding flour should be 30 to 45 seconds maximum to prevent overdevelopment of gluten.
- 6
Fill cupcake liners
Using a large ice cream scoop or spoon, divide batter evenly among the 12 prepared cupcake liners, filling each about two-thirds full (approximately 3 tablespoons of batter per cup). This amount allows room for the cupcakes to rise without overflowing. Tap the filled pan gently on the counter two times to release any large air bubbles.
- 7
Bake cupcakes
Place the muffin tin in the preheated oven and bake for 18 to 22 minutes, rotating the pan 180 degrees halfway through baking for even browning. Cupcakes are done when the tops spring back when lightly pressed with your finger, the edges just begin pulling away from the liners, and a toothpick inserted in the center comes out clean or with only a few moist crumbs attached.
- 8
Cool completely
Remove cupcakes from the oven and let them cool in the pan on a wire rack for 5 minutes. This brief resting period allows the structure to set. Then carefully remove cupcakes from the tin and place them directly on the wire rack to cool completely, about 45 minutes to 1 hour. Cupcakes must be completely cool before frosting to prevent melting.
Nutrition Facts
Per serving (estimated)
185 calories
Calories
26g
Carbs
3g
Protein
8g
Fat
0.5g
Fiber
125mg
Sodium
15g
Sugar


