
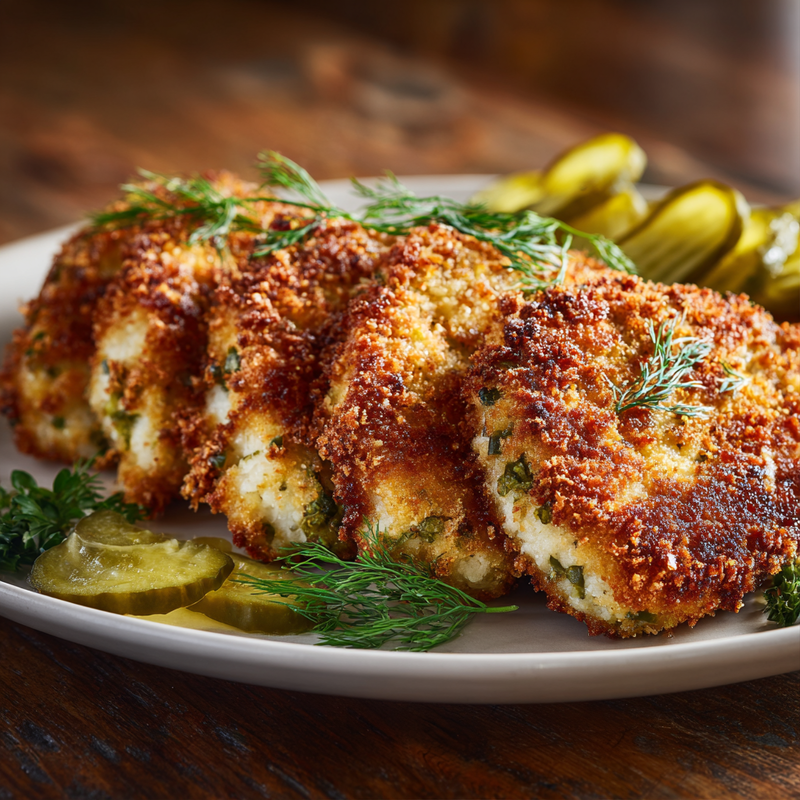
The Best Crispy Dill Pickle Parmesan Chicken Recipe
Crispy, tangy, and incredibly juicy! This Dill Pickle Parmesan Chicken features a golden coating infused with pickle brine and cheese for maximum flavor.
cookwithlucia.com/recipes/the-best-crispy-dill-pickle-parmesan-chicken
There's something magical about the way pickle brine transforms ordinary chicken into something extraordinary. The sharp tang, the savory depth, the way that briny liquid tenderizes and flavors the meat from the inside out—it's a technique that turns weeknight cooking into something worth gathering around the table for. When I first experimented with combining that distinctive dill pickle flavor with a crispy Parmesan coating, I knew I'd stumbled onto something special. The result is a chicken dish that delivers on every level: tender, juicy meat with a shatteringly crisp exterior that's both tangy and savory, with little bursts of pickle flavor in every bite.
What sets this Crispy Dill Pickle Parmesan Chicken apart is the way multiple layers of flavor work together. The chicken soaks in pickle brine, which not only seasons it but also keeps it impossibly moist during cooking. Then comes the coating—a brilliant combination of panko breadcrumbs, freshly grated Parmesan, and finely chopped dill pickles that creates texture and flavor you simply can't achieve any other way. It bakes up golden and crispy without any frying, making it accessible for busy weeknights while still feeling special enough for weekend gatherings.
In this guide, you'll learn exactly how to achieve that perfect crispy coating, discover the science behind pickle brine as a marinade, and master the timing that ensures juicy chicken every single time. Whether you're cooking for your family on a Tuesday evening or preparing something memorable for guests, this recipe will become one you return to again and again.
The Story Behind This Dish
The marriage of chicken and pickles isn't new—Southern cooks have been brining poultry in pickle juice for generations, understanding intuitively what food science later confirmed: the acidity and salt in pickle brine work together to break down proteins, resulting in incredibly tender, well-seasoned meat. What began as a practical way to use leftover brine from pickle jars has evolved into a beloved technique that home cooks across the country have embraced and adapted.
This particular version takes that classic brining method and elevates it by incorporating pickle flavor into the coating itself. Rather than letting the pickle taste remain subtle, we're celebrating it, making it a starring component alongside the nutty richness of Parmesan cheese. The combination might sound unconventional, but it works beautifully—the sharpness of the pickles cuts through the richness of the cheese, while the Parmesan adds a savory depth that balances the brine's tanginess.
What makes the homemade version so superior to anything you'd find in a restaurant is the freshness of the ingredients and the ability to control the pickle-to-cheese ratio. You can adjust the tanginess to your preference, ensure the Parmesan is freshly grated for maximum flavor, and bake it to your ideal level of crispiness. Plus, making it at home means you know exactly what goes into that coating—no mystery ingredients or excessive additives, just real food that tastes incredible.
What Makes This Recipe Special
Pickle Brine Marinade: The chicken soaks in dill pickle brine for at least two hours, which accomplishes two things simultaneously. First, it deeply seasons the meat throughout, not just on the surface. Second, the acidity tenderizes the proteins, ensuring each bite is impossibly juicy and tender. You'll notice the difference from the very first taste.
Double-Pickle Flavor: This Crispy Dill Pickle Parmesan Chicken doesn't rely solely on the brine. Finely chopped dill pickles get mixed directly into the breadcrumb coating, creating little pockets of concentrated pickle flavor that provide delightful tangy bursts throughout. It's an unexpected touch that makes each bite interesting.
Baked, Not Fried: Achieving a genuinely crispy coating without deep frying might seem impossible, but this recipe proves otherwise. By using panko breadcrumbs, which have a lighter, airier structure than regular breadcrumbs, and baking at a high temperature on a wire rack, you get that satisfying crunch without the mess, calories, or hassle of frying.
Parmesan Richness: Freshly grated Parmesan cheese adds a nutty, savory dimension that balances the pickle's acidity perfectly. As it bakes, the cheese melts slightly into the coating while also crisping up, creating layers of flavor and texture that make this chicken truly special.
Family-Friendly and Crowd-Pleasing: Despite the bold pickle flavor, this dish appeals to a wide range of palates. The tanginess isn't overwhelming—it's balanced and bright. Kids often love the crispy coating, while adults appreciate the sophisticated flavor combination. It's equally at home on a weeknight dinner table or as the centerpiece of a casual gathering.
Make-Ahead Friendly: You can brine the chicken a day ahead, or even bread the cutlets several hours before baking. This flexibility makes it perfect for busy schedules, allowing you to do the prep work when you have time and simply pop everything in the oven when you're ready to eat.
Breaking Down the Ingredients
The chicken breasts themselves are the foundation, and for this recipe, you'll want to either use thin-cut breasts or slice standard breasts horizontally to create cutlets. Thinner pieces cook more evenly and quickly, reducing the risk of dry, overcooked meat. They also provide a better ratio of crispy coating to tender chicken, which is exactly what we're after in this Crispy Dill Pickle Parmesan Chicken.
Dill pickle brine is the secret weapon here, and it's something you probably already have in your refrigerator. Don't throw away that jar liquid after finishing your pickles—it's liquid gold for cooking. The brine contains salt, vinegar, dill, and garlic, creating a complex marinade that does multiple jobs at once. Look for brine from good-quality dill pickles; the better the pickles, the better the flavor your chicken will have.
The dill pickles themselves, finely chopped, become part of the coating mixture. You'll want to pat them quite dry after chopping to prevent excess moisture from making your coating soggy. The pickles add textural interest and concentrated flavor that complements the subtler brine-marinated meat. They also create little caramelized bits as they bake, adding another layer of deliciousness.
Parmesan cheese must be freshly grated from a block—the pre-grated stuff in containers contains anti-caking agents that prevent it from adhering properly and melting into that beautiful golden crust. Freshly grated Parmesan has a stronger, more complex flavor and better texture. It brings savory umami notes that round out the bright acidity of the pickles.
Panko breadcrumbs are essential for achieving that signature crispiness. Unlike traditional breadcrumbs, panko crumbs are made from crustless bread and have a flakier, larger structure. This creates more surface area and air pockets, which translates to a lighter, crunchier coating that stays crispy longer. Regular breadcrumbs will work in a pinch, but the texture won't be quite as impressive.
Garlic powder and dried dill weed in the breading mixture amplify the pickle flavors and add aromatic depth. Fresh herbs can release too much moisture during baking, so dried dill works better here. The garlic powder provides savory warmth that ties all the flavors together without overwhelming the dish's bright, tangy character.
Eggs serve as the binding agent, creating a sticky layer that helps the breadcrumb mixture adhere to the brined chicken. Whisking a tablespoon of pickle brine into the eggs adds another subtle layer of flavor and helps the coating stick even better. Some recipes use buttermilk or milk, but eggs create a sturdier, crispier final coating.
All-purpose flour is the first layer in the breading station, and it's crucial for creating a dry surface that the egg can grip. Without this flour layer, the egg would slide right off the moist, brined chicken, taking the breadcrumb coating with it. A light, even dusting is all you need—too much creates a pasty layer that detracts from the crispy exterior.
The Cooking Process Explained
The journey to perfect Crispy Dill Pickle Parmesan Chicken begins with the brine. Place your chicken cutlets in a container or resealable bag and pour in enough pickle brine to cover them completely. Refrigerate for at least two hours, though four to six hours is ideal for maximum flavor and tenderness. You'll notice the chicken taking on a slightly firmer texture as the brine works its magic—this is exactly what you want. The salt and acid are restructuring the proteins, ensuring the meat stays juicy during cooking.
When you're ready to cook, set up your breading station with three shallow dishes: one with flour seasoned with a pinch of salt and pepper, one with beaten eggs mixed with a tablespoon of pickle brine, and one with the panko-Parmesan-pickle mixture. This assembly line approach makes the coating process efficient and mess-free. Pat your brined chicken dry with paper towels before starting—excess moisture will make the coating slide off rather than adhere properly.
The breading technique matters more than you might think. Dredge each cutlet in flour, shaking off excess so you have just a light, even coating. Then dip it in the egg mixture, letting excess drip off before pressing it firmly into the breadcrumb mixture. Really press those crumbs on, coating both sides thoroughly and patting to ensure good adhesion. For extra crispiness, you can even do a double coating: after the first breadcrumb layer, dip back in egg and coat with breadcrumbs again.
Baking on a wire rack set over a baking sheet is the secret to all-around crispiness. If you place the chicken directly on a baking sheet, the bottom steams and becomes soggy. The wire rack allows hot air to circulate completely around each piece, crisping every surface evenly. Lightly spray the rack with cooking oil to prevent sticking, then arrange your breaded chicken with a bit of space between pieces. A light mist of cooking spray over the tops helps them achieve that golden color.
The oven needs to be preheated to 425°F—hot enough to crisp the coating quickly while cooking the chicken through. Bake for 20 to 25 minutes, depending on the thickness of your cutlets, until the coating is deep golden brown and the internal temperature reaches 165°F. You'll know they're ready when the kitchen fills with the irresistible aroma of toasted Parmesan and the coating looks shatteringly crisp. Let them rest for five minutes before serving, which allows the juices to redistribute throughout the meat.
Mistakes to Avoid
Don't skip the brining step, even if you're short on time. The pickle brine is what makes this Crispy Dill Pickle Parmesan Chicken truly special, and without it, you're essentially making regular breaded chicken with a pickle-flavored coating. If you're really pressed for time, even 30 minutes in the brine will make a noticeable difference, though longer is always better. Plan ahead when possible and let that brine work overnight for the absolute best results.
Avoid using wet pickles in your coating mixture. After chopping your pickles, spread them on paper towels and press firmly to remove as much moisture as possible. Wet pickles will release liquid into your breadcrumb mixture, creating a coating that never crisps properly and may even fall off during baking. Some cooks even go so far as to briefly microwave chopped pickles on paper towels to dry them further—it's worth the extra step.
Don't place breaded chicken directly on the baking sheet. I can't stress this enough: the wire rack is essential, not optional. Without it, the bottoms of your chicken cutlets will steam in their own moisture, becoming soggy and pale while the tops crisp up. This creates an uneven texture that's disappointing after all your careful preparation. Invest in an oven-safe wire rack if you don't have one—you'll use it for countless recipes.
Resist the urge to flip the chicken halfway through baking. Unlike pan-frying, where flipping is necessary, oven-baking on a rack cooks the chicken evenly from all sides. Flipping risks damaging that beautiful crispy coating you've worked so hard to create. Trust the process and leave the chicken undisturbed until it's fully cooked. The only exception is if your oven has particularly uneven heat, in which case you might rotate the pan 180 degrees after 12 minutes.
Finally, don't use pre-grated Parmesan cheese from a container. Those products contain cellulose and other anti-caking agents that prevent proper melting and crisping. They also have significantly less flavor than freshly grated cheese. Take the extra three minutes to grate a block of real Parmesan—the difference in your final dish will be dramatic. Your Crispy Dill Pickle Parmesan Chicken deserves real cheese.
How to Serve This
The bright, tangy flavors of this chicken pair beautifully with simple, creamy sides that provide contrast. Garlic mashed potatoes are a classic choice, their buttery richness balancing the pickle's acidity. The creamy texture also complements the crispy coating nicely. For a lighter option, try roasted baby potatoes tossed with fresh dill and olive oil, which echo the pickle flavors without competing with them.
A crisp, fresh salad cuts through the richness perfectly. Consider a simple mixed green salad with a light vinaigrette, or go with a cucumber and tomato salad that plays into the pickle theme. The cool, crunchy vegetables provide textural contrast to the hot, crispy chicken. In warmer months, a chilled pasta salad with herbs and lemon dressing makes an excellent accompaniment for casual gatherings.
For a complete comfort meal, serve your Crispy Dill Pickle Parmesan Chicken alongside buttered egg noodles or creamy macaroni and cheese. The mild, rich pasta dishes let the chicken's bold flavors shine while providing satisfying substance. Steamed green beans or roasted asparagus add color and a fresh vegetable component that rounds out the plate.
Consider turning this into a sandwich for a fun variation. Serve the crispy cutlets on soft rolls or flatbread with lettuce, tomato, and a simple mayo-based sauce. It makes a fantastic handheld meal for casual weekend lunches or easy dinners. You could even slice the chicken and serve it over a grain bowl with quinoa, roasted vegetables, and a drizzle of garlic sauce for a healthier approach.
Make-Ahead and Storage Guide
This recipe is wonderfully suited to advance preparation, making busy weeknights much more manageable. You can marinate the chicken in pickle brine for up to 24 hours before cooking—in fact, longer marinating often produces even better results. Simply keep the chicken submerged in brine in the refrigerator until you're ready to bread and bake it. The meat will become increasingly tender and flavorful, though there's a point of diminishing returns after about eight hours.
You can also bread the chicken several hours ahead of baking. Arrange the breaded cutlets on a wire rack set over a baking sheet, cover loosely with plastic wrap, and refrigerate for up to four hours. This actually helps the coating adhere better as it dries slightly in the cold air. When you're ready to cook, simply remove the plastic, spray with cooking oil, and pop directly into the preheated oven. This strategy is perfect for entertaining, allowing you to do the messy work well before guests arrive.
Once cooked, Crispy Dill Pickle Parmesan Chicken keeps well in the refrigerator for three to four days. Store it in an airtight container, though be aware that the coating will soften somewhat during storage—this is unavoidable with any breaded food. To reheat and restore some crispiness, place the chicken on a wire rack set over a baking sheet and warm in a 375°F oven for about 10 minutes until heated through. Avoid microwaving, which will make the coating soggy and tough.
Freezing is absolutely possible and quite successful with this recipe. Freeze cooked chicken in a single layer on a baking sheet until solid, then transfer to freezer bags or containers, separating layers with parchment paper. Properly stored, it will maintain good quality for up to three months. Thaw overnight in the refrigerator before reheating in the oven as described above. The texture won't be quite as crispy as freshly made, but it's still delicious and far superior to most freezer-to-table options.
Reader Questions Answered
Can I use chicken thighs instead of breasts?
Absolutely! Boneless, skinless chicken thighs work wonderfully in this recipe and many people actually prefer them for their richer flavor and naturally juicy texture. The brining time remains the same, though thighs may need an extra 3 to 5 minutes in the oven due to their higher fat content and slightly thicker profile. Check that the internal temperature reaches 165°F before removing from the oven.
What if I don't have pickle brine?
If you've finished your pickles and discarded the brine, you can make a quick substitute by mixing 2 cups water with 3 tablespoons salt, 2 tablespoons white vinegar, 1 teaspoon dried dill, and 1 teaspoon garlic powder. While it won't have quite the depth of real pickle brine that's been aging with pickles, it will provide similar tenderizing and flavoring effects for your Crispy Dill Pickle Parmesan Chicken.
Can I make this recipe dairy-free?
Yes, with a simple substitution. Replace the Parmesan with nutritional yeast, which provides a similar savory, slightly nutty flavor without any dairy. You'll need about two-thirds of the amount of Parmesan called for, as nutritional yeast has a more concentrated flavor. The coating will still crisp up beautifully, though it won't have quite the same golden color or melted cheese pockets.
How do I know when the chicken is done without a thermometer?
While an instant-read thermometer is the most reliable method, you can check doneness by cutting into the thickest part of a cutlet. The meat should be opaque white throughout with no pink remaining, and the juices should run clear rather than pink or red. If you notice any translucent or pink areas, return the chicken to the oven for another 3 to 5 minutes and check again.
Can I prepare this in an air fryer?
Definitely! The air fryer actually produces exceptional results with breaded chicken. Preheat your air fryer to 400°F, lightly spray the basket with cooking oil, and arrange breaded cutlets in a single layer without overlapping. Cook for 10 to 12 minutes, flipping once halfway through, until golden and crispy. You may need to work in batches depending on your air fryer's size, but the results are worth it.
Is this recipe spicy or too tangy for kids?
This Crispy Dill Pickle Parmesan Chicken has a bright, tangy flavor but isn't spicy at all. Most children who enjoy pickles love this recipe, as the pickle flavor is balanced by the savory Parmesan and the coating adds fun crunchiness. If you're concerned about the tang level for particularly sensitive eaters, you can reduce the chopped pickles in the coating by half or use a milder pickle brine for marinating. The chicken will still be flavorful and delicious with these adjustments.
The Best Crispy Dill Pickle Parmesan Chicken
Tender chicken breasts marinated in dill pickle brine, coated in a crispy Parmesan-panko crust with chopped pickles, then baked to golden perfection. Tangy, savory, and incredibly juicy.
Prep Time
20 min
Cook Time
25 min
Total Time
2h 45m
Servings
4 servings
Ingredients
For 4 servings
- 4 boneless, skinless chicken breast cutlets (about 1.5 pounds total)
- 2 cups dill pickle brine (from a jar of dill pickles)
- 1 cup all-purpose flour
- 2 large eggs
- 1 tablespoon pickle brine (for egg mixture)
- 2 cups panko breadcrumbs
- 1 cup freshly grated Parmesan cheese
- 1/2 cup dill pickles, finely chopped and patted very dry
- 2 teaspoons dried dill weed
- 1 teaspoon garlic powder
- 1/2 teaspoon black pepper
- 1/2 teaspoon salt (divided)
- Cooking spray or olive oil spray
Instructions
- 1
Brine the chicken
Place chicken breast cutlets in a large resealable bag or shallow container. Pour 2 cups of dill pickle brine over the chicken, ensuring all pieces are completely submerged. Seal or cover and refrigerate for at least 2 hours, preferably 4 to 6 hours, turning occasionally. This step tenderizes the meat and infuses it with pickle flavor throughout.
- 2
Prepare baking setup
Preheat your oven to 425°F. Set a wire rack on top of a large rimmed baking sheet and lightly spray the rack with cooking spray to prevent sticking. This elevated setup allows hot air to circulate around the chicken, creating an evenly crispy coating on all sides.
- 3
Set up breading station
Prepare three shallow dishes for breading. In the first dish, combine flour with 1/4 teaspoon salt and 1/4 teaspoon black pepper. In the second dish, whisk together eggs and 1 tablespoon pickle brine until well combined. In the third dish, mix panko breadcrumbs, grated Parmesan cheese, finely chopped dried pickles, dried dill weed, garlic powder, remaining 1/4 teaspoon salt, and remaining 1/4 teaspoon black pepper.
- 4
Dry the chicken
Remove chicken from the pickle brine and pat each cutlet thoroughly dry with paper towels. Removing excess moisture is crucial for helping the coating adhere properly and achieve maximum crispiness. Discard the used brine.
- 5
Bread the chicken
Working with one cutlet at a time, dredge in the seasoned flour, coating both sides and shaking off excess. Dip into the egg mixture, allowing excess to drip back into the dish. Finally, press firmly into the breadcrumb mixture, coating both sides thoroughly and patting gently to ensure the crumbs adhere well. Place breaded cutlets on the prepared wire rack.
- 6
Prepare for baking
Once all chicken cutlets are breaded and arranged on the rack with slight space between each piece, lightly spray the tops with cooking spray. This helps the coating brown and crisp up beautifully during baking. Make sure the spray is even but not heavy.
- 7
Bake the chicken
Place the baking sheet in the preheated oven and bake for 20 to 25 minutes, until the coating is deep golden brown and crispy, and the internal temperature of the chicken reaches 165°F when checked with an instant-read thermometer. Avoid opening the oven door frequently, as this releases heat and can affect cooking time.
- 8
Rest and serve
Remove the chicken from the oven and let rest on the rack for 5 minutes before serving. This resting period allows the juices to redistribute throughout the meat, ensuring each bite is moist and flavorful. The coating will also set slightly, making it even crispier. Serve hot with your favorite sides.
Nutrition Facts
Per serving (estimated)
420 calories
Calories
32g
Carbs
45g
Protein
12g
Fat
2g
Fiber
980mg
Sodium
3g
Sugar


