
Super Cute Easter Desserts That Are Easy & Delicious
Discover adorable, easy-to-make spring desserts perfect for family gatherings. From bunny treats to floral sweets, these recipes delight all ages.
cookwithlucia.com/recipes/super-cute-easter-desserts
Wholesome Spring Desserts That Bring Joy to Every Gathering
When spring arrives with its gentle warmth and blooming gardens, our hearts naturally turn toward celebration and sweet treats that capture the season's playful spirit. Creating delightful desserts for family gatherings doesn't have to mean spending hours in the kitchen or mastering complicated techniques. The beauty of spring-inspired sweets lies in their simplicity and the joy they bring to both the maker and the recipient.
These adorable desserts transform ordinary ingredients into charming creations that make everyone smile. Picture pastel-colored treats decorated with fresh berries, coconut flakes shaped into fuzzy textures, and simple candies arranged to resemble spring garden creatures. The magic happens when you combine basic baking skills with a touch of creativity and food-safe decorations.
What makes these recipes truly special is their versatility and approachability. Whether you're an experienced baker or someone who rarely ventures beyond boxed mixes, you'll find options that suit your skill level and available time. From no-bake refrigerator treats to simple cupcakes transformed with clever frosting techniques, each dessert offers that perfect balance of impressive presentation and achievable execution. Let's explore how to bring these charming creations to life in your own kitchen.
Why These Spring Desserts Work for Every Skill Level
The genius of these charming spring treats lies in their foundation of familiar techniques elevated by creative presentation. Most recipes start with basic components you already know how to make: cupcakes, cookies, rice cereal treats, or simple buttercream frosting. The transformation happens through simple decorating techniques that anyone can master with a little patience and the right guidance.
These desserts succeed because they embrace the concept of assembly rather than complex baking chemistry. You're not tempering chocolate to precise temperatures or creating delicate pastry layers that require years of practice. Instead, you're combining reliable recipes with food coloring, shaped candies, and strategic piping techniques that turn ordinary sweets into extraordinary centerpieces.
The beauty of working with spring-themed desserts is the forgiving nature of the designs. If your bunny ears tilt slightly or your frosted flowers look more abstract than realistic, they still capture the whimsical spirit of the season. Children especially adore these treats regardless of technical perfection, and adults appreciate the thoughtfulness and creativity involved.
Another practical advantage is the make-ahead potential of most spring desserts. Many components can be baked, frozen, or prepared days in advance, leaving only the final assembly and decoration for the day of your gathering. This approach reduces stress and allows you to enjoy the creative process rather than rushing through it at the last minute.
The Essential Ingredient Lineup for Spring Dessert Magic
Creating adorable spring desserts begins with stocking your pantry with versatile basics that work across multiple recipes. All-purpose flour serves as the foundation for cookies, cupcakes, and simple cakes, while granulated sugar and butter create the structure and texture that make baked goods irresistible. These staples transform into countless variations with the addition of flavor extracts and food coloring.
Food coloring in pastel shades becomes your artistic palette for spring creations. Gel-based colors provide more vibrant and controllable results than liquid versions, allowing you to achieve those soft pinks, gentle yellows, mint greens, and sky blues that define spring aesthetics. A small investment in quality food coloring opens up endless decorating possibilities.
Vanilla extract and almond extract bring depth and complexity to simple batters and frostings. Vanilla provides that warm, familiar sweetness everyone loves, while a touch of almond extract adds sophisticated dimension without overwhelming other flavors. Together, they create desserts that taste as delightful as they look.
For decorating and assembly, mini marshmallows, shredded coconut, and various candies become your sculpting materials. Coconut can be tinted with food coloring to create grass, fur textures, or decorative borders. Jellybeans, chocolate eggs, and gummy candies serve as both embellishment and edible building blocks. Cream cheese and butter form the base of luxurious frostings that pipe beautifully and hold their shape while remaining soft and delicious.
Eggs and milk provide moisture and richness to your baked foundations, while baking powder and baking soda ensure proper rise and tender crumb structure. With these fundamental ingredients on hand, you're prepared to create an impressive array of spring desserts.
Creating Your Adorable Spring Treats Step by Step
The process of creating charming spring desserts begins with preparing your base components. Start by baking simple vanilla or chocolate cupcakes using your favorite recipe or a reliable box mix enhanced with an extra egg and melted butter for richness. While cupcakes cool completely on wire racks, you can prepare buttercream frosting by beating softened butter until fluffy, then gradually adding powdered sugar, vanilla extract, and a splash of milk until you achieve a smooth, pipeable consistency.
Divide your frosting into separate bowls and tint each with gel food coloring to create your spring palette. For bunny-themed treats, you might prepare white frosting, pink for inner ears and noses, and perhaps a touch of green for decorative grass. Work the coloring in gradually, adding tiny amounts until you reach your desired shade, remembering that colors often deepen slightly as frosting sits.
The assembly process becomes pure creative joy. Fit piping bags with different tips, star tips for textured fur effects and round tips for smooth surfaces and details. Pipe frosting onto cooled cupcakes, using reference images if needed for more complex designs. For bunny faces, pipe a generous swirl of white frosting, then use pink candies or small frosting dots for ears and nose. Mini chocolate chips create perfect eyes, while white frosting piped in whisker patterns completes the face.
For treats requiring shaped elements, like standing bunny ears or flower petals, you can create these separately using fondant, modeling chocolate, or even shaped cookies that insert into the main dessert. Allow these components to firm up before assembly to ensure they hold their positions. The final touches might include sprinkling colored sugar, arranging small candies, or dusting with edible shimmer for extra magic.
Customizing Spring Desserts for Different Dietary Needs
Adapting these adorable spring treats for various dietary requirements ensures everyone at your gathering can enjoy the sweetness and fun. For gluten-free needs, substitute all-purpose flour with a quality gluten-free baking blend that includes xanthan gum for proper structure. Most spring dessert designs work beautifully with gluten-free bases, as the decoration techniques remain identical regardless of the underlying cake or cookie composition.
Creating dairy-free versions requires replacing butter with plant-based alternatives and using non-dairy milk in both cakes and frostings. Coconut cream, whipped until fluffy, makes an excellent frosting base that holds decorative shapes when chilled. For egg-free baking, commercial egg replacers or flax eggs work well in most cupcake and cookie recipes, though you may need to adjust baking times slightly.
Reducing refined sugar while maintaining sweetness and structure presents more challenge but remains achievable. Consider using coconut sugar in place of granulated sugar for a lower glycemic option, though this will create a slightly darker color that affects pastel aesthetics. Alternatively, prepare fruit-based desserts like parfaits layered with naturally sweet berries, coconut cream, and granola, decorated to fit spring themes using shaped fruit cutouts and edible flowers.
For families with young children, consider making mini versions of larger desserts using small cupcake pans or cookie cutters. Smaller portions reduce sugar intake per serving while still delivering the full experience of adorable spring treats. You can also incorporate healthier ingredients like whole wheat flour, Greek yogurt, or fruit purees into base recipes without significantly affecting the final decorated appearance.
Meal Prep and Make-Ahead Strategies for Stress-Free Spring Celebrations
Successful spring dessert preparation relies heavily on understanding which components store well and which require last-minute attention. Unfrosted cupcakes and cookies freeze beautifully for up to three months when wrapped tightly in plastic wrap and stored in freezer-safe containers. Bake these bases weeks in advance, then thaw them overnight in the refrigerator before decorating day arrives.
Buttercream frosting also freezes exceptionally well and can be prepared up to two months ahead. Store it in airtight containers, removing as much air as possible to prevent freezer burn. When ready to use, thaw frosting in the refrigerator overnight, then bring it to room temperature and rewhip it briefly to restore its original fluffy texture and smooth consistency.
For optimal freshness and presentation, complete final assembly and decoration no more than one day before your gathering. Fully decorated cupcakes and cookies can be refrigerated in single layers on baking sheets, then carefully transferred to storage containers once decorations have firmed. Allow refrigerated desserts to come to room temperature for about thirty minutes before serving to ensure frosting softens to its ideal creamy texture.
Some spring desserts actually improve with advance preparation. No-bake treats like chocolate bark decorated with spring candies or refrigerator cakes with stabilized whipped cream layers benefit from several hours or overnight chilling. These options work perfectly when your schedule demands maximum advance preparation with minimal day-of assembly.
Organize your decorating station efficiently by preparing all frosting colors, filling piping bags, and arranging candies and embellishments in small bowls before you begin. This assembly-line approach allows you to decorate multiple treats quickly and maintains consistency across your finished desserts. Take photos of your first completed piece to reference as you work through the rest.
Serving Your Spring Desserts for Maximum Impact
Presentation transforms good desserts into memorable experiences that delight guests before they even take their first bite. Arrange your spring treats on tiered cake stands or serving platters lined with decorative paper doilies in coordinating colors. Create height variation by using stands of different sizes, and fill any gaps with fresh spring flowers, decorative eggs, or scattered candies that echo your dessert decorations.
Consider the flow of your dessert table by grouping similar items together while maintaining visual variety. Place taller items toward the back and shorter treats in front to ensure everything remains visible and accessible. Label each dessert with small tent cards if you've created multiple varieties, helping guests identify options that suit their preferences or dietary needs.
Timing your dessert service appropriately ensures everything tastes and looks its best. If serving outdoors during warm weather, keep desserts with delicate frosting refrigerated until just before presentation to prevent melting and sliding. For indoor gatherings, display desserts away from direct sunlight and heating sources that could compromise decorations.
Portion guidance helps guests feel comfortable taking appropriate amounts. For richly frosted cupcakes and elaborate decorated cookies, one per person typically suffices alongside other treats. Smaller bite-sized items like cake pops or mini cookies invite guests to sample two or three varieties. Provide small plates, napkins, and serving utensils to make self-service easy and tidy.
Frequently Asked Questions
How far in advance can I make spring desserts?
Unfrosted cakes and cookies freeze beautifully for up to three months, while buttercream frosting keeps frozen for two months. Complete final decoration no more than 24 hours before serving for optimal appearance and freshness. No-bake refrigerator desserts often benefit from overnight chilling and can be made one to two days ahead.
What's the easiest spring dessert for beginners?
Decorated sugar cookies offer the gentlest entry point for beginners since they're baked flat, eliminating concerns about cake structure or frosting stability. Use royal icing or buttercream to pipe simple designs, and embellish with candies and colored sugar for adorable results without advanced techniques.
How do I transport decorated desserts safely?
Invest in sturdy bakery boxes or plastic containers with secure lids and adequate height clearance. Place desserts in single layers with minimal space between items, and use non-slip shelf liner on the container bottom to prevent sliding. Keep containers level during transport and refrigerate immediately upon arrival if desserts contain perishable ingredients.
Can I make these desserts healthier without sacrificing cuteness?
Absolutely! The adorable appearance comes from decoration rather than specific ingredients. Substitute whole grain flours, reduce sugar by up to one-third, use Greek yogurt in place of some butter, and create fruit-based parfaits decorated with shaped fruit cutouts. The visual appeal remains intact while nutritional profiles improve.
What tools do I really need for decorating spring desserts?
Start with basic piping bags, three or four standard piping tips including round and star shapes, gel food coloring, offset spatulas for smoothing frosting, and toothpicks for detail work. These essentials cover most decorating techniques. As you gain confidence, expand your collection with specialty tips and tools for more intricate designs.
How do I fix frosting that's too soft to hold shapes?
Chill soft frosting in the refrigerator for 15-20 minutes to firm it up, or beat in additional powdered sugar one tablespoon at a time until you achieve the desired consistency. If frosting becomes too stiff, add milk one teaspoon at a time while mixing. Temperature and humidity significantly affect frosting consistency, so adjustments are normal and expected.
Advanced Decoration Techniques for Spring Dessert Excellence
Once you've mastered basic frosting and simple candy embellishments, expanding your decorating repertoire opens new creative possibilities. Learning to work with fondant allows you to create three-dimensional elements like bunny ears, flower petals, and decorative plaques that maintain their shape indefinitely. Fondant accepts food coloring readily and can be rolled thin for delicate details or shaped thick for structural elements.
Royal icing offers different advantages than buttercream, particularly for detailed piping work and decorations that need to dry completely hard. This egg white and powdered sugar mixture can be thinned to flooding consistency for smooth surfaces or kept thick for intricate piping. Royal icing decorations can be made weeks in advance and stored in airtight containers, then attached to desserts with a small amount of fresh frosting.
Airbrushing with food-safe colors creates professional-looking gradients and subtle color variations impossible to achieve with traditional methods. While airbrush equipment represents a larger investment, the ability to add dimensional shading to bunny fur, create sunset skies on cookie surfaces, or apply delicate color washes elevates your desserts dramatically.
Working with modeling chocolate combines the workability of fondant with the superior taste of chocolate. This mixture of melted chocolate and corn syrup can be colored, shaped, and molded into any form imaginable. It remains pliable at room temperature but firms nicely when chilled, making it ideal for creating standing elements and sculpted details.
Edible printing technology now allows home bakers to create custom decorations featuring any design imaginable. Print images onto edible paper using food-safe inks, then apply these decorations to cookies, cakes, or cupcakes with a thin layer of frosting. This technique works beautifully for incorporating specific spring garden imagery or creating matching designs across multiple desserts.
The Science Behind Perfect Spring Dessert Textures
Understanding basic baking science ensures your dessert foundations consistently deliver the texture and structure needed to support adorable decorations. The ratio of flour to fat to liquid determines whether your cake turns out dense and compact or light and tender. More fat creates tenderness by coating flour proteins and preventing excessive gluten development, while proper liquid ratios ensure adequate moisture without creating gummy textures.
Butter temperature significantly impacts both mixing success and final texture. Room temperature butter, around 65-68°F, creams properly with sugar, incorporating air that helps cakes rise and creates tender crumb. Too-cold butter won't cream adequately, while too-warm butter becomes greasy and fails to hold the air structure necessary for light cakes. Let butter sit at room temperature for about 45 minutes before beginning, or cut it into small pieces to speed softening.
Egg temperature matters equally, as cold eggs can cause butter to firm up again during mixing. Room temperature eggs also emulsify more effectively with other ingredients, creating more stable batters. If you forget to remove eggs from the refrigerator in advance, place them in a bowl of warm water for about five minutes to take off the chill.
Proper measuring techniques prevent the dry, crumbly cakes or dense, heavy results that come from flour measurement errors. Spoon flour into measuring cups and level with a knife rather than scooping directly from the bag, which compacts flour and leads to using too much. Better yet, weigh flour using a kitchen scale for perfect consistency every time.
Baking temperature and time work together to set structure while developing flavor through Maillard reactions. Too high heat creates burnt exteriors with raw centers, while too low heat produces pale, dense results. Oven thermometers ensure your actual baking temperature matches the dial setting, eliminating one of the most common sources of baking frustration.
Creating Stunning Spring Dessert Photography for Memories
Capturing beautiful images of your adorable spring desserts preserves memories and allows you to share your creations with distant family and friends. Natural light provides the most flattering illumination for food photography, creating soft shadows and true colors that artificial light struggles to replicate. Position your desserts near a large window, ideally during morning or late afternoon when light is warm and gentle rather than harsh midday sun.
Background selection dramatically affects the overall impression of your dessert photos. Simple, neutral backgrounds prevent visual competition with your star subjects, allowing decorative details to shine. White marble, light wood cutting boards, or solid-colored tablecloths work beautifully. Incorporate subtle spring elements like fresh flowers, pastel linens, or scattered candy eggs to reinforce seasonal themes without overwhelming the composition.
Photograph from multiple angles to discover the most flattering perspective for each dessert type. Overhead shots work wonderfully for arrangements of multiple cookies or cupcakes, showing pattern and variety. Slight angles reveal dimension and decorative details, while straight-on shots at dessert height create intimate, engaging images that draw viewers into the scene.
Styling with props adds context and visual interest without detracting from your desserts. Small forks, decorative napkins, vintage serving pieces, or scattered ingredients like fresh berries create story and atmosphere. Keep props supporting rather than competing, ensuring your adorable spring treats remain the undisputed focal point.
Basic photo editing enhances images without creating artificial-looking results. Adjust brightness and contrast to ensure your photos look vibrant and appetizing. Slightly increase saturation to make pastel colors pop, but avoid over-editing that creates unrealistic hues. Crop tightly to eliminate distracting elements and draw focus to the most beautiful aspects of your creations.
Building Your Spring Dessert Decorating Confidence
Developing decorating skills follows the same path as learning any craft—start simple, practice consistently, and gradually increase complexity as confidence builds. Your first attempts at piping buttercream bunnies may look more abstract than adorable, and that's perfectly normal. The joy comes from the creative process itself and the smiles these treats bring regardless of technical perfection.
Set realistic expectations by acknowledging that professional bakers create stunning desserts after years of daily practice. Your homemade creations carry love and personal effort that no bakery purchase can match. Family and friends appreciate the thoughtfulness and creativity involved far more than they critique minor imperfections in piping technique.
Practice decorating techniques on parchment paper before working on actual desserts. Pipe frosting patterns, experiment with color mixing, and test consistency without the pressure of potentially ruining a finished cake. This low-stakes practice builds muscle memory and confidence before you work on desserts destined for your gathering table.
Seek inspiration from various sources, but resist the urge to replicate impossibly complex designs that require professional training and specialized equipment. Instead, identify elements you find appealing—a particular color combination, a simple but effective decorating technique, or a clever use of candy embellishments—and adapt these ideas to match your skill level.
Celebrate your progress by photographing your creations over time. Looking back at earlier attempts reveals how much your skills have improved, providing motivation to continue developing your decorating abilities. Each dessert you create teaches valuable lessons about what works, what doesn't, and how to approach the next project more effectively.
Spring Flavor Combinations That Elevate Simple Desserts
While adorable decorations capture attention initially, exceptional flavor keeps guests reaching for seconds. Spring desserts shine when they incorporate seasonal flavors that taste as fresh and delightful as they look. Lemon and vanilla create a classic combination that feels light and refreshing, perfect for outdoor gatherings as weather warms.
Fresh berries—strawberries, raspberries, and blueberries—provide natural sweetness and vibrant color while adding nutritional value to your desserts. Fold berries into cake batters, layer them into parfaits, or use them as fresh garnishes that double as decoration. Their natural tartness balances rich frosting and provides complexity beyond simple sweetness.
Almond and cherry pairing evokes spring gardens in bloom, with almond's subtle nuttiness complementing cherry's bright fruit flavor. Add almond extract to buttercream or use almond flour in cookie bases for sophisticated depth. Top desserts with fresh or dried cherries for beautiful pops of deep red that contrast gorgeously with pastel decorations.
Coconut brings tropical brightness to spring treats while serving decorative purposes when shredded and tinted to resemble grass or bunny fur. Coconut milk creates rich, dairy-free frosting and cake bases, while coconut extract adds intense flavor with just a few drops. Toast coconut flakes for deeper, more complex flavor and appealing golden color.
Floral flavors like rosewater and orange blossom water transport desserts to fragrant spring gardens. Use these potent extracts sparingly—just a quarter teaspoon can perfume an entire batch of frosting or cake batter. Pair floral notes with vanilla or almond to create sophisticated flavor profiles that surprise and delight adult palates while remaining approachable for younger guests.
Troubleshooting Common Spring Dessert Decoration Challenges
Even experienced bakers encounter decorating obstacles, and knowing how to address common issues saves time and frustration. When frosting tears cake surfaces during application, your cake may be too fresh and tender. Allow cakes to cool completely and consider refrigerating them for an hour before frosting. A thin crumb coat of frosting, chilled until firm, prevents crumbs from mixing into your final decorative layer.
Food coloring that produces muddy or unexpected colors often results from starting with non-white bases or mixing too many colors together. Begin with pure white frosting or fondant for truest pastel results. If you need specific colors like purple or green, add colors separately in the proper ratio—red and blue for purple, yellow and blue for green—rather than trying to correct an existing mixture.
Piping bags that burst or leak create frustrating messes during decoration. Prevent this by avoiding overfilling bags beyond the halfway point and twisting the top firmly closed as you work. Hold bags at the twisted point rather than squeezing from the middle. Double-bag when working with particularly thick frosting or for extended decorating sessions.
Decorations that slide, droop, or fall off signal frosting that's too warm or soft. Refrigerate decorated desserts for fifteen minutes to firm up frosting, which helps elements hold their positions. For particularly humid environments, add a bit more powdered sugar to frosting recipes to increase stability, or consider using royal icing for elements that need to stand upright.
Colors that fade or change after decorating indicate reactions between acidic ingredients and certain food dyes. This commonly affects red and pink shades, which can shift toward blue. Use gel colors specifically labeled as stable in buttercream, and add colors shortly before decorating rather than letting tinted frosting sit overnight.
Creating Lasting Spring Gathering Traditions Through Desserts
Establishing traditions around creating adorable spring desserts builds anticipation and creates treasured memories that family members carry forward. Designating a dessert-decorating day where family members gather to create treats together transforms baking from solitary task into joyful communal activity. Assign each person different elements to decorate or compete friendly contests for most creative design.
Involving children in dessert preparation teaches valuable skills while creating opportunities for connection and conversation. Young children can help measure ingredients, mix batters, and select candies for decoration. Older children handle more complex tasks like piping frosting or following multi-step recipes independently. The skills learned and confidence built through baking extend far beyond the kitchen.
Documenting your spring dessert creations year after year reveals how skills develop and family dynamics evolve. Create a special album or digital folder dedicated to these dessert photos, adding new images each season. Looking back through previous years becomes its own tradition, prompting stories and laughter about memorable successes and spectacular failures alike.
Sharing your desserts extends joy beyond your immediate family. Prepare extra treats to deliver to neighbors, teachers, or community members who might appreciate a sweet surprise. This generosity strengthens community bonds and models kindness for younger family members, showing how food creates connection and brings happiness to others.
The time invested in creating adorable spring desserts yields returns far exceeding the simple pleasure of eating sweets. These activities create space for conversation, laughter, and cooperation in our busy lives. The desserts themselves become vessels for love and care, tangible expressions of the effort we invest in celebrating life's sweet moments together.
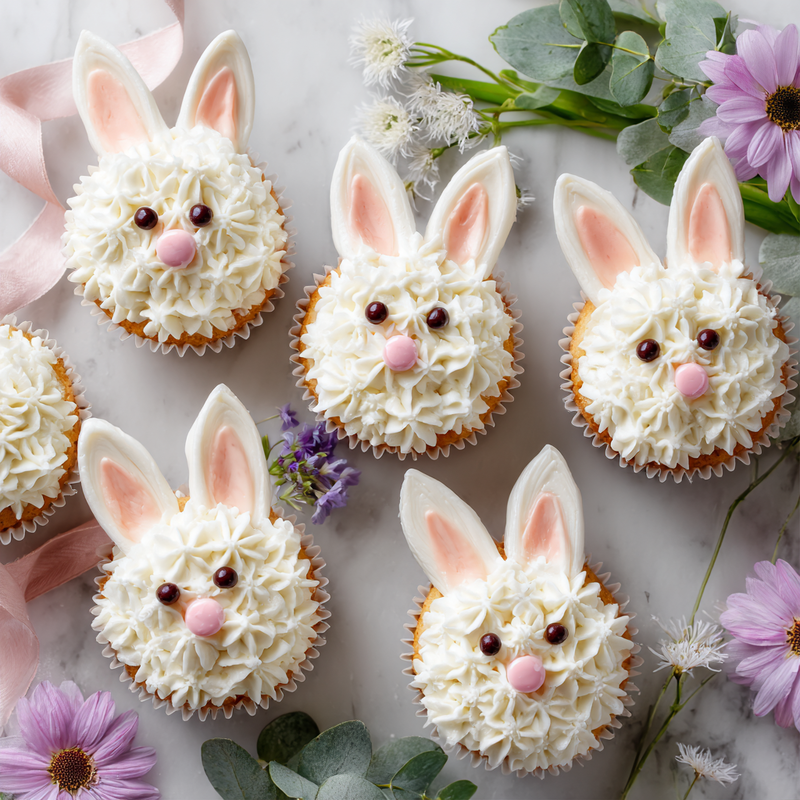
Spring Bunny Cupcakes
Adorable vanilla cupcakes decorated with fluffy buttercream frosting, shaped and colored to resemble charming spring bunnies with pink ears and sweet faces.
Prep Time
30 min
Cook Time
20 min
Total Time
50 min
Servings
12 cupcakes
Ingredients
For 12 cupcakes
- 1 and 1/2 cups all-purpose flour
- 1 and 1/2 teaspoons baking powder
- 1/4 teaspoon salt
- 1/2 cup unsalted butter, softened to room temperature
- 3/4 cup granulated sugar
- 2 large eggs, at room temperature
- 2 teaspoons pure vanilla extract
- 1/2 cup whole milk, at room temperature
- 1 cup unsalted butter, softened for frosting
- 4 cups powdered sugar, sifted
- 3 tablespoons whole milk for frosting
- 1 teaspoon vanilla extract for frosting
- Pink gel food coloring
- 24 mini marshmallows for ears
- 12 pink jellybeans for noses
- 24 mini chocolate chips for eyes
- Shredded coconut, optional for texture
Instructions
- 1
Prepare baking essentials
Preheat your oven to 350°F (175°C) and line a 12-cup muffin tin with paper cupcake liners. Bring eggs and milk to room temperature by letting them sit on the counter for 30 minutes, which ensures even mixing and optimal texture.
- 2
Combine dry ingredients
In a medium bowl, whisk together flour, baking powder, and salt until thoroughly combined. This distributes the leavening agents evenly throughout the flour, ensuring your cupcakes rise uniformly.
- 3
Cream butter and sugar
In a large mixing bowl, beat softened butter and granulated sugar together using an electric mixer on medium-high speed for 3-4 minutes until light and fluffy. This creaming process incorporates air that helps cupcakes achieve a tender, light texture.
- 4
Add eggs and vanilla
Add eggs one at a time to the butter mixture, beating well after each addition until fully incorporated. Mix in vanilla extract. The mixture should look smooth and slightly increased in volume.
- 5
Alternate dry and wet
Add the flour mixture in three additions, alternating with the milk in two additions, beginning and ending with flour. Mix on low speed just until combined after each addition, being careful not to overmix which can create tough cupcakes.
- 6
Bake the cupcakes
Divide batter evenly among prepared cupcake liners, filling each about two-thirds full. Bake for 18-20 minutes until a toothpick inserted in the center comes out clean. Cool in the pan for 5 minutes, then transfer to a wire rack to cool completely before decorating.
- 7
Make buttercream frosting
Beat softened butter in a large bowl with an electric mixer until creamy and smooth, about 2 minutes. Gradually add powdered sugar one cup at a time, alternating with milk, beating on low speed until combined, then increase to high speed and beat for 3 minutes until light and fluffy.
- 8
Color and prepare frosting
Reserve 1/4 cup of white frosting for details. Divide remaining frosting into two portions: leave one white for the bunny body, and tint the other pale pink with gel food coloring for inner ears. Transfer white frosting to a piping bag fitted with a star tip for textured fur effect.
- 9
Create bunny faces
Pipe white frosting in a circular swirl covering the entire top of each cooled cupcake, creating a fluffy texture. Cut mini marshmallows in half diagonally and dip the cut sides in pink frosting to create inner ear details, then press two halves onto the top of each cupcake for ears.
- 10
Add facial features
Press a pink jellybean into the center lower portion of each cupcake for the nose. Position two mini chocolate chips above the nose for eyes. Use white frosting in a small piping bag with a round tip to add three small dots on each side of the nose for whiskers, completing your adorable bunny face.
Nutrition Facts
Per serving (estimated)
385 calories
Calories
52g
Carbs
3g
Protein
19g
Fat
1g
Fiber
125mg
Sodium
41g
Sugar


