
Stuffed Onions (Onion Dolma) Recipe Guide
Learn to make impressive stuffed onions (onion dolma) with seasoned rice and meat filling. This showstopping dish is easier than it looks!
cookwithlucia.com/recipes/stuffed-onions-onion-dolma
There's something almost magical about the moment you bring a platter of golden, glistening stuffed onions to the table. The outer layers have softened to butter-tender perfection, their edges caramelized to a beautiful amber hue. Steam rises from the dish, carrying with it the most intoxicating aroma—sweet onion, fragrant spices, and savory meat all mingling together. Your guests lean forward, curiosity lighting up their faces as they try to understand what they're looking at. These aren't ordinary onions anymore; they've been transformed into elegant vessels holding a treasure of seasoned rice and spiced meat. Someone inevitably reaches for their phone because this is the kind of dish that demands to be photographed. And here's the beautiful secret: while stuffed onions (onion dolma) look like something that requires professional culinary training, they're actually quite achievable for the home cook. Yes, there's a bit of patience involved in the preparation, but the technique itself is straightforward. Once you understand the basic process of separating those onion layers and filling them, you'll find yourself making this impressive dish again and again for family gatherings and special dinners. The reward—both in flavor and in the delighted reactions of everyone at your table—is absolutely worth every minute.
What Makes This a Showstopper
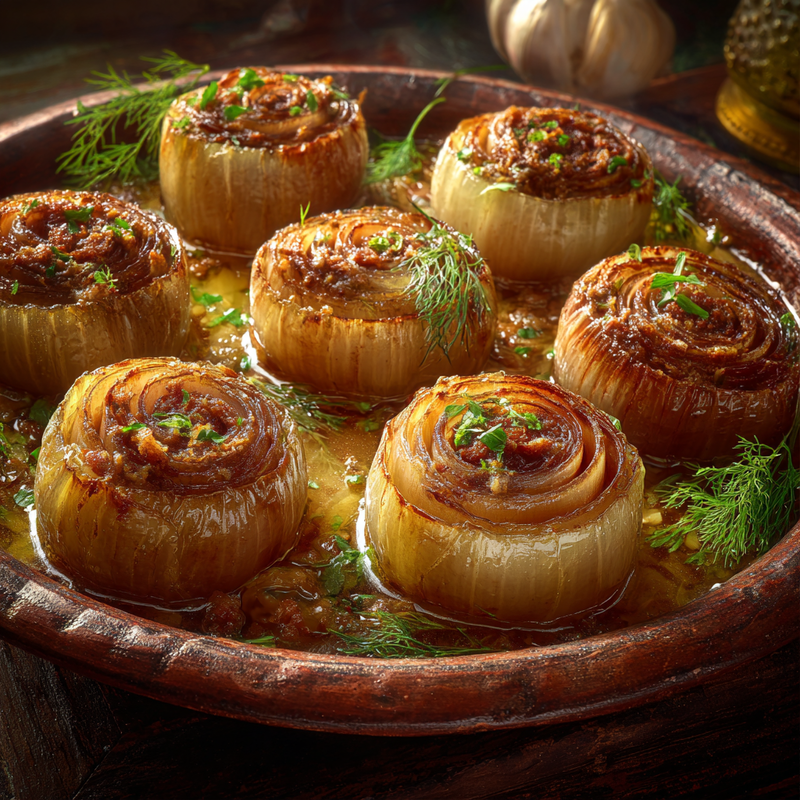
The visual impact of onion dolma is undeniable. Unlike traditional stuffed vegetables where the filling is hidden inside a pepper or tomato, these beauties showcase their layers in the most elegant way. When you slice through a stuffed onion, you reveal concentric rings of tender onion embracing the aromatic filling, creating a cross-section that's genuinely stunning. The colors are gorgeous too—the translucent white and gold of the cooked onion against the darker, spice-flecked filling creates a natural contrast that needs no fancy plating to shine.
But this dish isn't just about looks. The flavor experience is something truly special. That first bite gives you the sweetness of slow-cooked onion, which has lost all its harsh bite and developed an almost caramel-like quality. Then you hit the filling: tender rice that's absorbed all the cooking liquid, ground meat seasoned with warm spices, perhaps a hint of tomato and the brightness of fresh herbs. The textures play beautifully together—the silky onion, the fluffy rice, the tender meat all combining in your mouth.
What makes stuffed onions particularly impressive is that they deliver restaurant-quality sophistication without requiring professional techniques. You're not tempering chocolate or making complicated sauces or attempting delicate pastry work. You're simply boiling onions, separating their layers, filling them with a well-seasoned mixture, and letting them simmer until tender. It's approachable cooking that yields spectacular results. This is the kind of dish you'd happily pay a premium for at a Middle Eastern or Mediterranean restaurant, yet here you are, pulling it off in your own kitchen.
The Ingredients That Matter Most
The foundation of exceptional onion dolma starts with the onions themselves, and size matters here. You want large, firm yellow or white onions—the bigger, the better. Large onions give you more usable layers to work with, and their natural sweetness intensifies beautifully during cooking. Look for onions that feel heavy for their size with tight, papery skins and no soft spots. This is not the place for small cooking onions or red onions, which can be too sharp or fall apart too easily.
Your rice choice significantly impacts the final texture of your stuffed onions. Medium-grain rice works beautifully because it becomes tender without turning mushy, and it holds together nicely within the onion layers. You'll use it partially cooked or even raw in the filling, as it will finish cooking in the simmering liquid, absorbing all those wonderful flavors. Some cooks prefer short-grain rice for a stickier result that's easier to handle, while others love long-grain for distinct, separate grains.
The ground meat—typically beef or lamb—should have a moderate fat content. Too lean and your filling will be dry; too fatty and it becomes greasy. Around fifteen to twenty percent fat is ideal. The meat provides richness and body to the filling, and as it cooks, its juices mingle with the rice and spices to create something truly delicious. Fresh herbs like parsley, mint, and dill add brightness that cuts through the richness, while spices like cumin, allspice, and black pepper provide warmth and depth.
Tomato paste is your flavor amplifier here. Just a few tablespoons stirred into the filling adds umami depth and a subtle sweetness that complements the onions beautifully. For the cooking liquid, a good quality broth makes all the difference—it's what the rice absorbs and what creates the sauce. Don't skimp on this element; use homemade if you have it, or choose a high-quality store-bought option.
Building It Step by Step
Creating onion dolma is a process that unfolds in distinct stages, each one bringing you closer to that spectacular final dish. The first stage is preparing the onions themselves, which is admittedly the most time-consuming part but becomes easier with practice. You'll start by cutting off the root end and peeling away the papery outer skin. Then comes the clever part: you'll gently boil the whole onions until they're just soft enough that the layers begin to separate but still hold their shape. This usually takes ten to fifteen minutes, depending on size.
Once cooled enough to handle, you'll carefully peel away the layers one by one, creating individual "cups" for your filling. The outer layers will be larger and can hold more filling, while the inner layers might be combined or used for smaller portions. This is where patience pays off—rushing this step can lead to torn layers. Don't worry if you tear a few; even experienced cooks do, and those pieces can be used to line the bottom of your cooking pot.
The second stage involves preparing your filling, which comes together quickly. You'll combine partially cooked or rinsed raw rice with seasoned ground meat, finely chopped herbs, tomato paste, and spices. The mixture should be moist but not wet, well-seasoned because this is your chance to build flavor. Mix it thoroughly with your hands—this is the best way to ensure everything is evenly distributed. At this point, you can taste a tiny bit of the mixture to check seasoning, adjusting salt and spices as needed.
Now comes the fun part: filling those onion layers. Take a layer in your palm, place a tablespoon or two of filling (depending on the size of the layer) near one end, and roll it up like a small package. Some cooks prefer to fold the sides in like a burrito; others simply roll. Place each stuffed onion seam-side down in your pot. The final stage is the cooking: you'll arrange your stuffed onions snugly in a heavy pot, pour over your seasoned broth or cooking liquid, weight them down with a plate to keep them submerged, and let them simmer gently for forty-five minutes to an hour. The rice finishes cooking, the meat becomes tender, and those onion layers become meltingly soft, absorbing all the delicious flavors around them.
Presentation and Plating Tips
The beauty of stuffed onions lies in their natural elegance, so your plating doesn't need to be complicated to be impressive. I love serving them on a large, shallow platter where guests can see all the beautiful rolls arranged together. The golden color of the cooked onions creates its own visual appeal, especially when you spoon some of that cooking liquid over the top, making them glisten under the light.
For garnishing, simplicity wins. A generous sprinkle of fresh chopped parsley or dill over the platter adds a pop of green that makes the colors sing. Some cooks like to add a few lemon wedges around the edges—not just for looks, but because a squeeze of fresh lemon juice over your portion brightens all the flavors beautifully. If you want to add richness, a small drizzle of high-quality olive oil over the arranged stuffed onions creates an appetizing sheen.
Consider your serving vessel carefully. A beautiful ceramic baking dish that goes from oven to table works wonderfully if you've finished your onion dolma in the oven. A traditional wide, shallow serving platter lets you arrange them in a single layer, which is ideal for showing off their shape. For a more rustic, family-style presentation, you can serve them right from the pot they cooked in, as long as it's presentable. Individual plating works beautifully too—arrange two or three stuffed onions on each plate, spoon over some sauce, and add your herbs. This approach is perfect when you want to make each serving feel special and restaurant-worthy.
Scaling Up for a Crowd
One of the wonderful things about onion dolma is how well it scales up for feeding a large group. The recipe doubles or triples quite easily—you're simply preparing more onion layers and more filling, using the same techniques. The key consideration when cooking for a crowd is your pot size. You'll need a vessel large enough to hold all your stuffed onions in no more than two layers, or you may need to use two separate pots. Plan on three to four stuffed onion rolls per person as a main course, or two as part of a larger spread.
Advance preparation becomes your best friend when serving a crowd. The entire dish can be assembled up to one day ahead, which is a tremendous advantage. Simply prepare your onion layers and filling, roll them all up, and arrange them in your cooking pot. Cover tightly and refrigerate until about ninety minutes before you want to serve. Add your cooking liquid, bring to a gentle boil, then reduce to a simmer and cook as usual. They'll take an extra ten minutes or so to come to temperature from cold, but otherwise, the process is identical.
For even more advance work, you can prepare and boil your onions up to two days ahead, keeping the separated layers in a covered container in the refrigerator. The filling can also be made a day ahead and refrigerated. This means on the day of your gathering, you're simply assembling and cooking—the time-consuming prep work is already behind you. If you're really organized, you can even fully cook the stuffed onions, refrigerate them in their cooking liquid, and gently reheat them before serving. They actually benefit from this treatment, as the flavors have more time to meld together.
Storing Any Leftovers
Stuffed onions store remarkably well, which is fortunate because they're delicious the next day—some would argue even better. Allow them to cool completely in their cooking liquid, then transfer to an airtight container along with enough of that liquid to keep them moist. They'll keep in the refrigerator for up to four days. The onion layers continue to absorb the flavors of the cooking liquid as they sit, deepening and mellowing over time.
Reheating requires a gentle approach to preserve the texture. The microwave works in a pinch—place your portion in a microwave-safe dish, add a splash of the cooking liquid or water, cover loosely, and heat in thirty-second intervals until warmed through. But for better results, reheat them on the stovetop. Place them in a pot with some of their cooking liquid, cover, and warm over low heat for ten to fifteen minutes. This method keeps them moist and restores their texture beautifully.
Freezing is absolutely possible and extends your enjoyment of this dish for up to three months. The best method is to freeze them in their cooking liquid in a freezer-safe container. This protects them from freezer burn and helps maintain their texture. Thaw overnight in the refrigerator, then reheat gently on the stovetop. While the onion layers may be slightly softer after freezing, the flavor remains excellent, making this a wonderful make-ahead option for future meals.
Variations to Explore
Once you've mastered the basic technique for stuffed onions, a world of variations opens up. A vegetarian version is wonderfully satisfying—replace the meat with finely chopped mushrooms, walnuts, or cooked lentils. The mushrooms add an earthy, meaty quality, while walnuts provide richness and texture. Season these generously, as you'll need to compensate for the absence of meat's natural savoriness. Add extra herbs, perhaps some ground coriander, and a bit more tomato paste for depth.
For a richer, more luxurious version, try mixing ground lamb with a handful of toasted pine nuts and dried currants or chopped dried apricots. The sweet-savory combination is traditional in many Middle Eastern cuisines and creates a more complex flavor profile. The fruit adds little bursts of sweetness that contrast beautifully with the savory meat and spices.
A simpler weeknight version uses pre-cooked rice mixed with leftover cooked meat or even canned tuna, which sounds unconventional but is actually delicious. This approach cuts your cooking time significantly since you're just warming everything through rather than cooking raw ingredients. The onion layers still need their initial boiling, but the final simmer can be shortened to twenty minutes.
Mini versions make impressive appetizers. Use small onions or even large shallots, fill them with your mixture, and create bite-sized portions that are perfect for passing at gatherings. They cook faster—about thirty minutes—and look absolutely adorable. For seasonal variation, add finely diced butternut squash to your autumn and winter fillings, or incorporate fresh tomatoes and extra herbs in summer for a lighter, brighter version of this classic dish.
Questions You Might Have
Can I prepare stuffed onions completely ahead of time?
Absolutely, and they're actually one of the best dishes for advance preparation. You can assemble them completely up to twenty-four hours before cooking, keeping them covered and refrigerated in their cooking pot. Alternatively, cook them entirely, let them cool in their liquid, and reheat gently before serving. Many cooks find the flavors even better the next day as everything has had time to meld together.
What if my onion layers tear during preparation?
Don't worry at all—this happens to everyone, even experienced cooks. Torn or damaged layers can be used to line the bottom of your cooking pot, which actually serves a purpose by preventing the stuffed onions from sticking. You can also use torn pieces to patch other layers or simply chop them and add them to the filling for extra onion flavor. The beauty of this dish is that it's quite forgiving.
Can I use a different type of onion?
Yellow onions are traditional and ideal because of their size, structure, and balanced sweetness. White onions work well too. I'd avoid red onions as they can become oddly colored and too sharp in flavor. Sweet onions like Vidalia can work but may become overly soft, so handle them extra gently. The key is choosing large, firm onions with multiple substantial layers.
How do I know when the stuffed onions are fully cooked?
Your onion dolma is ready when the onion layers are completely tender and nearly translucent, the rice is fully cooked and fluffy, and the meat is cooked through. This typically takes forty-five minutes to an hour of gentle simmering. You can test by carefully opening one roll to check the rice texture. The cooking liquid should be mostly absorbed, with just enough remaining to keep everything moist.
Can I transport these to a gathering?
Stuffed onions travel quite well, making them perfect for potlucks or bringing to family gatherings. Cook them completely, then transport them in their cooking pot with the lid secured. If possible, keep them warm in an insulated carrier. They can sit at room temperature for up to two hours safely, and they're actually delicious served at room temperature, so timing isn't critical. Just give them a gentle stir before serving to redistribute the cooking liquid.
What should I serve alongside onion dolma?
These stuffed onions are rich and satisfying enough to be a main course, but they pair beautifully with lighter sides. A crisp salad with lemon dressing cuts through the richness perfectly. Yogurt-based sauces or a simple cucumber and herb salad add refreshing contrast. For a heartier meal, serve them alongside roasted vegetables or a grain salad. Warm flatbread is wonderful for soaking up the delicious cooking liquid that pools around the stuffed onions.
Stuffed Onions (Onion Dolma)
Tender onion layers filled with seasoned rice and ground meat, simmered in aromatic broth until meltingly soft. A showstopping dish that's impressive yet achievable.
Prep Time
45 min
Cook Time
60 min
Total Time
1h 45m
Servings
6 servings
Ingredients
For 6 servings
- 6 large yellow onions
- 1 pound ground beef or lamb
- 1 cup medium-grain rice, rinsed and drained
- 3 tablespoons tomato paste
- 1/2 cup fresh parsley, finely chopped
- 1/4 cup fresh mint, finely chopped
- 2 tablespoons fresh dill, finely chopped
- 1 teaspoon ground cumin
- 1 teaspoon ground allspice
- 1 teaspoon salt, plus more for boiling water
- 1/2 teaspoon black pepper
- 1/4 teaspoon cayenne pepper (optional)
- 3 cups beef or chicken broth
- 2 tablespoons olive oil
- 2 tablespoons lemon juice
- 2 cloves garlic, minced
Instructions
- 1
Prepare the onions
Cut off the root end of each onion and peel away the papery outer skin. Bring a large pot of salted water to a boil. Add the whole onions and boil for 10-15 minutes until the layers begin to soften and separate but the onions still hold their shape. Remove from water and let cool until safe to handle.
- 2
Separate onion layers
Once cooled, carefully separate the onion layers one by one, creating individual cups. Start from the outer layers and work your way in. Handle gently to avoid tearing. Set aside all usable layers. Reserve any torn pieces to line the bottom of your cooking pot.
- 3
Prepare the filling
In a large bowl, combine the ground meat, rinsed rice, tomato paste, chopped parsley, mint, dill, cumin, allspice, salt, black pepper, cayenne if using, minced garlic, and 1 tablespoon of olive oil. Mix thoroughly with your hands until all ingredients are evenly distributed. The mixture should be moist and well-seasoned.
- 4
Stuff the onion layers
Take an onion layer in your palm and place 1-2 tablespoons of filling near one end, depending on the size of the layer. Roll up the onion layer around the filling, tucking in the sides if possible. Place seam-side down in a heavy-bottomed pot. Repeat with remaining layers and filling, arranging them snugly in the pot.
- 5
Add cooking liquid
In a separate bowl, mix the broth with lemon juice and remaining tablespoon of olive oil. Pour this mixture over the stuffed onions until they are nearly covered. Place any torn onion pieces on top, then cover with an inverted heatproof plate to keep the stuffed onions submerged during cooking.
- 6
Simmer the dolma
Bring the pot to a boil over medium-high heat, then reduce to low. Cover the pot with a lid and simmer gently for 45-60 minutes, until the onions are completely tender, the rice is fully cooked, and the meat is cooked through. Check occasionally to ensure there's enough liquid, adding a bit more broth if needed.
- 7
Rest and serve
Remove from heat and let the stuffed onions rest in the pot for 10 minutes. This allows the flavors to settle and makes them easier to transfer. Carefully remove the plate and arrange the stuffed onions on a serving platter. Spoon some of the cooking liquid over the top and garnish with fresh herbs. Serve warm with lemon wedges on the side.
Nutrition Facts
Per serving (estimated)
385 calories
Calories
42g
Carbs
22g
Protein
14g
Fat
4g
Fiber
680mg
Sodium
9g
Sugar


