Sourdough Discard Pretzel Bites Recipe | Easy & Delicious
Transform your sourdough starter discard into golden, chewy pretzel bites. Professional results with simple techniques. Perfect for gatherings!
cookwithlucia.com/recipes/sourdough-discard-pretzel-bites-what-to-make-with-my-sourdough-starter
Picture this: you walk into the room carrying a platter piled high with golden-brown, salt-crusted pretzel bites, steam still rising from their beautifully bronzed surfaces. The room goes quiet for just a moment before everyone leans in, drawn by that unmistakable aroma of fresh-baked pretzels—you know, that scent that makes you weak in the knees at the mall or ballpark. Someone inevitably pulls out their phone because these sourdough discard pretzel bites look like they came from an artisan bakery, not your home kitchen. And here's the beautiful secret I'm going to share with you today: these are shockingly easy to make, and they're the perfect solution for that sourdough starter discard you've been feeling guilty about tossing down the drain.
I absolutely love recipes that make me feel like a culinary genius without actually requiring professional skills, and these pretzel bites deliver on that promise every single time. The signature pretzel crust—that deep mahogany color with its distinct chew—comes from a simple baking soda bath that takes less than a minute per batch. The sourdough discard adds a subtle tang that elevates these beyond ordinary soft pretzels, giving them a complexity that has people asking what your secret is. Whether you're looking for an impressive appetizer for your next gathering or simply want to transform your weekly sourdough discard into something your family will devour, this recipe is about to become your new favorite.

What Makes This a Showstopper
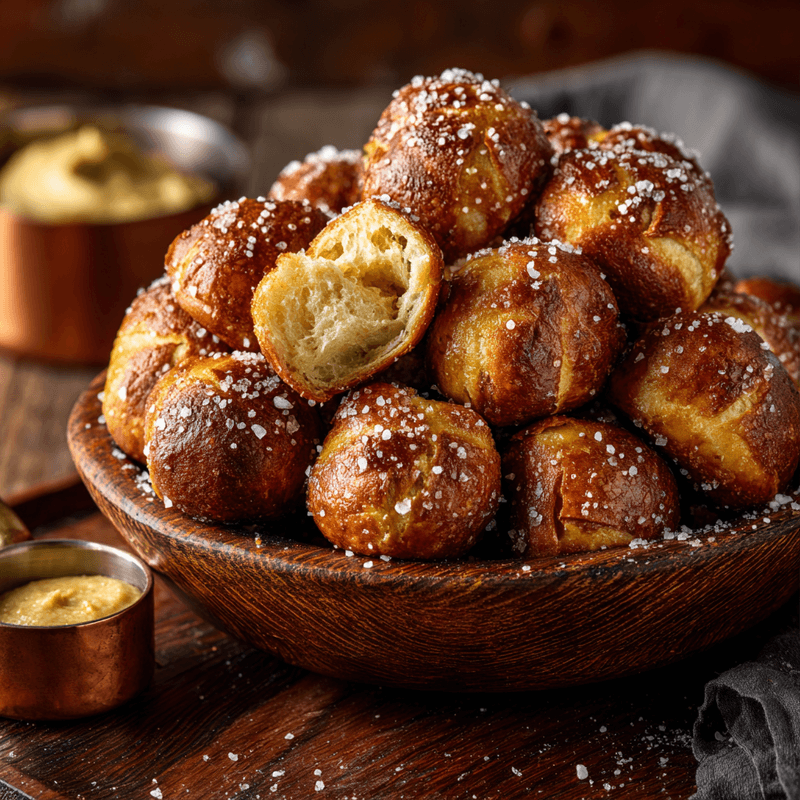
The visual impact of sourdough discard pretzel bites is undeniable. That distinctive pretzel appearance—the rich brown exterior glistening slightly from the alkaline bath, the coarse salt crystals catching the light, the deep scores that create an almost geometric pattern on each bite—immediately signals something special. When you pile them high on a serving board or in a rustic bowl, they create this irresistible mountain of golden-brown goodness that draws people in before they even taste one.
But the real magic happens with that first bite. Your teeth break through the slightly crisp, chewy exterior—that signature pretzel texture that's both tender and resistant—and then you hit the soft, pillowy interior with its gentle sourdough tang. The contrast is extraordinary, and it's exactly what makes authentic pretzels so addictive. The flavor profile walks this perfect line between comforting bread and something more sophisticated, with that subtle fermented note from the discard adding depth you simply can't get from regular pretzel recipes.
What truly makes these impressive is that they deliver bakery-quality results without requiring any special equipment or advanced techniques. You don't need a stand mixer, though you can certainly use one. You don't need any fancy shaping skills—these are bite-sized, so imperfection actually adds to their rustic charm. And yet, when people bite into one, they're experiencing something they'd happily pay premium prices for at a specialty pretzel shop or upscale gastropub. The fact that you made them from ingredients you already had on hand, using sourdough discard you might have otherwise discarded, makes them taste even better.
The Ingredients That Matter Most
Let's talk about what really makes sourdough discard pretzel bites exceptional, starting with that star ingredient: your sourdough discard. Whether it's unfed starter that's been sitting in your fridge for a week or discard from this morning's feeding, it all works beautifully here. The discard contributes that subtle tanginess and also adds tenderness to the dough, creating a more complex flavor than you'd get from commercial yeast alone. Don't worry about whether your discard is particularly active—this recipe uses additional yeast for reliable rise, so even sluggish discard performs perfectly.
The flour you choose matters more than you might think. I always reach for bread flour when making these sourdough discard pretzel bites because the higher protein content creates that satisfying chew we associate with authentic pretzels. All-purpose flour will work in a pinch, but you'll get a slightly softer, less structured bite. The gluten development from bread flour is what gives you that pull-apart texture that makes pretzels so satisfying.
Now, let's discuss the baking soda bath—this is where ordinary dough transforms into pretzel magic. Food-grade baking soda creates an alkaline environment that gelatinizes the exterior of the dough, resulting in that characteristic mahogany color and distinctive flavor. Some recipes call for lye, which is traditional, but baking soda is safer for home cooks and delivers excellent results. The higher the ratio of baking soda to water, the deeper your color will be, so don't skimp here.
The coarse salt finishing is non-negotiable for authentic pretzel character. Those large crystals provide bursts of salinity that contrast beautifully with the subtle sweetness of the dough. Pretzel salt or coarse sea salt works best—table salt is too fine and will dissolve, while kosher salt sits somewhere in between. Finally, a touch of sugar in the dough isn't just for sweetness; it feeds the yeast and helps achieve that beautiful bronzed exterior. And don't forget quality butter for brushing—it adds richness and helps those salt crystals adhere while contributing a gorgeous sheen.
Building It Step by Step
The journey to perfect sourdough discard pretzel bites begins with creating a soft, supple dough that's a pleasure to work with. You'll combine your sourdough discard with warm water, melted butter, sugar, and yeast, letting it sit for just a few minutes until it becomes slightly foamy. This proves your yeast is active and ready to work. Then you'll incorporate the flour and salt, mixing until a shaggy dough forms before kneading it into submission. The dough should be soft but not sticky—tacky to the touch but releasing from your hands cleanly. This usually takes about 8 minutes of kneading by hand or 5 minutes in a stand mixer.
Once your dough is smooth and elastic, it needs time to rise and develop flavor. Place it in a lightly greased bowl, cover it well, and let it rest in a warm spot for about an hour until it's doubled in size. This first rise is crucial for developing the structure and flavor that makes these pretzel bites so spectacular. While you're waiting, this is the perfect time to prepare your baking soda bath and get your workspace ready for shaping.
The shaping stage is where these sourdough discard pretzel bites come to life, and it's wonderfully forgiving. After punching down the risen dough, you'll divide it into manageable portions, then roll each portion into ropes about half an inch thick. The key here is even thickness so all your bites bake uniformly. Cut each rope into one-inch pieces—I find a bench scraper works beautifully for this, giving you clean cuts with minimal sticking. You can shape them into neat balls if you're feeling particular, but honestly, the rustic, slightly irregular pieces have just as much charm.
Now comes the transformation moment: the baking soda bath. Bring a large pot of water with dissolved baking soda to a gentle boil, then reduce it to a simmer. Working in small batches, drop your pretzel bites into the alkaline bath for about 20 seconds, flipping them halfway through. They'll puff up slightly and take on a slightly glossy appearance. Remove them with a slotted spoon, letting excess water drain off, and transfer them to your prepared baking sheets. This bath is what gives these bites that signature pretzel flavor and color, so don't skip it—though I know it might seem like an extra step, it's absolutely essential.
The final stage before baking is all about that classic pretzel appearance. While the pretzel bites are still damp from their bath, sprinkle them generously with coarse salt. The moisture helps the salt adhere, so work quickly. Then they go into a hot oven—around 425°F—where they'll transform from pale and puffy to deep golden brown in just 12 to 15 minutes. The high heat sets that exterior quickly, creating the contrast between the chewy crust and soft interior. When they emerge, brush them immediately with melted butter for extra richness and shine. This last butter bath is optional, but it takes these sourdough discard pretzel bites from great to absolutely irresistible.
Presentation and Plating Tips
The beauty of sourdough discard pretzel bites lies partly in their casual, approachable presentation. I love piling them high in a rustic wooden bowl or on a large cutting board, creating this abundant, help-yourself display that invites people to dig in. The height creates drama—stack them loosely so you can see the beautiful brown surfaces and those glistening salt crystals. A piece of parchment paper underneath adds a professional touch and makes cleanup easier.
For a more elevated presentation, consider serving them in individual portions using small cast iron skillets or ramekins. Place 6 to 8 pretzel bites in each vessel while they're still warm, and they'll hold their heat beautifully. This approach works wonderfully when you're serving these as an appetizer at a more formal gathering—each guest gets their own portion, and the individual vessels create an upscale feel.
Garnish keeps things simple but impactful. A small bowl of grainy mustard, a warm cheese sauce, or even honey butter creates beautiful color contrast against the dark pretzels. I like to use small copper or ceramic bowls for dipping sauces, placing them strategically among the pretzel bites so people can reach them easily. Fresh herbs like rosemary or thyme scattered around the platter add a pop of green and hint at the flavors within.
For photos—because trust me, you'll want to photograph these sourdough discard pretzel bites—natural light from a window works beautifully. Shoot from a slight angle rather than directly overhead to show off that three-dimensional quality and the texture of the crust. A light dusting of extra salt or a drizzle of melted butter just before photographing makes them glisten enticingly. And always include at least one pretzel bite broken open to show that tender, airy interior—it's irresistible.
Scaling Up for a Crowd
When you're feeding a crowd, sourdough discard pretzel bites are an absolute blessing because they scale up beautifully and can be largely prepared in advance. The recipe doubles or triples without any adjustments to technique or timing—you'll just need more baking sheets and possibly need to work in batches for the baking soda bath and oven time. I've made quadruple batches for larger gatherings, and they turn out just as perfectly as small batches.
The smartest approach for advance preparation is to complete everything through the shaping stage the day before your event. Shape all your pretzel bites, arrange them on parchment-lined baking sheets, cover them tightly with plastic wrap, and refrigerate overnight. This slow, cold fermentation actually improves the flavor, giving the sourdough discard more time to work its magic. The next day, bring them to room temperature for about 20 minutes while you prepare your baking soda bath, then proceed with boiling, salting, and baking as usual.
If you want to go even further ahead, you can freeze shaped pretzel bites for up to a month. Freeze them in a single layer on baking sheets until solid, then transfer to freezer bags. When you're ready to use them, there's no need to thaw—just add an extra 10 seconds to the baking soda bath time and possibly a minute or two to the baking time. This makes these sourdough discard pretzel bites perfect for those times when you want to have an impressive snack ready at a moment's notice.
For timing on the day of serving, bake your final batches about 30 minutes before you want to serve them. They're absolutely best warm from the oven, when that exterior is at its peak chewiness and the interior is still steaming and soft. If you need to bake further in advance, you can refresh them in a 350°F oven for about 5 minutes before serving, though truly fresh is unbeatable.
Storing Any Leftovers
While sourdough discard pretzel bites are undeniably best the day they're made, you can store leftovers successfully with the right approach. Once they've cooled completely—and this is important, as any residual steam will create sogginess—transfer them to an airtight container or resealable bag. They'll keep at room temperature for up to 2 days, though the exterior will soften somewhat as time passes. That characteristic pretzel chewiness gradually gives way to a softer texture more like regular bread.
For longer storage, freezing is your best option and works remarkably well. Arrange cooled pretzel bites in a single layer on a baking sheet and freeze until solid, then transfer to a freezer-safe bag, pressing out as much air as possible. They'll maintain quality for up to 3 months. The beauty of freezing these individually first is that you can pull out just as many as you need rather than defrosting the entire batch.
Reheating is crucial for restoring that fresh-baked magic. For refrigerated or room-temperature pretzel bites, a 350°F oven for 5 to 7 minutes works wonders, crisping up the exterior while warming the interior through. If they seem dry, a light mist of water before reheating helps. For frozen pretzel bites, you can either thaw them overnight in the refrigerator and then reheat, or go straight from freezer to a 350°F oven for about 10 minutes. A quick brush with melted butter after reheating revives their appearance and adds back some of that just-baked richness.
Avoid the microwave if at all possible—it turns these sourdough discard pretzel bites rubbery and sad, eliminating everything that makes them special. If you absolutely must use it, wrap them in a slightly damp paper towel and heat in very short bursts, no more than 15 seconds at a time, but know that the texture won't compare to oven-refreshed bites.
Variations to Explore
Once you've mastered the basic sourdough discard pretzel bites, a world of variations opens up. For a everything bagel twist, skip the coarse salt and instead brush the boiled bites with egg wash, then coat them generously in everything bagel seasoning before baking. The combination of sesame seeds, poppy seeds, dried garlic, and dried onion with that pretzel base is absolutely addictive and creates a flavor profile that's perfect for serving with cream cheese or hummus.
Cheese lovers will flip for jalapeño cheddar pretzel bites. Knead about a cup of shredded sharp cheddar and a couple of diced fresh jalapeños into your dough during the final minute of kneading. The cheese creates pockets of gooey richness throughout, while the jalapeños add a pleasant kick. You can still do the traditional salt topping, or try sprinkling them with extra cheese just before baking for crispy, golden edges.
For a sweeter take on sourdough discard pretzel bites, skip the baking soda bath entirely and instead brush the shaped bites with melted butter, then roll them in cinnamon sugar before baking. After baking, while they're still warm, toss them in more cinnamon sugar and serve with cream cheese frosting or vanilla glaze for dipping. These cinnamon sugar versions are phenomenal for weekend mornings or afternoon gatherings.
If you want the flavor with less fuss, try the simplified weeknight version: skip the baking soda bath and the resting time after shaping. Simply shape your dough into bites after the first rise, brush them with an egg wash, sprinkle with coarse salt, and bake. You won't get that distinctive deep brown pretzel color or quite the same chewy exterior, but you'll still have delicious, tangy sourdough bites ready in about half the time. Finally, mini versions make adorable party snacks—cut your ropes into half-inch pieces instead of one-inch, reduce the baking time to 8 to 10 minutes, and you'll have perfect two-bite morsels.
Questions You Might Have
Can I make the dough the night before and bake the next day?
Absolutely, and this is actually one of my favorite ways to work with these sourdough discard pretzel bites when I'm short on time the day of serving. After the first rise, punch down the dough, shape it into a ball, and refrigerate it in a covered bowl overnight. The next day, bring it to room temperature for about 30 minutes, then proceed with rolling, cutting, boiling, and baking as usual. The cold fermentation adds even more flavor complexity.
What if I don't have bread flour?
All-purpose flour works perfectly fine, though you'll notice a slightly softer, less chewy texture compared to pretzels made with bread flour. If you're using all-purpose flour, consider adding an extra tablespoon or two—all-purpose absorbs liquid slightly differently, and you want to maintain that soft-but-not-sticky consistency. The flavor will be just as delicious, even if the texture is a bit more tender.
How do I transport these to a gathering without losing quality?
For the best results, bake them as close to serving time as possible, then transport them while still slightly warm in a container lined with paper towels to absorb any steam. Don't seal the container completely—you want a little airflow to prevent the exterior from getting soggy. If you need to bake ahead and transport cold, bring a butter brush and some melted butter with you, and refresh the pretzel bites in your host's oven at 350°F for about 5 minutes before serving.
Can I use active sourdough starter instead of discard?
Yes, you can use fed, active starter in place of discard for these sourdough discard pretzel bites. The main difference is that active starter will contribute slightly more rise and a bit more tang. You might notice the dough rises a touch faster during the first fermentation. The recipe works either way, so use whatever you have on hand—this is a perfect discard solution, but it doesn't require discard specifically.
Why are my pretzel bites not getting dark enough?
The depth of color comes primarily from the baking soda bath concentration and oven temperature. Make sure you're using a full 1/4 cup of baking soda per 6 cups of water for a proper alkaline bath. Also verify your oven temperature with an oven thermometer—if it's running cool, you won't get that deep mahogany color. Finally, make sure your bites are spending the full 20 seconds in the baking soda bath and that the water is at a gentle boil.
What's the best dipping sauce for pretzel bites?
This is entirely personal preference, but I'm partial to three options: a sharp grainy mustard for traditional pretzel flavor, a warm cheese sauce made with sharp cheddar and a touch of cream for indulgent richness, or honey butter for those who prefer a sweeter accompaniment. For these sourdough discard pretzel bites specifically, the subtle tang from the starter pairs beautifully with creamy, rich dips that provide contrast to the complex bread flavor.
Sourdough Discard Pretzel Bites
Golden, chewy pretzel bites made with sourdough discard, featuring the signature pretzel crust and soft interior. Perfect for gatherings and a delicious way to use extra starter.
Prep Time
20 min
Cook Time
15 min
Total Time
1h 50m
Servings
6 servings
Ingredients
For 6 servings
- 1 cup sourdough discard, unfed
- 3/4 cup warm water (110°F)
- 2 tablespoons unsalted butter, melted
- 2 tablespoons granulated sugar
- 2 1/4 teaspoons instant yeast (1 packet)
- 3 1/2 cups bread flour
- 1 1/2 teaspoons salt
- 6 cups water for boiling
- 1/4 cup baking soda
- Coarse pretzel salt or coarse sea salt for topping
- 3 tablespoons unsalted butter, melted, for brushing
Instructions
- 1
Prepare the dough
In a large mixing bowl, combine the sourdough discard, warm water, melted butter, sugar, and yeast. Stir gently and let sit for 5 minutes until slightly foamy. Add the bread flour and salt, stirring until a shaggy dough forms.
- 2
Knead the dough
Turn the dough out onto a lightly floured surface and knead for 8 to 10 minutes until smooth and elastic, or knead in a stand mixer with the dough hook for 5 to 6 minutes. The dough should be soft and slightly tacky but not sticky.
- 3
First rise
Place the dough in a lightly greased bowl, turning once to coat. Cover with a clean kitchen towel or plastic wrap and let rise in a warm place for 60 to 75 minutes, until doubled in size.
- 4
Shape the pretzel bites
Punch down the risen dough and turn it out onto a clean work surface. Divide the dough into 6 equal portions. Roll each portion into a rope about 1/2 inch thick, then cut into 1-inch pieces using a bench scraper or sharp knife. You should have about 60 pretzel bites total.
- 5
Prepare baking soda bath
Preheat your oven to 425°F and line two large baking sheets with parchment paper. In a large pot, bring 6 cups of water and the baking soda to a boil, then reduce to a gentle simmer. The mixture will foam initially.
- 6
Boil the pretzel bites
Working in batches of 8 to 10 pieces, carefully drop the pretzel bites into the simmering baking soda bath. Boil for 20 seconds, flipping halfway through with a slotted spoon. Remove and place on the prepared baking sheets, spacing them about 1 inch apart.
- 7
Season and bake
While the pretzel bites are still damp from the bath, sprinkle generously with coarse salt. Bake for 12 to 15 minutes, until deep golden brown. The bites should have a rich, mahogany color and feel firm to the touch.
- 8
Brush with butter
Remove from the oven and immediately brush the hot pretzel bites with melted butter for added richness and shine. Serve warm with your favorite dipping sauces such as mustard, cheese sauce, or honey butter.
Nutrition Facts
Per serving (estimated)
320 calories
Calories
52g
Carbs
10g
Protein
8g
Fat
2g
Fiber
850mg
Sodium
5g
Sugar


