
Sourdough Cheesy Breadsticks Recipe | Flavor Scroll
Learn how to make incredible sourdough cheesy breadsticks with tangy starter, gooey cheese, and herbs. Perfect for family gatherings and cozy dinners!
cookwithlucia.com/recipes/sourdough-cheesy-breadsticks-flavor-scroll
There's something magical about the aroma of freshly baked bread mingling with melted cheese and garlic wafting through the kitchen on a quiet evening. That warm, yeasty scent has a way of bringing everyone to the table before you even call them. When I set out to develop my version of sourdough cheesy breadsticks, I wanted to capture that irresistible combination of tangy sourdough flavor, stretchy melted cheese, and the satisfying pull of fresh-baked bread that makes you reach for just one more piece. These aren't your average breadsticks from a chain restaurant — they're crafted with active sourdough starter that adds complex flavor and a tender crumb, then loaded with a generous blend of cheeses that creates golden, bubbly edges. What sets these sourdough cheesy breadsticks apart is the incredible depth you get from the fermented dough, which provides subtle tang that balances beautifully with rich, savory cheese. By the time you finish this guide, you'll know exactly how to transform your sourdough starter into the most craveable breadsticks you've ever tasted, complete with pro tips for achieving that perfect golden crust and gooey center every single time.
The Story Behind This Dish
Breadsticks have long been a beloved accompaniment to meals across countless cultures, from Italian grissini to American restaurant staples. The genius of combining sourdough culture with cheesy breadsticks brings together two beloved baking traditions into one spectacular creation. Sourdough baking dates back thousands of years, when bakers discovered that wild yeasts created breads with superior flavor, texture, and keeping qualities. Home bakers have embraced sourdough in recent years not just for its tangy complexity, but for the way it transforms simple ingredients into something extraordinary. The homemade version of sourdough cheesy breadsticks far surpasses anything you'd find in a restaurant freezer or take-out box. When you make these at home, you control the quality of every ingredient, from the flour in your starter to the cheese you layer on top. The result is breadsticks with real character — a tender interior with complex fermented notes, a golden crust that actually tastes like something, and cheese that's melted to perfection rather than rubbery or artificial.
What Makes This Recipe Special
Authentic Sourdough Flavor: These sourdough cheesy breadsticks deliver genuine tangy depth that comes from active starter, not shortcuts or flavorings. The fermentation process develops complex notes that make each bite more interesting than the last.
Incredible Texture Contrast: You get a tender, slightly chewy interior from the sourdough dough paired with crispy, golden edges where the cheese caramelizes against the pan. That textural contrast is what keeps you reaching for another piece.
Flexible Timing: Unlike some sourdough recipes that demand rigid schedules, these breadsticks work around your life. You can do a long, cold fermentation overnight or a shorter room-temperature rise depending on your schedule.
Crowd-Pleasing Appeal: Whether you're serving them alongside soup for a cozy family dinner or offering them at a gathering, these sourdough cheesy breadsticks disappear fast. They appeal to both sourdough enthusiasts and those who simply love cheesy, garlicky bread.
Budget-Friendly Comfort: You're using pantry staples and transforming them into something that tastes gourmet. A little flour, your existing starter, some cheese, and basic seasonings create breadsticks that would cost three times as much at a restaurant.
Adaptable Canvas: The base recipe welcomes countless variations — different cheese blends, herb combinations, or spice additions mean you'll never get bored making these.
Breaking Down the Ingredients
The foundation of exceptional sourdough cheesy breadsticks starts with active sourdough starter that's bubbly and at its peak. This isn't just a leavening agent — it's the source of that distinctive tang and complex flavor that sets these breadsticks apart from ordinary versions. Your starter should be fed and doubled in size, full of energy and ready to work its magic on the dough. The flour you choose matters too; bread flour with its higher protein content creates better structure and that satisfying chew, though all-purpose flour works perfectly well if that's what you have on hand. The cheese is where you can really have fun — a combination of mozzarella for that gorgeous melt and stretch, plus sharp cheddar or parmesan for flavor punch, creates the most balanced result. Mozzarella alone can be bland, while strong cheeses alone can be overwhelming, but together they're perfect. Olive oil adds richness to the dough and helps achieve golden, crispy edges during baking. Fresh garlic brings pungent, aromatic notes that perfume the entire batch, while dried herbs like oregano, basil, or Italian seasoning add another layer of savory complexity. Salt is crucial not just for flavor but for controlling fermentation and strengthening the gluten network in your dough. Finally, a touch of honey or sugar feeds the yeast and helps with browning, creating those beautiful golden spots that make these sourdough cheesy breadsticks so visually appealing.
The Cooking Process Explained
Creating perfect sourdough cheesy breadsticks begins with mixing your active starter with flour, water, and salt to form a shaggy dough that you'll knead until smooth and elastic. This initial mixing and kneading develops the gluten structure that gives your breadsticks their characteristic chew, so don't rush this stage — you want the dough to pass the windowpane test where you can stretch a small piece thin enough to see light through it. After kneading, the dough enters its bulk fermentation phase, where it rests at room temperature for several hours or in the refrigerator overnight, developing flavor and structure as the wild yeasts work their magic. You'll know it's ready when it's increased in volume by about fifty percent and feels puffy and alive when you gently press it.
Once fermentation is complete, you'll turn the dough out onto a floured surface and roll it into a large rectangle, about half an inch thick. This is when the real fun begins — you'll spread softened butter mixed with minced garlic across the entire surface, then shower it with your cheese blend and herbs. Rolling this into a log and slicing it into individual breadsticks reveals those gorgeous swirls of cheese and garlic throughout each piece. Arranging the breadsticks in a prepared baking dish with sides touching means they'll support each other as they rise and bake, creating soft sides and crispy tops.
The final proof happens right in the baking dish, giving the breadsticks time to puff up one last time before they hit the oven. During this stage, the dough should look noticeably lighter and airier, with visible expansion. Baking at a moderately high temperature creates the perfect environment for the cheese to melt and bubble while the dough bakes through completely. You're looking for deep golden color on top with visibly melted, slightly browned cheese in all the crevices. The aroma that fills your kitchen during these final minutes of baking will have everyone hovering nearby, ready to grab the first piece.
Mistakes to Avoid
The most common mistake when making sourdough cheesy breadsticks is using starter that isn't at peak activity, which results in dense, heavy breadsticks that lack that light, tender texture you're after. Always use starter that has been fed within four to eight hours and has doubled in size, showing plenty of bubbles throughout. If your starter isn't active enough, your breadsticks will taste more like flour than fermented dough, and they won't rise properly during proofing or baking.
Another pitfall is over-flouring your work surface when rolling out the dough, which can make the breadsticks dry and tough rather than tender. Use just enough flour to prevent sticking, and if your dough feels sticky, let it rest for five minutes — the gluten will relax and become much easier to handle without adding excess flour.
Skimping on the cheese or spreading it too conservatively means you'll miss out on those pockets of melted goodness that make these breadsticks so addictive. Be generous with your cheese application, making sure it reaches almost to the edges so every bite delivers that cheesy punch. Don't rush the final proof either — breadsticks that go into the oven before they've had time to puff up properly will be dense rather than light and fluffy.
Finally, resist the urge to slice into these sourdough cheesy breadsticks the moment they come out of the oven. Letting them rest for at least five minutes allows the cheese to set slightly and the structure to firm up, making them much easier to separate and handle without falling apart.
How to Serve This
These sourdough cheesy breadsticks shine brightest alongside a bowl of hearty tomato soup or rich vegetable minestrone, where you can use them for dipping and soaking up every last bit of broth. The tangy notes in the sourdough complement the acidity of tomato-based soups beautifully, while the cheese adds richness that makes the pairing feel complete and satisfying.
For a lighter accompaniment, serve these breadsticks with a crisp green salad dressed in a bright vinaigrette — the acidity cuts through the richness of the cheese while the breadsticks add substance that transforms a simple salad into a proper meal. They're also spectacular as part of a mezze-style spread with hummus, roasted vegetables, olives, and fresh vegetables, where their garlicky, cheesy flavor plays well with Mediterranean-inspired dishes.
On busy weeknights, these sourdough cheesy breadsticks can practically be dinner on their own, especially if you serve them with a simple marinara sauce for dipping. The combination feels indulgent enough for weekend entertaining but comes together easily enough for casual family dinners. For visual appeal, arrange the breadsticks on a wooden board or in a basket lined with a clean kitchen towel, and garnish with fresh herbs like parsley or basil for a pop of color that makes them look as good as they taste.
Make-Ahead and Storage Guide
Freshly baked sourdough cheesy breadsticks are best enjoyed warm from the oven, but they store remarkably well for quick reheating later. Once completely cooled, transfer them to an airtight container or resealable bag and refrigerate for up to four days. The sourdough's natural acidity actually helps preserve freshness, so they'll taste nearly as good on day three as they did fresh.
For longer storage, these breadsticks freeze beautifully for up to three months. Wrap them tightly in plastic wrap, then place in a freezer bag with as much air pressed out as possible to prevent freezer burn. You can freeze them as a whole batch or individually wrapped for grabbing just one or two at a time.
When you're ready to enjoy refrigerated breadsticks, wrap them loosely in foil and warm in a preheated oven at 350°F for about ten minutes until heated through and the cheese is melty again. For frozen breadsticks, let them thaw in the refrigerator overnight, then reheat using the same method. If you're in a hurry, you can reheat individual breadsticks in the microwave for thirty to forty seconds, though they won't have quite the same crispy exterior as oven reheating provides.
You can also prepare these sourdough cheesy breadsticks up to the point of the final proof, then cover and refrigerate overnight. The next day, let them come to room temperature for about thirty minutes before baking as directed — this method actually enhances the sourdough flavor through extended fermentation.
Reader Questions Answered
Can I make sourdough cheesy breadsticks without a stand mixer?
Absolutely — this dough comes together beautifully by hand using just a large bowl and your hands or a sturdy wooden spoon. Mix the ingredients until a shaggy dough forms, then turn it onto a clean counter and knead for eight to ten minutes until smooth and elastic. Hand kneading actually gives you a better feel for the dough's texture and development, though it does require a bit more time and effort than using a mixer.
What if I don't have enough sourdough starter?
You can easily scale the recipe to work with whatever amount of active starter you have available, adjusting the flour and water proportionally. Alternatively, if you have sourdough discard that's been fed within the past week, you can use it and add a small amount of instant yeast to ensure proper rise. Use about half a teaspoon of instant yeast added to the flour, and your sourdough cheesy breadsticks will still have that characteristic tang with more reliable leavening.
Can I make these breadsticks dairy-free?
While cheese is certainly central to the recipe, you can experiment with dairy-free cheese alternatives, though the results will vary depending on the brand you choose. Look for dairy-free mozzarella-style shreds that are specifically designed to melt, and consider adding extra herbs and garlic to compensate for any flavor differences. The sourdough base itself is naturally dairy-free as long as you use oil instead of butter for the filling.
How do I know when my sourdough cheesy breadsticks are fully baked?
Look for deep golden brown color on the top surface with visibly bubbly, melted cheese throughout, and check that the internal temperature registers at least 190°F when you insert an instant-read thermometer into the center. The breadsticks should feel firm to the touch rather than doughy, and you should see some browning on the bottom when you carefully lift one edge to peek underneath. If the tops are browning too quickly before the centers are done, tent loosely with foil for the final few minutes of baking.
Can I add other ingredients to these breadsticks?
Definitely — these sourdough cheesy breadsticks are wonderfully adaptable to your taste preferences. Try adding sun-dried tomatoes, sliced olives, fresh spinach, or caramelized onions to the filling along with the cheese for extra flavor and nutrition. Just make sure any additions are well-drained and not too wet, as excess moisture can make the breadsticks soggy. You can also experiment with different cheese combinations like gruyere, fontina, or even a bit of feta for a tangy punch.
How far in advance can I prepare the dough?
The dough for sourdough cheesy breadsticks benefits from a long, slow fermentation, so you can absolutely prepare it one or even two days ahead. After the initial mixing and kneading, place the dough in the refrigerator for its bulk fermentation, where it will develop even more complex flavor as it slowly rises. The cold fermentation can extend anywhere from twelve to forty-eight hours — just make sure to bring it back to room temperature for about an hour before shaping, filling, and continuing with the recipe. This make-ahead approach actually improves the flavor while fitting perfectly into a busy schedule.
Sourdough Cheesy Breadsticks
Tender, tangy sourdough breadsticks swirled with garlic butter and loaded with melted cheese. Perfect for dipping in soup or serving at family gatherings.
Prep Time
30 min
Cook Time
25 min
Total Time
8h 55m
Servings
12 breadsticks
Ingredients
For 12 breadsticks
- 1 cup (240g) active sourdough starter, fed and bubbly
- 3 cups (360g) bread flour, plus more for dusting
- 1 cup (240ml) warm water
- 2 tablespoons olive oil
- 1 tablespoon honey
- 1 1/2 teaspoons salt
- 3 tablespoons unsalted butter, softened
- 4 cloves garlic, minced
- 2 cups (200g) shredded mozzarella cheese
- 1 cup (100g) shredded sharp cheddar cheese
- 1/2 cup (50g) grated parmesan cheese
- 2 teaspoons dried Italian seasoning
- 1/2 teaspoon garlic powder
- Fresh parsley, chopped, for garnish
Instructions
- 1
Mix the dough
In a large mixing bowl, combine the active sourdough starter, warm water, olive oil, and honey. Stir until well mixed. Add the bread flour and salt, mixing until a shaggy dough forms. Turn out onto a lightly floured surface and knead for 8-10 minutes until the dough is smooth, elastic, and passes the windowpane test.
- 2
Bulk fermentation
Place the dough in a lightly oiled bowl, turning once to coat. Cover with a damp kitchen towel or plastic wrap. Let rise at room temperature for 6-8 hours until increased by about 50% and puffy, or refrigerate overnight for 12-24 hours for enhanced flavor. If refrigerated, bring to room temperature for 1 hour before proceeding.
- 3
Prepare the filling
In a small bowl, mix together the softened butter and minced garlic until well combined. In another bowl, combine the mozzarella, cheddar, and parmesan cheeses with the Italian seasoning and garlic powder. Set both aside.
- 4
Roll out dough
Turn the risen dough out onto a lightly floured surface. Roll into a large rectangle approximately 12 inches by 16 inches and about 1/2 inch thick. Use gentle, even pressure to maintain consistent thickness throughout.
- 5
Add filling layers
Spread the garlic butter mixture evenly across the entire surface of the dough, leaving a 1/2-inch border on one long edge. Sprinkle the cheese mixture generously over the butter, pressing down gently so it adheres to the dough.
- 6
Roll and slice
Starting from the long edge opposite the border, roll the dough tightly into a log, keeping the roll as even as possible. Pinch the seam to seal. Using a sharp knife or bench scraper, cut the log into 12 equal pieces, each about 1 to 1.5 inches wide.
- 7
Arrange for proofing
Grease a 9x13-inch baking dish with butter or cooking spray. Arrange the breadstick slices cut-side up in the prepared dish, placing them close together so they touch slightly. This helps them rise upward and creates soft sides.
- 8
Final proof
Cover the baking dish loosely with a kitchen towel or plastic wrap. Let the breadsticks proof at room temperature for 45-60 minutes until noticeably puffy and slightly expanded. They should look lighter and airier than when first arranged.
- 9
Preheat and bake
Preheat your oven to 375°F (190°C). Once the breadsticks have completed their final proof, uncover and bake for 23-27 minutes until the tops are deep golden brown and the cheese is bubbling and slightly caramelized around the edges. The internal temperature should reach at least 190°F.
- 10
Cool and serve
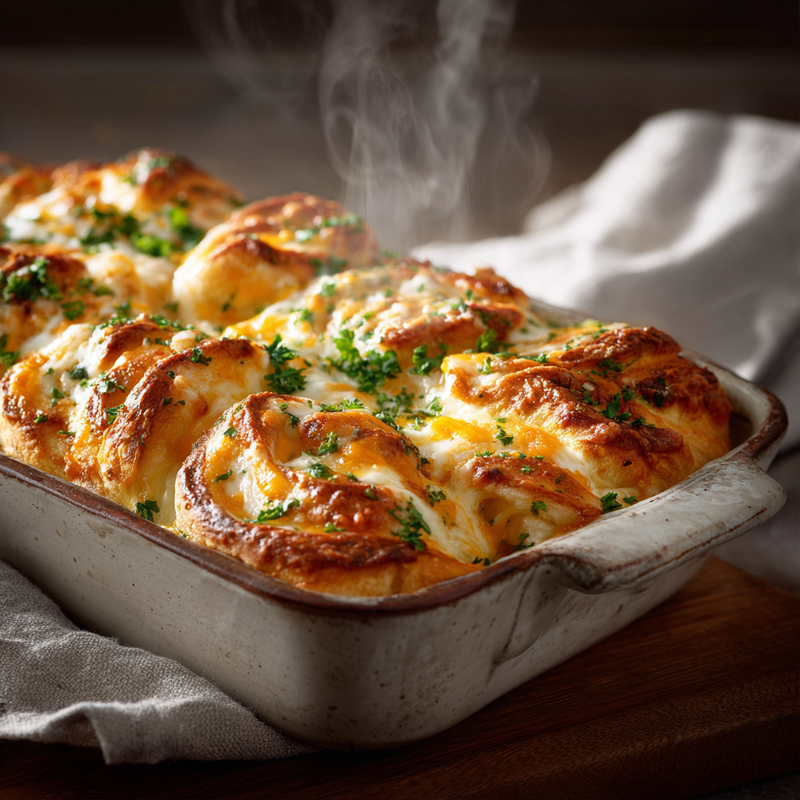
Remove the breadsticks from the oven and let them rest in the pan for 5-7 minutes to allow the cheese to set slightly. Garnish with freshly chopped parsley if desired. Serve warm, pulling apart individual breadsticks or cutting between them with a knife for cleaner separation.
Nutrition Facts
Per serving (estimated)
285 calories
Calories
32g
Carbs
12g
Protein
12g
Fat
2g
Fiber
445mg
Sodium
2g
Sugar


