S'mores Cookie Bars - Easy No-Campfire Recipe
Indulgent S'mores Cookie Bars with graham cracker crust, chocolate chunks, and gooey marshmallow topping. Perfect for family gatherings year-round!
cookwithlucia.com/recipes/smores-cookie-bars-chef-and-press
There's something absolutely magical about the combination of buttery graham crackers, melted chocolate, and toasted marshmallows all nestled together in one perfect bite. If you've ever loved the classic campfire treat but wished you could enjoy it without the smoke and outdoor setup, then these S'mores Cookie Bars are about to become your new obsession. I still remember the first time I made these beauties in my own kitchen on a rainy evening when my family was craving something sweet and nostalgic but going outside was out of the question.
The genius of S'mores Cookie Bars lies in their ability to capture all those beloved flavors we associate with summer evenings and cozy gatherings, but in a convenient, slice-and-serve format that's perfect for any occasion. Unlike traditional s'mores that require careful assembly and perfectly timed marshmallow roasting, these bars come together in a single baking dish and emerge from the oven with perfectly golden tops and layers of gooey goodness throughout. They're incredibly easy to make, require no special equipment, and somehow taste even better than the original campfire version.
What makes this recipe truly special is how it transforms simple pantry ingredients into something that feels indulgent and impressive. Whether you're planning a weekend treat for your family, need a crowd-pleasing dessert for a gathering, or simply want to satisfy that s'mores craving any time of year, these bars deliver every single time. In this post, I'll walk you through everything you need to know to create the most incredible S'mores Cookie Bars, from selecting the right ingredients to achieving that perfect balance of textures that makes each bite utterly irresistible.
What are S'mores Cookie Bars?
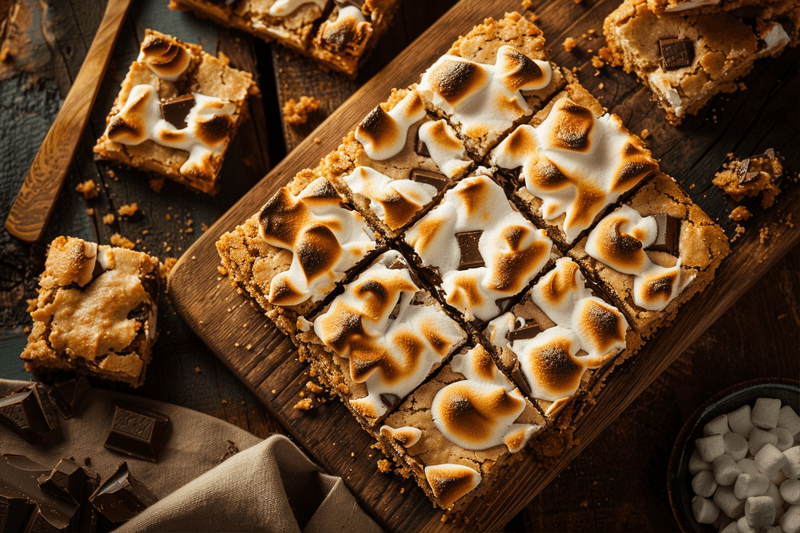
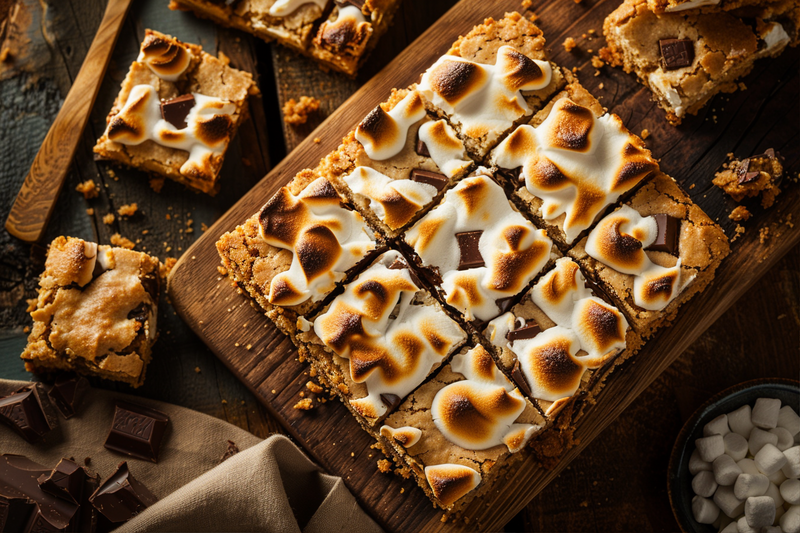
Have you ever wondered how to capture the essence of a campfire classic without ever leaving your kitchen? That's exactly what S'mores Cookie Bars accomplish with stunning simplicity. These decadent bars are essentially a deconstructed s'more transformed into a layered cookie bar format that's much easier to share and enjoy. The foundation starts with a buttery graham cracker cookie base that's studded with chocolate chunks, creating a sturdy yet tender platform for all the deliciousness that follows.
Originating from the creative minds of home bakers who wanted to bring the beloved campfire treat indoors, S'mores Cookie Bars have become a staple in dessert repertoires across the country. The traditional s'more itself dates back to the early 1900s, but this baked bar version is a modern innovation that solves all the challenges of the original while amplifying the flavors. The key characteristic that makes these bars so special is the layering technique: a cookie-like graham base, generous amounts of chocolate distributed throughout, and a marshmallow topping that gets beautifully golden and caramelized in the oven.
The flavor profile is everything you'd expect from s'mores but somehow more cohesive and refined. You get that distinctive graham sweetness, rich chocolate in every bite, and pillowy marshmallow that adds both sweetness and textural contrast. Ready to bring this indoor campfire magic to your own kitchen?
Why You'll Love This S'mores Cookie Bars Recipe
Incredibly Simple to Make: Even if you're new to baking, these S'mores Cookie Bars are foolproof. There's no complicated technique, no temperamental ingredients, and no special equipment required beyond a mixing bowl and a baking dish. The dough comes together in minutes, and the assembly is as straightforward as spreading and layering. Unlike finicky desserts that require precise timing or advanced skills, these bars are forgiving and turn out beautifully every single time.
Perfect Texture Balance: What truly sets these bars apart is the incredible textural experience in every bite. The bottom layer bakes up with a delightful chewiness reminiscent of the best chocolate chip cookies, while the graham cracker element adds a subtle crunch. The chocolate chunks create pockets of molten richness, and the marshmallow topping provides that signature s'mores gooeyness with slightly crispy, caramelized edges. It's a symphony of textures that keeps you reaching for just one more piece.
Budget-Friendly Indulgence: Creating an impressive dessert doesn't have to break the bank, and these S'mores Cookie Bars prove it. The ingredients are all pantry staples or easily found at any grocery store, and the recipe makes a generous pan that serves a crowd. Compared to buying individual fancy desserts or expensive bakery treats, making these bars at home costs a fraction of the price while delivering restaurant-quality results that'll have everyone asking for your secret.
Crowd-Pleaser for All Ages: From young children to grandparents, everyone recognizes and loves the classic s'mores flavor combination. These bars are perfect for family gatherings, potlucks, or casual get-togethers because they appeal to such a wide range of palates. Even picky eaters who might turn their noses up at more adventurous desserts will enthusiastically devour these familiar, comforting treats. They're also much easier to serve to a group than trying to make individual s'mores for everyone.
Highly Customizable: While the classic version is absolutely delicious, S'mores Cookie Bars serve as an excellent canvas for your creativity. You can swap in different types of chocolate, add nuts for extra crunch, incorporate peanut butter for richness, or even adjust the sweetness level to suit your preferences. The base recipe is so solid that it welcomes experimentation, allowing you to make the bars uniquely yours while still maintaining that essential s'mores character.
Make-Ahead Friendly: Unlike traditional s'mores that must be made and eaten immediately, these bars actually improve slightly after resting, making them perfect for advance preparation. You can bake them a day ahead for your gathering, and they'll stay delicious for several days when properly stored. This convenience factor makes them ideal for busy schedules or when you want to spread out your party preparation without sacrificing freshness or flavor. Get ready to fall in love with the easiest, most delicious way to enjoy s'mores anytime!
Key Ingredients and What They Bring
The foundation of exceptional S'mores Cookie Bars starts with quality butter, which contributes both richness and that irresistible tender texture to the cookie base. I always use unsalted butter so I can control the salt level precisely, and bringing it to room temperature ensures it creams properly with the sugar, creating those tiny air pockets that give the bars their perfect texture. The butter also carries the graham flavor beautifully and helps achieve that golden-brown color we're looking for.
Granulated and brown sugar work together in harmony here, with the granulated sugar providing sweetness and helping with structure, while the brown sugar adds moisture and a subtle molasses depth that complements the graham crackers perfectly. The brown sugar is particularly important because it keeps the bars from becoming too crisp or dry, ensuring they stay chewy and tender even the next day. This sugar combination is what separates good cookie bars from truly exceptional ones.
Graham cracker crumbs are obviously the star ingredient that gives these S'mores Cookie Bars their distinctive flavor and ties them directly to the classic campfire treat. You can either buy pre-made graham crumbs or make your own by crushing whole crackers in a food processor, and I honestly think crushing your own gives you slightly better texture and fresher flavor. The graham crackers provide that signature honey-sweet, slightly nutty taste that's absolutely essential to authentic s'mores character, and they also contribute to the structure of the bars.
All-purpose flour works alongside the graham crumbs to create the proper structure and prevent the bars from being too crumbly or falling apart when you cut them. The flour gives the cookie base enough strength to support all that chocolate and marshmallow while still maintaining a tender bite. I've found that the ratio of flour to graham crumbs is crucial, too much flour and you lose the graham flavor, too little and the bars won't hold together properly.
Chocolate chunks or chips are non-negotiable in S'mores Cookie Bars, and I prefer chunks because they create those beautiful pockets of melted chocolate throughout the bars rather than disappearing into the dough. High-quality chocolate makes a noticeable difference here since it's such a prominent flavor, so I recommend using the best you can find. The chocolate should be distributed generously because that rich, slightly bitter cocoa flavor balances the sweetness of the marshmallow and graham elements perfectly.
Marshmallows are the crowning glory of these bars, and you have options: mini marshmallows distribute more evenly and create a blanket effect, while regular marshmallows cut in half give you those dramatic peaks and valleys with extra caramelization. The marshmallows toast beautifully in the oven, developing that golden exterior while staying gooey underneath, which is exactly what we're trying to replicate from the traditional campfire experience. Their sweetness and unique texture are what complete the s'mores trifecta and make these bars truly special.
How to Make S'mores Cookie Bars — Quick Overview
Creating these incredible S'mores Cookie Bars is wonderfully straightforward and comes together in distinct stages that build upon each other beautifully. You'll start by preparing your cookie base, which involves creaming together butter and sugars until light and fluffy, then mixing in your egg and vanilla before gradually incorporating the dry ingredients including those essential graham cracker crumbs. This dough is thick and substantial, almost like a soft cookie dough, and it spreads easily into your prepared baking pan where it forms the foundation for all the delicious layers to come.
Once your base layer is spread evenly in the pan, you'll press a generous amount of chocolate chunks into the surface, ensuring every future bite will have plenty of melted chocolate running through it. The dough goes into the oven first to bake partially, allowing it to set up and develop that golden-brown color and slightly crispy edges while remaining tender in the center. This pre-baking step is crucial because it ensures the cookie base is fully cooked before you add the marshmallows, which need much less time in the oven.
After about fifteen to eighteen minutes, you'll remove the partially baked bars from the oven and immediately top them with your marshmallows, arranging them in a single layer that covers the entire surface. Back into the oven they go for just a few more minutes, just long enough for the marshmallows to puff up, turn golden on top, and develop those beautiful toasted edges that give you that authentic s'mores experience. The whole process from start to finish takes about thirty-five to forty minutes, including prep time, and the result is a pan of perfectly layered bars that smell absolutely heavenly and look bakery-worthy.
Top Tips for Perfecting S'mores Cookie Bars
The quality of your graham cracker crumbs makes a significant difference in the final flavor of your S'mores Cookie Bars, so I always recommend using fresh crackers and crushing them yourself if possible. Pre-packaged crumbs can sometimes taste stale or lose their distinctive honey-sweet flavor, whereas freshly crushed crackers bring a brightness and authenticity that really shines through. If you do use packaged crumbs, give them a quick taste test first to ensure they're fresh and flavorful.
Don't skip the step of letting your butter come to fully room temperature before you begin mixing, as this seemingly small detail dramatically affects your bars' texture. Cold butter won't cream properly with the sugar, leading to a denser, less tender final product, while butter that's too soft or melted will result in bars that spread too much and lose their structure. The perfect butter should leave a slight indentation when you press it with your finger but still hold its shape.
When pressing the cookie base into your pan, take time to ensure it's completely even across the entire surface, paying special attention to the corners and edges where it tends to be thinner. An uneven base means some areas will overcook while others remain underdone, and nobody wants burnt edges with a raw center. I like to use the bottom of a measuring cup or glass to press and smooth the dough, which creates a perfectly level surface.
Watch your bars carefully during that final marshmallow-toasting phase, as marshmallows can go from perfectly golden to burnt in mere seconds. Every oven is slightly different, so you might need to adjust the timing or even switch to the broiler for the last minute to achieve that ideal golden-brown top. If you notice the marshmallows browning too quickly, you can tent the pan loosely with foil to slow down the process.
Let your S'mores Cookie Bars cool completely before attempting to cut them, as patience here is truly rewarded with clean, beautiful slices. Cutting while still warm results in a gooey mess where the layers don't hold together and the chocolate is still molten. I know it's tempting to dive right in, but waiting at least an hour allows everything to set up properly, and the bars are actually easier to handle and just as delicious at room temperature.
For the cleanest cuts, use a sharp knife that you've run under hot water and dried between each slice, which prevents the marshmallow and chocolate from sticking and dragging. You can also lightly spray your knife with cooking spray for the same effect. Making decisive, firm cuts rather than sawing back and forth will give you those professional-looking bars with distinct layers that photograph beautifully.
If you want to amplify the chocolate flavor even further, try using a combination of chocolate chunks in the dough and some extra chips sprinkled on top of the marshmallow layer during the final minutes of baking. This creates multiple levels of chocolate intensity and ensures that even the most devoted chocolate lovers are satisfied. You can also experiment with different chocolate varieties like dark chocolate for a more sophisticated flavor or even white chocolate for something completely different.
Variations and Flavor Twists
For peanut butter lovers, try adding a peanut butter swirl layer between the cookie base and marshmallow topping by warming about half a cup of creamy peanut butter until it's pourable and drizzling it over the partially baked base before adding marshmallows. This addition transforms your S'mores Cookie Bars into a peanut butter cup inspired creation that's absolutely incredible, and the nutty richness pairs beautifully with both the chocolate and graham flavors. You can also substitute peanut butter chips for some of the chocolate chunks throughout the base for even more peanut butter presence.
Create a triple chocolate version by using chocolate graham crackers instead of regular ones, doubling the chocolate chunks, and finishing with a drizzle of melted chocolate over the cooled marshmallow top. This variation is for serious chocolate enthusiasts who can't get enough of that deep cocoa flavor, and it turns the bars into an even more decadent treat that's perfect for special occasions. The chocolate grahams are usually available in the same grocery aisle as regular graham crackers and add an extra dimension of chocolate flavor to the base.
For those who enjoy a little crunch, fold in about half a cup of chopped nuts like almonds, pecans, or cashews into the cookie base along with the chocolate chunks. The nuts add textural interest and a subtle richness that complements the sweetness of the marshmallows beautifully, and they also make the bars feel a bit more sophisticated and less like a childhood treat. Just be mindful of any nut sensitivities among your guests before adding this variation.
Spice up your S'mores Cookie Bars by adding a teaspoon of cinnamon and a pinch of cayenne pepper to the cookie base for a warming, slightly spicy kick that makes the chocolate flavor more complex and interesting. This variation is inspired by traditional spiced chocolate desserts and adds an unexpected twist that will have people trying to figure out your secret ingredient. The heat from the cayenne is very subtle and just enhances rather than overpowers the other flavors.
Make a strawberry s'mores variation by pressing a thin layer of strawberry jam or preserves over the partially baked cookie base before adding the marshmallows, which introduces a fruity element that cuts through the richness beautifully. The strawberry flavor pairs naturally with both chocolate and graham crackers, and this version tastes like a gourmet campfire treat with a sophisticated twist that's perfect for warm weather gatherings.
What to Serve with S'mores Cookie Bars
A cold glass of milk is perhaps the most classic pairing for S'mores Cookie Bars, as the creamy, cool milk provides the perfect counterpoint to the sweet, rich bars and helps cleanse your palate between bites. The milk also helps balance the sweetness and makes the bars feel less heavy, allowing you to enjoy more than one piece without feeling overwhelmed. For an extra special touch, you could even serve slightly chilled almond milk or oat milk as delicious alternatives.
Freshly brewed coffee creates an outstanding pairing with these bars, especially if you serve them as an afternoon treat or after-dinner dessert. The coffee's slight bitterness and robust flavor contrast beautifully with the sweet marshmallow and chocolate, while the warmth of the coffee complements the cozy, nostalgic feeling of s'mores. A medium or dark roast works particularly well, and the combination feels sophisticated enough for adult gatherings while remaining accessible.
Vanilla ice cream served alongside warm S'mores Cookie Bars creates an irresistible hot-and-cold contrast that takes the dessert experience to another level entirely. The ice cream melts slightly when it touches the warm bar, creating a creamy sauce that mingles with the gooey marshmallow and melted chocolate for pure indulgence. This combination turns a simple bar cookie into a restaurant-quality plated dessert that will impress your guests.
Fresh berries like strawberries, raspberries, or blueberries make an excellent accompaniment because their bright, tart flavor cuts through the richness of the bars and adds a refreshing element to the plate. The fruit also adds a pop of color that makes your dessert presentation more appealing and provides a lighter option for guests who might want just a taste of something fresh alongside their treat. A small handful of berries per serving is perfect.
Hot chocolate or a warm spiced tea creates a cozy beverage pairing that emphasizes the comforting, nostalgic aspects of S'mores Cookie Bars and makes them feel perfect for relaxed evenings at home. The warm drink keeps the theme cohesive and creates a complete dessert experience that feels intentional and thought-through. Herbal teas like chamomile or rooibos work particularly well as they're naturally sweet and won't compete with the bars' flavors.
Storing and Reheating Tips
Store your S'mores Cookie Bars in an airtight container at room temperature for up to three days, where they'll maintain their texture beautifully and remain perfectly enjoyable. Layer parchment paper between stacked bars to prevent them from sticking together, especially since the marshmallow topping can be quite tacky. Keep the container in a cool, dry place away from direct sunlight, as heat can cause the chocolate to bloom and the marshmallows to become overly sticky.
For longer storage, refrigerate the bars in an airtight container where they'll keep well for up to one week, though the graham cookie base may become slightly firmer when chilled. Many people actually prefer the texture of cold S'mores Cookie Bars because the chocolate becomes more solid and snappy, creating an interesting contrast with the still-soft marshmallow layer. Just be sure to let them come closer to room temperature for about fifteen minutes before serving if you prefer a softer texture.
Freezing S'mores Cookie Bars is absolutely possible and works wonderfully for make-ahead preparation or preserving leftovers for up to three months. Wrap individual bars tightly in plastic wrap, then place them in a freezer-safe container or bag with as much air removed as possible to prevent freezer burn. When you're ready to enjoy them, thaw the bars at room temperature for about an hour, or if you're impatient like me, you can warm them gently as described below.
To reheat and recapture that fresh-from-the-oven magic, place bars on a baking sheet and warm them in a 300°F oven for about five to eight minutes until the marshmallow softens and the chocolate becomes slightly melty again. This method brings back much of the original texture and makes even day-old bars taste freshly baked, and your kitchen will smell amazing in the process. Watch them carefully to ensure the marshmallows don't burn, as they can darken quickly at higher temperatures.
If you're in a hurry, you can microwave individual bars for about ten to fifteen seconds on medium power, which will soften the marshmallow and warm the chocolate without making everything too gooey or causing the bars to fall apart. The microwave method isn't quite as good as oven reheating for texture, but it's convenient for a quick single serving and still delivers that warm, comforting s'mores experience. Just be careful not to overheat, as marshmallows can expand dramatically and create quite a mess in the microwave.
Frequently Asked Questions
Can I make S'mores Cookie Bars ahead of time for a gathering?
Absolutely, and in fact, making these bars a day ahead often improves their texture as everything sets up perfectly and the flavors have time to meld together. Bake them completely, let them cool, then store them covered at room temperature overnight. They'll be just as delicious the next day, and you'll save yourself stress on the day of your event.
What can I substitute for graham crackers if I can't find them?
Digestive biscuits are the closest substitute and will give you a very similar flavor and texture in your S'mores Cookie Bars, though they're slightly less sweet than graham crackers. You could also use vanilla wafer cookies crushed into fine crumbs, though the flavor profile will be noticeably different and less authentically s'mores-like. In a pinch, you could even use all flour instead, though you'd lose that distinctive graham character that makes these bars special.
How do I prevent the marshmallows from burning while still getting them golden?
The key is positioning your oven rack in the center position and watching the bars closely during the final few minutes of baking when the marshmallows are exposed. If your marshmallows are browning too quickly, reduce the oven temperature by 25 degrees or tent the pan loosely with aluminum foil to shield them from direct heat. Some people prefer to use the broiler for the last minute or two for extra control, but this requires constant attention.
Can I reduce the sugar in this recipe to make it less sweet?
You can reduce the sugar slightly, cutting it by up to one-quarter cup total, but be aware that this will affect both the sweetness and the texture of your S'mores Cookie Bars. Sugar contributes to the tender, chewy texture and helps with browning, so reducing it too much can result in bars that are drier and less appealing. A better approach might be to use dark chocolate chunks instead of milk chocolate, which will add a sophisticated bitter note that balances the sweetness.
Why did my cookie base turn out hard instead of chewy?
A hard cookie base usually results from overbaking or using too much flour, both of which remove moisture and create a crisp rather than chewy texture. Make sure you're measuring your flour correctly by spooning it into the measuring cup and leveling it off rather than scooping directly from the bag, which can pack in too much flour. Also, remove the bars from the oven as soon as the edges are set and golden, even if the center looks slightly underdone, as they'll continue cooking from residual heat.
Can I make these bars without eggs for someone with an allergy?
Yes, you can substitute the egg with a flax egg by mixing one tablespoon of ground flaxseed with three tablespoons of water and letting it sit for five minutes until it becomes gel-like. This substitution works quite well in S'mores Cookie Bars, though the texture may be slightly less tender and more crumbly than the original version. Another option is using a quarter cup of unsweetened applesauce, which adds moisture and helps bind the ingredients, though it will make the bars slightly more cake-like in texture.
S'mores Cookie Bars
Indulgent layered bars with a graham cracker cookie base, chocolate chunks, and toasted marshmallow topping that capture all the magic of campfire s'mores.
Prep Time
15 min
Cook Time
25 min
Total Time
40 min
Servings
16 bars
Ingredients
For 16 bars
- 1/2 cup (115g) unsalted butter, softened to room temperature
- 1/2 cup (100g) granulated sugar
- 1/3 cup (65g) packed light brown sugar
- 1 large egg, at room temperature
- 1 teaspoon pure vanilla extract
- 1 1/4 cups (150g) graham cracker crumbs (about 9-10 full crackers)
- 3/4 cup (95g) all-purpose flour
- 1/2 teaspoon baking powder
- 1/4 teaspoon salt
- 1 1/2 cups (255g) chocolate chunks or chips
- 2 1/2 cups mini marshmallows or 3 cups regular marshmallows, halved
Instructions
- 1
Prepare pan and oven
Preheat your oven to 350°F (175°C). Line an 8x8-inch or 9x9-inch square baking pan with parchment paper, leaving an overhang on two sides for easy removal later. Lightly spray the parchment with cooking spray to prevent sticking.
- 2
Cream butter and sugars
In a large mixing bowl, beat the softened butter, granulated sugar, and brown sugar together using an electric mixer on medium speed for 2-3 minutes until light and fluffy. The mixture should be pale and creamy, with the sugar crystals mostly dissolved into the butter.
- 3
Add wet ingredients
Beat in the egg and vanilla extract until fully incorporated and the mixture is smooth, scraping down the sides of the bowl as needed. The batter should be cohesive and slightly glossy at this point.
- 4
Combine dry ingredients
In a separate bowl, whisk together the graham cracker crumbs, flour, baking powder, and salt until evenly combined. This ensures the leavening and salt are distributed throughout the dry mixture.
- 5
Mix dough
Add the dry ingredients to the wet ingredients and mix on low speed just until combined and no flour streaks remain. Fold in 1 cup of the chocolate chunks, reserving the remaining half cup for later. The dough will be thick and slightly sticky.
- 6
Press into pan
Transfer the dough to your prepared baking pan and press it evenly into the bottom using your hands or the back of a spatula. Make sure to press the dough all the way into the corners and create an even layer across the entire surface. Press the remaining chocolate chunks into the top of the dough.
- 7
Bake cookie base
Bake the cookie base for 15-18 minutes, until the edges are set and lightly golden brown but the center still looks slightly soft. The surface should no longer look wet or glossy. Do not overbake at this stage.
- 8
Add marshmallow topping
Remove the pan from the oven and immediately arrange the marshmallows in a single, even layer covering the entire surface of the partially baked bars. Press them down gently so they adhere to the warm surface.
- 9
Toast marshmallows
Return the pan to the oven and bake for an additional 5-7 minutes, until the marshmallows are puffed, golden brown on top, and have toasted edges. Watch carefully during this stage to prevent burning.
- 10
Cool completely
Remove from the oven and let the bars cool completely in the pan on a wire rack for at least 1 hour before cutting. This cooling time allows the layers to set properly and makes cutting much easier.
- 11
Cut and serve
Using the parchment overhang, lift the entire slab of bars out of the pan and place on a cutting board. Use a sharp knife, cleaned and wiped between cuts, to slice into 16 squares. Serve at room temperature or slightly warmed.
Nutrition Facts
Per serving (estimated)
245 calories
Calories
38g
Carbs
3g
Protein
10g
Fat
1g
Fiber
125mg
Sodium
26g
Sugar


