
Red Velvet Cake Pops: Budget-Friendly Treats
Learn how to make stunning red velvet cake pops at home for under $1 per pop! Easy step-by-step guide with money-saving tips and variations.
cookwithlucia.com/recipes/red-velvet-cake-pops
Let me tell you something that changed how I think about homemade treats: those gorgeous red velvet cake pops you see at bakeries for three or four dollars each? You can make them at home for less than a dollar apiece, and they'll taste even better. I'm talking about rich, velvety chocolate cake with that signature tang, coated in smooth candy melts, and decorated however your heart desires. The best part is that you don't need any fancy equipment or professional baking skills to pull this off. Red velvet cake pops are the perfect example of how a little time in the kitchen can save you serious money while delivering bakery-quality results. Whether you're planning treats for a gathering, looking for a fun activity to do with family, or just want to enjoy something special without the hefty price tag, these beauties check every box. Each pop costs roughly 75 cents to make when you break down the ingredients, compared to the $3-4 you'd pay at a specialty bakery. That's a savings of over 300 percent, and the flavor is absolutely worth celebrating.
Why This Recipe Is a Budget Winner
Red velvet cake pops are incredibly economical because they rely almost entirely on pantry staples you probably already have on hand. Flour, sugar, cocoa powder, and vegetable oil form the backbone of the cake, and these ingredients cost pennies per serving when purchased in standard grocery store quantities. The cream cheese frosting uses just a small block of cream cheese, butter, and powdered sugar, all of which are affordable basics. When you compare the cost of making two dozen red velvet cake pops at home (around $18 total) versus buying them from a bakery (anywhere from $60 to $96), the savings become impossible to ignore. Beyond the immediate cost savings, this recipe is brilliant for batch cooking. You can easily double or triple the recipe and freeze unbaked cake balls for up to three months, giving you ready-to-dip treats whenever you need them. There's virtually zero food waste with this method because any cake scraps or crumbs get mixed into the frosting binding, and leftover candy melts can be saved indefinitely. One batch makes enough to feed a crowd at a fraction of what you'd spend on store-bought desserts or even other homemade treats that require expensive ingredients like nuts or specialty chocolate.
Affordable Ingredients, Maximum Impact
The magic of red velvet cake pops lies in how simple, inexpensive ingredients combine to create something that looks and tastes luxurious. All-purpose flour is your foundation, and a five-pound bag that costs around four dollars will make multiple batches. Cocoa powder adds that subtle chocolate flavor, and you only need two tablespoons per cake, making even a premium tin last for months. Granulated sugar and vegetable oil are kitchen workhorses that you can buy in bulk for maximum savings. The red food coloring is where the signature look comes from, and a single small bottle (about two dollars) contains enough for at least four batches of red velvet cake pops. For the cream cheese frosting, opt for store-brand cream cheese, which performs identically to name brands at half the cost. Candy melts or chocolate coating are your only semi-specialty ingredient, but buying them in bulk bags from warehouse stores brings the per-ounce cost way down. If candy melts feel too pricey, you can substitute chocolate chips melted with a small amount of coconut oil for an even more budget-friendly coating. Lollipop sticks come in packs of 100 for just a few dollars, meaning each stick costs mere cents. The beauty of these ingredients is their versatility too, everything except the red food coloring can be used in dozens of other recipes, so nothing goes to waste sitting in your pantry.
How to Make It
Making red velvet cake pops is a straightforward process that breaks down into manageable stages, even if you've never made cake pops before. First, you'll bake a simple red velvet cake in a standard nine-by-thirteen-inch pan, which takes about 25 minutes in the oven. The cake needs to cool completely, and this is actually a great make-ahead step, you can bake the cake the night before and let it sit covered on the counter. Once cooled, you'll crumble the entire cake into fine crumbs using your hands or a fork, breaking apart any larger chunks until the texture resembles coarse sand. Next comes the binding stage where you mix in cream cheese frosting gradually, starting with about three-quarters of a cup and adding more only if needed. You want the mixture to hold together when squeezed but not feel overly wet or sticky. Roll the mixture into balls about one and a half inches in diameter, placing them on a parchment-lined baking sheet as you go. Pop the tray into the refrigerator for at least two hours or into the freezer for thirty minutes to firm up. This chilling step is crucial because it prevents the cake balls from falling off the sticks or cracking during dipping. When you're ready to coat them, melt your candy coating according to package directions, dip each lollipop stick about half an inch into the melted coating, then insert it into a chilled cake ball. Dip the entire pop into the coating, tap off excess gently, and stand it upright in a foam block or turned-over colander to set. The whole process from start to finish takes about three hours, but most of that is hands-off chilling time.
Stretching It Further
The beauty of red velvet cake pops is how easily they multiply to feed more people or extend across multiple occasions. If you're feeding a large gathering, double the cake recipe and use a full sheet pan instead of a nine-by-thirteen, you'll get nearly fifty pops from one doubled batch. Freeze half of the uncoated cake balls for future use, and you've essentially created two separate dessert opportunities from one baking session. When you're ready to use frozen cake balls, simply thaw them in the refrigerator overnight before dipping. You can also transform leftover red velvet cake pops into other desserts if you find yourself with extras. Crumble them over ice cream for an instant sundae topping, or layer them with whipped cream in parfait glasses for an impressive no-bake trifle. If you have cake ball mixture left over before forming and you've made too much, press it into a parchment-lined pan and cut it into truffle squares instead of rolling balls, same delicious flavor with even less work. The cake base itself is versatile enough to become cupcakes if you'd rather skip the pop-making process on a busy week. Making red velvet cake pops in bulk and storing them properly means you always have an affordable homemade treat ready to go, whether for unexpected guests or a personal reward after a long day.
Smart Swaps and Variations
Red velvet cake pops are wonderfully adaptable, and smart substitutions can drive costs down even further while keeping flavor high. If cream cheese feels expensive, substitute half of it with additional softened butter and add a tablespoon of sour cream or plain yogurt for tanginess. You'll save about two dollars per batch without sacrificing the binding quality or flavor. For the cake itself, buttermilk is traditional but pricey, so use regular milk with one tablespoon of white vinegar stirred in and let it sit for five minutes before adding to your batter. This creates the same acidic reaction at a fraction of the cost. Instead of artificial red food coloring, try using beet powder for a natural alternative, though your color will be more burgundy than bright red. Coat your red velvet cake pops in white chocolate, dark chocolate, or even peanut butter coating depending on what's on sale, each variation offers a different flavor profile. If you want to skip coating altogether for maximum savings, roll the cake balls in cocoa powder, powdered sugar, or finely chopped nuts instead. For a fun twist, add a teaspoon of espresso powder to the cake batter to deepen the chocolate notes, or fold mini chocolate chips into the cake crumb mixture before rolling. You can create a cookies-and-cream version by substituting crushed chocolate sandwich cookies for some of the cake crumbs. During different seasons, adjust your decorations rather than the base recipe, use what's affordable and available rather than expensive specialty sprinkles or edible decorations.
Storage and Reheating
Proper storage keeps your red velvet cake pops fresh and delicious for much longer than you might expect, maximizing your batch-cooking efforts. Once the candy coating has fully set, you can store the pops at room temperature in an airtight container for up to three days, making them perfect for preparing ahead of gatherings. For longer storage, refrigerate them in a covered container for up to two weeks, though you'll want to bring them to room temperature before serving for the best texture and flavor. The coating may develop a slight condensation when moving from cold to warm, so let them sit unwrapped for about twenty minutes before serving. For maximum longevity, freeze coated red velvet cake pops by arranging them in a single layer on a baking sheet until solid, then transferring to freezer bags with parchment paper between layers. They'll keep beautifully for up to three months in the freezer. Thaw frozen pops in the refrigerator overnight, still in their container to prevent condensation from affecting the coating. If you're storing just the cake ball mixture before coating, it keeps in the refrigerator for up to five days or in the freezer for three months sealed tightly. Red velvet cake pops actually taste slightly better the day after making them because the flavors have time to meld and develop, so don't worry about making them a day or two in advance. There's no reheating necessary with these treats since they're meant to be enjoyed at room temperature, which also makes them incredibly convenient.
Your Questions Answered
Can I make red velvet cake pops without a stand mixer?
Absolutely, and in fact, many home bakers prefer making these by hand to avoid overmixing the cake batter. You can whisk the dry ingredients together in one bowl, combine the wet ingredients in another, then fold them together with a wooden spoon or spatula. The crumbling and mixing stage works perfectly well with your hands, giving you better control over the texture of your cake ball mixture.
What's the cheapest way to buy ingredients for multiple batches?
Buy your dry ingredients like flour, sugar, and cocoa powder in bulk from warehouse stores, and stock up on candy melts when they go on sale, especially during clearance times. Store-brand cream cheese and butter work just as well as name brands for a fraction of the price. Food coloring and lollipop sticks can be purchased in large quantities online for significant per-unit savings if you plan to make red velvet cake pops regularly.
How many cake pops can I make from one box cake mix?
A standard box cake mix yields approximately 40 to 48 cake pops depending on how large you roll your balls. Using a box mix is a legitimate shortcut that can actually save money compared to buying small quantities of individual ingredients. Just be sure to let the cake cool completely and follow the same crumbling and binding process for best results with your red velvet cake pops.
Can I make these without lollipop sticks?
Definitely, and it saves money on supplies too. Simply form the cake mixture into balls or truffle shapes, dip them in coating using a fork or dipping tool, and let them set on parchment paper. These become cake truffles instead of pops, but the flavor is identical and they're actually easier to eat. You can also press the mixture into mini muffin tins for uniform shapes that don't require any dipping tools.
Will red velvet cake pops work for feeding a large crowd?
They're actually ideal for large gatherings because you can make them days in advance and they're naturally portion-controlled. One batch of homemade red velvet cake pops typically yields about 30 to 36 pops, and doubling the recipe is simple. Calculate about two to three pops per person for a dessert table, or one to two if you're offering other sweets alongside them.
What should I do if my cake balls keep falling off the sticks?
This usually means either your cake mixture is too crumbly or your balls weren't chilled long enough before dipping. Make sure to add enough frosting that the mixture holds together firmly when squeezed, and always chill for at least two hours. Dipping the stick in melted coating before inserting it into the ball creates a stronger bond. Let that initial stick insertion set for a few minutes before dipping the entire red velvet cake pop into the coating.
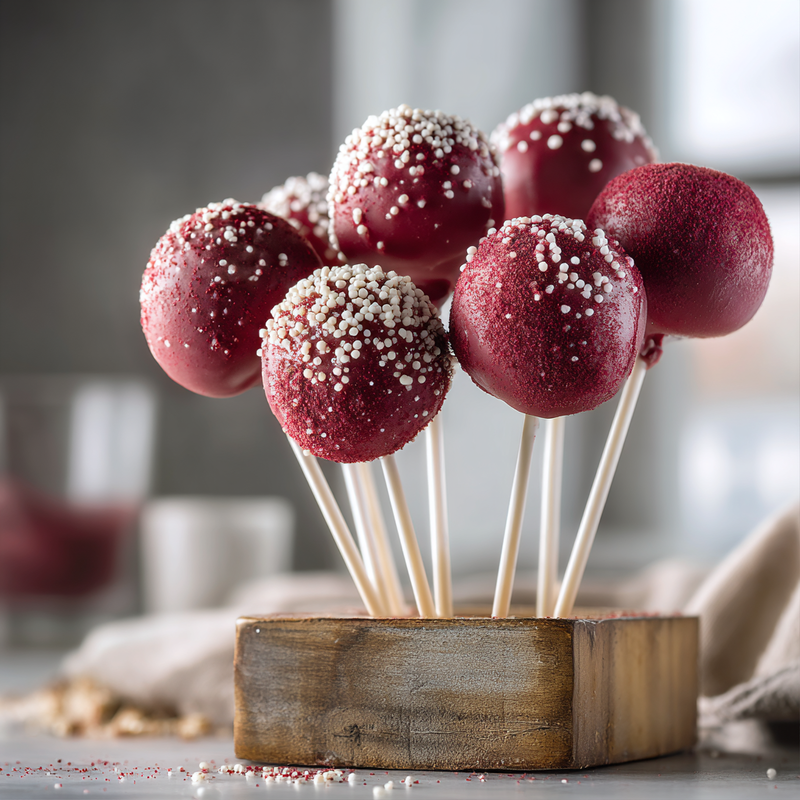
Red Velvet Cake Pops
Gorgeous homemade red velvet cake pops with cream cheese frosting, coated in smooth candy melts for an affordable bakery-quality treat.
Prep Time
45 min
Cook Time
25 min
Total Time
3h 10m
Servings
36 cake pops
Ingredients
For 36 cake pops
- 1 1/2 cups all-purpose flour
- 1 cup granulated sugar
- 2 tablespoons unsweetened cocoa powder
- 1 teaspoon baking soda
- 1/2 teaspoon salt
- 1 cup vegetable oil
- 1 cup buttermilk, room temperature
- 2 large eggs, room temperature
- 2 tablespoons red food coloring
- 1 teaspoon white vinegar
- 1 teaspoon vanilla extract
- 8 ounces cream cheese, softened
- 1/4 cup unsalted butter, softened
- 2 cups powdered sugar
- 1 teaspoon vanilla extract
- 16 ounces candy melts or chocolate coating
- 36 lollipop sticks
- Sprinkles for decoration, optional
Instructions
- 1
Prepare and bake cake
Preheat your oven to 350°F and grease a 9x13-inch baking pan. In a large bowl, whisk together flour, sugar, cocoa powder, baking soda, and salt. In another bowl, combine oil, buttermilk, eggs, red food coloring, vinegar, and vanilla extract. Pour wet ingredients into dry ingredients and mix until just combined. Pour batter into prepared pan and bake for 23-25 minutes until a toothpick inserted in the center comes out clean.
- 2
Cool and crumble cake
Allow the cake to cool completely in the pan, about one hour at room temperature. Once cooled, use your hands or a fork to crumble the entire cake into a large bowl, breaking it into fine crumbs. Make sure there are no large chunks remaining, aiming for a texture similar to coarse sand.
- 3
Make cream cheese frosting
In a medium bowl, beat together softened cream cheese and butter until smooth and creamy. Gradually add powdered sugar and vanilla extract, mixing until fully incorporated. The frosting should be smooth and spreadable without being runny.
- 4
Bind cake mixture
Add three-quarters cup of cream cheese frosting to the cake crumbs and mix thoroughly with your hands or a sturdy spoon. The mixture should hold together when squeezed but not feel overly wet. Add more frosting one tablespoon at a time only if needed to achieve the right consistency.
- 5
Form cake balls
Using a small cookie scoop or tablespoon, portion out the cake mixture and roll into balls about 1.5 inches in diameter. Place each ball on a parchment-lined baking sheet as you work. Try to make them as uniform as possible so they cook and look consistent.
- 6
Chill cake balls
Transfer the baking sheet to the refrigerator and chill for at least two hours, or place in the freezer for 30 minutes. The balls need to be very firm before dipping to prevent them from falling apart or sliding off the sticks during coating.
- 7
Melt coating
Melt candy melts according to package directions, either in the microwave in 30-second intervals or in a double boiler. Stir until completely smooth. The coating should be fluid enough to easily dip but not so thin that it runs off immediately.
- 8
Attach sticks
Dip the tip of a lollipop stick about half an inch into the melted coating, then insert it straight into a chilled cake ball, pushing it in about halfway. The coating acts as glue to secure the stick. Repeat with all cake balls and let the coating set for 2-3 minutes.
- 9
Dip cake pops
Holding the stick, dip each cake ball completely into the melted coating, submerging it fully. Gently tap the stick against the side of the bowl to remove excess coating, rotating as you tap. Work quickly but gently to maintain a smooth finish.
- 10
Decorate and set
Immediately add any sprinkles or decorations while the coating is still wet. Stand each cake pop upright in a foam block, empty egg carton, or inverted colander to dry completely. Allow coating to set for at least 30 minutes at room temperature before serving or storing.
Nutrition Facts
Per serving (estimated)
185 calories
Calories
24g
Carbs
2g
Protein
9g
Fat
1g
Fiber
125mg
Sodium
18g
Sugar


