
Quick 1-Hour Sourdough Discard Rolls: Budget-Friendly Buns
Transform sourdough discard into soft, fluffy dinner rolls in just 1 hour! These budget-friendly buns cost pennies per serving. Perfect recipe.
cookwithlucia.com/recipes/quick-1-hour-sourdough-discard-rolls-soft-fluffy-dinner-buns
Let me tell you something that transformed my weekly meal planning: discovering I could turn something I'd been throwing away into the most delicious, pillowy soft dinner rolls imaginable. If you maintain a sourdough starter, you know the drill—you feed your starter, and you're left with this tangy discard that feels wrong to waste. But what if I told you that discard could become quick 1-hour sourdough discard rolls that rival anything from a fancy bakery, all while costing you less than fifty cents per serving?
These soft and fluffy dinner buns have become my secret weapon for stretching meals and making even the simplest dinner feel special. The beauty of this recipe lies in its practicality: you're using something that would otherwise go down the drain, combining it with the most basic pantry staples, and creating restaurant-quality bread in a fraction of the time traditional rolls require. No overnight proofing, no complicated techniques, just straightforward baking that delivers incredible results. Whether you're serving soup, building sliders, or just want fresh bread on the table, these rolls deliver big flavor on a tiny budget.
Why This Recipe Is a Budget Winner
The economics of these quick 1-hour sourdough discard rolls are genuinely remarkable when you break them down. First, you're utilizing sourdough discard that costs you absolutely nothing—it's a byproduct you already have. The remaining ingredients are flour, milk, butter, sugar, yeast, and salt, all of which are pantry staples that you probably already stock. A batch of twelve rolls uses maybe two dollars worth of ingredients total, bringing your per-roll cost to about seventeen cents. Compare that to bakery rolls at two to three dollars each, or even store-bought dinner rolls at four to five dollars per package of eight.
Beyond the raw ingredient savings, these rolls help you stretch more expensive main dishes further. That roasted chicken that might serve four people? Suddenly it serves six when you're filling half the plate with homemade rolls. The leftover stew that's running low becomes a complete meal when you've got fresh bread for dipping and soaking up every drop. I've found that serving homemade bread makes even the most budget-conscious meals feel abundant and generous, transforming perception entirely.
The recipe also produces zero waste, which is budget-minded cooking at its finest. You're rescuing discard from the compost bin, and these rolls are so delicious that every single one gets eaten—no sad, stale leftovers going uneaten. Plus, the active hands-on time is minimal, maybe fifteen minutes of actual work, which means you're not spending hours to achieve these savings. The efficiency of time and money makes this recipe an absolute winner for anyone watching their grocery budget while refusing to compromise on quality or taste.
Affordable Ingredients, Maximum Impact
Let's talk about what goes into these soft and fluffy dinner buns and why each ingredient punches above its weight class. The star, of course, is sourdough discard—literally free if you maintain a starter. That discard brings complex, tangy flavor that would cost you extra at an artisan bakery, plus it adds tenderness to the crumb. If you're not maintaining a starter yet, consider that a small initial investment in flour and water that keeps giving indefinitely, making it one of the most cost-effective baking projects you can undertake.
All-purpose flour forms the structure of these rolls, and buying it in bulk brings the cost down to pennies per cup. I purchase flour in ten or twenty-five pound bags, which drops the per-pound price significantly. You can often find store-brand all-purpose flour for less than fifty cents per pound, and it works beautifully in this recipe—no need for expensive bread flour or specialty flours. The milk adds richness and helps create that soft, tender texture we're after. Whole milk works best, but even the most budget-friendly option from your store will deliver excellent results. If milk prices spike, you can substitute water with a tablespoon of powdered milk stirred in.
Butter contributes flavor and keeps these quick 1-hour sourdough discard rolls soft for days, but you only need a few tablespoons for the entire batch. When butter goes on sale, I stock up and freeze it, ensuring I always have it at the lowest price point. The instant yeast is what makes the one-hour timeline possible, and while yeast might seem pricey per jar, buying it in bulk from warehouse stores or online brings the cost to mere cents per batch. One pound of yeast costs about six dollars and makes roughly fifty batches of rolls—that's twelve cents per dozen rolls.
Sugar feeds the yeast and adds a subtle sweetness that balances the tang from the sourdough discard, and you need less than a quarter cup. Salt is the final essential ingredient, enhancing every other flavor in the dough. These simple, affordable ingredients combine to create something that tastes far more expensive than the sum of its parts, which is exactly what smart budget cooking is all about.
How to Make Quick 1-Hour Sourdough Discard Rolls
The process for these soft and fluffy dinner buns is beautifully straightforward, designed for efficiency without sacrificing quality. You'll start by warming your milk to about body temperature—not hot, just pleasantly warm—which creates the perfect environment for yeast activation. In a large mixing bowl, combine the warm milk with sugar and instant yeast, giving it a quick stir and letting it sit for about five minutes until it becomes foamy. This proves your yeast is alive and ready to work. Then you'll add your sourdough discard, melted butter, salt, and about half the flour, stirring until everything comes together in a shaggy mixture.
Gradually add the remaining flour, mixing until a soft dough forms. You can do this by hand or with a stand mixer fitted with a dough hook—both work perfectly well. Knead the dough for about five to seven minutes until it becomes smooth, elastic, and slightly tacky but not sticky. If it's too sticky, add flour one tablespoon at a time; if it's too dry, add water by the teaspoon. This is where you develop the gluten structure that gives these quick 1-hour sourdough discard rolls their wonderful texture, so don't rush this step even though we're working quickly overall.
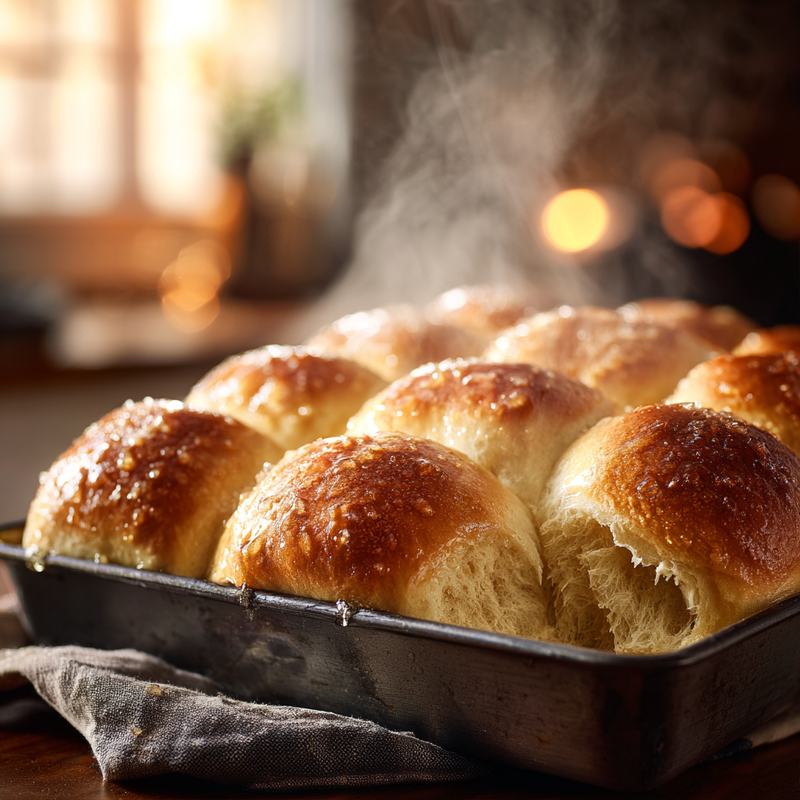
Once your dough is beautifully smooth, divide it into twelve equal pieces—I use a kitchen scale for precision, aiming for about seventy to eighty grams each, but eyeballing works fine too. Shape each piece into a smooth ball by tucking the edges underneath and rolling between your palm and the counter. Place them in a greased nine-by-thirteen-inch baking pan, leaving a little space between each roll. They'll expand and touch as they rise, creating those gorgeous pull-apart edges. Cover the pan with a clean kitchen towel and let the rolls rise in a warm spot for about thirty to thirty-five minutes, until they're puffy and nearly doubled.
While the rolls complete their rise, preheat your oven to 375 degrees Fahrenheit. Once risen, brush the tops with melted butter for that golden, glossy finish, then bake for eighteen to twenty-two minutes until the rolls are golden brown on top and sound slightly hollow when tapped. The moment they come out of the oven, brush them again with butter—this keeps them incredibly soft and adds irresistible flavor. Let them cool for just five minutes before serving, though honestly, they're dangerously good even piping hot. The entire process from mixing bowl to dinner table takes about sixty minutes, delivering fresh-baked perfection exactly when you need it.
Stretching It Further
These quick 1-hour sourdough discard rolls are already budget-friendly, but let's talk about maximizing their value even more. First, consider doubling the batch and freezing half. The dough freezes beautifully either after shaping or after baking. If freezing unbaked rolls, shape them, place them on a baking sheet to freeze individually, then transfer to a freezer bag. When you need fresh rolls, let them thaw and rise for about an hour before baking. If freezing baked rolls, let them cool completely, wrap tightly, and freeze for up to three months. Reheat them wrapped in foil at 350 degrees for ten minutes, and they taste freshly baked.
Leftover rolls—though there rarely are any—transform into multiple meals throughout the week. Turn them into slider buns for pulled chicken or meatball sandwiches, stretching expensive proteins further by serving smaller portions on bread. Cube day-old rolls and toast them for the most incredible homemade croutons that elevate budget-friendly salads into something special. You can also make bread pudding, stuffing, or breadcrumbs from rolls that have gone slightly stale, ensuring absolutely nothing goes to waste.
Another brilliant strategy is using these soft and fluffy dinner buns as the foundation for creative meal planning. Make a double batch on the weekend, and suddenly you have the building blocks for multiple meals: breakfast sandwiches, lunch sliders, dinner rolls, and snack-time mini pizzas. One recipe becomes the backbone of your entire week's meal plan, dramatically reducing your grocery bill while adding homemade goodness to every meal. The versatility of these rolls means you're never eating the same thing twice, even though you've invested time in baking just once.
Smart Swaps and Variations
The beauty of these quick 1-hour sourdough discard rolls lies in their adaptability to whatever ingredients you have on hand or whatever's cheapest at the store. If milk prices are high, substitute equal parts water, or use non-dairy milk like soy or oat milk, which often goes on sale. The rolls will be slightly less rich but still wonderfully soft. You can also use the leftover liquid from canned beans or chickpeas—seriously—for added protein and a subtle flavor boost that costs nothing since you'd be draining it anyway.
Butter can be swapped for an equal amount of neutral oil like canola or vegetable oil, which is often cheaper and works perfectly well in the dough. You'll lose a tiny bit of buttery flavor, but the rolls remain tender and delicious. For a dairy-free version that's even more budget-friendly, use oil in the dough and brush with olive oil instead of butter before and after baking. The sourdough tang compensates beautifully for any richness you might miss from dairy.
Get creative with additions based on what needs using up in your kitchen. Minced fresh herbs from that bunch you bought for another recipe transforms these into herbed rolls. A handful of shredded cheese mixed into the dough adds protein and flavor while using up odds and ends from your cheese drawer. Seeds like sesame, poppy, or sunflower sprinkled on top before baking add texture and nutrition for pennies. You can even make these sweet by increasing the sugar slightly and adding cinnamon, turning your quick 1-hour sourdough discard rolls into breakfast buns that eliminate the need for expensive pastries.
For the most budget-conscious variation, reduce the butter to just one tablespoon and use water instead of milk. You'll still get excellent rolls, just slightly less rich, and you'll save another fifty cents per batch. During summer when fresh herbs grow abundantly, add whatever's thriving in your garden. During winter, dried herbs from the dollar store work beautifully at a fraction of the cost of fresh.
Storage and Reheating
Proper storage ensures these soft and fluffy dinner buns maintain their wonderful texture and continue delivering value long after baking. At room temperature, store the rolls in an airtight container or resealable bag for up to three days. They stay remarkably soft thanks to the butter and milk in the dough, plus the moisture from the sourdough discard. Don't refrigerate them unless absolutely necessary, as refrigeration actually accelerates staling in bread products, making them dry and crumbly faster than leaving them on the counter.
For longer storage, freezing is your best friend. Once the rolls have cooled completely, place them in a freezer-safe bag, pressing out as much air as possible. They'll keep beautifully for up to three months without any loss of quality. To reheat frozen rolls, you have several options depending on your timeline. For quick results, microwave individual rolls for fifteen to twenty seconds until warmed through. For the best texture that rivals fresh-baked, wrap them in foil and heat in a 350-degree oven for about ten to twelve minutes. The foil trapping steam helps restore moisture and softness.
Interestingly, these quick 1-hour sourdough discard rolls actually develop more complex flavor after a day or two, as the sourdough tang becomes more pronounced. Many people prefer them on day two, especially when used for sandwiches where that extra tang complements savory fillings. If rolls do become slightly stale, don't toss them—slice them in half, brush with olive oil, and toast them for incredible garlic bread or bruschetta bases. That staling actually becomes an advantage, creating the perfect texture for soaking up flavored oils without becoming soggy.
Your Questions Answered
Can I make these rolls without sourdough discard?
Absolutely, though you'll lose the characteristic tang and the budget benefit of using free discard. Replace the sourdough discard with an equal amount of all-purpose flour and water mixed together, using a roughly equal ratio. You'll need to adjust the total flour and liquid in the recipe slightly, adding flour until you reach the right dough consistency. The rolls will still be delicious, just with a more straightforward bread flavor rather than that complex sourdough note.
What's the best way to feed a large family on a tight budget with these rolls?
Double or triple the recipe easily, as these quick 1-hour sourdough discard rolls scale beautifully. A double batch makes twenty-four rolls and still costs under four dollars total. Serve them alongside budget-friendly proteins like beans, lentils, or eggs, where the bread helps fill everyone up and makes the meal feel more substantial. Many families find that adding homemade bread to the table reduces how much expensive protein they need to serve, as people fill up on the rolls first.
Can the dough be made ahead to save time during busy weekdays?
Yes, with a slight modification to the technique. Mix and knead the dough, then immediately cover and refrigerate it for up to twenty-four hours instead of letting it rise at room temperature. The cold temperature slows the yeast activity dramatically. When you're ready to bake, remove the dough, shape the rolls, and let them rise at room temperature for about forty-five minutes to an hour before baking. This cold fermentation actually develops even more flavor while giving you flexibility in timing.
How can I make these rolls even softer?
For ultra-soft rolls, try a technique called tangzhong, which involves cooking a small portion of the flour and liquid into a paste before adding it to the dough. Take two tablespoons of flour and six tablespoons of milk from your recipe, cook them together until thickened, then cool and add to your dough. This creates incredibly soft, fluffy dinner buns that stay fresh even longer. Alternatively, simply increase the butter by one tablespoon and add an extra egg yolk, both of which tenderize the crumb beautifully.
What's the cheapest protein to serve alongside these rolls?
Beans and lentils are unbeatable for cost per serving, often under twenty-five cents per person. A simple pot of seasoned beans served with these quick 1-hour sourdough discard rolls makes a complete, satisfying meal for under one dollar per person. Eggs are another excellent budget option, especially when prices are low. Even affordable cuts of chicken, like leg quarters or thighs, stretch further when you're serving homemade bread alongside, as people naturally eat smaller portions of protein when they're filling up on delicious rolls.
Do these rolls work for meal prep and weekly planning?
They're actually ideal for meal prep because they maintain quality so well and serve multiple purposes throughout the week. Bake a batch on the weekend, use some for dinner that night, pack some in lunches as sandwich bread, freeze some for later in the week, and save a few for breakfast sandwiches. This single recipe replaces store-bought sandwich bread, burger buns, and dinner rolls, saving you money across multiple shopping categories while ensuring you always have fresh-baked bread available whenever you need it.
The Real Value of Homemade Bread
Beyond the obvious financial savings, making these quick 1-hour sourdough discard rolls regularly brings value that's harder to quantify but deeply meaningful. There's something profoundly satisfying about transforming the simplest ingredients into food that brings people together around your table. When you serve homemade bread, you're offering hospitality and care in a way that store-bought items simply cannot match, regardless of their price point.
These soft and fluffy dinner buns also represent a shift in how we think about cooking and budgeting. Rather than viewing frugal cooking as deprivation or settling for less, this recipe demonstrates that budget-friendly food can be absolutely delicious, impressive, and special. You're not sacrificing quality to save money—you're being smart about where you invest your time and resources. The skills you develop making these rolls transfer to countless other recipes, building confidence and competence that saves money across your entire cooking life.
The environmental impact matters too, especially when you're using sourdough discard that would otherwise be waste. By finding delicious uses for byproducts, you're participating in a more sustainable food system while keeping more money in your pocket. It's a win-win situation that feels good on multiple levels. Plus, the aroma of fresh-baked bread filling your home is its own reward, creating an atmosphere of warmth and abundance that money truly cannot buy.
I encourage you to try these quick 1-hour sourdough discard rolls even if you're new to bread baking. The process is forgiving, the timeline is manageable even on busy days, and the results are so rewarding that you'll find yourself making them weekly. Start with the basic recipe, then experiment with the variations and swaps that make sense for your budget and preferences. Before long, you'll wonder how you ever managed without this recipe in your regular rotation. The combination of speed, affordability, and absolutely delicious results makes these rolls a true kitchen staple that earns its place in your recipe collection for years to come.
Quick 1-Hour Sourdough Discard Rolls: Soft & Fluffy Dinner Buns
Transform sourdough discard into incredibly soft, fluffy dinner rolls in just one hour. These budget-friendly buns use simple pantry staples and deliver bakery-quality results perfect for any meal.
Prep Time
20 min
Cook Time
20 min
Total Time
1h
Servings
12 rolls
Ingredients
For 12 rolls
- 1 cup (240ml) whole milk, warmed to 110°F
- 1 cup (240g) sourdough discard, unfed and at room temperature
- 3 tablespoons (42g) unsalted butter, melted, plus more for brushing
- 2 tablespoons (25g) granulated sugar
- 2 teaspoons (7g) instant yeast
- 1 1/2 teaspoons (9g) salt
- 3 1/2 to 4 cups (420-480g) all-purpose flour, divided
Instructions
- 1
Activate the yeast
In a large mixing bowl, combine the warmed milk, sugar, and instant yeast. Stir gently and let the mixture sit for about 5 minutes until it becomes foamy on top, indicating the yeast is active. This step ensures your rolls will rise properly and develop the right texture.
- 2
Mix wet ingredients
Add the sourdough discard, melted butter, and salt to the yeast mixture. Stir until everything is well combined and the discard is fully incorporated. The mixture will look slightly lumpy at this stage, which is perfectly normal.
- 3
Form the dough
Add 2 cups of flour to the wet ingredients and stir until a shaggy dough begins to form. Gradually add the remaining flour, about 1/2 cup at a time, mixing well after each addition. Continue adding flour until the dough pulls away from the sides of the bowl and is soft but not overly sticky. You may not need all the flour, or you might need slightly more depending on humidity.
- 4
Knead the dough
Turn the dough out onto a lightly floured surface and knead for 5 to 7 minutes by hand, or use a stand mixer with a dough hook for 4 to 5 minutes on medium speed. The dough is ready when it's smooth, elastic, and springs back when poked gently. It should feel slightly tacky but not stick to your hands.
- 5
Divide and shape
Divide the dough into 12 equal pieces, each weighing about 70 to 80 grams if using a scale. Shape each piece into a smooth ball by tucking the edges underneath and rolling between your palm and the counter in a circular motion. This creates surface tension that helps the rolls rise tall and even.
- 6
Arrange for rising
Grease a 9x13-inch baking pan with butter or cooking spray. Place the shaped rolls in the pan, spacing them about 1 inch apart. They will expand during rising and baking to create beautiful pull-apart rolls. Cover the pan loosely with a clean kitchen towel.
- 7
Let rise
Place the covered pan in a warm, draft-free location and let the rolls rise for 30 to 35 minutes, until they're puffy, nearly doubled in size, and touching each other. While they rise, preheat your oven to 375°F (190°C) so it's ready when the rolls finish their rise.
- 8
Brush and bake
Once risen, brush the tops of the rolls generously with melted butter. This creates a beautiful golden color and adds flavor. Bake for 18 to 22 minutes, until the tops are golden brown and the rolls sound slightly hollow when tapped. An instant-read thermometer inserted into the center should read about 190°F.
- 9
Finish and serve
Remove the pan from the oven and immediately brush the hot rolls with more melted butter. This final butter coating keeps them incredibly soft and adds irresistible flavor. Let the rolls cool in the pan for about 5 minutes before serving, though they're wonderful even piping hot. Serve warm and enjoy!
Nutrition Facts
Per serving (estimated)
185 calories
Calories
31g
Carbs
5g
Protein
4g
Fat
1g
Fiber
295mg
Sodium
3g
Sugar


