Philly Cheesesteak Bowls | Low Carb & Ready in 30 Minutes
Master the art of Philly cheesesteak bowls in 30 minutes! Low carb, full flavor, and perfect for busy weeknights. All the taste, none of the bread.
cookwithlucia.com/recipes/philly-cheesesteak-bowls-low-carb-ready-in-30-minutes
There's something magical about transforming a beloved sandwich into a bowl that's both satisfying and nourishing. These Philly cheesesteak bowls capture everything you love about the classic street food—tender beef, melted cheese, sweet caramelized peppers and onions—while delivering it in a format that fits perfectly into your low-carb lifestyle. The beauty of this approach is how it actually intensifies the flavors: without bread to compete for attention, every element shines.
I know what you're thinking. Can a bowl really deliver that same indulgent, crave-worthy experience? Absolutely. The secret lies in understanding how to build layers of flavor and texture that make each bite feel complete. When you nail the technique—getting a proper sear on your beef, achieving deep caramelization on your vegetables, and timing your cheese melt just right—you create something that stands proudly on its own.
The intimidation factor here is minimal, which makes this technique perfect for both beginners and experienced home cooks looking for a weeknight win. You're working with straightforward ingredients and familiar flavors, just arranged in a smarter way. Once you understand why each step matters—the high heat for the meat, the patient cooking for the vegetables, the resting period before slicing—the how becomes almost intuitive. These Philly cheesesteak bowls will quickly become a rotation staple, and the technique opens doors to countless other deconstructed favorites.
The Science Behind the Method
The magic of Philly cheesesteak bowls relies on three key chemical processes working in harmony. First, the Maillard reaction transforms your beef from merely cooked to deeply flavorful. When protein and sugars meet high heat, they create hundreds of new flavor compounds—that's what gives you those savory, almost nutty notes that make a cheesesteak irresistible. This reaction only kicks into high gear above 285°F, which is why a screaming hot skillet matters so much.
Caramelization is your second ally, and it's what turns sharp onions and bitter peppers into sweet, complex vegetables. As heat breaks down the natural sugars in these vegetables, they brown and develop new flavors that add depth to your Philly cheesesteak bowls. This process requires patience and the right amount of fat to conduct heat evenly. Rush it, and you'll get steamed vegetables with none of that characteristic sweetness.
Finally, understanding emulsification and fat distribution ensures your cheese doesn't break into a greasy mess. Cheese contains proteins, fat, and water that want to separate when heated. By controlling your heat and adding cheese at the right moment—when there's residual moisture from the vegetables—you create a silky, cohesive sauce rather than an oily puddle. This knowledge transforms you from someone following a recipe to someone who understands how to manipulate ingredients for the best possible result.
Tools and Ingredients You'll Need
Your most important tool for excellent Philly cheesesteak bowls is a large, heavy-bottomed skillet or cast-iron pan. The thermal mass of cast iron holds heat beautifully, giving you consistent browning even when you add cold ingredients. If you don't have cast iron, a stainless steel skillet works wonderfully—just make sure it's at least 12 inches to give everything room to sear rather than steam. Nonstick pans are my last choice here because they can't handle the high heat you need for proper browning.
A sharp chef's knife makes slicing your beef and vegetables a pleasure rather than a chore. You'll want your beef sliced thin—about 1/8 inch thick—which is much easier if you partially freeze it for 20-30 minutes first. A bench scraper or metal spatula helps you flip and move ingredients efficiently, and a good pair of tongs gives you control when you're working with hot ingredients. For budget-friendly alternatives, even a basic metal spatula from the dollar store works fine as long as it's sturdy.
For ingredients, ribeye or sirloin steak gives you the best flavor-to-value ratio. Ribeye offers more marbling and tenderness, while sirloin is leaner but still flavorful. Bell peppers—any color you prefer—and yellow onions form your vegetable base. Provolone cheese is traditional and melts beautifully, but you can use mozzarella or even cheddar if that's what you have. High-quality beef broth or stock adds moisture without extra carbs, and your choice of oil should have a high smoke point—avocado or refined olive oil work perfectly. Skip extra virgin olive oil here; its low smoke point creates bitter flavors at high heat.
The Method, Step by Step
Begin by preparing your ingredients before any heat touches the pan. Slice your beef as thinly as possible—this is where that 20-minute freezer trick really pays off. Pat the slices completely dry with paper towels; moisture is the enemy of browning. Cut your peppers into strips about 1/4 inch wide and slice your onions the same thickness. This uniformity ensures everything cooks at the same rate, which is crucial when you're working quickly. Season your beef generously with salt and black pepper right before cooking, not earlier, to prevent the salt from drawing out moisture.
Heat your skillet over medium-high to high heat until it's genuinely hot—a drop of water should sizzle and evaporate almost instantly. Add about one tablespoon of your high-smoke-point oil and let it shimmer. Working in batches if necessary to avoid crowding, lay your beef slices in a single layer. This is where discipline matters: resist the urge to move them. Let each piece sit undisturbed for 60-90 seconds to develop that caramelized crust. Flip once, cook another 30-45 seconds, then remove to a plate. Your beef should be just barely cooked through; it'll get a bit more heat later when you combine everything.
Reduce your heat to medium and add another small drizzle of oil if your pan looks dry. Add your sliced onions first with a pinch of salt—the salt helps draw out moisture and speeds up caramelization. Cook them for about 4-5 minutes, stirring occasionally, until they start to turn golden and sweet. Then add your peppers. The peppers take less time to soften, so this sequential addition ensures both vegetables finish simultaneously. Cook together for another 5-6 minutes, stirring every minute or so, until everything is tender and lightly browned. The pan should have some flavorful brown bits stuck to the bottom—that's concentrated flavor, not something to worry about.
Once your vegetables reach that sweet, caramelized state, it's time to deglaze. Add about 1/4 cup of beef broth to the hot pan and use your spatula to scrape up all those brown bits. This technique, called deglazing, transforms stuck-on bits into a flavorful sauce that coats everything. Let the liquid reduce by about half—this takes just 1-2 minutes. Now return your beef to the pan along with any juices that accumulated on the plate. Toss everything together for about 30 seconds to reheat the beef and marry the flavors.
Kill the heat completely and immediately add your cheese. For Philly cheesesteak bowls, I prefer tearing or roughly chopping the cheese rather than using slices—it melts more evenly this way. Scatter it over the hot beef and vegetables, then cover the pan with a lid or even a baking sheet for 1-2 minutes. The residual heat creates a steamy environment that melts the cheese into a creamy, cohesive sauce without breaking it. When you remove the lid, give everything a gentle stir to distribute the melted cheese throughout.
Finally, taste and adjust. This is your moment to make these Philly cheesesteak bowls truly yours. Does it need more salt? A crack of fresh black pepper? Some people love a dash of hot sauce or a sprinkle of dried oregano at this stage. The beauty of the bowl format is that you can customize each serving—some people want extra cheese, others want more vegetables. Divide into bowls and serve immediately while everything is hot and the cheese is still gloriously melted.
Troubleshooting Guide
If your beef turns out tough and chewy rather than tender, you likely overcooked it or didn't slice it thin enough. Beef continues cooking from residual heat even after you remove it from the pan, so slightly undercooking during the initial sear is actually ideal. For next time, aim for even thinner slices and don't let them sit in the hot pan for more than two minutes total. If you've already made this mistake, you can salvage things by adding a bit more broth and letting everything simmer together gently for 2-3 minutes to tenderize the beef slightly.
Steamed, pale vegetables instead of caramelized ones mean your pan wasn't hot enough or you overcrowded it. Vegetables release moisture as they cook, and if there's not enough surface area and heat to evaporate that moisture quickly, they'll steam instead of brown. The fix: use a larger pan or cook your vegetables in two batches. Make sure your pan is genuinely hot before adding anything, and resist the urge to stir constantly—let them sit and develop color.
Greasy, separated cheese that looks curdled rather than creamy happens when cheese hits too much direct heat or gets added to a pan that's too hot. Always remove your skillet from heat entirely before adding cheese, and if your cheese tends to break, add a small splash of cream or a pinch of cornstarch mixed with water to help stabilize the emulsion. For Philly cheesesteak bowls, using freshly shredded cheese rather than pre-shredded also helps, since pre-shredded varieties contain anti-caking agents that interfere with melting.
If your finished bowls taste bland despite following the recipe, you probably under-seasoned or didn't develop enough caramelization. Salt should be added at multiple stages: to the beef before cooking, to the onions as they cook, and adjusted again at the end. Those brown bits stuck to your pan contain concentrated flavor—if you skipped the deglazing step or didn't let anything brown properly, you're missing a crucial flavor layer. Remember that low-carb dishes sometimes need more assertive seasoning since you're not getting flavor contributions from bread or starchy sides.
Watery bowls with liquid pooling at the bottom usually mean you didn't let your deglazing liquid reduce enough, or your vegetables released too much moisture. Always cook your deglazing liquid until it's reduced by at least half and looks slightly syrupy. If you're dealing with particularly watery peppers, you can even cook them a minute or two longer to drive off excess moisture before adding the broth.
Taking It to the Next Level
Professional touches elevate these Philly cheesesteak bowls from weeknight dinner to restaurant-quality experience. Try finishing your bowls with a drizzle of truffle oil—just a tiny amount adds luxurious, earthy notes that complement the beef beautifully. Compound butter is another chef's trick: blend softened butter with minced garlic and fresh herbs, then place a small pat on each hot bowl just before serving. As it melts, it creates a silky richness that coats everything.
For deeper, more complex flavor, add a splash of coconut aminos or a high-quality soy sauce alternative during the deglazing stage. This introduces umami that makes the beef taste even beefier. Mushrooms are a natural addition that won't significantly impact your carb count—slice baby bellas or shiitakes thin and cook them along with your peppers for an earthy dimension. Some cooks like to add a pinch of smoked paprika or cumin to their beef seasoning for subtle warmth and complexity.
Texture contrasts make each bite more interesting. Consider topping your Philly cheesesteak bowls with something crunchy—toasted nuts, crispy fried onions (watch the carb count), or even pork-free crispy prosciutto if you can source halal versions. Fresh herbs at the end—a handful of chopped parsley or cilantro—add brightness that cuts through the richness. For those who appreciate heat, pickled jalapeños or a drizzle of hot sauce right before serving provides a spicy-tangy contrast that's absolutely addictive.
Storing Your Results
Philly cheesesteak bowls keep beautifully for meal prep, making them ideal for batch cooking. Store cooled bowls in airtight glass or plastic containers in your refrigerator for up to four days. The key is letting everything cool to room temperature before sealing—trapping steam creates condensation that makes ingredients soggy and reduces shelf life. I like to portion them into individual containers so I can grab one for a quick lunch without reheating more than I need.
For reheating, the microwave works in a pinch, but a skillet gives you better results. Add your refrigerated bowl to a pan over medium heat with a splash of broth or water to create steam. Cover and heat for 4-5 minutes, stirring occasionally, until everything is hot throughout. This gentle reheating prevents the beef from toughening and keeps the vegetables from turning to mush. If you're microwaving, use 50% power and heat in 90-second intervals, stirring between each, until hot.
Freezing is possible but comes with texture trade-offs. The cheese and vegetables won't be quite as perfect after thawing, but the flavors remain delicious. Freeze in portion-sized containers for up to two months, and thaw overnight in the refrigerator before reheating. For best results when freezing, slightly undercook your vegetables initially—they'll finish cooking during reheating. Add fresh cheese after reheating rather than freezing it with the bowl for better texture.
Common Questions
Can I make Philly cheesesteak bowls without a cast-iron skillet?
Absolutely! While cast iron is ideal for heat retention and even browning, any heavy-bottomed skillet works well. Stainless steel is actually my second choice because it develops better fond—those flavorful brown bits—than nonstick surfaces. Just make sure whatever pan you use is at least 12 inches in diameter to prevent overcrowding, which causes steaming instead of searing.
How do I adjust this recipe for high altitude cooking?
High altitude affects cooking primarily through lower boiling points and faster moisture evaporation. For these Philly cheesesteak bowls, you might need to add slightly more broth during deglazing since liquids evaporate more quickly. Your beef and vegetables will actually brown faster due to the drier air, so watch them carefully and potentially reduce your cooking time by 1-2 minutes overall. The cheese melting stage remains unchanged.
Can I double or triple this recipe for a crowd?
You can absolutely scale up, but never crowd your pan. Instead, work in batches using the same pan, keeping finished batches warm in a low oven while you complete the rest. Alternatively, use two large skillets simultaneously if you have two burners available. The timing for each batch remains the same—rushing by overloading one pan will give you steamed, grey meat instead of the caramelized exterior that makes Philly cheesesteak bowls special.
What's the best way to slice beef really thin without a deli slicer?
The freezer is your secret weapon. Place your beef in the freezer for 20-30 minutes until it's firm but not frozen solid. This firms up the meat enough that your knife can glide through cleanly without the meat compressing or tearing. Use your sharpest knife and a smooth, confident slicing motion rather than sawing. Slicing against the grain—perpendicular to the muscle fibers—ensures tenderness in every bite.
My grocery store only has pre-sliced steak. Will that work?
Pre-sliced steak labeled for cheesesteaks or stir-fry works perfectly for these bowls. Just check the thickness—you want pieces around 1/8 inch thick. If they're thicker, you might need to add 30-60 seconds to your cooking time. The advantage of pre-sliced is convenience; the disadvantage is sometimes higher cost and less control over the cut quality. Pat them dry thoroughly before cooking regardless of how they come packaged.
Can I prep any components ahead of time?
Yes! Slice your vegetables up to two days ahead and store them in airtight containers in the refrigerator. You can also slice your beef the night before, keeping it wrapped tightly. What you shouldn't do is cook components ahead and try to assemble later—these Philly cheesesteak bowls are so quick that cooking fresh takes barely longer than reheating, and the results are dramatically better. The exception is if you're meal prepping full bowls for the week, in which case cook everything together as described in the storing section.
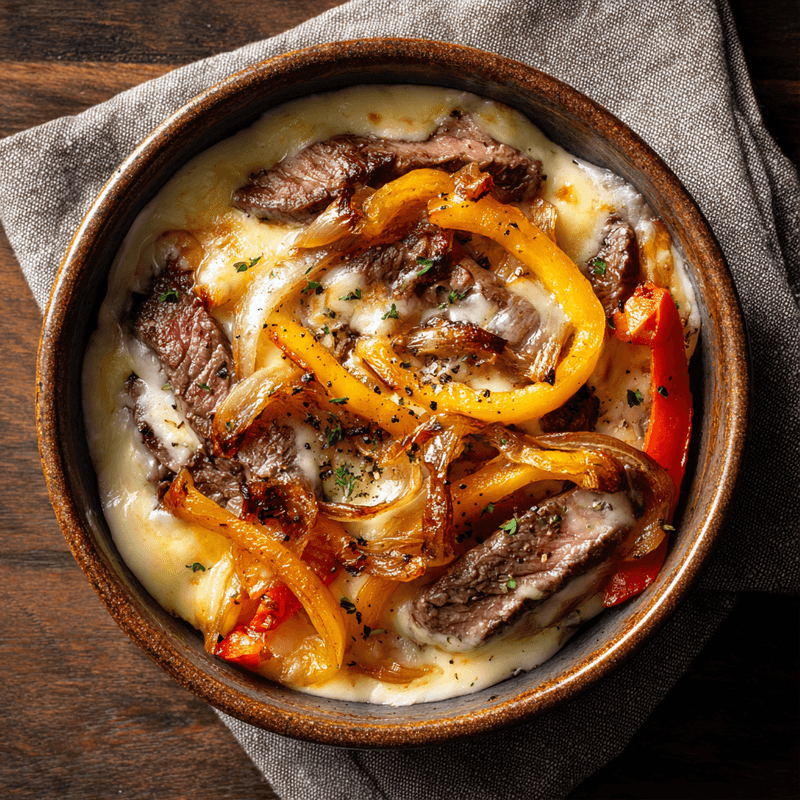
Philly Cheesesteak Bowls
A low-carb take on the classic Philly cheesesteak with tender beef, caramelized peppers and onions, and melted cheese, all ready in just 30 minutes.
Prep Time
10 min
Cook Time
20 min
Total Time
30 min
Servings
4 servings
Ingredients
For 4 servings
- 1.5 pounds ribeye or sirloin steak, sliced very thin (about 1/8 inch thick)
- 2 large bell peppers, any color, sliced into 1/4 inch strips
- 1 large yellow onion, sliced into 1/4 inch strips
- 8 ounces provolone cheese, torn or roughly chopped
- 2 tablespoons avocado oil or refined olive oil, divided
- 1/4 cup beef broth or stock
- 1 teaspoon sea salt, divided
- 1/2 teaspoon freshly ground black pepper
- 1/4 teaspoon garlic powder
- 1/4 teaspoon onion powder
Instructions
- 1
Prepare the beef
Place the steak in the freezer for 20-30 minutes to firm it up. Once firm, slice the beef as thinly as possible, about 1/8 inch thick, cutting against the grain. Pat the slices completely dry with paper towels to ensure proper browning. Season the beef with half the salt, black pepper, garlic powder, and onion powder.
- 2
Sear the beef
Heat a large cast-iron or heavy-bottomed skillet over medium-high to high heat until very hot. Add 1 tablespoon of oil and let it shimmer. Working in batches to avoid crowding, lay beef slices in a single layer. Let cook undisturbed for 60-90 seconds until a brown crust forms, then flip and cook another 30-45 seconds. Remove to a plate and set aside.
- 3
Cook the onions
Reduce heat to medium and add remaining oil if the pan looks dry. Add the sliced onions and a pinch of salt. Cook for 4-5 minutes, stirring occasionally, until the onions begin to turn golden and caramelize. The salt helps draw out moisture and speeds up the caramelization process.
- 4
Add the peppers
Add the sliced bell peppers to the onions in the pan. Cook together for 5-6 minutes, stirring every minute or so, until the peppers are tender and both vegetables are lightly browned and caramelized. You should see some flavorful brown bits developing on the bottom of the pan.
- 5
Deglaze the pan
Pour the beef broth into the hot pan with the vegetables. Use a spatula to scrape up all the brown bits stuck to the bottom—this adds concentrated flavor. Let the liquid reduce by about half, which takes 1-2 minutes, until it looks slightly syrupy.
- 6
Combine beef and vegetables
Return the cooked beef to the pan along with any accumulated juices from the plate. Toss everything together for about 30 seconds to reheat the beef and combine all the flavors. The beef should be heated through but not overcooked.
- 7
Melt the cheese
Turn off the heat completely. Scatter the torn or chopped provolone cheese evenly over the hot beef and vegetable mixture. Cover the pan with a lid or baking sheet for 1-2 minutes. The residual heat and steam will melt the cheese into a creamy sauce.
- 8
Finish and serve
Remove the lid and gently stir to distribute the melted cheese throughout the mixture. Taste and adjust seasoning with additional salt and pepper if needed. Divide the mixture into four bowls and serve immediately while hot and the cheese is still melted and creamy.
Nutrition Facts
Per serving (estimated)
485 calories
Calories
9g
Carbs
42g
Protein
31g
Fat
2g
Fiber
820mg
Sodium
5g
Sugar


