
One-Pan Roasted Carrot and Chickpea Bowl Recipe
Master this vibrant one-pan roasted carrot and chickpea bowl with crispy edges, warm spices, and fluffy grains. Easy weeknight dinner ready in 45 minutes.
cookwithlucia.com/recipes/one-pan-roasted-carrot-and-chickpea-bowl
There's something genuinely magical about watching raw vegetables transform in the oven's heat, their sugars caramelizing into golden-brown edges while chickpeas turn impossibly crispy. The one-pan roasted carrot and chickpea bowl is more than just a recipe—it's a technique that teaches you how to build complete, nourishing meals using a single sheet pan and the dry heat of your oven. When you pull that pan from the oven, you're greeted with carrots that have concentrated into candy-sweet batons with crispy exteriors, chickpeas that shatter like the best croutons, and aromatics that have mellowed into savory depth.
I know the phrase "bowl recipe" might sound intimidating if you're used to following rigid instructions, but this approach is actually incredibly forgiving. The beauty of the one-pan roasted carrot and chickpea bowl lies in understanding a few fundamental principles: proper spacing for crispness, temperature control for even cooking, and the strategic layering of flavors through spices and fresh finishes. Once you grasp why each element works the way it does, you'll find yourself improvising confidently, swapping vegetables based on what's in your refrigerator, and adjusting spices to match your mood.
This technique transforms humble pantry staples into restaurant-quality meals that look stunning in a bowl and taste even better. The contrast of textures—crispy chickpeas against tender grains, caramelized carrots beside fresh herbs—creates eating experiences that keep you coming back for another forkful. Let's break down exactly how to achieve these results every single time.
The Science Behind the Method
Roasting vegetables and legumes at high heat triggers the Maillard reaction, a complex chemical process where amino acids and reducing sugars create hundreds of new flavor compounds. This is why roasted carrots taste fundamentally different from boiled ones—you're not just cooking them, you're transforming their very flavor profile. The dry heat of the oven evaporates surface moisture rapidly, allowing the exterior to brown and crisp while the interior steams in its own retained water, creating that perfect contrast of textures we're after in a one-pan roasted carrot and chickpea bowl.
Chickpeas present a fascinating scientific challenge because they're naturally moist from their cooking or canning liquid. When you drain and thoroughly dry them before roasting, you're removing the barrier that would prevent crisping. The oven's heat then dehydrates the outer layer of each chickpea, causing the starches to crystallize into a crunchy shell while the inside remains creamy. Understanding this moisture principle is crucial—it's why professional kitchens obsessively pat ingredients dry before roasting.
The spices you add before roasting don't just season the vegetables; they also undergo their own transformations. Whole spices release essential oils when heated, toasting brings out nutty undertones in cumin and coriander, and dried herbs bloom in the fat you toss everything with. This knowledge elevates your cooking beyond following recipes—you begin to understand that timing matters, that adding fresh herbs before roasting would burn them, while adding hardy spices early allows them to develop complexity. When you master the science behind the one-pan roasted carrot and chickpea bowl, you're really mastering the fundamentals of flavor development through dry heat.
Tools and Ingredients You'll Need
The foundation of successful sheet pan cooking starts with the pan itself. A heavy-duty rimmed baking sheet, typically 18x13 inches (half-sheet size), provides enough surface area to spread ingredients in a single layer without crowding. Thin, flimsy pans warp at high temperatures and cook unevenly, creating hot spots that burn some vegetables while leaving others pale. If you don't have a professional-grade sheet pan, you can double-stack two thinner pans to create better heat distribution and prevent warping during the roasting process for your one-pan roasted carrot and chickpea bowl.
Parchment paper or a silicone baking mat makes cleanup effortless and prevents sticking, but they're not mandatory—a well-oiled pan works perfectly fine. I avoid aluminum foil for roasting vegetables because it can react with acidic ingredients and sometimes causes sticking despite oil. A good quality chef's knife makes quick work of cutting carrots into uniform pieces, which is essential for even cooking. Uniform sizing matters more than the specific cut—whether you prefer coins, half-moons, or batons, just keep them consistent so everything finishes simultaneously.
For ingredients, you'll want fresh carrots with their greens still attached when possible, indicating freshness and sweetness. Avoid baby carrots, which are often just large carrots machine-cut and tumbled, lacking the natural sugars of whole carrots. Canned chickpeas work beautifully for this technique—look for brands with minimal sodium if you're watching salt intake, and always rinse them thoroughly to remove the starchy canning liquid. Your choice of oil matters: olive oil adds fruity notes, avocado oil handles high heat without smoking, and even coconut oil works if you want subtle tropical undertones in your one-pan roasted carrot and chickpea bowl.
The Method, Step by Step
Begin by preheating your oven to 425°F (220°C), which is the sweet spot for achieving caramelization without burning. While the oven heats, prepare your chickpeas by draining them completely, then spreading them on a clean kitchen towel or several layers of paper towels. Pat them thoroughly dry and let them air-dry for 5-10 minutes—this step dramatically improves crispness and cannot be rushed. Any residual moisture will steam the chickpeas instead of crisping them, so invest this time upfront for vastly better results in your one-pan roasted carrot and chickpea bowl.
Peel your carrots and cut them into pieces about ½-inch thick and 2-3 inches long, adjusting based on the carrot's diameter to maintain consistent thickness. The goal is pieces that will cook through in 25-30 minutes without becoming mushy. In a large mixing bowl, combine the dried chickpeas and cut carrots with 2-3 tablespoons of your chosen oil—enough to coat everything lightly when tossed, creating a glistening surface but not pools of oil. Add your spices now: ground cumin, coriander, smoked paprika, a pinch of cinnamon for warmth, salt, and black pepper create a classic profile that complements both vegetables beautifully.
Toss everything thoroughly with your hands, which works better than spoons for ensuring even coating. You should see and smell the spices distributed across every surface—this tactile step connects you to your cooking and ensures nothing gets left unseasoned. Transfer the mixture to your prepared baking sheet and here's the critical technique: spread everything in a single layer with space between pieces. Crowding causes steaming instead of roasting, resulting in soft, pale vegetables instead of the caramelized gems you're aiming for.
Slide the pan into the preheated oven on the center rack and set a timer for 15 minutes. At this halfway point, remove the pan and use a spatula to flip and redistribute everything, moving pieces from the edges (which cook faster) toward the center and vice versa. This ensures even browning and prevents burning. Notice how the chickpeas are beginning to darken and the carrot edges are taking on color—these visual cues tell you the Maillard reaction is progressing perfectly. Return the pan to the oven for another 12-15 minutes.
Your one-pan roasted carrot and chickpea bowl components are done when the carrots are tender when pierced with a fork but still hold their shape, with deeply caramelized edges ranging from golden to dark brown. The chickpeas should be noticeably crispy on the outside—you can test one by letting it cool for a moment, then biting into it. You should hear a distinct crunch before reaching the creamy interior. If they're still soft, give them another 5 minutes, watching carefully to prevent burning.
While the pan cools slightly, prepare your grain base—quinoa, brown rice, couscous, or even cauliflower rice all work wonderfully. Fresh elements like chopped parsley, cilantro, mint, or green onions should be prepped now, along with any sauce or dressing you're using. A simple tahini drizzle thinned with lemon juice and water, or a yogurt-based sauce with garlic and herbs, provides cooling contrast to the warm, spiced vegetables. The assembly is intuitive: grain on the bottom, roasted vegetables and chickpeas on top, fresh herbs scattered over, and sauce drizzled generously.
Troubleshooting Guide
If your chickpeas turn out soft and mushy instead of crispy, moisture is the culprit. Next time, extend the drying period after rinsing, or even roast them alone for the first 10 minutes before adding the carrots, giving them a head start on dehydration. You can also try patting them with paper towels halfway through roasting if you notice they're releasing moisture. Another trick is tossing dried chickpeas with a tiny bit of cornstarch or arrowroot powder before oiling, which absorbs surface moisture and creates an extra-crispy exterior on your one-pan roasted carrot and chickpea bowl.
Pale, undercooked vegetables that lack caramelization usually indicate your oven temperature was too low or the pan was overcrowded. Invest in an oven thermometer to verify your actual temperature—many ovens run 25-50 degrees cooler than their displays indicate. If overcrowding was the issue, use two pans next time, rotating their positions halfway through cooking. Remember that it's better to roast in batches than to compromise on that essential single-layer spacing that allows moisture to evaporate and edges to crisp.
Burned spots while other areas remain undercooked point to uneven heat distribution or irregular cutting. Check that your carrots are uniformly sized—thick pieces need longer than thin ones, creating that problematic variation. Dark patches specifically on the pan's edges suggest your oven has hot spots; combat this by rotating the pan 180 degrees at the halfway point in addition to stirring. If burning persists, reduce your temperature to 400°F and extend cooking time by 5-8 minutes for gentler, more even caramelization.
Spices that taste bitter or burnt mean they were either applied too heavily or the oven was too hot for delicate spices. Ground spices can burn at high temperatures, especially in direct contact with the hot pan. Try tossing your vegetables in oil first, then adding spices for the final 10 minutes of cooking, or use whole spices like cumin seeds that tolerate heat better. For your one-pan roasted carrot and chickpea bowl, you can also add half the spices before roasting and the other half immediately after removing from the oven for brighter, more vibrant flavor.
Dry, shriveled carrots indicate overcooking or starting with older, dehydrated vegetables. Fresh carrots contain enough natural moisture to steam themselves tender while the exteriors caramelize. If you're working with older carrots, try cutting them slightly thicker to retain more moisture, or reduce cooking time by 5 minutes. You can also toss them with a tablespoon of water or vegetable stock along with the oil, which provides just enough moisture to prevent complete dehydration while still achieving good browning.
Taking It to the Next Level
Professional chefs often use a technique called "pan sauce" even with roasted vegetables—after removing the roasted components, they place the hot sheet pan directly on the stovetop over medium heat, add a splash of vegetable stock or citrus juice, and scrape up all the caramelized bits stuck to the pan. This intensely flavored liquid becomes a finishing sauce that ties the entire one-pan roasted carrot and chickpea bowl together. Whisk in a pat of plant-based butter or an extra drizzle of olive oil for richness and body that coats each ingredient beautifully.
Experiment with layering flavors through different spice applications. Toast whole cumin and coriander seeds in a dry skillet until fragrant, then grind them fresh for exponentially more complex flavor than pre-ground versions. Try spice blends like za'atar, ras el hanout, or berbere for completely different flavor profiles that transform the same basic technique into entirely new dishes. Adding aromatics like smashed garlic cloves or thick onion wedges to the pan during the last 15 minutes introduces another dimension without much extra effort.
For restaurant-quality presentation, consider the visual composition of your bowl. Use a ring mold to pack grains into a neat cylinder in the center, arrange roasted carrots in a fan pattern, and scatter chickpeas artfully rather than dumping everything together. Microgreens, edible flowers, or a sprinkle of dukkah (a nut and seed mixture) on top adds sophistication. A final flourish of flaky sea salt and a drizzle of high-quality finishing oil just before serving elevates the one-pan roasted carrot and chickpea bowl from weeknight dinner to something special enough for guests.
Storing Your Results
The components of your one-pan roasted carrot and chickpea bowl store beautifully when kept separate, maintaining their individual textures much better than if combined. Transfer cooled roasted vegetables and chickpeas to an airtight container and refrigerate for up to five days. The chickpeas will lose some crispness in storage, which is normal and expected—you can revive them by spreading on a baking sheet and warming in a 375°F oven for 5-7 minutes until they crisp up again. The carrots actually develop deeper, more concentrated flavor after a day in the refrigerator as the seasonings permeate more thoroughly.
Store your grain base separately in its own container, which prevents it from absorbing moisture from the vegetables and becoming mushy. Cooked grains typically keep for 4-5 days refrigerated and reheat beautifully with a splash of water or broth in the microwave or on the stovetop. Fresh herbs, sauces, and delicate toppings should always be stored separately and added only when assembling individual servings—this preserves their bright flavors and prevents everything from becoming a soggy, homogeneous mixture.
For meal prep enthusiasts, this technique is ideal because you can roast double or triple batches on multiple sheet pans simultaneously. Portion everything into individual containers with grains on the bottom and roasted components on top, keeping sauce in small separate containers. When you're ready to eat, reheat the base elements for 60-90 seconds in the microwave, add your fresh toppings and sauce, and you have a restaurant-quality one-pan roasted carrot and chickpea bowl in under two minutes. The recipe also freezes reasonably well for up to two months—freeze the roasted vegetables and chickpeas in freezer-safe bags, pressing out excess air, though texture will be slightly softer upon thawing.
Common Questions
Can I make this without an oven using stovetop methods?
Absolutely, though the technique shifts slightly. Use a large cast-iron skillet or heavy-bottomed pan over medium-high heat with enough oil to coat the bottom. Roast the chickpeas first for 8-10 minutes, stirring frequently, until crispy, then remove them. Add the carrots with a bit more oil and cook for 12-15 minutes, stirring occasionally, until caramelized and tender. The results won't be identical to oven-roasted, but you'll still achieve excellent caramelization and the signature flavors of a one-pan roasted carrot and chickpea bowl.
How do I adjust this recipe for high-altitude cooking?
High altitude affects roasting less dramatically than baking, but you may need slight modifications. The lower air pressure means moisture evaporates faster, so your vegetables might dry out before fully caramelizing. Try increasing your oil by about one tablespoon and reducing oven temperature by 25°F while extending cooking time by 5-8 minutes. Keep a closer eye on browning and don't hesitate to add a tablespoon of water if carrots seem to be drying out too quickly before they're fork-tender.
Can I scale this recipe up for a large gathering?
Definitely, with one important caveat: don't overcrowd your pans. For serving 8-10 people, use multiple sheet pans rather than piling everything onto one or two. Rotate pan positions in your oven halfway through cooking, moving bottom pans to the top rack and vice versa, to ensure even heat distribution. Everything can be kept warm in a 200°F oven for up to 30 minutes before serving, or served at room temperature as part of a buffet-style spread where the one-pan roasted carrot and chickpea bowl components become a build-your-own station.
What if I only have canned carrots or frozen vegetables?
Fresh carrots truly make a difference here because their natural sugars caramelize beautifully and their texture holds up to roasting. Canned carrots are too soft and waterlogged to roast successfully—they'll turn to mush. Frozen carrots can work in a pinch, but you must thaw them completely and pat them absolutely dry, then expect slightly softer results. For the best version of this one-pan roasted carrot and chickpea bowl, I strongly recommend using fresh carrots, which are inexpensive and available year-round in most areas.
How can I make this recipe more filling for very hungry eaters?
The beauty of bowl meals is their modularity—you can easily boost heartiness. Increase the grain portion at the base, add roasted sweet potato chunks alongside the carrots, or include a protein element like roasted chicken pieces, grilled fish, or marinated tofu cubes. A generous tahini sauce or cashew cream drizzled over everything adds healthy fats and calories that increase satiety. You might also include a side of warm flatbread for scooping, turning the one-pan roasted carrot and chickpea bowl into an even more substantial meal that satisfies the biggest appetites.
Can I prepare components ahead and assemble later?
This is actually the ideal approach for stress-free entertaining or efficient meal prep. Roast your vegetables and chickpeas up to three days ahead, cook your grains two days before, and prepare your sauce and chop fresh herbs the morning of serving. Everything can be served at room temperature, which is traditional for many grain bowl preparations, or quickly warmed. This advance preparation actually allows flavors to develop and meld, often resulting in a more cohesive, delicious final dish than if everything were made minutes before eating.
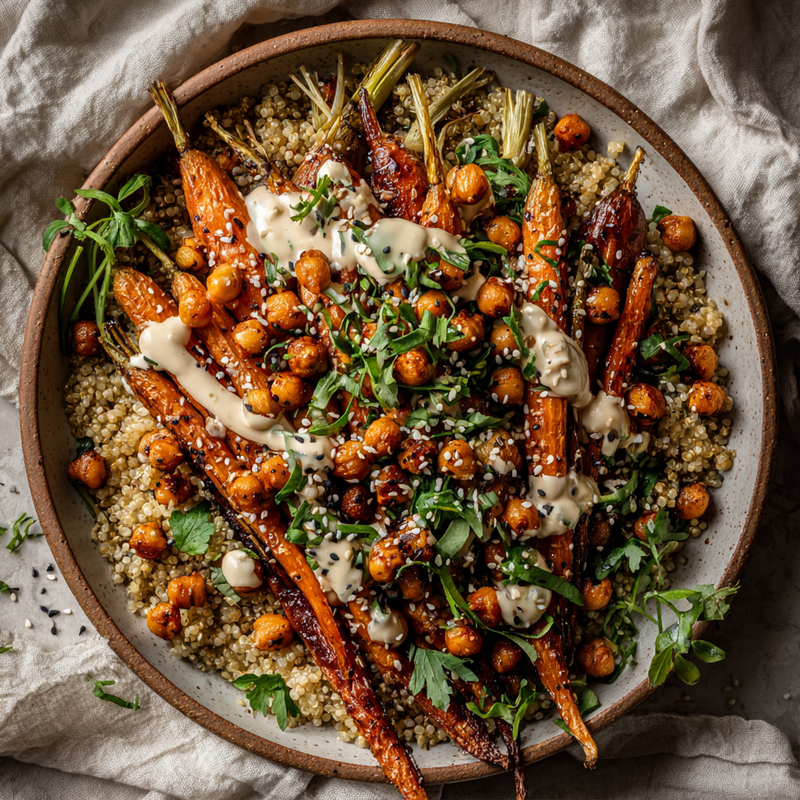
One-Pan Roasted Carrot and Chickpea Bowl
A vibrant, nourishing bowl featuring caramelized roasted carrots and crispy chickpeas over fluffy grains, topped with fresh herbs and creamy tahini sauce. Perfect for easy weeknight dinners or meal prep.
Prep Time
15 min
Cook Time
30 min
Total Time
45 min
Servings
4 servings
Ingredients
For 4 servings
- 1 pound carrots, peeled and cut into ½-inch thick pieces
- 1 can (15 oz) chickpeas, drained, rinsed, and thoroughly dried
- 3 tablespoons olive oil, divided
- 1½ teaspoons ground cumin
- 1 teaspoon ground coriander
- 1 teaspoon smoked paprika
- ¼ teaspoon ground cinnamon
- 1 teaspoon kosher salt
- ½ teaspoon black pepper
- 2 cups cooked quinoa or brown rice, warm
- ¼ cup tahini
- 2 tablespoons fresh lemon juice
- 2-3 tablespoons water
- 1 clove garlic, minced
- ¼ cup fresh parsley, chopped
- ¼ cup fresh cilantro, chopped
- 2 tablespoons toasted sesame seeds
- Pinch of red pepper flakes, optional
Instructions
- 1
Preheat and prep chickpeas
Preheat your oven to 425°F (220°C). Drain and rinse the chickpeas thoroughly, then spread them on a clean kitchen towel or several layers of paper towels. Pat them completely dry and let them air-dry for 5-10 minutes while you prepare the other ingredients. This crucial step removes excess moisture and ensures the chickpeas become crispy during roasting.
- 2
Prepare the carrots
Peel the carrots and cut them into uniform pieces about ½-inch thick and 2-3 inches long. If your carrots vary in diameter, adjust the thickness so all pieces are roughly the same size to ensure even cooking. Consistent sizing is key to having everything finish roasting at the same time with perfect caramelization.
- 3
Season the vegetables
In a large mixing bowl, combine the dried chickpeas and cut carrots. Add 2½ tablespoons of olive oil, cumin, coriander, smoked paprika, cinnamon, salt, and black pepper. Use your hands to toss everything thoroughly, ensuring every piece is evenly coated with oil and spices. You should see a light, glistening coating on all surfaces.
- 4
Arrange on baking sheet
Transfer the seasoned vegetables and chickpeas to a large rimmed baking sheet lined with parchment paper. Spread everything in a single layer with space between pieces—avoid overcrowding, as this causes steaming instead of roasting. If necessary, use two baking sheets to maintain proper spacing for optimal caramelization and crispness.
- 5
Initial roasting
Place the baking sheet on the center rack of the preheated oven and roast for 15 minutes. During this time, the vegetables will begin to soften and the exterior surfaces will start developing golden-brown color. The Maillard reaction is beginning, creating complex flavors and aromas.
- 6
Flip and continue roasting
Remove the pan from the oven and use a spatula to flip and redistribute all the vegetables and chickpeas. Move pieces from the edges toward the center and vice versa to ensure even browning. Return to the oven and roast for an additional 12-15 minutes, until carrots are fork-tender with deeply caramelized edges and chickpeas are crispy on the outside.
- 7
Make the tahini sauce
While the vegetables finish roasting, whisk together the tahini, lemon juice, minced garlic, remaining ½ tablespoon olive oil, and a pinch of salt in a small bowl. Add water one tablespoon at a time, whisking constantly, until the sauce reaches a smooth, pourable consistency. It should be thick enough to coat the back of a spoon but thin enough to drizzle easily.
- 8
Assemble the bowls
Divide the warm cooked grains among four bowls as the base. Top each portion with the roasted carrots and crispy chickpeas, distributing them evenly. Drizzle generously with the tahini sauce, then scatter fresh parsley and cilantro over the top. Finish with toasted sesame seeds and optional red pepper flakes for heat. Serve immediately while the roasted components are still warm and the contrast between warm and cool elements is most pronounced.
Nutrition Facts
Per serving (estimated)
420 calories
Calories
52g
Carbs
14g
Protein
18g
Fat
11g
Fiber
680mg
Sodium
9g
Sugar


