No-Bake Mini Egg Cheesecake: A Showstopping Dessert
This No-Bake Mini Egg Cheesecake is a stunning dessert that looks restaurant-worthy but requires zero oven time. Creamy, impressive, and perfect for gatherings.
cookwithlucia.com/recipes/no-bake-mini-egg-cheesecake
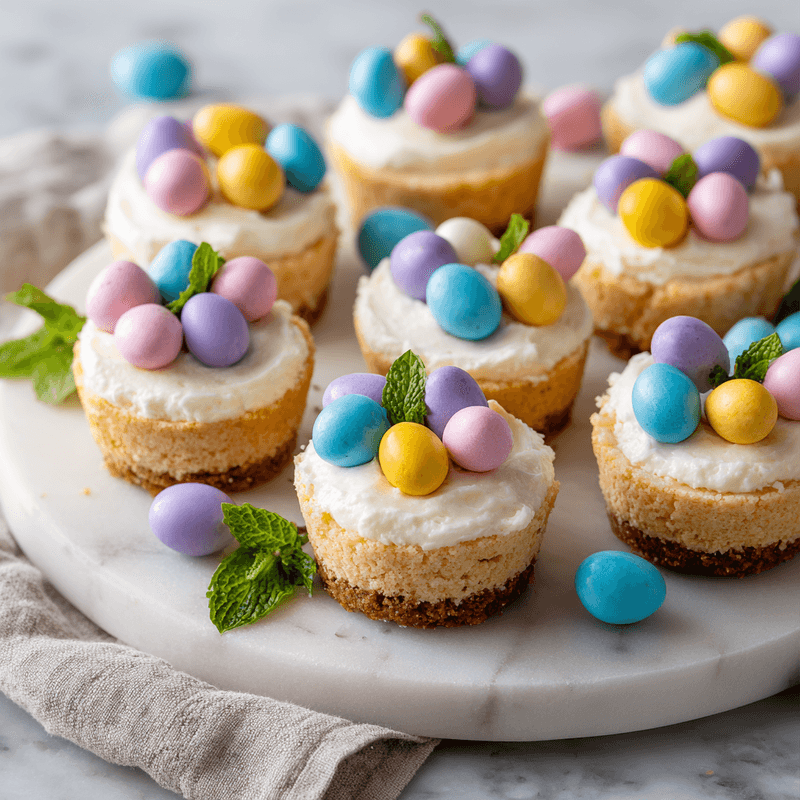
Picture this: you carry a platter of gleaming mini cheesecakes to the table, each one crowned with colorful candy-coated chocolate eggs, and watch as every single person stops mid-conversation to admire them. The creamy filling catches the light, the cookie crust provides a perfect geometric base, and those glossy eggs perched on top transform a simple dessert into something that belongs in a bakery window. Your guests will assume you spent hours in the kitchen, possibly attended culinary school, or at least consulted a professional pastry chef.
Here's the beautiful secret: this No-Bake Mini Egg Cheesecake requires no baking whatsoever. No temperamental oven temperatures to monitor, no risk of cracks forming across the top, no water baths to fuss with. Just a few simple steps, a refrigerator, and your ability to stir ingredients together. The mini format makes them even more approachable than a full-sized cheesecake, eliminating the stress of perfect slicing and portion control. Each guest gets their own pristine dessert, complete with its own decorative topping.
What makes these mini cheesecakes truly special is how they bridge the gap between effortless and elegant. The creamy filling sets up beautifully in the fridge, developing that classic cheesecake tang and velvety texture without any heat required. The individual portions mean you can customize toppings, experiment with flavors, and create a dessert spread that looks like it came from a high-end catering company.
What Makes This a Showstopper
The visual impact of a No-Bake Mini Egg Cheesecake array is undeniable. Imagine a dozen or more individual cheesecakes arranged on a serving board, each one a perfect circle of creamy white filling nestled in a golden cookie crust. The candy-coated eggs on top add pops of pastel color that catch every eye in the room. The height of these miniatures, usually around two to three inches tall, gives them presence despite their small footprint. They look structured, professional, and meticulously crafted.
That first bite delivers exactly what the presentation promises. Your fork or spoon cuts through the creamy filling with almost no resistance, revealing that signature cheesecake density that's rich without being heavy. The cookie crust provides a buttery crunch that contrasts beautifully with the smooth filling. The candy eggs on top add a satisfying snap and a burst of chocolate sweetness that complements the tangy cream cheese base. Every element works in harmony, creating a dessert experience that feels both nostalgic and sophisticated.
What impresses people most is that these look like something you'd pay premium prices for at a specialty bakery. The individual presentation suggests careful attention to detail. The uniformity of size implies precision and skill. Yet the reality is that anyone with basic kitchen skills can create them successfully. There's no need for piping bags, no delicate tempering of chocolate, no architectural engineering to keep layers from sliding. The No-Bake Mini Egg Cheesecake is remarkably forgiving, making it the perfect recipe for when you want maximum impact with minimum stress.
The Ingredients That Matter Most
The foundation of any great cheesecake is the cream cheese itself, and this is where quality truly matters. Full-fat cream cheese creates that luxurious, silky texture that defines a proper cheesecake. I always bring it to room temperature before using it, which prevents lumps and ensures it blends smoothly with the other ingredients. The difference between using cold, hard cream cheese and properly softened cream cheese is the difference between a grainy filling and one that's perfectly smooth.
Your cookie crust deserves attention too. Digestive biscuits or graham crackers work beautifully, providing that slightly sweet, slightly salty base that grounds the rich filling. The butter you mix with the crushed cookies should be unsalted and melted, coating every crumb so the crust holds together when you press it into your molds. Some recipes skimp on butter, resulting in crumbly crusts that fall apart. The right ratio creates a firm base that you can actually lift and eat without everything disintegrating.
The sweetener and stabilizer ingredients play crucial supporting roles. Powdered sugar dissolves more easily than granulated sugar in no-bake fillings, eliminating any grittiness. Heavy cream whipped to soft peaks gets folded into the cream cheese mixture, adding airiness and helping the filling set properly without gelatin. Quality vanilla extract enhances every other flavor rather than tasting artificial or chemical.
The candy-coated chocolate eggs are obviously the crown jewels of this No-Bake Mini Egg Cheesecake. Look for eggs with vibrant shells and quality chocolate inside. They should be fresh enough that the shells have a glossy sheen rather than looking dull or chalky. These aren't just decoration; they contribute genuine chocolate flavor and textural interest to each bite. You can find halal-certified versions at specialty stores or choose other candy-coated chocolates that meet your dietary requirements.
Building It Step by Step
The journey to perfect mini cheesecakes begins with your crust preparation. Crush your cookies into fine crumbs using a food processor or by placing them in a sealed bag and rolling with a heavy object until they're uniformly small. Mix these crumbs thoroughly with melted butter until the mixture resembles wet sand and holds together when squeezed. Press this mixture firmly into the bottom of your individual molds, using the back of a spoon or a small flat-bottomed glass to create an even, compact layer. This compression is essential for a crust that holds its shape when you remove the cheesecakes from their molds.
The filling comes together in a beautifully simple process. Beat your room-temperature cream cheese until it's completely smooth and fluffy, scraping down the bowl sides frequently. Add powdered sugar and vanilla, beating until fully incorporated and the mixture looks lighter in color. In a separate bowl, whip heavy cream to soft peaks, then gently fold it into the cream cheese mixture in three additions. This folding technique, rather than aggressive stirring, preserves the air you've incorporated, resulting in a lighter, more delicate filling.
Assembly is where your No-Bake Mini Egg Cheesecake truly takes shape. Spoon or pipe the filling onto your prepared crusts, filling each mold nearly to the top and smoothing the surface with an offset spatula or the back of a spoon. This is where the magic happens: the filling looks somewhat loose and soft now, but the refrigeration process will transform it into that classic firm-yet-creamy cheesecake texture. Tap each mold gently on the counter to release any air bubbles that might create pockets in your filling.
Chilling requires patience but no active work. Place your assembled mini cheesecakes in the refrigerator for at least four hours, though overnight is ideal. During this time, the cream cheese firms up, the flavors meld together, and the texture develops that perfect sliceability. The crust also benefits from this chilling time, becoming even more cohesive. When you're ready to serve, run a thin knife around the edge of each mold if needed, then carefully unmold each cheesecake onto your serving platter.
Presentation and Plating Tips
The final presentation of your No-Bake Mini Egg Cheesecake can elevate them from beautiful to absolutely stunning. Arrange them on a large white platter or wooden serving board with just enough space between each one that they look intentional rather than crowded. A cake stand gives them extra prominence, literally elevating them above other desserts on your table. The height makes them easier for guests to admire and photograph before diving in.
Garnishing should be done just before serving to ensure everything looks fresh. Place three to five candy eggs on top of each cheesecake in an artful cluster rather than a rigid pattern. Some can nestle right in the center while others perch slightly off-center or even cascade down one side. A light dusting of cocoa powder or a drizzle of melted chocolate around the platter adds a professional bakery touch. Fresh mint leaves tucked between the cheesecakes add a pop of green that makes the pastel eggs stand out even more.
For photographs that do your creation justice, natural light is your best friend. Position your platter near a window during daylight hours and shoot from a slight angle rather than directly overhead. This captures both the height of the cheesecakes and the decorative tops. A simple linen napkin or small dessert forks arranged nearby add context and scale to your photos.
Scaling Up for a Crowd
Doubling or tripling a No-Bake Mini Egg Cheesecake recipe is remarkably straightforward since there's no oven capacity to worry about. The only limitation is refrigerator space and the number of molds you own. If you're making these for a large gathering, consider investing in disposable aluminum cups or silicone molds that you can stack efficiently in your fridge. A double batch typically yields twenty-four to thirty individual cheesecakes, perfect for bigger celebrations.
Advance preparation is your secret weapon when serving a crowd. Make the crusts and press them into molds up to two days ahead, covering them tightly and refrigerating until you're ready to add the filling. The filling itself can be prepared and the cheesecakes assembled a full day before your event, giving them ample time to set completely. In fact, a longer chilling period often improves the texture and allows flavors to develop more fully.
For timing strategy, complete all assembly at least eight hours before serving, ideally the night before. Add your candy egg garnishes no more than two hours before serving to prevent the candy shells from potentially bleeding color onto the creamy surface in humid conditions. Keep the cheesecakes refrigerated until the last possible moment, bringing them out only fifteen minutes before serving to take the chill off slightly, which enhances the creamy texture.
Storing Any Leftovers
If you somehow have leftover No-Bake Mini Egg Cheesecake portions, proper storage keeps them delicious for days. Cover each individual cheesecake loosely with plastic wrap, making sure the wrap doesn't press down onto the decorative topping. Alternatively, place them in a single layer in an airtight container with enough height that the lid doesn't touch the candy eggs. They'll stay fresh in the refrigerator for up to five days, maintaining their creamy texture and structural integrity.
Freezing is absolutely possible and quite successful with these mini cheesecakes. Remove any candy toppings before freezing, as the shells can become discolored or soggy during thawing. Wrap each cheesecake individually in plastic wrap, then place them all in a freezer-safe container or bag. They'll keep frozen for up to two months. When you're ready to enjoy them, transfer to the refrigerator and let them thaw slowly overnight, then add fresh candy eggs before serving.
The texture after refrigeration or proper freezing and thawing remains remarkably close to freshly made. The no-bake method actually has an advantage here since there's no risk of the texture becoming overly dense or dry the way baked cheesecakes sometimes do. The filling stays smooth and creamy, and the crust maintains its pleasant crunch as long as you've stored everything properly sealed against moisture.
Variations to Explore
The basic No-Bake Mini Egg Cheesecake formula welcomes countless variations. Try a chocolate version by adding melted and cooled dark chocolate to the cream cheese filling, creating a rich, cocoa-forward dessert that pairs beautifully with the candy eggs. Or infuse the filling with citrus zest, adding finely grated lemon or orange zest that brightens the richness with fresh, aromatic notes. A few drops of almond extract in place of some vanilla creates a sophisticated flavor profile that tastes expensive and complex.
Seasonal ingredient swaps keep this recipe relevant year-round. Replace the candy eggs with fresh berries during summer months, creating a lighter, fruit-forward dessert. In autumn, add a swirl of caramel through the filling and top with chopped nuts. The individual format makes it easy to offer variety, preparing half the batch with one flavor profile and half with another.
For an even simpler weeknight version when you want the satisfaction of this No-Bake Mini Egg Cheesecake without the molding and unmolding, layer the crust and filling in small mason jars or pretty glasses. You'll get the same delicious flavors and textures with even less fuss, and the jars make portion control effortless. Kids especially love having their own individual serving in a jar they can hold.
Mini versions can go even smaller for party appetizers or dessert buffets. Use mini muffin tins lined with paper cups to create two-bite cheesecakes that guests can pop in their mouths. Or go larger, using ramekins to create cheesecakes that serve two people each for a romantic dessert. The recipe scales beautifully in any direction.
Questions You Might Have
Can I make these several days in advance?
Absolutely, and in fact they often taste even better after sitting for a day or two. The flavors meld together beautifully, and the texture becomes even more luxurious. Make your No-Bake Mini Egg Cheesecake up to three days ahead, storing them covered in the refrigerator. Add the candy egg garnishes on the day you plan to serve them for the freshest, most vibrant appearance.
What if I don't have individual molds?
Muffin tins work perfectly as molds for these cheesecakes. Line each cup with two strips of parchment paper in a cross pattern, leaving overhang on all sides that you can use as handles to lift the cheesecakes out once they're set. Small ramekins, silicone cupcake liners, or even cleaned and dried yogurt containers can serve as molds. The beauty of this recipe is its flexibility with equipment.
Why is my filling too runny?
The most common cause is cream cheese that wasn't at proper room temperature, which prevents it from whipping up properly. Make sure your cream cheese sits out for at least an hour before using. Also ensure you've whipped your heavy cream to actual soft peaks rather than just slightly thickened cream. If your filling seems too soft after mixing, refrigerate it for thirty minutes before assembling, which will help it firm up.
Can I transport these to another location?
Yes, these travel remarkably well compared to full-sized cheesecakes. Keep them in their molds if possible during transport, or place unmolded cheesecakes in a container with dividers to prevent sliding. A cooler with ice packs works perfectly for keeping them chilled during transport. Add your candy egg decorations after you arrive at your destination for the best presentation.
What's the best way to remove them from molds cleanly?
Let them chill completely, at least four hours or overnight. Run a thin knife under hot water, dry it quickly, then run it around the edge of each mold. If using springform pans or push-bottom molds, the release should be smooth. For regular molds, you may need to dip the bottom in warm water for just five seconds to loosen the crust slightly. Work gently and patiently for the cleanest release.
Can I make these without candy eggs?
Certainly! While the candy eggs make these No-Bake Mini Egg Cheesecake creations especially festive and eye-catching, you can top them with anything you like. Fresh berries, chocolate shavings, crushed cookies, toasted nuts, or even a simple dusting of cocoa powder all work beautifully. The base recipe is versatile enough to accommodate whatever garnish suits your occasion or preferences.
No-Bake Mini Egg Cheesecake
Individual no-bake cheesecakes with buttery cookie crusts, creamy filling, and candy-coated chocolate egg topping. No oven required for this stunning dessert.
Prep Time
25 min
Cook Time
0 min
Total Time
4h 25m
Servings
12 mini cheesecakes
Ingredients
For 12 mini cheesecakes
- 200g digestive biscuits or graham crackers
- 85g unsalted butter, melted
- 450g full-fat cream cheese, room temperature
- 120g powdered sugar
- 2 teaspoons pure vanilla extract
- 300ml heavy whipping cream, cold
- 36-48 candy-coated chocolate eggs, halal-certified
- Cocoa powder for dusting, optional
Instructions
- 1
Prepare the crust
Place digestive biscuits in a food processor and pulse until you have fine, uniform crumbs. Alternatively, place them in a sealed plastic bag and crush with a rolling pin. Transfer crumbs to a bowl and mix thoroughly with melted butter until the mixture resembles wet sand and holds together when pressed.
- 2
Form crust bases
Line a 12-cup muffin tin with paper liners or lightly grease individual molds. Divide the cookie mixture evenly among the cups, using about 2 tablespoons per cup. Press down firmly with the back of a spoon or a small flat-bottomed glass to create compact, even bases. Refrigerate while preparing the filling.
- 3
Beat cream cheese
In a large mixing bowl, beat the room-temperature cream cheese with an electric mixer on medium speed for 2-3 minutes until completely smooth and fluffy. Scrape down the sides of the bowl frequently to ensure no lumps remain. The mixture should look lighter in color and texture.
- 4
Add sugar and vanilla
Add the powdered sugar and vanilla extract to the cream cheese. Beat on medium speed for another 1-2 minutes until fully incorporated and the mixture is smooth and creamy. The powdered sugar should be completely dissolved with no graininess remaining.
- 5
Whip the cream
In a separate clean bowl, whip the cold heavy cream with clean beaters on medium-high speed until soft peaks form. This takes about 3-4 minutes. The cream should hold its shape when you lift the beaters but still have a slight droop at the peaks.
- 6
Fold cream into mixture
Add about one-third of the whipped cream to the cream cheese mixture and fold gently with a spatula until mostly combined. Add the remaining whipped cream in two more additions, folding gently each time until no white streaks remain. Be careful not to overmix or deflate the cream.
- 7
Fill the molds
Remove the crusts from the refrigerator. Spoon or pipe the cheesecake filling onto each crust, filling nearly to the top of each cup. Smooth the tops with the back of a spoon or a small offset spatula. Tap the pan gently on the counter a few times to release any air bubbles.
- 8
Chill completely
Cover the muffin tin loosely with plastic wrap, making sure it doesn't touch the filling surface. Refrigerate for at least 4 hours or preferably overnight until the filling is completely set and firm to the touch. The cheesecakes should hold their shape when you press gently on the surface.
- 9
Unmold and decorate
Carefully remove each cheesecake from its mold by lifting the paper liner or running a thin knife around the edge if using regular molds. Place on a serving platter. Top each cheesecake with 3-4 candy-coated chocolate eggs arranged in an attractive cluster.
- 10
Final touches and serve
If desired, lightly dust the platter around the cheesecakes with cocoa powder for a professional presentation. Keep refrigerated until ready to serve. Remove from refrigerator 10-15 minutes before serving for the best creamy texture. Serve chilled and enjoy immediately.
Nutrition Facts
Per serving (estimated)
285 calories
Calories
26g
Carbs
4g
Protein
19g
Fat
1g
Fiber
180mg
Sodium
18g
Sugar


