Mini Cheesecake Jars: Cute Desserts for Spring Brunch
Creamy mini cheesecake jars with fresh fruit toppings. Perfect for spring gatherings and weekend brunches. No-bake option included!
cookwithlucia.com/recipes/mini-easter-cheesecake-jars-for-cute-easter-desserts-and-brunch-tables
Introduction
Healthy eating doesn't mean you need to skip dessert entirely—it just means getting smarter about how you enjoy it. These mini cheesecake jars prove that you can satisfy your sweet tooth while still keeping portion sizes reasonable and ingredients wholesome. I'm absolutely delighted by how these individual servings naturally prevent overindulgence while delivering all the creamy, tangy richness you crave from a traditional cheesecake.
What makes these miniature desserts truly special is their versatility and the way they transform a typically indulgent treat into something you can feel better about serving at weekend brunches or family gatherings. The individual jar format means built-in portion control, and you have complete freedom to adjust sweetness levels, incorporate fresh seasonal fruit, and even sneak in some protein-rich Greek yogurt for an extra nutritional boost. The graham cracker crust provides satisfying crunch while the smooth, velvety filling melts on your tongue with each spoonful.
These mini cheesecake jars aren't just adorable—they're genuinely practical for anyone who wants to enjoy dessert without derailing their wellness goals. You can prepare them days ahead, customize each jar to different dietary preferences, and present them beautifully without any special plating skills required. This is proof that nutritious choices can be genuinely delicious, visually stunning, and completely satisfying.
Why This Recipe Works for Your Body
Unlike traditional cheesecakes that can leave you feeling heavy and sluggish, these mini cheesecake jars offer surprising nutritional benefits when prepared thoughtfully. The cream cheese base provides a good dose of calcium essential for bone health, while Greek yogurt (which I incorporate into my filling) adds protein that helps stabilize blood sugar and keeps you satisfied longer. Each jar delivers approximately 12-15 grams of protein when made with my preferred ratios, making this dessert surprisingly substantial.
The portion-controlled format is perhaps the biggest nutritional win here. Rather than cutting uncertain slices from a large cake and potentially overeating, each jar contains a predetermined serving that satisfies without excess. This built-in moderation makes it infinitely easier to enjoy dessert as part of a balanced approach to eating rather than viewing it as a "cheat" that requires guilt or compensation.
Fresh fruit toppings contribute vitamins, antioxidants, and fiber that you'd never find in store-bought desserts loaded with artificial colors and flavors. Berries in particular are nutritional powerhouses, offering vitamin C and compounds that support heart health and reduce inflammation. The graham cracker crust, while still a treat, provides some whole grains if you choose whole wheat crackers, and requires far less butter than a traditional pressed crust.
Compared to grabbing packaged desserts or ordering cheesecake at a restaurant (where a single slice can contain 800+ calories), these mini cheesecake jars give you complete control over ingredients and sweetness levels. You're fueling your body with real food you can pronounce, not a chemistry experiment, and that matters for both immediate satisfaction and long-term wellness.
The Ingredient Lineup
The foundation of these mini cheesecake jars starts with full-fat cream cheese, which might surprise health-conscious cooks, but hear me out. Full-fat dairy is more satiating than low-fat versions, keeps you fuller longer, and actually helps your body absorb the fat-soluble vitamins present in the recipe. The rich, tangy flavor also means you need less added sweetener to achieve that classic cheesecake taste everyone loves.
Greek yogurt is my secret weapon for lightening the filling while boosting protein content significantly. It adds a pleasant tang that complements the cream cheese beautifully and creates a slightly lighter texture without sacrificing creaminess. Look for plain, unsweetened varieties with at least 15-17 grams of protein per serving to maximize the nutritional benefit. This single swap can increase the protein content of your dessert by 40-50% compared to traditional recipes.
Graham crackers form the base layer, providing that essential textural contrast and honey-kissed flavor that makes cheesecake so irresistible. For a more nutritious option, choose whole wheat graham crackers which contain more fiber and nutrients than refined versions. If you need a gluten-free option, gluten-free graham crackers or even crushed nuts (like almonds or pecans) work beautifully and add healthy fats and additional protein.
Fresh fruit is where these mini cheesecake jars really shine nutritionally. Strawberries, blueberries, raspberries, and blackberries all bring vibrant color, natural sweetness, and impressive amounts of vitamins and antioxidants. I love mixing several berry types for visual appeal and varied flavor notes. The fruit transforms these from simple dessert into something that feels almost virtuous—you're literally topping your treat with nature's candy.
Honey or pure maple syrup serves as my preferred sweetener rather than refined white sugar. These natural options contain trace minerals and have a lower glycemic impact than table sugar, though they should still be used thoughtfully. The beauty of making your own mini cheesecake jars is adjusting sweetness to your exact preference—I typically use about 30% less sweetener than traditional recipes call for, letting the natural flavors shine.
Vanilla extract might seem like a minor player, but pure vanilla adds remarkable depth and warmth that makes the entire dessert feel more luxurious and satisfying. Just half a teaspoon per batch enhances all the other flavors without adding any calories or sugar. Finally, a pinch of salt in both the crust and filling amplifies sweetness perception, meaning you can use less actual sweetener while achieving better flavor.
Putting It Together
Creating these mini cheesecake jars is remarkably straightforward, even for novice cooks who feel intimidated by traditional cheesecake recipes. Start by crushing your graham crackers into fine crumbs using a food processor, or place them in a sealed plastic bag and crush with a rolling pin for a therapeutic, low-tech approach. Mix the crumbs with melted butter and a touch of honey until the mixture resembles wet sand and holds together when pressed.
Divide this mixture among your jars (I prefer 4-ounce mason jars or similar glass containers), pressing firmly with the back of a spoon or a small glass to create a compact, even layer. This step is crucial—a well-packed crust won't fall apart when you dig in with a spoon, and it creates a satisfying foundation that contrasts beautifully with the creamy filling. Pop these into the refrigerator while you prepare the filling, allowing the butter to firm up slightly.
For the filling, beat softened cream cheese until completely smooth and fluffy—this takes about 2-3 minutes with an electric mixer and is worth every second. Lumpy filling ruins the luxurious mouthfeel that makes cheesecake special. Add Greek yogurt, your chosen sweetener, vanilla extract, and a pinch of salt, beating until silky and uniform. Taste and adjust sweetness at this stage, remembering that flavors mellow slightly when chilled.
Spoon or pipe the filling over your chilled crusts, leaving about half an inch of space at the top for fruit toppings. I love using a piping bag or a zip-top bag with the corner snipped off for neat, professional-looking layers, but a spoon works perfectly fine too. Smooth the tops gently, then refrigerate for at least 4 hours or overnight. This chilling time allows the filling to set properly and flavors to meld beautifully.
Just before serving, top each mini cheesecake jar with fresh fruit arranged however you like—scattered casually for a rustic look, or arranged in careful patterns for special occasions. The fruit stays brightest and freshest when added at the last moment rather than sitting in the refrigerator for hours. A small drizzle of honey or a light dusting of lemon zest adds a final flourish that makes these look absolutely stunning.
Customizing for Your Goals
If you're focused on maximizing protein content, there are several easy modifications that transform these mini cheesecake jars into genuinely substantial snacks. Replace half the cream cheese with additional Greek yogurt, or stir in a scoop of unflavored protein powder (whey or plant-based) to the filling. I've successfully added up to 2 tablespoons of vanilla protein powder per batch without affecting texture negatively—just reduce other sweeteners slightly since many protein powders contain stevia or other sweeteners.
For lower-carb or reduced-sugar versions, swap the graham cracker crust for a nut-based version using finely ground almonds or pecans mixed with melted coconut oil and a touch of cinnamon. This cuts the carbohydrate content significantly while adding healthy fats and creating a deliciously different flavor profile. Use a sugar-free sweetener like monk fruit or erythritol in the filling, starting with less than you think you need and adjusting to taste.
Those following dairy-free or plant-based eating patterns can absolutely enjoy these mini cheesecake jars with a few simple swaps. Use dairy-free cream cheese (many brands now offer versions made from cashews or almonds that work beautifully) and coconut yogurt in place of Greek yogurt. The texture will be slightly different but still wonderfully creamy and satisfying. Just be aware that plant-based versions typically contain less protein, so consider adding a tablespoon of almond butter or cashew butter to boost both protein and healthy fats.
Kid-friendly versions might incorporate fun toppings beyond fresh fruit—think a small dollop of nut butter, a sprinkle of mini chocolate chips, or even a swirl of fruit preserves. You can also involve children in the assembly process, letting them press the crusts into jars and choose their own fruit toppings. This hands-on experience often makes kids more excited about trying new foods and develops their confidence in the kitchen.
Meal Prep Like a Pro
These mini cheesecake jars are meal prep champions, staying fresh and delicious for up to five days when stored properly in the refrigerator. I recommend preparing the crusts and filling on the same day, but keeping the fresh fruit separate until you're ready to serve. This approach ensures the berries stay vibrant and don't release excess moisture that could make your filling watery.
Store your assembled jars (crust and filling, without fruit) covered tightly with lids or plastic wrap in the refrigerator. Glass mason jars with screw-top lids are ideal because they're airtight, stackable, and protect your desserts from absorbing other refrigerator odors. If you're meal prepping for the week, prepare 5-6 jars on your designated prep day, then simply add fresh fruit each morning or evening when you're ready to enjoy one.
The graham cracker crust actually improves over the first day or two as it absorbs slight moisture from the filling, becoming even more cohesive and flavorful. The filling itself sets more firmly after 24 hours, developing deeper flavor as the vanilla and other ingredients meld together. This makes these mini cheesecake jars one of those rare desserts that genuinely tastes better the day after you make it.
For longer storage, these can be frozen for up to one month, though the texture becomes slightly denser and less creamy upon thawing. Freeze without the fruit topping, and allow to thaw in the refrigerator overnight before adding fresh berries and serving. I find freezing most useful when I've made a large batch for a gathering and have leftovers—it's wonderful knowing you have a homemade dessert waiting in the freezer for unexpected guests or a weekend treat.
If you're packing these mini cheesecake jars for lunches or picnics, include a small ice pack in your bag to keep them properly chilled until eating time. The individual serving format makes them incredibly portable and eliminates the need for plates or complicated serving situations. Just grab a spoon and you're ready to enjoy a restaurant-quality dessert anywhere.
Serving Suggestions and Complete Meals
These mini cheesecake jars shine brightest at weekend brunches, where they can serve as both a beautiful centerpiece and a practical dessert that guests can grab easily. Set them out on a decorative tray alongside fresh berries, allowing guests to customize their own toppings if desired. They pair wonderfully with coffee or herbal tea, making them ideal for relaxed morning gatherings with family and friends.
For a complete balanced brunch, serve these mini cheesecake jars as the sweet finish after a savory main course featuring eggs, vegetables, and whole grains. The protein-rich filling means they're more substantial than typical desserts, but they're still light enough that they won't leave anyone feeling uncomfortably full. I love offering them alongside fresh fruit salad and nuts for guests who want to customize their sweetness level.
As a post-dinner dessert, a single jar provides satisfying closure to the meal without the heaviness of a large slice of traditional cheesecake. The portion control is built in, which helps everyone feel good about their choices while still enjoying something genuinely delicious. For family dinners, prepare one jar per person and present them all together for a special-occasion feel that makes ordinary evenings feel more celebratory.
These also work surprisingly well as an afternoon snack when you need something more substantial than fruit but don't want to spoil your appetite for dinner. The protein content from the Greek yogurt and cream cheese provides lasting energy and satisfaction, while the sweetness curbs cravings that might otherwise lead to less nutritious choices. One jar alongside a handful of nuts or a piece of fruit makes for a genuinely balanced mini-meal.
Frequently Asked Questions
Can I make these mini cheesecake jars without baking?
Absolutely—this is actually a no-bake recipe by default! The filling sets beautifully in the refrigerator without any oven time required, which makes it perfect for warm weather when you don't want to heat up your kitchen. The cream cheese and Greek yogurt combination firms up naturally when chilled, creating that classic cheesecake texture everyone loves. If you prefer a firmer, more traditional cheesecake texture, you can bake the filled jars in a water bath at 325°F for about 20-25 minutes, but it's completely optional.
How long do these stay fresh in the refrigerator?
When stored properly in airtight containers or covered tightly with lids, these mini cheesecake jars remain fresh and delicious for up to five days in the refrigerator. The filling actually improves over the first 24 hours as flavors meld and the texture firms up. For best results, add fresh fruit toppings just before serving rather than storing them on top, as berries can release moisture over time that may make the filling slightly watery.
What's the best way to increase protein content?
The easiest method is to increase the ratio of Greek yogurt to cream cheese—try using equal parts of each rather than mostly cream cheese. You can also add 2-3 tablespoons of unflavored protein powder to the filling, which boosts protein by approximately 15-20 grams per batch without significantly affecting taste or texture. Another option is to create a nut-based crust using ground almonds, which adds both protein and healthy fats while reducing carbohydrates.
Can I make a completely plant-based version?
Yes, these mini cheesecake jars adapt beautifully to plant-based diets with a few simple ingredient swaps. Use dairy-free cream cheese made from cashews or almonds, and replace Greek yogurt with thick coconut yogurt or cashew yogurt. For the crust, ensure your graham crackers are made without honey (or substitute crushed nuts mixed with coconut oil). The texture will be slightly different from dairy-based versions but still wonderfully creamy and satisfying.
What other toppings work well besides fresh berries?
While fresh berries are my go-to choice for their nutritional benefits and beautiful appearance, many other toppings work wonderfully on these mini cheesecake jars. Try sliced kiwi, diced mango, or passion fruit pulp for tropical flair. A drizzle of nut butter adds healthy fats and protein, while a sprinkle of toasted coconut or chopped nuts provides delightful crunch. Fruit compotes or preserves offer concentrated fruit flavor, though they do add extra sugar.
How do I prevent the crust from getting soggy?
The key to maintaining a crisp, distinct crust layer is pressing it very firmly into the bottom of each jar so it becomes compact and cohesive. Use the back of a spoon or a small flat-bottomed glass to really pack it down. Chilling the crust layer for at least 15-20 minutes before adding the filling helps it set firmly. If you're storing these mini cheesecake jars for several days, a very thin layer of melted chocolate or coconut oil brushed over the crust before adding filling creates a moisture barrier, though this is usually unnecessary for recipes consumed within 3-4 days.
The Beauty of Individual Portions
One aspect of these mini cheesecake jars that deserves special attention is how the individual serving format changes our entire relationship with dessert. When you cut a slice from a whole cheesecake, it's easy to underestimate portion sizes or go back for seconds without really thinking about it. These jars eliminate that guesswork entirely, providing a predetermined amount that satisfies without excess.
This built-in portion control has psychological benefits beyond just calorie management. When you know you have a complete, beautiful serving in front of you, you can relax and truly enjoy every bite without the mental calculation of whether you should have more or feel guilty about the amount you're eating. It transforms dessert from a potential source of stress into pure enjoyment, which is exactly how sweet treats should feel.
The presentation factor cannot be overstated either. These mini cheesecake jars look absolutely stunning with their visible layers of golden crust, creamy filling, and vibrant fruit topping. When you serve something this visually appealing, it enhances the entire eating experience—we eat with our eyes first, after all. Guests feel special and cared for when presented with their own individual dessert, even though the actual effort required is often less than making and serving a traditional cake.
For anyone working on mindful eating practices, these jars encourage exactly the kind of presence and attention that makes food more satisfying. You can see exactly what you're getting, enjoy it spoonful by spoonful, and feel genuinely content when you've finished. There's no ambiguity, no second-guessing, just straightforward enjoyment of a delicious homemade treat.
Seasonal Variations Throughout the Year
While these mini cheesecake jars are absolutely perfect for spring gatherings with fresh berries at their peak, they adapt beautifully to every season with simple topping adjustments. During late spring and summer, take advantage of stone fruits like diced peaches, nectarines, or cherries. The combination of creamy cheesecake and juicy summer fruit is absolutely heavenly, and the natural sweetness of peak-season produce means you might even reduce added sweeteners in the filling.
As autumn arrives, consider warming spices like cinnamon, nutmeg, or cardamom in your filling, and top with sautéed apples or pears tossed with a touch of honey and cinnamon. Pomegranate arils add gorgeous ruby-red color and a tart burst that cuts through the richness beautifully. You could even incorporate pumpkin puree into the filling itself, creating mini pumpkin cheesecake jars that celebrate fall flavors while maintaining that light, portion-controlled approach.
Winter opens up opportunities for citrus-forward versions using orange or lemon zest in the filling and topping with supremed orange segments or grapefruit. The bright, sunny flavors feel especially welcome during darker months when fresh berries are expensive and less flavorful. Dried fruit like chopped dates or figs rehydrated in warm water also works wonderfully, providing concentrated sweetness and chewy texture contrast.
The beauty of mastering a basic mini cheesecake jar recipe is that it becomes a blank canvas you can adapt to whatever produce is freshest, most affordable, and most appealing in any given week. This flexibility keeps the recipe exciting and prevents boredom, while the fundamental technique remains exactly the same. Once you understand the basic ratios and method, you can improvise confidently and create endless variations.
Troubleshooting Common Issues
If your filling turns out runny rather than thick and creamy, the most likely culprit is cream cheese that wasn't sufficiently softened before mixing. Cold cream cheese won't incorporate smoothly with other ingredients and can create a thin, almost liquid consistency. Always let your cream cheese sit at room temperature for at least 30-45 minutes before beginning, or soften it in the microwave in short 10-second bursts, checking frequently to avoid melting.
Lumpy filling is another common frustration, and it stems from the same root cause—insufficiently softened cream cheese. The solution is to beat the cream cheese alone for a full 2-3 minutes until it's completely smooth and fluffy before adding any other ingredients. If you've already mixed everything and discover lumps, you can sometimes save it by pressing the mixture through a fine-mesh sieve, though this is tedious. Prevention through proper softening is definitely easier.
Crusts that won't hold together typically need more butter or more thorough mixing. The crumb mixture should feel like wet sand and hold its shape when you press it together. If it's too dry and crumbly, add melted butter one teaspoon at a time until it reaches the right consistency. Conversely, if your crust is too greasy or soft, you've added too much butter—try mixing in a few more graham cracker crumbs to absorb the excess.
If your mini cheesecake jars seem too sweet or not sweet enough, remember that you can always adjust for next time, but you can also balance flavors at serving time. If they're too sweet, add extra fresh fruit or a squeeze of lemon juice over the top to cut through the richness. If they're not sweet enough, a drizzle of honey or maple syrup just before serving solves the problem instantly without requiring you to remake the entire batch.
Making It Your Signature Dish
Once you've mastered the basic technique for these mini cheesecake jars, I encourage you to experiment and develop your own signature variation that reflects your personal taste preferences and nutritional priorities. Maybe you'll become known for a version that incorporates matcha powder in the filling for beautiful color and antioxidant benefits, or perhaps you'll perfect a chocolate variation using cocoa powder and dark chocolate shavings.
The process of developing your own signature version teaches you so much about flavor balancing, ingredient functions, and how to adjust recipes confidently. Start with the base recipe exactly as written, then make one small change at a time, noting what works and what doesn't. This methodical approach builds genuine cooking skills that transfer to other recipes and situations, making you a more confident, capable cook overall.
Part of what makes a signature dish truly special is the consistency—when people know they can count on you to bring those amazing mini cheesecake jars to gatherings, it becomes your thing. There's something wonderful about having a go-to recipe that you can execute perfectly without even consulting the written instructions, that always receives compliments, and that makes people genuinely happy.
These individual desserts also make thoughtful gifts for neighbors, teachers, or anyone who could use a little pick-me-up. Prepare a few extra jars during your regular meal prep session, tie a ribbon around them, and you have a homemade gift that's far more meaningful than anything store-bought. The fact that they're individually portioned and shelf-stable for several days makes them ideal for gifting without worrying about immediate consumption.
Final Thoughts on Dessert and Wellness
I truly believe that the path to sustainable healthy eating includes room for desserts like these mini cheesecake jars—treats that satisfy cravings while providing some nutritional value and built-in moderation. The all-or-nothing approach to nutrition, where certain foods are completely forbidden, almost always backfires eventually. Instead, finding ways to enjoy sweet treats in reasonable portions, made with quality ingredients you feel good about, creates a much more sustainable and enjoyable relationship with food.
These jars represent a middle path between deprivation and overindulgence. You're not eating an entire cheesecake, but you're also not denying yourself the pleasure of creamy, sweet, satisfying dessert. You're choosing real cream cheese and Greek yogurt over artificial low-fat substitutes, but you're also controlling portions and loading up on fresh fruit. This balanced approach is what allows people to maintain healthy habits long-term rather than cycling through restrictive diets and inevitable rebellion.
The skills you develop making these mini cheesecake jars—portion awareness, ingredient quality assessment, meal prep efficiency, and flavor balancing—serve you well beyond this single recipe. They're life skills that make everyday eating more enjoyable, more economical, and more aligned with your wellness goals. When you can prepare beautiful, delicious food in your own kitchen, you're less reliant on restaurants and packaged foods that don't serve your health or budget.
Most importantly, recipes like this prove that taking care of your body doesn't require sacrifice or suffering. It can be genuinely pleasurable, creative, and satisfying. These mini cheesecake jars taste absolutely delicious—nobody eating them would guess they were conceived with nutrition in mind. That's exactly how it should be. Wellness and enjoyment aren't opposing forces; they're partners in creating a life that feels good in every way.
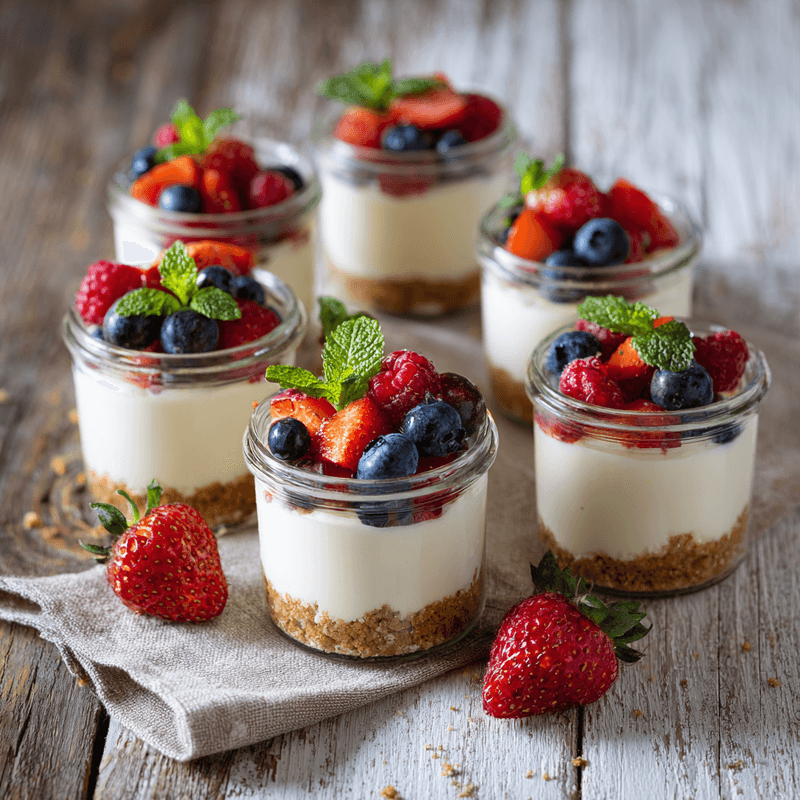
Mini Cheesecake Jars
Creamy no-bake mini cheesecake jars with graham cracker crust and fresh fruit topping. Perfect portion-controlled dessert for spring gatherings and weekend brunches.
Prep Time
20 min
Cook Time
0 min
Total Time
4h 20m
Servings
6 servings
Ingredients
For 6 servings
- 1 cup graham cracker crumbs (about 8 full crackers, finely crushed)
- 3 tablespoons unsalted butter, melted
- 1 tablespoon honey
- 8 ounces cream cheese, softened to room temperature
- 1/2 cup plain Greek yogurt (full-fat or 2%)
- 1/4 cup honey or pure maple syrup
- 1 teaspoon pure vanilla extract
- 1/8 teaspoon fine sea salt
- 1 1/2 cups fresh mixed berries (strawberries, blueberries, raspberries)
- 1 tablespoon honey for drizzling (optional)
- Fresh mint leaves for garnish (optional)
Instructions
- 1
Prepare the crust
In a medium bowl, combine graham cracker crumbs, melted butter, and 1 tablespoon honey. Stir until the mixture resembles wet sand and holds together when pressed. The texture should be cohesive but not overly greasy.
- 2
Press crust into jars
Divide the crust mixture evenly among six 4-ounce mason jars or similar glass containers, using about 2-3 tablespoons per jar. Press down firmly with the back of a spoon or small flat-bottomed glass to create a compact, even layer at the bottom of each jar.
- 3
Chill the crusts
Place the jars in the refrigerator for 15-20 minutes while you prepare the filling. This allows the butter in the crust to firm up and creates a more stable base for the creamy filling.
- 4
Beat the cream cheese
In a large mixing bowl, beat the softened cream cheese with an electric mixer on medium speed for 2-3 minutes until completely smooth and fluffy with no lumps remaining. Scrape down the sides of the bowl as needed to ensure even mixing.
- 5
Add remaining filling ingredients
Add Greek yogurt, 1/4 cup honey (or maple syrup), vanilla extract, and salt to the cream cheese. Beat on medium speed for another 1-2 minutes until the mixture is silky smooth and all ingredients are fully incorporated. Taste and adjust sweetness if desired.
- 6
Fill the jars
Remove jars from the refrigerator. Spoon or pipe the cheesecake filling over the chilled crusts, dividing evenly among the six jars and leaving about 1/2 inch of space at the top for fruit toppings. Smooth the tops gently with the back of a spoon or small offset spatula.
- 7
Chill to set
Cover the jars tightly with lids or plastic wrap and refrigerate for at least 4 hours or overnight. The filling will firm up as it chills and the flavors will meld beautifully. For best results, allow at least 6-8 hours of chilling time.
- 8
Prepare fresh fruit
Just before serving, wash and prepare your fresh berries. Hull and slice strawberries if using, and leave smaller berries like blueberries and raspberries whole. Pat all fruit dry gently with paper towels to remove excess moisture.
- 9
Top and serve
Remove the chilled cheesecake jars from the refrigerator and arrange fresh berries on top of each one. Drizzle with a small amount of honey if desired and garnish with fresh mint leaves. Serve immediately with small spoons, or keep refrigerated until ready to enjoy.
Nutrition Facts
Per serving (estimated)
285 calories
Calories
32g
Carbs
7g
Protein
14g
Fat
2g
Fiber
220mg
Sodium
20g
Sugar


