Homemade Sourdough Discard Bagels for Beginners
Master homemade sourdough discard bagels with this beginner-friendly guide. Chewy, golden, and delicious—learn the boiling technique that makes them perfect.
cookwithlucia.com/recipes/homemade-sourdough-discard-bagels-for-beginners
If you've been feeding your sourdough starter faithfully and watching that discard pile up in your refrigerator, I have the perfect solution for you. Learning to make homemade sourdough discard bagels is one of those transformative kitchen skills that turns what seems like waste into something absolutely magnificent. These aren't just any bagels—they're chewy on the outside with that characteristic shiny crust, tender and slightly tangy on the inside, and infinitely better than anything you'll find at the grocery store.
The beauty of homemade sourdough discard bagels is that they don't require a perfectly timed, actively bubbly starter. You're using the discard—that portion you'd normally toss when feeding your starter—which means you can make these any time without planning days ahead. The process might seem intimidating at first, especially the boiling step that makes bagels unique among breads, but I promise once you understand why each step matters, you'll find yourself confidently shaping and boiling these beauties every weekend.
What makes bagels different from other breads is that brief boil before baking. This quick dip in simmering water gelatinizes the exterior starches, creating that signature shiny, chewy crust that bagel lovers crave. Combined with the subtle tang from your sourdough discard, these bagels have depth of flavor that store-bought versions simply can't match. Let me walk you through everything you need to know to master homemade sourdough discard bagels, from the science behind the method to troubleshooting tips that'll help you nail them on your first try.
The Science Behind the Method
Understanding what happens during bagel-making transforms this from a mysterious process into something logical and repeatable. When you mix flour with water and knead it into dough, you're developing gluten—those elastic protein strands that give bagels their characteristic chew. The kneading process aligns these gluten strands, creating a strong network that can trap gases and hold the bagel's dense structure. Unlike sandwich bread, which we want light and airy, bagels should be dense and chewy, which is why we use less water and knead more aggressively.
The sourdough discard contributes two important elements to your homemade sourdough discard bagels. First, it adds flavor—that subtle tanginess comes from the lactic acid bacteria in your discard, even if it's no longer actively rising dough. Second, it contributes to browning through the Maillard reaction, a chemical process where proteins and sugars react under heat to create complex flavors and that beautiful golden-brown color. The acids in the discard also help strengthen the gluten network, contributing to that perfect chewy texture.
The boiling step is where bagel magic truly happens. When you drop your shaped bagels into simmering water, the exterior starches immediately gelatinize—they absorb water, swell, and form a thin barrier that seals the surface. This accomplishes two things: it limits how much the bagel can rise in the oven, keeping it dense rather than puffy, and it creates that glossy, slightly crisp exterior that makes a bagel a bagel. Some recipes add honey or barley malt syrup to the boiling water, which contributes to both color and subtle sweetness in the finished crust. Understanding these transformations helps you recognize what you're looking for at each stage, making success almost inevitable.
Tools and Ingredients You'll Need
Let's talk about what you actually need to make homemade sourdough discard bagels successfully. The good news is that you don't need specialized equipment—if you've been maintaining a sourdough starter, you already have most of what's required. A large mixing bowl, a sturdy wooden spoon or your hands for mixing, and a clean work surface are your foundation. For kneading, I prefer working directly on a wooden cutting board or clean countertop rather than using a stand mixer, because feeling the dough transform under your hands teaches you what properly developed gluten feels like.
You'll need a large pot for boiling—something wide enough to fit three or four bagels at once without crowding. A slotted spoon or spider strainer makes retrieving the bagels from the boiling water much easier and safer than trying to fish them out with regular tongs. For baking, a large rimmed baking sheet lined with parchment paper works perfectly. Some bakers prefer a perforated bagel pan, but honestly, a regular sheet pan produces excellent results. If you want that professional bakery look, a pastry brush for applying an egg wash is helpful, though completely optional.
Ingredient-wise, quality matters but specialty items don't. Bread flour is my strong preference over all-purpose flour because its higher protein content develops more gluten, giving you that characteristic bagel chew. Your sourdough discard can be any age—I've used discard that's been in my refrigerator for two weeks with great success. For the boiling water, you'll need honey, which adds subtle sweetness to the crust and helps with browning. The salt in your dough isn't just for flavor; it strengthens gluten and controls fermentation. Finally, instant yeast gives these bagels their rise, since we're not relying on the discard for leavening power. If you only have active dry yeast, it works fine—just dissolve it in the water first before adding to your flour.
The Method, Step by Step
Let's walk through making homemade sourdough discard bagels from start to finish, so you understand not just what to do but why you're doing it. Begin by combining your dry ingredients in a large bowl—bread flour, instant yeast, and salt. Whisk these together thoroughly to distribute the yeast and salt evenly throughout the flour. This prevents concentrated pockets of salt from inhibiting yeast activity or creating uneven seasoning. In a separate container, mix your sourdough discard with lukewarm water. The water should feel neutral to the touch, neither warm nor cool, because we want to wake up the yeast without shocking it with extreme temperatures.
Pour the wet ingredients into the dry and stir with a sturdy spoon until a shaggy dough forms. It will look rough and uneven at this stage—that's exactly right. Turn the dough out onto your work surface and begin kneading. This is where patience matters. Bagel dough is deliberately stiff and low-hydration, so it will feel firm and possibly even a bit difficult to work at first. Use the heel of your hand to push the dough away from you, fold it back over itself, give it a quarter turn, and repeat. After about ten minutes of steady kneading, the dough should transform from rough and sticky to smooth and elastic. When you poke it, it should spring back slowly. If it tears easily, keep kneading—you're developing those gluten strands we talked about earlier.
Once your dough is properly kneaded, shape it into a ball and place it in a lightly oiled bowl, turning once to coat the surface. Cover with a damp kitchen towel or plastic wrap and let it rest for about an hour. It won't double in size like sandwich bread dough—bagel dough rises more modestly, increasing by about fifty percent. While the dough rests, those gluten strands are relaxing and the yeast is producing gases that create flavor and a bit of lift. This rest period also makes the dough easier to shape, because relaxed gluten is more pliable than freshly kneaded dough.
After the rest, divide your dough into equal portions—eight pieces for standard-sized bagels, ten if you prefer them a bit smaller. Shape each piece into a tight ball by pulling the edges down and pinching them together at the bottom, then rolling the ball under your cupped palm against the work surface. To form the bagel shape, poke your thumb through the center of each ball and gently stretch the hole to about two inches in diameter. The hole needs to be larger than seems right because it will shrink during boiling and baking. Place the shaped bagels on a parchment-lined baking sheet, cover them again, and let them rest for another thirty minutes. During this second rest, prepare your boiling water.
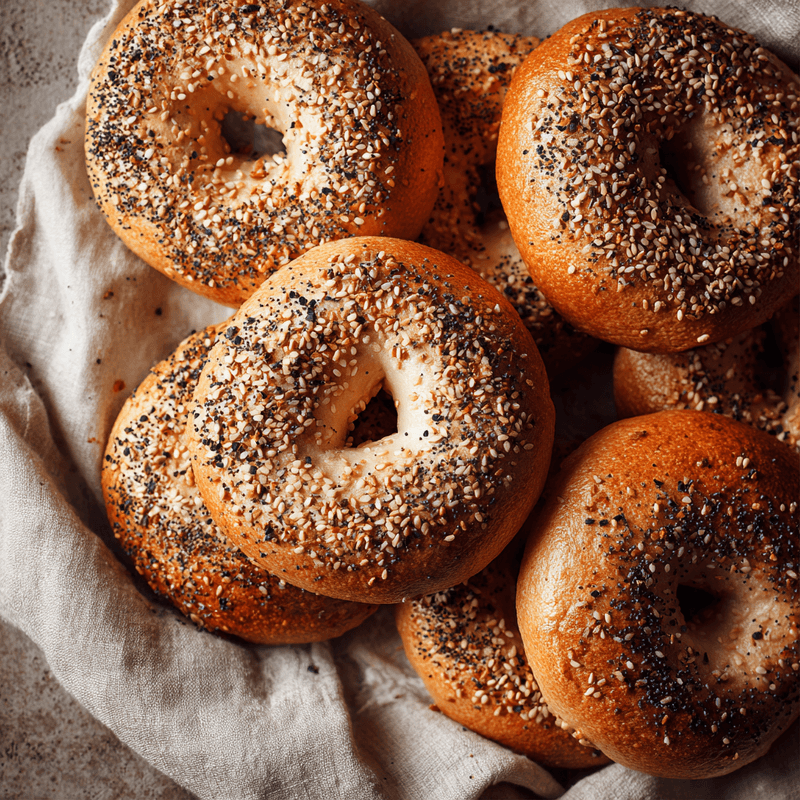
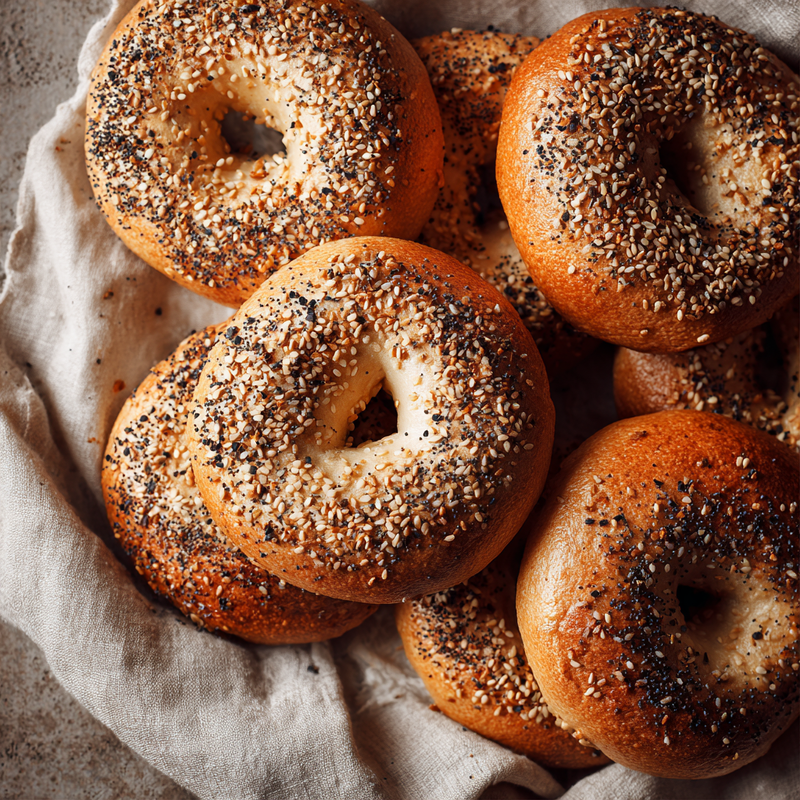
Fill your large pot about two-thirds full with water and add honey—roughly two tablespoons per quart of water. Bring this to a gentle boil, then reduce to a simmer. You want steady bubbles but not a rolling boil. Working in batches so you don't crowd the pot, carefully slide three or four bagels into the water. They'll sink briefly, then float to the surface. Boil for one minute, flip them with your slotted spoon, and boil for one more minute on the second side. This brief boil gelatinizes the exterior and sets the shape. Remove the boiled bagels with your slotted spoon, letting excess water drip off, and return them to your parchment-lined baking sheet. Once all your homemade sourdough discard bagels are boiled, you can brush them with beaten egg for extra shine and add toppings like sesame seeds, poppy seeds, or coarse salt.
Bake in a preheated hot oven until the bagels are deep golden brown, rotating the pan halfway through for even coloring. They should sound hollow when tapped on the bottom and feel firm to the touch. The internal temperature should reach around 200°F if you want to be precise. Let them cool on a wire rack for at least fifteen minutes before slicing—cutting into a hot bagel releases too much steam and can make the interior gummy. That first slice through a properly made bagel, hearing that slight crack as the knife breaks through the crust, is incredibly satisfying.
Troubleshooting Guide
Even with careful attention, things can go sideways when you're learning to make homemade sourdough discard bagels. Let me help you diagnose and fix the most common issues. If your bagels come out flat and dense like hockey pucks, the problem is usually under-proofing or dough that's too stiff. Make sure you're measuring flour by weight rather than volume if possible—packed cup measurements can add significantly more flour than intended. Also check that your yeast is fresh and active; expired yeast won't provide the lift you need. Give the dough the full resting time it needs, and make sure your water for mixing is lukewarm, not cold, which can slow yeast activity considerably.
If your bagels puff up too much and lose their dense, chewy texture, becoming more like bread rolls, you've over-proofed them. This happens when the dough rises too long or in too warm an environment. Bagels should rise modestly, not double in size. The second rest after shaping should be just thirty minutes at room temperature—if your kitchen is very warm, shorten this time or even refrigerate them briefly. Over-proofed dough has exhausted its gluten strength and produces a lighter, breadier texture rather than that characteristic bagel chew.
When bagels come out pale and don't develop that beautiful golden-brown crust, the issue is usually insufficient boiling time or oven temperature that's too low. Make sure your boiling water is actually simmering—if it's barely bubbling, you won't gelatinize the exterior properly. Boil for the full two minutes total, one minute per side. Also verify your oven temperature with an oven thermometer; many home ovens run cooler than the dial indicates. If your bagels are browning too quickly on the outside but remain doughy inside, your oven is too hot—reduce the temperature by twenty-five degrees and bake a few minutes longer.
Sometimes the sourdough tang can be overwhelming, especially if your discard is quite old or very acidic. If this happens, reduce the amount of discard slightly and replace it with additional water, or use fresher discard that hasn't been in the refrigerator as long. Conversely, if you want more tang, let your shaped bagels do their second rise in the refrigerator overnight rather than at room temperature—this slow, cool fermentation develops more complex sour flavors. Finally, if your bagel holes are closing up during baking, you didn't make them large enough initially. Remember that the hole shrinks significantly, so make it about two inches in diameter when shaping, even though it looks comically large at first.
Taking It to the Next Level
Once you've mastered the basic technique for homemade sourdough discard bagels, there are countless ways to elevate them. Professional bagel shops often add barley malt syrup to their boiling water instead of honey—it contributes a distinctive malty sweetness and promotes deeper browning. You can find barley malt syrup at homebrew supply stores or online. Some bakers also add a tablespoon of baking soda to the boiling water, which raises the pH and accelerates browning reactions, though this can sometimes create a slightly metallic taste if you use too much.
For flavor variations, consider adding ingredients directly to the dough. Dried minced onion and garlic powder kneaded into the dough create everything bagels from the inside out. Cinnamon and a bit of sugar mixed into the dough, then topped with more cinnamon sugar after the egg wash, makes incredible breakfast bagels. Finely chopped fresh herbs like rosemary or thyme add sophisticated flavor that pairs beautifully with cream cheese. You can also experiment with different flours—replacing up to twenty-five percent of the bread flour with whole wheat flour adds nutty flavor and nutrition, though it will make the texture slightly denser.
The classic bagel toppings deserve attention too. Apply your egg wash immediately after boiling while the bagels are still wet, then generously sprinkle with toppings. Press them gently so they adhere well. Classic everything bagel topping combines sesame seeds, poppy seeds, dried minced onion, dried minced garlic, and coarse salt. Toast your sesame seeds briefly in a dry skillet before using them—this intensifies their nutty flavor remarkably. For something different, try za'atar, which brings Middle Eastern flavors to your homemade sourdough discard bagels, or coarse salt and cracked black pepper for a simple but sophisticated finish that lets the tangy flavor shine through.
Storing Your Results
Proper storage keeps your homemade sourdough discard bagels delicious for days after baking. Once completely cooled, store them in a paper bag at room temperature if you'll eat them within two days. Paper allows air circulation, preventing the crust from getting soggy while keeping the interior from drying out too quickly. Plastic bags work too, but they soften the crust more, which some people prefer anyway. If you want to maintain that crispy exterior, avoid plastic and reheat in a regular oven or toaster oven rather than the microwave.
For longer storage, freezing is your best option. Slice the bagels in half before freezing—this lets you toast them directly from frozen without waiting for them to thaw. Place them in a freezer bag with as much air pressed out as possible, or wrap them individually in plastic wrap and then place in a freezer bag. Properly frozen bagels maintain excellent quality for up to three months. When you're ready to eat one, pop it straight into the toaster from the freezer. The toaster warms and crisps the cut surfaces while the heat penetrates through, essentially refreshing the bagel to almost its original glory.
To refresh day-old bagels without freezing, split them and toast them, or sprinkle the whole bagel lightly with water and heat in a preheated oven for about five minutes. The water creates steam that softens the interior while the dry oven heat re-crisps the exterior. This technique works beautifully for bagels that have gotten a bit stale but aren't moldy—it's like magic watching them come back to life. Avoid refrigerating bagels if possible, as refrigeration accelerates staling in bread products through a process called starch retrogradation. Room temperature or frozen are your best bets for maintaining the texture and flavor you worked so hard to achieve in your homemade sourdough discard bagels.
Common Questions
Can I make these without a stand mixer?
Absolutely—in fact, I prefer making homemade sourdough discard bagels by hand. The dough is stiff enough that a stand mixer doesn't offer much advantage, and kneading by hand helps you develop a feel for proper gluten development. It takes about ten minutes of steady kneading, which is great for building upper body strength and quite meditative once you get into a rhythm.
What if my sourdough discard has been in the fridge for weeks?
Older discard works perfectly fine in this recipe since you're not relying on it for leavening power. I've used discard that's been refrigerated for a month with excellent results. Just stir it well before measuring, and if there's any liquid (hooch) on top, either stir it back in for more tang or pour it off for milder flavor.
Can I make the dough ahead and bake the next day?
Yes, this is actually a great strategy for fresh morning bagels. After shaping, place the bagels on a parchment-lined tray, cover tightly with plastic wrap, and refrigerate overnight. In the morning, let them sit at room temperature for about twenty minutes while you preheat the oven and prepare the boiling water, then proceed with boiling and baking as usual.
Why do my bagels sink in the water and not float?
If your bagels sink and stay on the bottom of the pot, they're likely under-proofed. The dough needs enough yeast activity to create gas bubbles that make it buoyant. Make sure you're giving the dough adequate time to rise—both the initial hour-long rest and the thirty-minute rest after shaping are important for developing enough internal structure and gas to make the bagels float.
How can I make these bagels larger or smaller?
Simply divide the dough into fewer or more pieces depending on your preference. Six portions make very large, bakery-style bagels perfect for hearty sandwiches. Ten to twelve portions create smaller bagels ideal for kids or for serving at gatherings. Just keep the boiling and baking times the same—the relatively thin profile of bagels means they'll cook through properly regardless of diameter.
Can I use all-purpose flour instead of bread flour?
You can, though the texture will be slightly less chewy since all-purpose flour has lower protein content and develops less gluten. If all-purpose is all you have, the bagels will still be delicious and miles better than store-bought. Some bakers add a tablespoon of vital wheat gluten per cup of all-purpose flour to increase the protein content and approximate bread flour's properties.
Homemade Sourdough Discard Bagels for Beginners
Chewy, golden bagels made with sourdough discard. These beginner-friendly bagels feature the classic boiled-then-baked technique for authentic texture and flavor.
Prep Time
30 min
Cook Time
25 min
Total Time
2h 25m
Servings
8 bagels
Ingredients
For 8 bagels
- 4 cups (500g) bread flour, plus more for dusting
- 1 cup (240g) sourdough discard, unfed
- 1 cup (240ml) lukewarm water
- 2 teaspoons instant yeast
- 2 tablespoons granulated sugar
- 2 teaspoons fine sea salt
- 2 tablespoons honey, for boiling water
- 1 large egg, beaten (optional, for egg wash)
- Toppings of choice: sesame seeds, poppy seeds, coarse salt, or everything bagel seasoning
Instructions
- 1
Mix dry ingredients
In a large mixing bowl, whisk together the bread flour, instant yeast, sugar, and salt until evenly combined. This ensures the yeast and salt are distributed throughout the flour, preventing concentrated pockets that could affect rising or flavor.
- 2
Combine wet ingredients
In a separate container, mix the sourdough discard with the lukewarm water, stirring until relatively smooth. The water should feel neutral to the touch, around 95-100°F, which activates the yeast without shocking it.
- 3
Form the dough
Pour the wet ingredients into the dry ingredients and stir with a sturdy spoon or your hands until a shaggy, rough dough forms. The dough will be stiff and may seem dry compared to other bread doughs—this is correct for bagels. Turn the dough out onto a clean work surface.
- 4
Knead thoroughly
Knead the dough for 10-12 minutes until it becomes smooth, elastic, and springs back when poked. Use the heel of your hand to push the dough away, fold it back, rotate a quarter turn, and repeat. The dough should transform from rough to silky and feel firm but pliable.
- 5
First rise
Shape the dough into a ball and place it in a lightly oiled bowl, turning once to coat. Cover with a damp kitchen towel or plastic wrap and let rest at room temperature for 60-90 minutes, until increased in size by about fifty percent. It won't double like sandwich bread.
- 6
Divide and pre-shape
Turn the risen dough onto your work surface and divide it into 8 equal portions (about 115g each). Shape each piece into a tight ball by pulling the edges underneath and pinching them together at the bottom, then rolling under your cupped palm until smooth and taut.
- 7
Shape bagels
Poke your thumb through the center of each ball and gently work your fingers around to stretch the hole to about 2 inches in diameter. The hole should look larger than you think it needs to be, as it will shrink during boiling and baking. Place shaped bagels on a parchment-lined baking sheet, cover, and rest for 30 minutes.
- 8
Prepare boiling water
While the shaped bagels rest, fill a large wide pot about two-thirds full with water and add the honey. Bring to a boil, then reduce to a steady simmer. Preheat your oven to 425°F (220°C) and position a rack in the center.
- 9
Boil the bagels
Working in batches of 3-4 bagels to avoid crowding, carefully slide the bagels into the simmering water. They should float to the surface after a moment. Boil for 1 minute, flip with a slotted spoon, and boil for 1 more minute on the second side. Remove with the slotted spoon, let excess water drip off, and return to the parchment-lined baking sheet.
- 10
Add toppings
If using egg wash, brush the tops of the boiled bagels with beaten egg while they're still wet. Immediately sprinkle with your chosen toppings, pressing gently so they adhere. The moisture helps toppings stick better than applying them to dry bagels.
- 11
Bake until golden
Bake the bagels for 22-25 minutes, rotating the pan halfway through, until deep golden brown. They should sound hollow when tapped on the bottom and feel firm to the touch. An instant-read thermometer inserted into the center should register around 200°F.
- 12
Cool completely
Transfer the baked bagels to a wire cooling rack and let cool for at least 15 minutes before slicing. Cutting into hot bagels releases too much steam and can make the interior gummy. Once cooled, slice and enjoy with your favorite spreads and toppings.
Nutrition Facts
Per serving (estimated)
285 calories
Calories
56g
Carbs
10g
Protein
2g
Fat
2g
Fiber
585mg
Sodium
4g
Sugar


