Homemade Chocolate Croissants Recipe | Easy & Delicious
Learn to make buttery, flaky homemade chocolate croissants with this simple recipe. Perfect for family gatherings with step-by-step instructions.
cookwithlucia.com/recipes/homemade-chocolate-croissants-simplyyummybites
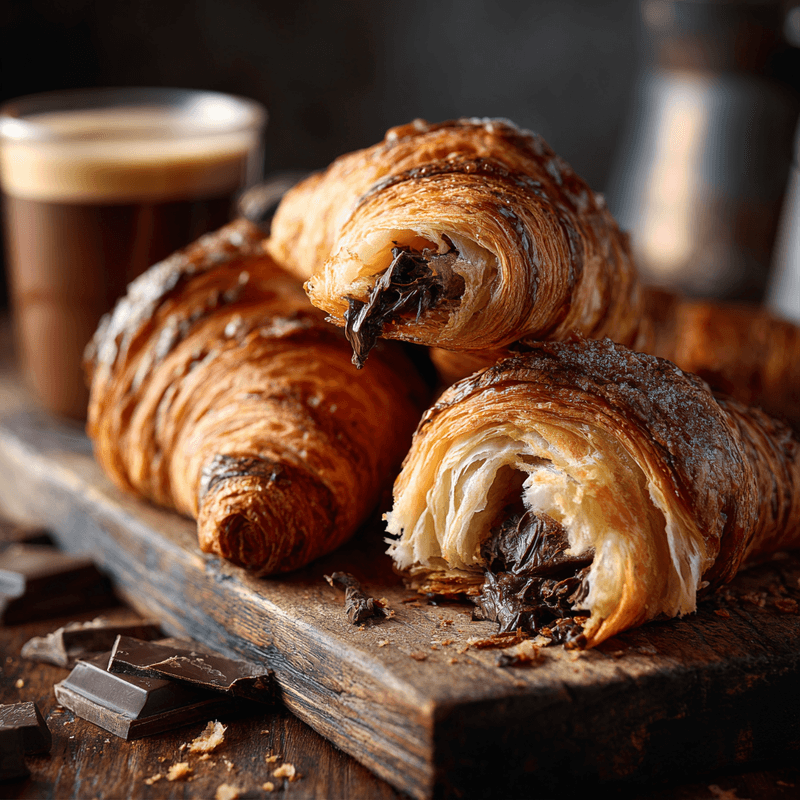
There's something absolutely magical about biting into a warm, flaky homemade chocolate croissant and watching the layers shatter into golden buttery shards while rich, melted chocolate oozes out from the center. That first bite is pure bliss—a perfect marriage of crispy, delicate pastry and luxurious sweetness that makes your taste buds sing. If you've ever walked past a bakery and been drawn in by the intoxicating aroma of fresh-baked pastries, you already know the allure of these gorgeous treats.
I'll never forget the first time I attempted homemade chocolate croissants in my own kitchen. I was intimidated, convinced that achieving those beautiful honeycomb layers was reserved only for professional pastry chefs. But after my first successful batch emerged from the oven, golden and perfect, I realized that with a little patience and the right technique, anyone can create bakery-quality croissants at home. The look on my family's faces when they tasted those warm, chocolate-filled pastries made every minute of the process worthwhile. Now, making homemade chocolate croissants has become one of my favorite weekend rituals.
What makes this recipe truly special is that it breaks down what seems like a complicated process into manageable, straightforward steps. You don't need fancy equipment or years of baking experience—just quality ingredients, a bit of time, and a willingness to enjoy the therapeutic process of working with dough. In this post, I'll walk you through everything you need to know to create stunning homemade chocolate croissants that rival anything you'd find in a French patisserie. From selecting the right chocolate to mastering the lamination technique, you'll discover all my secrets for pastry perfection. Let me take you on this delicious journey that will transform your kitchen into a cozy bakery.
What Are Homemade Chocolate Croissants?
Have you ever wondered what makes a croissant truly exceptional? Homemade chocolate croissants, also known as pain au chocolat in French bakeries, are buttery, flaky pastries made from laminated dough wrapped around bars or pieces of rich chocolate. The lamination process—which involves folding butter into dough multiple times—creates those distinctive paper-thin layers that puff up beautifully during baking, resulting in a pastry that's simultaneously crispy on the outside and tender within.
Originating in France, these beloved pastries have become a breakfast staple and afternoon treat enjoyed worldwide. While traditional French versions use specific chocolate batons, homemade chocolate croissants can be customized with your favorite chocolate varieties, from dark and bittersweet to smooth milk chocolate. The key characteristic that sets these apart is the perfect balance between the rich, slightly salty butter in the dough and the sweet chocolate filling that melts into pockets of pure indulgence.
What truly makes homemade chocolate croissants stand out is their versatility and the satisfaction of creating something so impressive from scratch. The aroma alone—butter, chocolate, and toasted pastry—is enough to bring everyone running to the kitchen. Ready to learn how to make these spectacular treats in your own home?
Why You'll Love This Homemade Chocolate Croissants Recipe
Surprisingly Achievable for Home Bakers: While homemade chocolate croissants might seem intimidating at first glance, this recipe breaks down each step into clear, manageable phases. You don't need professional training or specialized equipment—just a rolling pin, some patience, and a commitment to following the process. The dough is forgiving, and even if your first attempt isn't picture-perfect, it will still taste absolutely divine.
Incredible Flavor That Beats Store-Bought: Nothing compares to the taste of freshly baked homemade chocolate croissants straight from your oven. The butter is richer, the chocolate more luxurious, and the layers more pronounced than anything you'll find in the frozen section. You control every ingredient, ensuring the highest quality and freshest results that will have everyone asking for your secret.
Perfect for Special Occasions and Cozy Mornings: These homemade chocolate croissants elevate any gathering into something memorable. Whether you're hosting weekend brunch, treating your family to a special breakfast, or creating a beautiful spread for guests, these pastries always impress. They make ordinary mornings feel extraordinary and turn simple moments into cherished memories.
Budget-Friendly Luxury: While artisan bakery croissants can be quite expensive, making homemade chocolate croissants costs a fraction of the price. A single batch yields multiple pastries, and the ingredients—butter, flour, chocolate, and a few basics—are affordable and readily available. You get premium quality without the premium price tag.
Customizable to Your Preferences: This recipe serves as a perfect foundation for creativity. Love dark chocolate? Use your favorite bittersweet variety. Prefer milk chocolate? Go for it. You can even experiment with chocolate spreads, add a touch of cinnamon, or create savory versions. The possibilities are endless, making these homemade chocolate croissants truly your own.
Meal Prep Friendly: One of the best-kept secrets about homemade chocolate croissants is that you can prepare them ahead and freeze the unbaked pastries. This means you can enjoy fresh-baked croissants any morning by simply pulling them from the freezer and baking. It's like having your own personal bakery at home, ready whenever you crave that buttery, chocolate goodness.
Key Ingredients and What They Bring
The foundation of exceptional homemade chocolate croissants starts with high-quality all-purpose flour, which provides the structure and strength needed to support all those delicate layers. The flour's protein content creates just enough gluten development to make the dough elastic and easy to roll, while still maintaining that tender, melt-in-your-mouth quality we love in croissants. I always recommend using unbleached flour for the best flavor and color.
Unsalted butter is absolutely crucial—it's not an exaggeration to say that butter makes or breaks homemade chocolate croissants. You'll need it both in the dough and as the laminating layer, and the quality truly matters here. European-style butter with higher fat content creates flakier, more flavorful layers. The butter provides that rich, slightly tangy flavor and creates steam during baking, which puffs up each layer into crispy perfection. If you need to substitute, ensure you're using a high-quality alternative that's suitable for lamination.
Granulated sugar adds a subtle sweetness to the dough that balances the richness of the butter without overwhelming the chocolate filling. It also helps with browning, giving your homemade chocolate croissants that beautiful golden color. Active dry yeast or instant yeast provides the leavening power, creating air pockets that contribute to the light, airy texture between those buttery layers.
Whole milk adds tenderness, richness, and helps create a soft, pliable dough that's easier to work with during the lamination process. The milk proteins also contribute to better browning and a more flavorful crust. Salt is essential for enhancing all the other flavors and balancing the sweetness—never skip it, as it makes the butter taste butterier and the chocolate more complex.
The chocolate itself deserves special attention when making homemade chocolate croissants. I prefer using high-quality chocolate bars or chocolate batons specifically made for croissants, which hold their shape better during baking. Dark chocolate with 60-70% cocoa content provides a sophisticated, slightly bitter contrast to the sweet, buttery pastry, though milk chocolate works beautifully if you prefer something sweeter. The chocolate you choose will be front and center in every bite, so invest in something you truly love eating on its own.
How to Make Homemade Chocolate Croissants — Quick Overview
The journey to perfect homemade chocolate croissants begins with creating a soft, slightly sweet dough that gets a overnight rest in the refrigerator. This chilling period allows the gluten to relax and makes the dough much easier to handle during the lamination process. While the dough rests, you'll prepare your butter block by pounding cold butter into a flat, pliable square that will be folded into the dough. This step might seem unusual, but it's the secret to creating those hundreds of flaky layers.
The next phase involves the lamination process, where you'll encase the butter in the dough and perform a series of folds called "turns." Each turn multiplies the number of layers exponentially—by the time you're finished, you'll have created literally hundreds of alternating layers of butter and dough. Between each turn, the dough rests in the refrigerator, keeping the butter cold and firm. This temperature control is crucial for achieving distinct, separate layers in your homemade chocolate croissants.
Once the lamination is complete, you'll roll the dough into a large rectangle and cut it into smaller rectangles, place chocolate pieces on each, and roll them into their classic shape. After a final proof where the croissants puff up beautifully, they're brushed with an egg wash and baked until deeply golden. The entire process takes about two days when you factor in the resting periods, but the active hands-on time is quite manageable. The result is absolutely worth every minute—homemade chocolate croissants that are impossibly flaky, buttery, and filled with melted chocolate perfection.
Top Tips for Perfecting Homemade Chocolate Croissants
Temperature control is absolutely critical when making homemade chocolate croissants. Your butter needs to stay cold but pliable throughout the lamination process—if it gets too soft, it will squish out of the dough instead of creating layers, and if it's too hard, it will break through the dough. The ideal temperature is around 60°F, which feels cool to the touch but still bends without cracking. If your kitchen is warm, work quickly and return the dough to the refrigerator between folds without hesitation.
Invest in quality ingredients, especially your butter and chocolate, since they're the stars of homemade chocolate croissants. The difference between mediocre butter and excellent European-style butter is immediately noticeable in the final pastry. Similarly, choose chocolate you'd be happy eating by itself—those candy bars or chocolate chips won't deliver the same luxurious experience as a good baking chocolate or proper chocolate batons.
Don't rush the resting periods, even though waiting can be difficult when you're excited to see the final result. Each rest in the refrigerator serves a purpose: it keeps the butter firm, relaxes the gluten so the dough doesn't shrink back, and makes the dough easier to roll without tearing. Skipping or shortening these rests will result in tough, dense croissants instead of the light, flaky texture you're aiming for.
When rolling out your dough for homemade chocolate croissants, use firm, even pressure and roll from the center outward. Avoid pressing down too hard, which can fuse the layers together, and try to maintain an even thickness throughout. If you notice the dough shrinking back as you roll, it means the gluten needs more rest—simply cover it and refrigerate for another 15-20 minutes before continuing.
The proofing stage before baking requires patience and attention. Your shaped homemade chocolate croissants need to roughly double in size and feel pillowy and jiggly when gently shaken. Under-proofed croissants will be dense and doughy inside, while over-proofed ones may collapse in the oven. The ideal proofing environment is around 75-78°F—slightly warm but not hot. A closed oven with just the light on often provides the perfect conditions.
Baking at the right temperature ensures your homemade chocolate croissants achieve that gorgeous golden-brown exterior while fully cooking through. Start at a higher temperature (around 400°F) to create initial steam and layer separation, then you may need to reduce slightly if they're browning too quickly. Rotate your baking sheet halfway through for even coloring, and resist the urge to open the oven door repeatedly, which releases heat and steam.
Brush your croissants with egg wash gently but thoroughly, making sure to cover all surfaces without letting it pool in the creases. The egg wash creates that beautiful shine and deep golden color we associate with professional bakery pastries. For an extra-glossy finish, you can apply a second coat of egg wash just before baking your homemade chocolate croissants.
Variations and Flavor Twists
For a sophisticated twist on classic homemade chocolate croissants, try incorporating a thin layer of almond cream (frangipane) along with your chocolate. Simply spread a small amount of almond paste or almond cream onto the dough before adding the chocolate pieces. This creates an almond-chocolate combination that's utterly irresistible and adds a subtle nutty richness that complements the butter beautifully.
Spice enthusiasts will love adding a pinch of cinnamon or cardamom to the dough itself, which infuses the entire pastry with warm, aromatic notes. Alternatively, dust the chocolate pieces with a tiny amount of cinnamon or even cayenne pepper before rolling for a surprise hint of warmth that enhances the chocolate's depth. These spiced homemade chocolate croissants are perfect for cozy mornings.
Create a different filling entirely by swapping the chocolate for sweetened cream cheese mixed with vanilla and a touch of sugar, or try a thick layer of your favorite chocolate spread. You could also use chopped chocolate mixed with toasted nuts like hazelnuts or pistachios for added texture and flavor complexity. Each variation transforms your homemade chocolate croissants into something unique.
For those seeking a lighter option, reduce the amount of chocolate slightly and add thin slices of fresh strawberries or raspberries alongside the chocolate. The fruit provides a fresh, tart contrast that cuts through the richness. Just be careful not to add too much moisture, which can make the pastry soggy.
If you want to experiment with savory homemade chocolate croissants, omit the chocolate entirely and fill them instead with cheese and herbs, or create a mushroom and cheese filling. While these won't be chocolate croissants anymore, the laminated dough technique creates equally impressive savory pastries that work wonderfully for brunch or light meals.
What to Serve with Homemade Chocolate Croissants
A steaming cup of freshly brewed coffee or rich espresso is perhaps the most classic pairing with homemade chocolate croissants. The slight bitterness of coffee perfectly balances the sweet chocolate and buttery pastry, cleansing your palate between bites. For a luxurious experience, try a creamy café au lait or cappuccino that mirrors the richness of the croissants themselves.
Fresh fruit provides a bright, refreshing contrast that makes your homemade chocolate croissants feel like part of a complete breakfast. A bowl of mixed berries—strawberries, blueberries, and raspberries—adds natural sweetness and acidity that cuts through the richness. Sliced oranges or a fruit salad with a hint of fresh mint also work beautifully, adding color and nutrition to your plate.
For a more substantial spread, serve your homemade chocolate croissants alongside scrambled eggs prepared with cream and fresh herbs, or a simple vegetable frittata. The savory elements create a satisfying balance and transform your croissants from a simple pastry into part of a memorable brunch. Add some roasted tomatoes or sautéed mushrooms for an elegant touch.
Yogurt parfaits made with thick Greek yogurt, honey, granola, and fresh fruit complement homemade chocolate croissants wonderfully. The tangy yogurt provides a cool, creamy contrast to the warm, flaky pastry, and guests can customize their parfaits to their preferences. This combination works particularly well when hosting a crowd.
For afternoon enjoyment, pair your homemade chocolate croissants with herbal tea or hot chocolate for an indulgent treat. Mint tea, chamomile, or Earl Grey all offer different flavor profiles that enhance the chocolate. If you're creating a dessert spread, add some fresh whipped cream and additional berries to make the croissants feel extra special.
Storing and Reheating Tips
Freshly baked homemade chocolate croissants are at their absolute best within the first few hours of baking, when the exterior is still crispy and the interior tender. However, you can store them at room temperature in an airtight container for up to two days. Place them in a paper bag or wrap them loosely in a clean kitchen towel rather than plastic, which can make the exterior soggy by trapping moisture. The croissants will gradually lose their crispness but will still taste delicious.
For longer storage, refrigeration isn't ideal as it can dry out your homemade chocolate croissants and make them stale more quickly. Instead, freeze them for up to two months. Allow the croissants to cool completely after baking, then wrap each one individually in plastic wrap followed by aluminum foil, or place them in a freezer-safe bag with as much air removed as possible. Proper wrapping prevents freezer burn and preserves that wonderful buttery flavor.
When you're ready to enjoy frozen homemade chocolate croissants, remove them from the freezer and let them thaw at room temperature for about an hour while still wrapped. Once thawed, the best way to refresh them is in a preheated 350°F oven for 5-7 minutes. This revives the flaky texture and warms the chocolate filling to melty perfection. Avoid microwaving if possible, as it makes the pastry tough and chewy rather than crisp.
For an even better make-ahead strategy, freeze your homemade chocolate croissants before baking. Shape the croissants completely, place them on a baking sheet, and freeze until solid. Then transfer to freezer bags for up to one month. When you want fresh croissants, place the frozen shaped croissants on a baking sheet, let them proof until doubled (this will take longer than room-temperature croissants, about 3-4 hours), then brush with egg wash and bake as directed. This method gives you the closest thing to fresh-from-the-oven croissants any time you want them.
Frequently Asked Questions
Can I Make Homemade Chocolate Croissants Ahead of Time?
Absolutely! In fact, making homemade chocolate croissants ahead is one of the best strategies for stress-free entertaining. You can prepare the dough through the lamination process, shape the croissants, and freeze them unbaked. When you're ready to serve them, simply proof the frozen croissants until doubled in size, then bake as directed. This gives you the aroma and taste of freshly baked pastries without the time commitment on the day you want to serve them.
What If I Don't Have European-Style Butter?
While European-style butter with higher fat content produces the flakiest homemade chocolate croissants, regular unsalted butter will still work. The key is to ensure whatever butter you use is cold and pliable during lamination. Your croissants may be slightly less rich and have marginally fewer crispy layers, but they'll still be delicious and far better than anything store-bought.
How Do I Know When My Homemade Chocolate Croissants Are Properly Proofed?
Properly proofed homemade chocolate croissants should look noticeably puffy and approximately doubled in size from when you first shaped them. When you gently shake the baking sheet, they should jiggle slightly and feel pillowy soft. If you very gently press a finger into the dough, it should slowly spring back but leave a slight indentation. Under-proofed croissants will be dense inside, while over-proofed ones may deflate during baking.
Can I Use Chocolate Chips Instead of Chocolate Bars?
While you can use chocolate chips in homemade chocolate croissants, they're not ideal because they contain stabilizers that help them hold their shape during baking. This means they won't melt into that luxurious, gooey filling the way chopped chocolate bars or proper chocolate batons will. If chocolate chips are your only option, they'll work in a pinch, but chopped high-quality chocolate bars will give you much better results.
Why Did My Butter Leak Out During Baking?
Butter leakage from homemade chocolate croissants usually indicates one of several issues: the butter was too soft during lamination and broke through the dough layers, the dough had tears or holes that allowed butter to escape, or the croissants were over-proofed before baking. To prevent this, maintain proper temperature throughout the lamination process, handle the dough gently to avoid tears, seal the edges well, and don't let the shaped croissants proof beyond doubling in size.
Can I Make These Without a Stand Mixer?
Yes, you can absolutely make homemade chocolate croissants by hand! The dough comes together easily with just a wooden spoon and some gentle kneading. While a stand mixer makes the initial mixing slightly easier, the majority of the work in croissant-making happens during the lamination process, which is always done by hand anyway. Your arms may get a bit of a workout, but the results will be just as delicious as using a machine.
Final Thoughts
Making homemade chocolate croissants is truly a labor of love that rewards you with incomparable flavor, texture, and the pride of creating something spectacular from scratch. While the process requires time and patience, the steps themselves are straightforward and approachable for any home baker willing to embrace the journey. Each time you make these beautiful pastries, you'll gain confidence and develop your own techniques and preferences.
The beauty of homemade chocolate croissants lies not just in their delicious taste, but in the joy they bring to everyone who enjoys them. There's something deeply satisfying about watching layers of golden, flaky pastry shatter with each bite, revealing pockets of melted chocolate inside. Whether you're making them for a special weekend breakfast, impressing guests at a gathering, or simply treating yourself to something extraordinary, these croissants never fail to deliver happiness.
I encourage you to embrace the process, forgive any imperfections in your first batch, and enjoy the wonderful aroma that will fill your kitchen. The techniques you learn while making homemade chocolate croissants will serve you well in countless other baking adventures. Most importantly, remember that even slightly imperfect croissants taste absolutely incredible when they're fresh from your own oven.
So gather your ingredients, clear some space in your refrigerator for the resting periods, and embark on this delicious adventure. Your kitchen is about to become the best bakery in town, and those homemade chocolate croissants will create memories and moments of pure joy for everyone lucky enough to taste them. Happy baking, and I can't wait to hear about your croissant success stories!
Homemade Chocolate Croissants
Buttery, flaky homemade chocolate croissants with layers of golden pastry wrapped around rich chocolate. These bakery-quality croissants are achievable at home with patience and proper technique.
Prep Time
45 min
Cook Time
20 min
Servings
12 croissants
Ingredients
For 12 croissants
- 4 cups (500g) all-purpose flour, plus more for dusting
- 1/4 cup (50g) granulated sugar
- 1 tablespoon active dry yeast
- 1 1/4 cups (300ml) whole milk, warmed to 110°F
- 2 teaspoons salt
- 2 tablespoons unsalted butter, melted
- 1 1/4 cups (280g) cold unsalted butter, for laminating
- 8 ounces (225g) dark chocolate bars, broken into pieces or chocolate batons
- 1 large egg, beaten with 1 tablespoon milk for egg wash
Instructions
- 1
Make the dough
In the bowl of a stand mixer, combine the flour, sugar, and yeast. Add the warm milk and mix with the dough hook on low speed until combined. Add the salt and melted butter, then knead on medium speed for 5-6 minutes until the dough is smooth and elastic. The dough should be soft and slightly sticky.
- 2
First dough rest
Shape the dough into a rectangle about 1 inch thick, wrap tightly in plastic wrap, and refrigerate for at least 8 hours or overnight. This rest allows the gluten to relax and makes the dough easier to work with during lamination.
- 3
Prepare butter block
Place the cold laminating butter between two sheets of parchment paper. Using a rolling pin, pound and roll the butter into a 7x10-inch rectangle. The butter should be cold but pliable, not soft or melting. Refrigerate the butter block until ready to use, ensuring it stays around 60°F.
- 4
Encase the butter
Roll the chilled dough into a 10x16-inch rectangle on a lightly floured surface. Place the butter block in the center of the dough. Fold the dough over the butter like a letter, bringing one third over the butter, then folding the other third on top. Pinch the edges to seal the butter completely inside.
- 5
Perform first turn
With the seam side down, roll the dough into a long rectangle about 8x24 inches. Brush off any excess flour. Fold the dough into thirds again like a letter. Wrap in plastic wrap and refrigerate for 30 minutes. This is your first turn.
- 6
Complete remaining turns
Repeat the rolling and folding process two more times, refrigerating for 30 minutes between each turn. Always roll with the seam perpendicular to you and maintain even thickness. After the third and final turn, wrap the dough and refrigerate for at least 2 hours or overnight.
- 7
Roll and cut dough
On a lightly floured surface, roll the laminated dough into a large rectangle measuring approximately 12x24 inches and about 1/4 inch thick. Using a sharp knife or pizza cutter, trim the edges to create clean lines, then cut the dough into 12 rectangles, each about 4x6 inches.
- 8
Add chocolate and shape
Place 2-3 pieces of chocolate horizontally near the bottom edge of each rectangle. Roll the dough up from the bottom, enclosing the chocolate, and continue rolling tightly to create a cylinder. Place each croissant seam-side down on parchment-lined baking sheets, spacing them about 3 inches apart.
- 9
Proof the croissants
Cover the shaped croissants loosely with plastic wrap or a clean kitchen towel. Let them proof in a warm spot (75-78°F) for 2-3 hours until they've doubled in size and look puffy. They should jiggle slightly when the pan is gently shaken.
- 10
Apply egg wash
Preheat your oven to 400°F. Gently brush the proofed croissants with the egg wash, being careful not to deflate them. Make sure to coat all visible surfaces for a beautiful golden finish.
- 11
Bake the croissants
Bake for 18-22 minutes, rotating the pans halfway through, until the croissants are deep golden brown and crispy. If they're browning too quickly, reduce the oven temperature to 375°F. The croissants should sound hollow when tapped on the bottom.
- 12
Cool and serve
Transfer the baked croissants to a wire rack and let them cool for at least 10 minutes before serving. This allows the chocolate to set slightly while the pastry remains warm. Enjoy your homemade chocolate croissants while they're fresh and the layers are at their crispiest.
Nutrition Facts
Per serving (estimated)
385 calories
Calories
42g
Carbs
7g
Protein
22g
Fat
2g
Fiber
310mg
Sodium
12g
Sugar


