Homemade Oreo Balls Recipe: Sweet No-Bake Treats
Learn to make delightful Oreo balls with cream cheese and chocolate coating. Perfect no-bake treats for family gatherings and celebrations.
cookwithlucia.com/recipes/homemade-bunny-oreo-balls-for-easter-treats-delicious-oreo-ball-bunnies-perfect-for-spring-cele
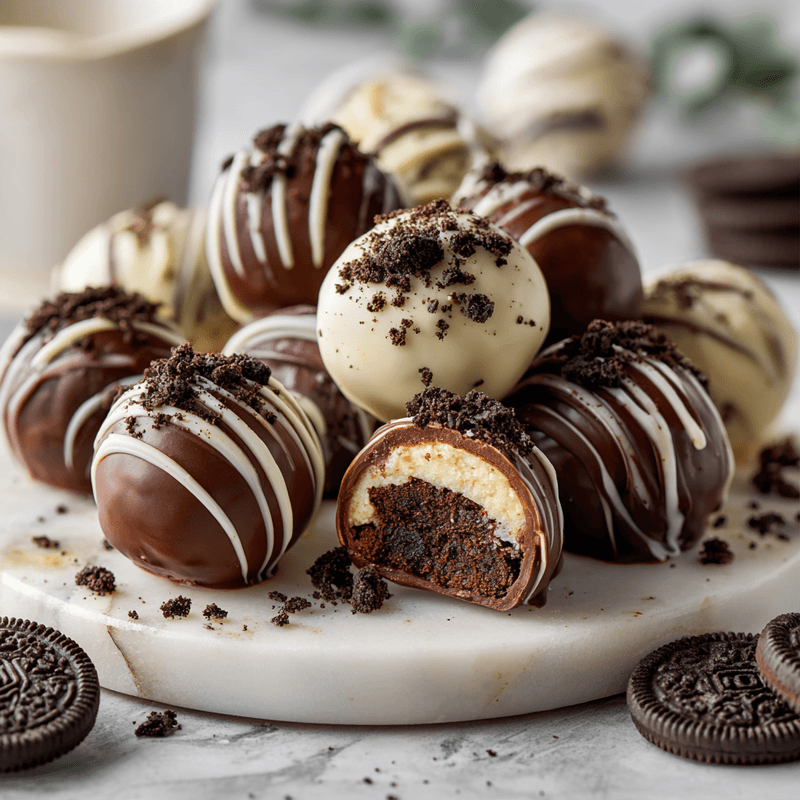
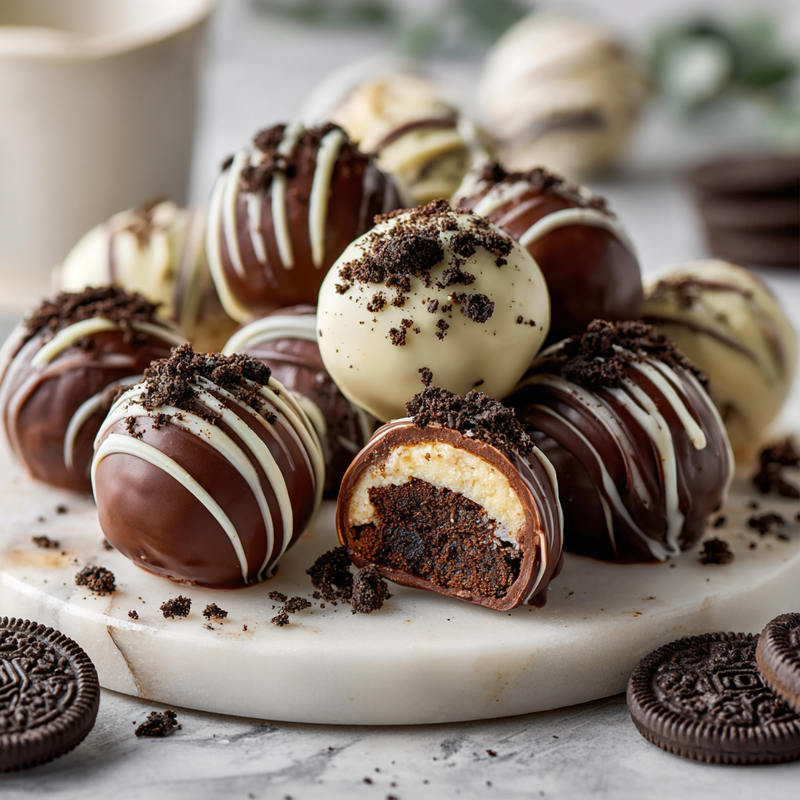
There's something magical about transforming simple ingredients into bite-sized treasures that bring joy to every gathering. These delightful Oreo balls have become a beloved treat in kitchens around the world, offering the perfect combination of cookies and cream in a convenient, elegant form. The beauty of these no-bake confections lies in their simplicity and the endless possibilities for customization, making them suitable for any occasion from casual family get-togethers to elegant celebrations.
I'll never forget the first time I tasted a perfectly crafted Oreo ball at a friend's gathering. The smooth chocolate coating gave way to a creamy, cookie-filled center that was neither too sweet nor too dense. It was perfectly balanced, and I immediately knew I had to master this recipe. While these treats might seem straightforward, achieving that ideal texture and coating requires understanding a few key techniques that I'm excited to share with you today.
I'll be honest with you: making exceptional Oreo balls takes patience and attention to detail. You'll need to allow proper chilling time, work with chocolate at the right temperature, and master the coating technique. But here's what makes it worthwhile: once you understand the fundamentals, you can create dozens of these treats in a single afternoon, and they'll disappear even faster than that. This guide will walk you through every step, from crushing the cookies to achieving that professional-looking finish.
This isn't just a quick recipe post. Consider this your comprehensive masterclass in creating Oreo balls that rival anything you'd find in a specialty shop. We'll explore the science behind the perfect texture, troubleshoot common issues, and discover creative variations that will make these treats your signature contribution to any gathering.
The Origins and History
The concept of Oreo balls emerged from the broader tradition of cake balls and truffles, which have been delighting dessert lovers for generations. While classic European truffles date back centuries, the American invention of cake balls and cookie balls represents a more playful, accessible approach to creating bite-sized confections. The specific combination of crushed Oreos with cream cheese appears to have gained popularity in the early 2000s, spreading rapidly through home kitchens via cooking websites and community gatherings.
What makes these treats particularly fascinating is how they represent the evolution of home baking in the modern era. Unlike traditional recipes that required specialized equipment or hard-to-find ingredients, Oreo balls democratized the art of candy-making. Anyone with a food processor, some patience, and access to common grocery items could create impressive desserts that looked professionally made. This accessibility transformed home cooks into confident dessert makers.
Regional variations have emerged as the recipe traveled across different communities. Some versions incorporate different cookie flavors, while others experiment with various coatings from white chocolate to colored candy melts. In the Middle East, creative bakers have adapted the concept using halal-certified ingredients and adding touches like crushed pistachios or rose water to the mixture. The Australian variation sometimes includes coconut, while European versions might feature dark chocolate with a hint of coffee.
The beauty of Oreo balls lies in their adaptability to modern lifestyles. They require no oven, making them perfect for warm weather or kitchens with limited equipment. They also store beautifully, improving in texture as the flavors meld together in the refrigerator. This combination of convenience, elegance, and deliciousness explains why these treats have become a staple at gatherings and celebrations worldwide.
Understanding the Flavor Profile
The magic of Oreo balls lies in their perfectly balanced flavor profile that combines multiple taste dimensions into one cohesive bite. The dominant notes are sweet and creamy, with the distinctive chocolate cookie flavor of Oreos providing a deep, slightly bitter undertone that prevents the treats from becoming cloying. The cream cheese adds a subtle tang that cuts through the sweetness, creating complexity that keeps you reaching for another.
As you bite through the chocolate coating, you experience an initial snap of sweet chocolate that quickly melts on your tongue. This gives way to the soft, almost mousse-like interior where crushed cookie pieces provide textural interest against the smooth cream cheese binding. The chocolate wafer cookies maintain some of their structure even when crushed and mixed, offering little moments of intensified cookie flavor throughout each bite.
The texture journey is just as important as the taste. The exterior coating should be firm enough to hold its shape at room temperature but melt immediately upon contact with your mouth. The interior should be creamy and smooth, not crumbly or dry, with a consistency similar to a soft truffle. When properly made, these treats have a luxurious mouthfeel that makes them feel indulgent despite their simple ingredient list. The contrast between the firm shell and yielding center creates that satisfying moment that defines excellent confectionery.
Essential Ingredients Explained
The foundation of exceptional Oreo balls begins with the cookies themselves. Using authentic Oreo cookies ensures you get that distinctive chocolate wafer and cream filling combination that defines the flavor. The cookies should be fresh, not stale, as older cookies can taste flat and won't provide the same depth of chocolate flavor. You'll use the entire cookie, including the cream filling, which contributes to both sweetness and the binding properties of the mixture.
Cream cheese serves as the crucial binding agent that transforms crushed cookies into a moldable mixture. Full-fat cream cheese is essential here; low-fat versions contain too much moisture and won't provide the proper structure. The cream cheese must be at room temperature before mixing, as cold cream cheese will create lumps and won't incorporate smoothly with the cookie crumbs. This ingredient also adds that signature tanginess that balances the sweetness and creates a more sophisticated flavor profile than using frosting or other binders.
The coating chocolate is where quality truly matters. You have several options: chocolate chips, chocolate bark, or candy melts. Real chocolate chips provide the best flavor but can be trickier to work with as they require proper tempering for a glossy finish. Chocolate bark or candy melts are more forgiving for beginners because they're formulated to melt smoothly and set with a nice sheen without tempering. Whatever you choose, ensure it's high-quality and halal-certified, as the coating is the first thing people taste.
Vanilla extract, though used in small amounts, enhances all the other flavors and adds aromatic complexity. Pure vanilla extract is worth the investment over imitation vanilla, as it provides a more rounded, nuanced flavor. Some recipes omit this ingredient, but I find it elevates the treats from good to exceptional.
Shortening or coconut oil is often added to the melted chocolate to thin it slightly, making coating easier and creating a thinner shell. This addition helps the chocolate flow smoothly and prevents it from hardening too quickly while you're working. Use refined coconut oil if you don't want any coconut flavor, or a small amount of vegetable shortening. The ratio is typically one tablespoon per cup of chocolate.
Decorative toppings, while optional, add visual appeal and textural variety. Crushed cookies, sprinkles, chopped nuts (like pistachios or almonds), or drizzles of contrasting chocolate all work beautifully. Apply these while the coating is still wet so they adhere properly. Choose toppings that complement rather than overwhelm the base flavor.
Mastering the Technique
The first critical stage is achieving the perfect cookie crumb consistency. You want fine, uniform crumbs without any large chunks that would make rolling difficult or create an uneven texture. A food processor makes quick work of this task, pulsing the cookies until they resemble fine sand. If working by hand, place cookies in a sealed plastic bag and crush them with a rolling pin, then sift to ensure uniformity. The finer the crumbs, the smoother your finished Oreo balls will be.
Mixing the crumbs with softened cream cheese requires a gentle but thorough approach. Use a stand mixer on low speed or mix by hand with a sturdy spoon to avoid incorporating too much air, which can create air pockets in your finished balls. The mixture should come together into a cohesive dough that holds its shape when pressed but isn't overly sticky. If it's too dry and crumbly, add cream cheese by the teaspoon; if too wet, add more crushed cookies. The perfect consistency feels like soft clay.
Shaping the mixture into uniform balls ensures even coating and professional presentation. Use a small cookie scoop to portion the mixture, which guarantees consistency in size. Roll each portion between your palms firmly enough to create a smooth sphere without cracks, but not so hard that you warm the mixture too much with your hands. Working quickly is important here, as the warmth from your hands can soften the mixture. If it becomes too soft, refrigerate for ten minutes before continuing.
The chilling phase is non-negotiable for success. Once shaped, the balls must firm up in the refrigerator for at least two hours, or even better, overnight. This step solidifies the cream cheese, making the balls easier to handle during coating and preventing them from falling apart when dipped in warm chocolate. Place them on a parchment-lined baking sheet with space between each ball so they don't touch and can chill evenly.
Melting and preparing the chocolate coating requires careful temperature control. Whether using chocolate chips or candy melts, melt in short bursts in the microwave (30 seconds at a time) or over a double boiler, stirring frequently. The chocolate should be warm enough to flow smoothly but not so hot that it melts the chilled Oreo balls on contact. Test the temperature by dipping a spoon; the chocolate should coat it smoothly without being runny. Add your shortening or coconut oil at this stage for easier working consistency.
The dipping and coating technique separates amateur results from professional-looking treats. Remove only a few balls from the refrigerator at a time to keep them cold. Use a fork or dipping tool to lower each ball into the melted chocolate, ensuring complete coverage. Lift it out, allowing excess chocolate to drip back into the bowl, then gently tap the fork against the bowl's edge to remove more excess. Transfer to a parchment-lined sheet and immediately add any toppings before the chocolate sets. The entire coating should be thin and even, without thick spots or bare patches.
Common Pitfalls and How to Fix Them
One of the most frequent issues home cooks encounter is Oreo balls that fall apart during the coating process. This usually happens because the mixture wasn't chilled long enough before dipping, or the chocolate was too hot. If you notice balls beginning to crumble as you dip them, immediately stop and return everything to the refrigerator for another thirty minutes. You can also try flash-freezing the balls for fifteen minutes before dipping, which provides extra insurance against falling apart. Always ensure your chocolate has cooled slightly after melting but remains fluid.
Thick, uneven chocolate coating is another common challenge that makes the treats look homemade in an unflattering way. This occurs when the chocolate is too thick or when you don't tap off enough excess. If your chocolate seems too thick, add another half teaspoon of shortening or coconut oil and stir thoroughly. When dipping, be patient with the tapping process, even though it feels tedious. A few extra seconds of tapping results in a much more refined appearance with a thin, elegant shell.
Cracks appearing on the surface after the chocolate sets indicate a temperature shock issue. This happens when very cold balls meet very hot chocolate, causing the outer layer to contract too quickly as it cools. Let your shaped balls sit at room temperature for just five minutes before dipping, taking them out of the refrigerator in small batches. The chocolate temperature matters too; it should be just barely warm to the touch, not hot.
Some bakers struggle with Oreo balls that are too soft and won't hold their shape, even after chilling. This problem stems from too much cream cheese in the mixture. The ratio should be approximately one package of cream cheese to one full package of Oreos. If you've already mixed your batch and it's too soft, gradually fold in more crushed Oreos until the mixture becomes workable. It's better to start with less cream cheese and add more if needed than to have too much from the beginning.
Grainy or seized chocolate coating can ruin an otherwise perfect batch. Chocolate seizes when even a small amount of water gets into it, turning it into a thick, grainy mess. Ensure all your tools are completely dry before melting chocolate, and avoid covering the chocolate while it's warm, as condensation can drip back in. If seizure occurs, sometimes whisking in a tablespoon of shortening vigorously can save it, but prevention is much easier than correction.
Finally, some cooks find their finished Oreo balls taste too sweet. While these are dessert treats, they shouldn't be overwhelming. Balance can be improved by using dark chocolate for coating instead of milk chocolate, or by adding a pinch of sea salt to the mixture before shaping. Some bakers also reduce sweetness by using less cream cheese and adding a tablespoon of sour cream for extra tang without additional sweetness.
Regional Twists Worth Trying
The Middle Eastern variation of these treats incorporates aromatic flavors that complement the chocolate beautifully. Add a half teaspoon of rose water or orange blossom water to the cream cheese mixture for a subtle floral note that makes the treats feel more sophisticated. Roll the chocolate-coated balls in finely crushed pistachios for a gorgeous green accent and a nutty crunch that's popular throughout the region. Some bakers also add a pinch of cardamom to the mixture, which provides warmth and complexity.
In Southeast Asian adaptations, coconut features prominently in creative ways. Mix shredded coconut into the Oreo mixture before shaping, then coat in white chocolate and roll in toasted coconut flakes for a tropical twist. Another variation uses pandan extract in place of vanilla, which gives the treats a distinctive flavor and pale green color that's visually stunning. These versions are often smaller, bite-sized portions perfect for serving with tea.
European-inspired versions tend toward darker, more intense chocolate flavors. Use dark chocolate Oreos or add a tablespoon of espresso powder to the mixture for a sophisticated mocha flavor. Coat in dark chocolate and dust with cocoa powder instead of rolling in sprinkles. Some recipes incorporate a small amount of hazelnut spread into the cream cheese mixture, creating a flavor reminiscent of popular European confections. These versions appeal to those who prefer less sweet, more complex desserts.
American regional variations showcase creativity and local flavor preferences. In the South, some bakers add a touch of bourbon-free vanilla-butter flavoring and coat the balls in crushed pecans. West Coast versions might include dried cranberries mixed into the filling and white chocolate coating. Coastal regions sometimes add lime zest to the mixture and coat in white chocolate, creating a refreshing twist that's perfect for warm weather gatherings.
The Perfect Spread
When serving Oreo balls as part of a dessert spread, consider them the centerpiece around which other treats orbit. They pair beautifully with lighter, fruit-based desserts that provide contrast to their rich, chocolatey density. Fresh fruit skewers, fruit tarts, or a colorful fruit salad offer palate-cleansing brightness between bites of these indulgent treats. The visual contrast of colorful fruits against dark chocolate also creates an appealing presentation.
For beverage pairings, consider the intensity of the chocolate and cream cheese flavors. Strong coffee or espresso cuts through the richness beautifully, while tea drinkers might prefer a robust black tea or even mint tea for a refreshing contrast. For non-caffeinated options, cold milk remains a classic pairing that most guests appreciate. At more formal gatherings, consider offering flavored sparkling water with citrus or berry notes.
If you're creating a more substantial dessert table, complement your Oreo balls with items that offer textural variety. Crispy cookies, delicate cream puffs, or flaky pastries provide contrast to the soft, truffle-like texture. Consider including both chocolate and non-chocolate options so guests who prefer variety can sample across flavor profiles. The key is creating a balanced selection where each item has its moment to shine.
Presentation elevates these simple treats into something special. Arrange them on a tiered serving stand for visual height and interest, or nestle them in decorative paper cups on a large platter. White or light-colored serving pieces make the dark chocolate coating stand out beautifully. For gatherings, label them with a small card so guests know what they're enjoying, especially if you've created multiple variations with different coatings or mix-ins.
Keeping and Reheating
Proper storage is essential for maintaining the quality of your Oreo balls over several days or even weeks. Store them in an airtight container with parchment paper between layers to prevent sticking, and keep them refrigerated at all times when not being served. They'll maintain optimal texture and flavor for up to two weeks in the refrigerator. The chocolate coating protects the interior from drying out, and interestingly, many people find the flavors actually meld and improve after a day or two of storage.
For longer storage, Oreo balls freeze exceptionally well, making them perfect for advance preparation before large gatherings. Place them in a single layer on a baking sheet and freeze until solid, then transfer to a freezer-safe container with parchment between layers. They'll keep for up to three months in the freezer without any loss of quality. This make-ahead capability means you can prepare treats during a free weekend and have them ready whenever needed.
When it comes to serving, these treats are best enjoyed slightly chilled but not frozen solid. Remove them from the refrigerator about ten to fifteen minutes before serving to allow them to come to ideal eating temperature. At this temperature, the chocolate coating has a pleasant snap while the interior is soft and creamy. Serving them too cold makes the center firm and less enjoyable, while room temperature causes them to become too soft.
There's no need to reheat Oreo balls, as they're designed to be enjoyed cold or at cool room temperature. In fact, applying heat would melt the chocolate coating and turn the interior mushy. If you've frozen them, thaw overnight in the refrigerator rather than at room temperature to prevent condensation from forming on the chocolate coating. Once thawed, they're identical to freshly made treats and can be stored in the refrigerator following the same guidelines.
Your Questions Answered
Can I make Oreo balls without a food processor?
Absolutely! While a food processor makes the job faster, you can easily crush Oreos by hand using a few simple methods. Place them in a heavy-duty zip-top bag, seal it while pressing out excess air, and crush them with a rolling pin until you achieve fine, uniform crumbs. Alternatively, use a sturdy bowl and the bottom of a heavy glass or measuring cup to crush them in batches. The key is ensuring the crumbs are fine and uniform, which might take a few extra minutes by hand but produces identical results to a food processor.
How far in advance can I prepare these for a gathering?
Oreo balls are excellent make-ahead treats, and I actually recommend preparing them at least one day before serving. Make them up to two weeks in advance and store them in the refrigerator, or freeze them up to three months ahead. The flavors improve as they sit, with the cream cheese and cookie flavors melding together beautifully. For the best workflow, shape the balls one day, chill them overnight, then coat them the following day. This spacing prevents rushing and ensures each step is done properly when you're fresh and focused.
What's the best way to scale this recipe for large gatherings?
Scaling Oreo balls is straightforward since the ratios remain consistent regardless of batch size. One package of Oreos with one package of cream cheese yields approximately 30-40 balls depending on size. For large events, I recommend making multiple separate batches rather than one enormous batch, as smaller amounts are easier to mix thoroughly and shape consistently. Prepare them assembly-line style: crush all cookies first, mix all batches, shape all balls, then coat everything. Having a helper for the coating stage makes the process much faster since one person can dip while the other applies toppings.
Can I use different types of cookies instead of Oreos?
While Oreos create the classic version of these treats, you can absolutely experiment with other sandwich cookies or even graham crackers or vanilla wafers for completely different flavor profiles. Keep in mind that the moisture content and texture of different cookies varies, so you may need to adjust the amount of cream cheese accordingly. Chocolate sandwich cookies work similarly to Oreos, while vanilla or golden Oreos create a lighter-colored, sweeter treat. If using cookies without cream filling, you might need slightly more cream cheese to achieve the right consistency.
How do I prevent my hands from getting messy when rolling the balls?
Messy hands are a common frustration when making Oreo balls, but several tricks can help. First, chill the mixture for thirty minutes before shaping, which makes it less sticky. Lightly dampen your hands with cool water before rolling each ball, wiping them clean between portions. Some bakers wear disposable gloves, changing them when they become too coated. Using a small cookie scoop to portion the mixture minimizes hand contact, and you can also try lightly coating your palms with a tiny amount of neutral oil. The key is working quickly so your warm hands don't soften the mixture too much.
What should I do if my chocolate coating is streaky or has white spots?
Streaky chocolate or white spots (called bloom) can result from several issues. Streaking during application usually means the chocolate is beginning to set too quickly or wasn't stirred thoroughly enough. Keep your chocolate at the right temperature throughout the coating process, reheating briefly if it starts to thicken. White spots that appear later indicate fat bloom or sugar bloom, typically caused by temperature fluctuations during storage. Prevent this by storing the coated balls at consistent refrigerator temperature and allowing them to come to room temperature gradually before serving. While bloom doesn't affect taste, it does impact appearance, so temperature control throughout the process is important for professional-looking results.
Homemade Oreo Balls
Delightful no-bake treats made with crushed Oreos, cream cheese, and chocolate coating. Perfect bite-sized desserts for any gathering.
Prep Time
30 min
Cook Time
5 min
Total Time
2h 35m
Servings
36 balls
Ingredients
For 36 balls
- 1 package (14.3 oz) Oreo cookies, regular size
- 8 oz cream cheese, softened to room temperature
- 1 teaspoon pure vanilla extract
- 16 oz chocolate coating (chocolate chips, candy melts, or chocolate bark)
- 2 tablespoons vegetable shortening or refined coconut oil
- Optional: sprinkles, crushed cookies, or chopped nuts for decoration
Instructions
- 1
Crush the cookies
Place all Oreo cookies, including the cream filling, into a food processor. Pulse in short bursts until the cookies are crushed into fine, uniform crumbs resembling sand. This should take about 1-2 minutes. If working without a food processor, place cookies in a sealed plastic bag and crush with a rolling pin until finely ground.
- 2
Mix with cream cheese
In a large mixing bowl, combine the crushed Oreo crumbs with the softened cream cheese and vanilla extract. Mix on low speed with an electric mixer or by hand with a sturdy spoon until completely combined into a uniform mixture. The consistency should resemble soft clay that holds together when pressed. Avoid overmixing, which can incorporate too much air.
- 3
Shape into balls
Using a small cookie scoop or tablespoon, portion out the mixture into uniform amounts. Roll each portion between your palms to form smooth, round balls approximately 1 inch in diameter. Apply gentle but firm pressure to ensure the balls are compact without cracks. Place shaped balls on a parchment-lined baking sheet, spacing them slightly apart so they don't touch.
- 4
Chill thoroughly
Transfer the baking sheet of shaped balls to the refrigerator and chill for at least 2 hours, or preferably overnight. This chilling time is essential for the cream cheese to firm up, which prevents the balls from falling apart during the coating process. The balls should feel very firm to the touch before proceeding to the next step.
- 5
Melt the chocolate
Place the chocolate coating in a microwave-safe bowl and add the shortening or coconut oil. Microwave in 30-second intervals, stirring thoroughly between each interval, until the chocolate is completely melted and smooth. Alternatively, melt over a double boiler, stirring frequently. The chocolate should be warm but not hot, with a smooth, flowing consistency.
- 6
Test chocolate consistency
Dip a spoon into the melted chocolate and lift it out. The chocolate should coat the spoon smoothly and drip off in a steady stream. If it's too thick, add another teaspoon of shortening and stir well. Let the chocolate cool for 2-3 minutes after melting so it's warm but not hot enough to melt the chilled balls.
- 7
Coat the balls
Working with 4-5 balls at a time (keeping the rest refrigerated), drop one ball into the melted chocolate. Use a fork or dipping tool to roll it around until completely covered, then lift it out, allowing excess chocolate to drip back into the bowl. Gently tap the fork against the bowl's edge several times to remove more excess chocolate, ensuring a thin, even coating.
- 8
Add decorations
Carefully slide the coated ball onto a parchment-lined baking sheet using a toothpick or second fork. While the chocolate is still wet, immediately add any desired toppings such as sprinkles, crushed cookies, or chopped nuts. The decorations will only stick if applied before the chocolate sets, which happens within 1-2 minutes.
- 9
Set the coating
Continue coating all balls, working in small batches and reheating the chocolate briefly if it begins to thicken. Once all balls are coated and decorated, refrigerate them for at least 30 minutes to allow the chocolate coating to set completely. The coating should be firm and have a slight sheen when properly set.
- 10
Store and serve
Transfer the finished Oreo balls to an airtight container with parchment paper between layers. Store in the refrigerator for up to 2 weeks. Remove from the refrigerator 10-15 minutes before serving to allow them to reach ideal eating temperature. The chocolate should have a pleasant snap while the interior remains soft and creamy.
Nutrition Facts
Per serving (estimated)
120 calories
Calories
14g
Carbs
2g
Protein
7g
Fat
1g
Fiber
85mg
Sodium
10g
Sugar


