Easy Spring Flower Cookies That Look Bakery-Perfect
Learn how to make stunning spring flower cookies at home with simple techniques. Beautiful buttercream flowers on soft sugar cookies—easier than you think!
cookwithlucia.com/recipes/easy-spring-flower-cookies-that-look-bakery-perfect-but-are-so-simple-to-make
Introduction
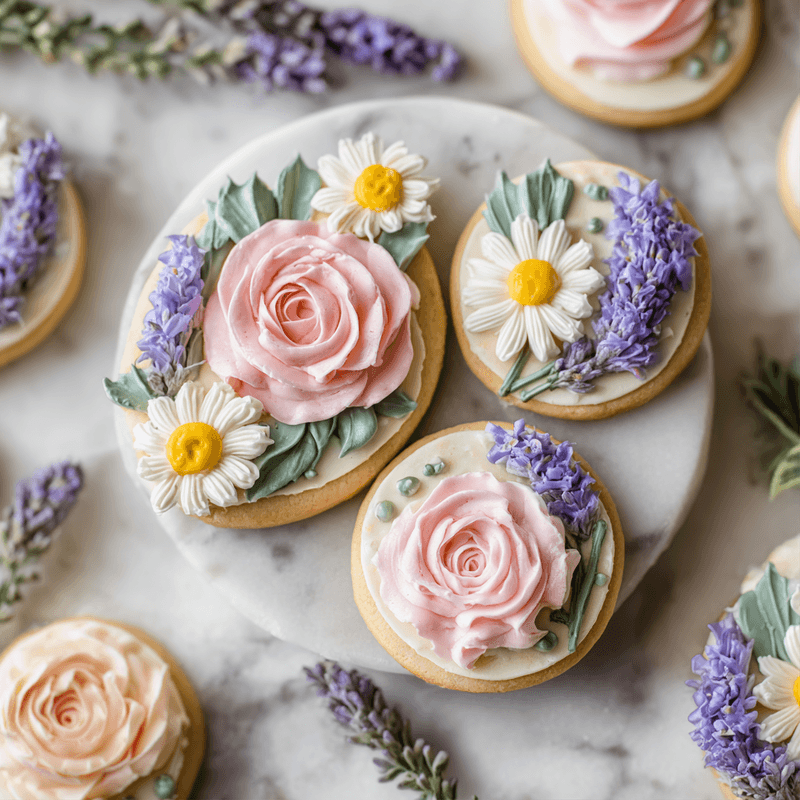
When you bite into a beautifully decorated cookie, there's something magical about it. The combination of buttery sweetness, delicate vanilla notes, and the sheer joy of edible art makes every occasion feel special. These easy spring flower cookies deliver that bakery-perfect aesthetic without requiring professional pastry skills or expensive equipment. What makes them truly special is how the soft, melt-in-your-mouth sugar cookie base pairs with silky smooth buttercream flowers that look like they took hours but come together in minutes once you know the technique.
I'm genuinely excited to share this recipe because it breaks down the intimidation barrier around cookie decorating. You don't need steady hands of a surgeon or years of practice to create gorgeous floral designs. With just a few piping tips and a straightforward buttercream recipe, you'll be creating roses, daisies, and blossoms that make people ask where you bought them. The secret lies in the right cookie texture—firm enough to hold its shape yet tender enough to practically dissolve on your tongue—and a buttercream that pipes smoothly without being too soft or too stiff. Whether you're preparing treats for a family gathering, a weekend celebration, or simply want to bring beauty to your everyday table, these spring flower cookies transform simple ingredients into something genuinely impressive.

Why This Recipe Works for Your Baking Success
The foundation of these easy spring flower cookies starts with a perfectly balanced sugar cookie dough that holds its shape during baking without spreading. Unlike some cookie recipes that puff up or flatten unpredictably, this formula uses just the right ratio of butter to flour, creating a stable canvas for your decorative work. The dough chills quickly, rolls out smoothly, and bakes to a consistent thickness every single time—no thin edges or thick centers.
The buttercream frosting is equally foolproof. By using a specific butter-to-powdered sugar ratio and incorporating just enough liquid, you get a consistency that's pipeable yet stable. It holds peaks beautifully for petal formation, doesn't weep or separate at room temperature, and tastes phenomenally buttery without being overly sweet. This isn't the grainy, overly sugary frosting that coats your mouth—it's smooth, creamy, and complements the cookie perfectly.
What truly makes these spring flower cookies accessible is the forgiving nature of the decorating process. Buttercream is incredibly user-friendly compared to royal icing or fondant. If you make a mistake, you can simply scrape it off and start again. The flowers don't need to be perfect to be beautiful—in fact, slight variations make them look more natural and handmade. Even your first attempt will yield cookies that look impressive, and by your third or fourth cookie, you'll feel like a seasoned decorator. The techniques transfer beautifully across different flower types, so mastering one style opens the door to endless creative possibilities.
The Ingredient Lineup That Makes Magic Happen
Let's talk about what goes into these easy spring flower cookies, starting with the base. All-purpose flour provides the structure, while a touch of cornstarch adds tenderness and helps the cookies maintain their shape without becoming tough. Unsalted butter is essential—it's the primary flavor carrier in both the cookie and the frosting, so using high-quality butter genuinely makes a difference. You'll taste it in every bite, that rich, creamy foundation that makes homemade cookies infinitely better than store-bought versions.
Granulated sugar sweetens the dough while contributing to the cookie's texture. It creams beautifully with butter, incorporating air that creates a lighter crumb. The eggs bind everything together and add richness, while pure vanilla extract brings warmth and depth. Don't skimp on vanilla quality here—it's one of the dominant flavors, and a good vanilla extract elevates the entire recipe. A small amount of baking powder gives just enough lift to create a tender cookie without causing excessive spreading or puffing.
For the buttercream that creates those stunning flowers, you'll need more butter (yes, butter is the star of this show), plenty of powdered sugar for sweetness and structure, heavy cream or milk for consistency adjustment, and more vanilla. The beauty of this ingredient list is its simplicity and accessibility. You likely have most of these items in your kitchen already, and nothing requires a trip to a specialty store. For coloring your buttercream, gel food coloring works best because it doesn't thin the frosting like liquid colors do. Soft pastels—pinks, lavenders, yellows, and peaches—are perfect for spring flower cookies, though you can absolutely customize to any color palette you love.
Putting It Together With Simple Techniques
Creating these easy spring flower cookies begins with making the sugar cookie dough, which takes just minutes with an electric mixer. You'll cream the butter and sugar until light and fluffy—this is crucial because it incorporates air that makes the cookies tender. Add your egg and vanilla, then gently mix in the dry ingredients until just combined. Overmixing develops gluten and creates tough cookies, so stop as soon as you no longer see flour streaks. The dough gets wrapped and chilled for at least one hour, which firms up the butter and makes rolling much easier.
When you're ready to roll, work with half the dough at a time, keeping the rest refrigerated. Roll to about a quarter-inch thickness on a lightly floured surface—this creates cookies that are sturdy enough for decorating but still tender to bite. Cut your shapes using round cutters in your preferred size (three-inch circles work beautifully for substantial cookies that showcase your flower designs). Transfer carefully to parchment-lined baking sheets, leaving space between each cookie. They bake at a moderate temperature until the edges are just barely golden—about ten to twelve minutes. The centers might look slightly underdone, but they'll firm up as they cool, giving you that perfect soft texture.
While the cookies cool completely (and I mean completely—warm cookies will melt your buttercream), you'll make the frosting. Beat softened butter until creamy, then gradually add powdered sugar. The mixture will look dry and crumbly at first, but keep going. Once all the sugar is incorporated, add vanilla and cream one tablespoon at a time until you reach the perfect piping consistency. It should hold stiff peaks but still be smooth enough to pipe without excessive hand fatigue. Divide your buttercream and tint each portion with gel colors, mixing thoroughly to eliminate streaks.
The decorating process is where these spring flower cookies truly come to life. Fit piping bags with your chosen tips—a petal tip for roses, a small round tip for dot flowers, or a leaf tip for daisies. For roses, you'll pipe a central cone, then add overlapping petals working from inside to outside. For simpler flowers, pipe five or six petals in a circle with a contrasting center dot. Don't worry about perfection; the charm of buttercream flowers lies in their organic, handmade appearance. As you work, you'll develop muscle memory for the pressure and movement, and each cookie will come more naturally than the last.
Customizing for Your Occasion and Preferences
One of the wonderful aspects of these easy spring flower cookies is how adaptable they are to different events and tastes. If you're serving them at a sophisticated afternoon gathering, keep the colors soft and elegant—blush pink, cream, and sage green create a refined palette. For more playful occasions, go bold with vibrant yellows, bright pinks, and cheerful oranges. You can even create ombre effects by tinting portions of buttercream in graduated shades of the same color.
The flavor profile is equally customizable. The base recipe uses vanilla, but you can easily incorporate almond extract for a more complex flavor—just use half vanilla and half almond extract in both the cookies and frosting. Lemon zest added to the cookie dough brings brightness that pairs beautifully with spring themes, and a touch of lemon extract in the buttercream creates a citrus variation that's absolutely delightful. For chocolate lovers, replace a quarter cup of flour with cocoa powder to create chocolate sugar cookies, then top with vanilla or mint buttercream flowers.
If you're making these spring flower cookies for guests with dietary considerations, several modifications work well. For a dairy-free version, use plant-based butter alternatives in both the cookies and frosting—the newer generations of these products cream and pipe remarkably well. You can also experiment with gluten-free flour blends designed for cookies, though you may need to adjust the liquid slightly. The decorating techniques remain exactly the same regardless of dietary modifications, so everyone can enjoy beautiful, delicious cookies.
Size variations allow you to tailor these cookies to your needs. Mini cookies decorated with single small blossoms make perfect bite-sized treats for large gatherings where you want to serve a variety of sweets. Standard three-inch cookies showcase detailed flower work beautifully and satisfy without being overwhelming. Larger four or five-inch cookies become statement pieces—you might decorate each with a bouquet of different flowers or create an elaborate floral scene across the surface.
Meal Prep Like a Pro Baker
The beauty of these easy spring flower cookies for busy schedules is that you can break the process into manageable stages over several days. The cookie dough actually benefits from extended chilling and can be made up to three days ahead. Wrap it tightly in plastic wrap and refrigerate, or freeze it for up to three months. When you're ready to bake, let frozen dough thaw in the refrigerator overnight, then proceed with rolling and cutting. This make-ahead capability means you can prepare the dough during a quiet evening and save the fun decorating part for when you have more time or want to involve family members.
Baked but undecorated cookies store exceptionally well, making them perfect for advance preparation. Once completely cooled, layer them between sheets of parchment paper in an airtight container. They'll stay fresh at room temperature for up to five days, or you can freeze them for up to two months. Frozen baked cookies thaw quickly at room temperature—just thirty minutes or so—and taste freshly baked. This approach lets you bake in bulk when you have oven time available, then decorate smaller batches as needed for different occasions throughout the week or month.
The buttercream frosting also stores beautifully, though it requires a quick re-whip before using. Made frosting keeps in an airtight container in the refrigerator for up to two weeks or in the freezer for up to three months. Before decorating, bring it to room temperature (this takes several hours), then beat it again with a mixer to restore the smooth, fluffy texture. If it seems too thick after refrigeration, add a tiny bit of cream; if too thin, add more powdered sugar. Keeping pre-tinted buttercream in different colors means you can decorate a few spring flower cookies whenever the mood strikes without mixing up fresh batches each time.
Fully decorated cookies need slightly more careful storage to protect your beautiful flower work. Place them in a single layer in a container with a lid tall enough that it doesn't touch the frosting. They'll keep at room temperature for three to four days, though the cookies themselves remain fresh longer—the buttercream just starts to develop a slight crust after several days. For longer storage, freeze decorated cookies uncovered on a baking sheet until the buttercream is firm, then transfer carefully to a freezer container with parchment between layers. They'll keep frozen for up to six weeks and thaw beautifully in about an hour at room temperature.
Serving Suggestions and Complete Presentation Ideas
These easy spring flower cookies deserve presentation that showcases their beauty. For casual family gatherings, arrange them on a simple white platter or cake stand where the colorful flowers really pop against the neutral background. Vary the flower types and colors across the platter to create visual interest—group similar colors together or create a rainbow arrangement. A light dusting of edible pearl dust or luster dust on the flower centers adds an extra touch of elegance that catches the light beautifully.
When serving these spring flower cookies as part of a larger spread, think about complementary treats that won't compete visually. Plain shortbread, simple brownies, or fruit tarts provide different textures and flavors while letting your decorated cookies be the visual stars. For beverage pairings, they're absolutely lovely with hot tea—the buttery sweetness pairs especially well with floral teas like chamomile or jasmine. Fresh lemonade or fruit-infused water provides refreshing contrast during warmer weather gatherings.
For gift-giving, these cookies make genuinely impressive presents. Arrange four to six cookies in a clear cellophane bag tied with ribbon, or use a decorative cookie box with a window that shows off your handiwork. Include a small card with the flavors and a note about them being handmade—people truly appreciate the time and care that goes into decorated cookies. You can even customize the flower colors to match someone's favorite palette or the season of their special event.
If you're serving these spring flower cookies at a gathering where guests will be standing and mingling, consider the practical aspects. Three-inch cookies are substantial enough to satisfy but can be eaten in a few bites without requiring a plate. Set out pretty napkins nearby, and perhaps arrange cookies on multiple smaller platters throughout the space rather than one large display. This prevents crowding and ensures everyone can admire your decorating skills up close. For seated events, placing one beautifully decorated cookie at each place setting—perhaps on a small doily or decorative plate—creates a lovely personal touch that doubles as both dessert and decor.
Frequently Asked Questions
How long do these spring flower cookies stay fresh?
Undecorated baked cookies stay fresh in an airtight container at room temperature for up to five days, or frozen for two months. Once decorated with buttercream, they're best within three to four days at room temperature, though the cookies themselves remain tender longer. The buttercream develops a slight crust after several days but still tastes delicious. For maximum freshness, store in a cool, dry place away from direct sunlight.
Can I make the buttercream flowers ahead of time?
Absolutely! You can pipe buttercream flowers directly onto parchment paper or a flower nail, then freeze them until solid. Transfer the frozen flowers to a container and keep frozen for up to two months. When you're ready to decorate, simply place the frozen flowers on your cookies and let them thaw—they'll adhere as they come to room temperature. This technique lets you practice flower-making without committing to immediate cookie decoration.
What piping tips do I need for different flower styles?
For roses, a petal tip like Wilton #104 is essential. For simple five-petal flowers, a small round tip (#3 or #5) works beautifully. A leaf tip (#352) creates realistic leaves and also makes lovely daisy petals. A small star tip (#16 or #18) produces textured flowers and is great for beginners because it's very forgiving. Starting with just these four tips gives you incredible variety for decorating spring flower cookies.
How do I fix buttercream that's too thick or too thin?
If your buttercream is too thick to pipe comfortably, add heavy cream or milk one teaspoon at a time, beating well after each addition until you reach the right consistency. If it's too thin and won't hold peaks, add more powdered sugar a quarter cup at a time. Temperature also affects consistency—if your kitchen is very warm, the butter softens and the frosting becomes loose. Refrigerate it for ten to fifteen minutes, then re-beat before using.
Can I use this recipe to make cut-out shapes other than circles?
Definitely! While circles provide the perfect canvas for flower decorating, this sugar cookie dough works beautifully for any shape. Hearts, rectangles, or even flower-shaped cutters all work well. Just ensure consistent thickness when rolling so all cookies bake evenly. More intricate shapes with thin sections might require slightly shorter baking times, so watch carefully and remove them when the edges just barely begin to color.
What's the best way to achieve vibrant colors in my buttercream?
Gel food coloring produces the most vibrant colors without thinning your buttercream. Start with a tiny amount—gel colors are highly concentrated—and add more gradually until you reach your desired shade. Mix thoroughly to eliminate streaks. For very deep colors like navy or black, make the buttercream a day ahead and let the color develop overnight in the refrigerator. The shade will deepen as it sits, giving you richer tones for your spring flower cookies without adding excessive gel that can affect taste or texture.
The Joy of Edible Art in Your Kitchen
There's something deeply satisfying about creating beauty with your own hands, especially when that beauty is also delicious. These easy spring flower cookies represent the perfect intersection of culinary skill and artistic expression, proving that you don't need professional training to produce genuinely impressive results. The soft, buttery cookies provide the foundation, while the silky buttercream flowers transform each one into a miniature work of art.
What I love most about this recipe is how it builds confidence. Your first cookie might feel awkward as you figure out piping pressure and petal placement, but by the fifth or sixth, you'll find your rhythm. By the time you've decorated a full batch, you'll have developed real skill that carries over to countless other decorating projects. The techniques you learn making these spring flower cookies apply to cupcakes, cakes, and other decorated treats, opening up a whole world of creative possibilities.
The response you'll get when you share these cookies makes every minute of preparation worthwhile. People are genuinely amazed when you tell them you made them yourself, and there's pride in knowing you've created something that brings joy and beauty to others. Whether you're preparing them for a special gathering or simply making an ordinary weekend feel more special, these cookies add a touch of elegance and care to any occasion.
Beyond their visual appeal, these easy spring flower cookies simply taste wonderful. The tender, vanilla-scented cookie practically melts on your tongue, while the buttercream adds richness without overwhelming sweetness. Each bite offers that perfect balance of textures—the slight firmness of the cookie giving way to creamy frosting—that makes it genuinely hard to stop at just one. They're the kind of treat that people remember, ask about, and request again for future gatherings.
As you develop your decorating skills, you'll find endless ways to customize these cookies for different seasons and occasions. Spring pastels give way to summer brights, autumn jewel tones, or winter whites and silvers. Different flower styles suit different themes—roses for elegance, daisies for casual charm, or elaborate multi-flower bouquets for show-stopping presentations. The basic recipe remains your reliable foundation while your creativity determines the final look.
I encourage you to embrace imperfection as you learn. Not every petal needs to be identical, and slight variations actually make your flowers look more natural and handcrafted. The charm of homemade decorated cookies lies precisely in their handmade quality—they have personality and warmth that perfectly uniform commercial cookies can't match. Let yourself enjoy the process, experiment with different techniques, and celebrate each small improvement in your skills.
Most importantly, have fun with these spring flower cookies. Invite friends or family members to decorate alongside you, turning cookie decorating into a creative activity that builds memories and skills simultaneously. Children especially love the process, and while their flowers might be wonderfully abstract, the pride they feel in creating something beautiful is genuine and heartwarming. These cookies offer a perfect opportunity to slow down, be present, and create something lovely with your hands.
The kitchen skills you develop making these cookies extend far beyond this single recipe. You'll gain confidence with dough handling, understand how butter-based frostings work, develop hand-eye coordination with piping bags, and learn to see how colors and designs work together. These are foundational techniques that elevate all your baking and decorating projects, making you a more capable and creative home baker overall.
So gather your ingredients, set aside an afternoon, and discover just how accessible beautiful cookie decorating can be. These easy spring flower cookies prove that with the right recipe, clear instructions, and a bit of practice, anyone can create bakery-perfect treats in their own kitchen. The satisfaction of pulling a tray of beautifully decorated cookies from your own oven, knowing you created them from scratch, is a feeling worth experiencing. Your kitchen is capable of producing genuine beauty, one cookie at a time.
Easy Spring Flower Cookies
Beautiful buttercream flower cookies with a soft sugar cookie base and silky frosting flowers. These bakery-style decorated cookies are easier to make than they look and perfect for any gathering.
Prep Time
30 min
Cook Time
12 min
Total Time
2h 42m
Servings
24 cookies
Ingredients
For 24 cookies
- 2 3/4 cups all-purpose flour
- 1/4 cup cornstarch
- 1 cup unsalted butter, softened
- 3/4 cup granulated sugar
- 1 large egg
- 2 teaspoons pure vanilla extract
- 1/2 teaspoon baking powder
- 1/4 teaspoon salt
- 1 cup unsalted butter, softened (for buttercream)
- 4 cups powdered sugar
- 3-4 tablespoons heavy cream or milk
- 1 teaspoon pure vanilla extract (for buttercream)
- Gel food coloring in assorted spring colors
Instructions
- 1
Cream butter and sugar
In a large mixing bowl, beat the softened butter and granulated sugar together with an electric mixer on medium-high speed for 3-4 minutes until light and fluffy. This incorporates air that creates tender cookies. Scrape down the sides of the bowl to ensure even mixing.
- 2
Add wet ingredients
Add the egg and vanilla extract to the butter mixture and beat until fully combined, about 1 minute. The mixture should be smooth and well incorporated. Scrape down the bowl again if needed.
- 3
Combine dry ingredients
In a separate bowl, whisk together the flour, cornstarch, baking powder, and salt. This ensures the leavening and salt are evenly distributed throughout the flour.
- 4
Form cookie dough
Add the dry ingredients to the wet ingredients and mix on low speed until just combined. Stop mixing as soon as you no longer see flour streaks to prevent tough cookies. The dough should be soft but not sticky.
- 5
Chill the dough
Divide the dough in half, flatten each portion into a disk, and wrap tightly in plastic wrap. Refrigerate for at least 1 hour or up to 3 days. This firms up the butter and makes rolling much easier.
- 6
Roll and cut cookies
Preheat oven to 350°F (175°C) and line baking sheets with parchment paper. On a lightly floured surface, roll one portion of dough to 1/4-inch thickness. Cut with a 3-inch round cutter and transfer to prepared baking sheets, spacing cookies 2 inches apart.
- 7
Bake cookies
Bake for 10-12 minutes until the edges are just barely beginning to turn golden. The centers will look slightly underdone but will firm as they cool. Let cookies cool on the baking sheet for 5 minutes, then transfer to a wire rack to cool completely before decorating.
- 8
Make buttercream frosting
In a large bowl, beat 1 cup of softened butter with an electric mixer until creamy, about 2 minutes. Gradually add the powdered sugar, one cup at a time, beating on low speed until incorporated. The mixture will look dry and crumbly initially.
- 9
Perfect frosting consistency
Add the vanilla extract and 3 tablespoons of heavy cream to the buttercream. Beat on medium-high speed for 3-4 minutes until light and fluffy. If the frosting is too thick to pipe smoothly, add the remaining tablespoon of cream. It should hold stiff peaks but pipe without excessive pressure.
- 10
Tint buttercream
Divide the buttercream into separate bowls for each color you want. Add gel food coloring one drop at a time, mixing thoroughly until you achieve your desired shade. Pastel colors work beautifully for spring flowers.
- 11
Fill piping bags
Fit piping bags with your chosen tips—petal tips for roses, small round tips for simple flowers, or leaf tips for daisies. Fill each bag about halfway with tinted buttercream, twisting the top to seal and prevent frosting from coming out the wrong end.
- 12
Pipe flowers
Hold the piping bag at a 45-degree angle for roses, piping a central cone then adding overlapping petals from inside to outside. For simple flowers, pipe 5-6 petals in a circle with a dot center. Practice on parchment paper first if desired, then decorate the completely cooled cookies.
- 13
Let frosting set
Allow decorated cookies to sit at room temperature for about 30 minutes so the buttercream develops a light crust. This makes them easier to handle and stack. Store in an airtight container at room temperature for up to 4 days.
Nutrition Facts
Per serving (estimated)
285 calories
Calories
38g
Carbs
2g
Protein
14g
Fat
0g
Fiber
45mg
Sodium
26g
Sugar


