Easy M&M Bunny Cookies - Colorful Spring Treats
Learn to make adorable M&M bunny cookies with this detailed guide. Perfect for spring gatherings with simple decorating techniques anyone can master.
cookwithlucia.com/recipes/easy-mm-bunny-cookies-for-easter
There's something magical about transforming simple cookie dough into whimsical animal shapes that bring joy to both children and adults alike. These colorful treats have become a beloved tradition during spring celebrations, gracing dessert tables at family gatherings and community events with their cheerful presence. The combination of a tender, buttery cookie base adorned with candy-coated chocolates creates not just a dessert, but an edible craft project that invites creativity and fun into your kitchen.
I remember the first time I encountered truly exceptional decorated cookies at a springtime potluck. They weren't just sweet—they were works of art that somehow remained approachable and homemade in the best possible way. The baker had achieved that perfect balance of whimsy and deliciousness, where the decoration enhanced rather than overshadowed the quality of the cookie itself. That experience taught me that M&M bunny cookies aren't about perfection; they're about creating something delightful that brings people together.
I'll be honest with you: these easy M&M bunny cookies for spring require a bit of planning and some patience during the decorating phase. But here's why every minute is worthwhile. First, the dough itself is incredibly forgiving and produces cookies with the ideal texture—crisp edges with a soft, almost melt-in-your-mouth center. Second, the decorating process is genuinely enjoyable, not stressful, because there's no wrong way to create your bunny faces. And third, the reactions you'll receive when you present these adorable treats make all the effort feel effortless.
This guide will walk you through every step of creating M&M bunny cookies that look impressive but remain achievable for bakers of all skill levels. We'll explore the techniques that ensure consistent results, the creative choices that make each cookie unique, and the small details that elevate these from simple cookies to memorable springtime treasures.

The Origins and History
Decorated cookies have existed for centuries, with evidence of ornamental baked goods dating back to medieval European celebrations. However, the tradition of creating animal-shaped cookies specifically for spring gatherings has more recent roots in American home baking culture. As commercial candies became widely available in the mid-20th century, creative home bakers began incorporating these colorful additions into their decorating repertoires, transforming simple sugar cookies into playful creations.
The bunny motif itself holds deep cultural significance across many traditions as a symbol of spring renewal and abundance. In baking, the bunny shape became popular because it's recognizable even with simplified features—two ears, a round face, and perhaps a pink nose are all you need to create an unmistakable silhouette. Regional variations abound: some bakers prefer round cookies decorated to suggest bunny faces, while others cut actual bunny shapes from dough and embellish them with candy details.
What makes easy M&M bunny cookies particularly appealing in modern kitchens is their accessibility. Unlike elaborate royal icing techniques that require specialized equipment and significant skill development, candy-decorated cookies offer instant gratification. The M&M candies provide consistent size, shape, and color, eliminating much of the guesswork from decoration. This democratization of cookie decorating has allowed generations of bakers to create impressive-looking treats without formal training.
Interestingly, the evolution of these cookies mirrors broader trends in home baking. As our lives have become busier, recipes that deliver maximum visual impact with minimum technical complexity have flourished. These M&M bunny cookies represent the perfect intersection of homemade quality and practical execution—they look like you spent hours, but the actual hands-on time remains manageable for even the most time-pressed home baker.
Understanding the Flavor Profile
The beauty of easy M&M bunny cookies lies in their harmonious simplicity. At their core, these cookies deliver the classic flavors of butter, vanilla, and sugar—the holy trinity of traditional sugar cookies. The butter provides richness and creates that signature tender crumb, while vanilla adds aromatic depth that elevates the dough beyond mere sweetness. The sugar content is carefully balanced to create cookies that taste pleasantly sweet without being cloying, allowing the subtle complexity of quality butter to shine through.
As you bite into a properly executed M&M bunny cookie, you experience a delightful textural journey. The exterior offers a slight crisp that gives way immediately to a soft, almost shortbread-like interior. The M&M candies provide contrasting moments of crunch followed by smooth chocolate as the candy shell yields. This interplay of textures keeps each bite interesting, preventing the one-note experience that can plague simpler cookies.
The flavor builds as you chew, with the vanilla notes becoming more pronounced and the butter creating a luxurious mouthfeel. If you've added the optional almond extract that some variations include, you'll detect a subtle nutty undertone that adds sophistication. The chocolate from the M&Ms introduces a complementary flavor that doesn't compete with the cookie base but rather enhances its sweetness. The overall effect should be comforting and nostalgic, reminiscent of the best homemade cookies from your childhood, but with a playful visual element that makes them distinctly special.
Essential Ingredients Explained
Unsalted butter forms the foundation of exceptional M&M bunny cookies, and its quality directly impacts your final results. I always use unsalted butter so I can control the exact salt level in my dough, ensuring consistent flavor every time. The butter should be at room temperature—soft enough to leave an impression when pressed but not greasy or melting. This precise consistency allows it to cream properly with sugar, incorporating air that creates the ideal cookie texture. Look for butter with a rich, yellow color, which indicates higher butterfat content and more robust flavor.
Granulated white sugar serves the obvious purpose of sweetening, but it also plays crucial structural roles. During the creaming process, sugar crystals cut into the butter, creating tiny air pockets that expand during baking. This mechanical leavening contributes significantly to the cookie's texture. Some recipes for easy M&M bunny cookies include a portion of powdered sugar, which contains cornstarch and produces an even more tender crumb—worth considering if you want especially delicate cookies.
All-purpose flour provides the protein structure that holds everything together, but the type and how you measure it matters enormously. I recommend measuring flour by weight if possible, or using the spoon-and-level method rather than scooping directly with your measuring cup. Too much flour creates dry, tough cookies, while too little results in spreading and loss of shape definition. For these decorated cookies where appearance matters, proper flour measurement becomes even more critical.
Vanilla extract should be pure, not imitation, for the best flavor development. The complex flavor compounds in real vanilla—derived from cured vanilla beans—provide depth that artificial vanilla simply cannot match. In a cookie where butter, sugar, and vanilla are the primary flavors, using quality vanilla makes a noticeable difference. You'll need about two teaspoons for a standard batch, and this is not the place to skimp.
M&M candies serve as both decoration and flavor accent, and color selection can completely change the visual impact of your cookies. For spring themes, pastel M&Ms create a soft, gentle aesthetic, while regular bright colors offer bold, cheerful appeal. I recommend purchasing more than you think you'll need—having abundant choices during decorating makes the process more creative and enjoyable. Store extras in a cool, dry place, as the candy shells can become sticky in humidity.
Eggs bind the ingredients and add moisture and richness. Use large eggs at room temperature for best incorporation into the dough. Cold eggs don't emulsify as smoothly with butter, potentially creating a less cohesive dough. If you forget to bring eggs to room temperature, place them in a bowl of warm (not hot) water for five minutes before using.
Baking powder provides the chemical leavening that ensures your easy M&M bunny cookies rise appropriately without puffing so much that they lose their shape. Check the expiration date on your baking powder—old leavening agents lose potency and won't perform properly. For these cookies, we want gentle rise that creates tender texture while maintaining clean edges for decoration.
Salt enhances all the other flavors in the dough, making sweetness taste sweeter and bringing forward the vanilla and butter notes. Even though it seems like a tiny amount, omitting salt results in flat-tasting cookies. I use fine sea salt or table salt for even distribution throughout the dough.
Mastering the Technique
Creating exceptional M&M bunny cookies begins with proper creaming of butter and sugar, a step that cannot be rushed. Beat the room-temperature butter and sugar together for a full three to four minutes, until the mixture becomes noticeably lighter in color and fluffy in texture. This extended creaming incorporates air into the dough, which translates directly to lighter, more tender cookies. You'll know you've creamed sufficiently when the mixture appears almost white and has increased in volume, with a texture resembling whipped frosting. This mechanical aeration is crucial because these cookies contain relatively little chemical leavening.
Once you've achieved perfect creaming, add eggs and vanilla, beating just until incorporated. Over-mixing at this stage can deflate the air you've worked so hard to incorporate. The mixture may look slightly curdled—this is normal and will resolve when you add the dry ingredients. In a separate bowl, whisk together your flour, baking powder, and salt, then add this mixture to the wet ingredients in two or three additions. Mix on low speed just until no flour streaks remain. The dough should be soft and pliable but not sticky. If it feels too soft to work with, refrigerate for 15-20 minutes before shaping.
Shaping easy M&M bunny cookies offers flexibility in approach. You can roll the dough into balls for round cookies that you'll decorate as bunny faces, or roll the dough out and use bunny-shaped cookie cutters. For round cookies, I form dough portions of about two tablespoons each into smooth balls, which bake into cookies approximately three inches in diameter—ideal for decorating. If rolling and cutting, work with half the dough at a time, keeping the rest refrigerated. Roll to about one-quarter inch thickness on a lightly floured surface for cookies that maintain their shape while achieving proper texture.
Baking temperature and timing dramatically affect final texture. Preheat your oven thoroughly to 350°F, and use an oven thermometer to verify accuracy if possible. Position your racks in the center of the oven for even heat distribution. Bake cookies for 10-12 minutes, watching for the edges to just begin turning the palest golden color. The centers will look slightly underdone—this is exactly what you want. Cookies continue baking on the hot sheet after removal from the oven, a phenomenon called carryover cooking. Removing them when centers still appear soft prevents the dry, crunchy cookies that result from overbaking.
The cooling process requires patience but ensures your cookies reach optimal texture and become stable enough for decorating. Leave cookies on the baking sheet for five full minutes after removing from the oven. During this time, they'll firm up enough to transfer without breaking. Then move them to a wire cooling rack, which allows air circulation on all sides and prevents soggy bottoms. Wait until cookies reach complete room temperature before decorating—warm cookies will melt your icing or cause M&Ms to slide off. This typically takes 30-40 minutes, and rushing this step undermines all your careful work.
Common Pitfalls and How to Fix Them
One of the most frustrating problems bakers encounter with easy M&M bunny cookies is excessive spreading during baking, resulting in thin, crispy cookies that lack the proper canvas for decoration. This issue usually stems from butter that was too warm during mixing or dough that wasn't chilled adequately before baking. If you notice your first batch spreading too much, immediately refrigerate your remaining dough for 20-30 minutes before continuing. You can also try reducing your oven temperature by 25 degrees and baking slightly longer, which allows cookies to set before they have time to spread excessively. For future batches, ensure your butter is truly at room temperature (68-70°F) rather than overly soft.
Conversely, cookies that emerge too thick and cake-like, with a dry, crumbly texture, signal a different set of issues. This problem typically indicates too much flour in the dough, often from packed measuring cups or dipping directly into the flour container. The excess flour absorbs moisture and creates excessive structure, preventing the desired tender crumb. Unfortunately, there's no fix once cookies are baked, but you can prevent this in future batches by measuring flour carefully using the spoon-and-level method. Additionally, check that you're not overbaking—even properly mixed dough becomes dry and crumbly if left in the oven too long.
Decorations that won't adhere or M&Ms that slide off during the decorating process usually mean you're working with icing that's too thin or cookies that are still slightly warm. The solution is twofold: ensure your cookies have cooled completely to room temperature, and adjust your icing consistency to be thick enough that it holds the candies in place but thin enough to spread smoothly. The icing should hold a peak when you lift the spoon but slowly settle back into itself. If M&Ms are still sliding, add a bit more powdered sugar to thicken your icing, or try using less icing per cookie and pressing the candies in more gently.
Cookies that brown too quickly on the bottom before cooking through indicate oven temperature issues or dark-colored baking sheets that absorb too much heat. If you're using dark non-stick pans, reduce your oven temperature by 25 degrees to compensate for their heat absorption properties. You can also try double-panning—placing one baking sheet inside another—to insulate the cookies from direct bottom heat. Light-colored aluminum baking sheets provide the most even, gentle baking for delicate cookies like these.
Inconsistent cookie sizes create an unprofessional appearance and result in uneven baking, with smaller cookies overdone while larger ones remain underbaked. The solution is using a cookie scoop or measuring spoon to portion dough uniformly. A two-tablespoon scoop creates perfectly sized cookies for decorating M&M bunny cookies. If some cookies still vary in baking time due to oven hot spots, rotate your baking sheet halfway through baking and consider baking similar-sized cookies on the same sheet.
Regional Twists Worth Trying
Across different baking traditions, variations on decorated spring cookies reveal fascinating approaches to flavor and technique. In some European baking traditions, almond flour partially replaces all-purpose flour, creating cookies with a more delicate, sandy texture and subtle nutty flavor that pairs beautifully with the chocolate in the M&Ms. To try this variation in your easy M&M bunny cookies, substitute up to one-quarter of the all-purpose flour with finely ground almond flour, reducing mixing time slightly to prevent the more delicate structure from becoming tough.
Middle Eastern-influenced versions sometimes incorporate orange blossom water or rose water into the dough, adding floral notes that create surprising sophistication while maintaining the playful appearance. Just half a teaspoon of either flavoring transforms the cookies into something more exotic and memorable. This approach works particularly well if you're serving these cookies at a gathering where you want to offer something familiar yet unexpected—the bunny shape provides comfort while the subtle floral notes intrigue the palate.
Some American regional bakers add a touch of cream cheese to their cookie dough, a technique borrowed from traditional thumbprint cookies. This variation produces an exceptionally tender, almost melt-in-your-mouth texture with a slight tanginess that balances the sweetness. To incorporate this into M&M bunny cookies, replace two tablespoons of the butter with an equal amount of room-temperature cream cheese, beating it in during the initial creaming stage. The resulting cookies have a more cake-like crumb that some people prefer, especially for decorated cookies where softness is prized over crisp edges.
For those who enjoy spiced cookies, a subtle cardamom or cinnamon variation offers warmth and complexity. Adding just one-quarter teaspoon of ground cardamom to the dry ingredients creates an aromatic cookie with Middle Eastern flair, while the same amount of cinnamon provides familiar comfort with added depth. These spiced versions pair exceptionally well with tea or coffee, making them ideal for afternoon gatherings.
The Perfect Spread
When planning a dessert table that features easy M&M bunny cookies, consider the broader context of flavors, textures, and colors to create an appealing, balanced presentation. These cookies pair beautifully with fresh fruit—sliced strawberries, melon wedges, or a colorful fruit salad provide refreshing contrast to the sweet, buttery cookies. The natural acidity and juiciness of fruit cleanses the palate between cookies, allowing guests to fully appreciate each bite without experiencing sweetness fatigue.
Beverage pairings elevate the entire experience of serving these decorated treats. Offer both cold and hot options to accommodate different preferences and weather conditions. Fresh lemonade or fruit-infused water provides light, refreshing accompaniment that doesn't compete with the cookies' flavors. For those who prefer warm drinks, herbal teas like chamomile or mint offer gentle, aromatic pairings, while mild coffee presents a more robust option for adults. Milk remains the classic cookie companion for good reason—its creamy richness and subtle sweetness create the ultimate comfort combination.
If you're building a larger spread for a spring gathering, consider complementary desserts with different textures and flavors. A light, airy angel food cake or simple vanilla cupcakes offer contrast to the denser cookies. Fresh cream-based desserts like panna cotta or vanilla pudding cups provide cooling creaminess that balances the crisp-tender cookie texture. Avoid serving too many chocolate-heavy desserts alongside these M&M bunny cookies, as the chocolate in the candies should remain a pleasant accent rather than a redundant flavor note.
Presentation matters significantly for these decorative cookies. Arrange them on a large platter or tiered cake stand, allowing each bunny face to be visible and appreciated. Consider using a cloth napkin or decorative paper liner underneath for added visual appeal. If serving outdoors during warm weather, keep cookies in a shaded area and perhaps set them out in smaller batches, replenishing as needed to ensure they remain fresh and the decorations don't soften in heat or humidity.
Keeping and Reheating
Proper storage ensures your easy M&M bunny cookies maintain their delightful texture and appearance for several days after baking. Once cookies have cooled completely and decorations have fully set—allow at least two hours after decorating—arrange them in a single layer in an airtight container. If you need to stack cookies, place parchment paper or wax paper between layers to prevent the M&M decorations from being disturbed or the cookies from sticking together. Stored this way at room temperature, these cookies remain fresh for up to five days, though they're typically consumed much faster.
Unlike some baked goods that improve with time as flavors meld, these cookies are at their absolute best within the first two to three days after baking. The texture remains optimally tender during this window, and the M&M candies maintain their appealing candy shell snap. Beyond three days, cookies gradually become softer and less distinct in texture, though they remain perfectly edible and tasty. If cookies do begin to soften more than you'd like, you can crisp them slightly by placing them on a baking sheet in a 300°F oven for three to four minutes—though be aware this may slightly affect the M&M candies.
Freezing decorated cookies requires care but offers excellent results for advance preparation. Freeze cookies in a single layer on a baking sheet until solid, then transfer to a freezer-safe container or bag, again using parchment paper between layers. Properly frozen, easy M&M bunny cookies maintain quality for up to two months. Thaw frozen cookies at room temperature while still in their container to prevent condensation from forming directly on the cookies, which could make decorations sticky or cause cookies to become soggy. Allow about 30 minutes for complete thawing.
If you prefer to freeze just the undecorated cookies and add M&M decorations later, you'll achieve the freshest possible appearance. Wrap undecorate cookies tightly and freeze for up to three months, then thaw and decorate as if freshly baked. This approach works brilliantly if you're planning for a specific event but want to spread out your baking tasks. You can also freeze the cookie dough itself, either as a disk or pre-portioned into balls, for up to three months—thaw overnight in the refrigerator before baking as usual.
Your Questions Answered
Can I make the dough ahead of time?
Absolutely—cookie dough for easy M&M bunny cookies actually benefits from resting in the refrigerator, which allows the flour to fully hydrate and the flavors to develop. Prepare the dough up to three days in advance, wrap it tightly in plastic wrap, and refrigerate until ready to use. Before shaping, let the chilled dough sit at room temperature for about 10-15 minutes to soften slightly for easier handling. This make-ahead approach is perfect when preparing for gatherings, allowing you to spread the work across multiple days.
What's the best type of icing for attaching the M&Ms?
A simple powdered sugar icing made with powdered sugar, a tiny amount of milk or water, and optional vanilla works beautifully as "glue" for the M&M decorations. Mix about one cup of powdered sugar with one to two tablespoons of liquid until you achieve a thick but spreadable consistency—it should be noticeably thicker than typical glaze. This icing dries firm enough to hold the candies securely but doesn't become rock-hard, maintaining the overall tender eating experience. Some bakers prefer cream cheese frosting for a tangier flavor and even better adhesion.
How can I prevent the colors from the M&Ms from bleeding onto the cookies?
Color bleeding typically occurs when moisture from icing or humid conditions causes the candy coating to dissolve slightly. The best prevention is ensuring your cookies are completely cool before decorating and using icing at the proper consistency—thick enough that it's not overly wet. Work in a cool, dry environment if possible, and once decorated, allow cookies to dry completely in a single layer before stacking or covering. If you live in a very humid climate, consider using a dehumidifier in your kitchen while cookies set, or decorate cookies on a dry day.
Can I make these cookies without a mixer?
Yes, though you'll need a bit more arm strength and patience. Use a wooden spoon or sturdy spatula to cream the butter and sugar together, working vigorously for five to six minutes until the mixture lightens in color and texture. The key is achieving sufficient creaming to incorporate air into the dough, which may take longer by hand than with a mixer. Once you add the dry ingredients, mix just until combined to avoid developing too much gluten, which would create tough cookies. Hand-mixing produces excellent results and was the traditional method for generations.
How do I scale this recipe for a large gathering?
Easy M&M bunny cookies scale beautifully, and I often make double or triple batches when baking for community events or large family gatherings. When multiplying the recipe, mix ingredients in the same order and using the same techniques, though you may need to cream in batches if your mixer bowl isn't large enough for the entire quantity. Bake in multiple batches rather than crowding your oven, as proper air circulation is essential for even baking. For decorating efficiency with large quantities, set up an assembly line approach—pipe or spread icing on several cookies, then add M&M decorations to all of them while the icing is still tacky.
Can I use other candies instead of M&Ms?
Certainly—small round candies of similar size work well for creating bunny features. Look for candy-coated chocolates in spring colors, or even use small jelly beans for a different look and flavor profile. Miniature chocolate chips can create adorable bunny eyes and noses, though they lack the colorful impact of M&Ms. When substituting, consider the size and weight of your chosen candy—very heavy decorations may need thicker icing or a different attachment method, while very small candies might require more delicate placement for clear bunny features.
Easy M&M Bunny Cookies
Adorable spring bunny cookies made with tender sugar cookie dough and decorated with colorful M&M candies. Perfect for family gatherings and springtime celebrations.
Prep Time
20 min
Cook Time
12 min
Total Time
92 min
Servings
24 cookies
Ingredients
For 24 cookies
- 1 cup (226g) unsalted butter, softened to room temperature
- 1 cup (200g) granulated white sugar
- 2 large eggs, room temperature
- 2 teaspoons pure vanilla extract
- 3 cups (360g) all-purpose flour, spooned and leveled
- 1 teaspoon baking powder
- 1/2 teaspoon fine sea salt
- 1 1/2 cups M&M candies in assorted spring colors
- 1 cup (120g) powdered sugar for icing
- 2 tablespoons milk for icing
- Pink food coloring, optional for noses
Instructions
- 1
Cream butter and sugar
In a large mixing bowl, beat the softened butter and granulated sugar together using an electric mixer on medium speed for 3-4 minutes. Continue beating until the mixture becomes light, fluffy, and noticeably paler in color. This creaming process incorporates air that creates tender cookies with the perfect texture.
- 2
Add eggs and vanilla
Add the eggs one at a time, beating well after each addition until fully incorporated into the butter mixture. Pour in the vanilla extract and beat for another 30 seconds until evenly distributed. The mixture may appear slightly curdled at this stage, which is completely normal.
- 3
Combine dry ingredients
In a separate medium bowl, whisk together the flour, baking powder, and salt until evenly combined. This ensures the leavening and salt distribute evenly throughout the dough, creating consistent texture in every cookie.
- 4
Mix dough
Add the dry ingredients to the wet ingredients in two or three additions, mixing on low speed just until no flour streaks remain. Avoid overmixing, which can develop too much gluten and create tough cookies. The dough should be soft and pliable but not sticky.
- 5
Shape cookies
Preheat your oven to 350°F (175°C) and line baking sheets with parchment paper. Using a cookie scoop or tablespoon, portion the dough into balls of about 2 tablespoons each. Roll each portion between your palms to create smooth, uniform balls and place them on the prepared baking sheets, spacing them 2 inches apart to allow for spreading.
- 6
Bake cookies
Bake in the preheated oven for 10-12 minutes, until the edges just begin to turn the palest golden color while centers still appear slightly soft. Do not overbake—the cookies will continue cooking on the hot pan after removal. Rotate the baking sheet halfway through for even baking.
- 7
Cool completely
Allow cookies to rest on the baking sheet for 5 minutes after removing from the oven, then carefully transfer them to a wire cooling rack. Let cookies cool completely to room temperature, about 30-40 minutes, before decorating. Warm cookies will cause icing to melt and decorations to slide.
- 8
Prepare icing
In a small bowl, whisk together the powdered sugar and milk until smooth, starting with 1 tablespoon of milk and adding more as needed to achieve a thick but spreadable consistency. The icing should hold a peak when lifted with a spoon but slowly settle back. Divide the icing and tint a small portion pink with food coloring for bunny noses if desired.
- 9
Create bunny faces
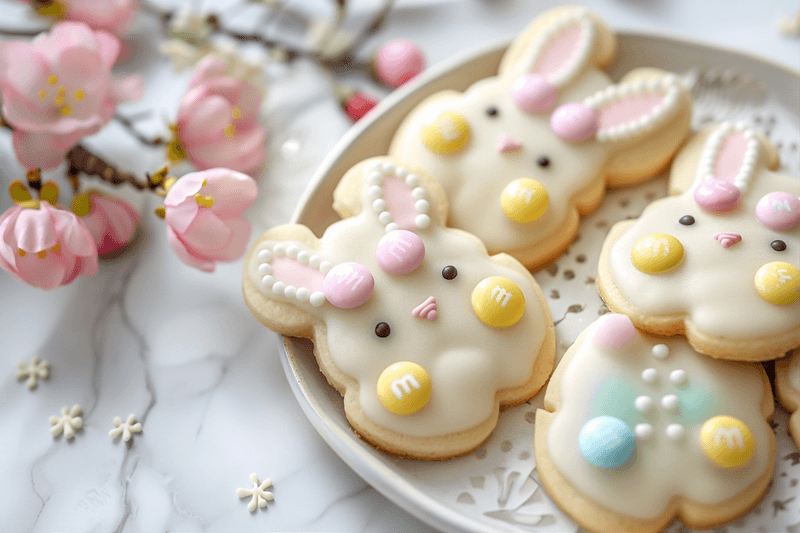
Using a small spoon or piping bag, apply a small dot of white icing where you want each M&M to sit. Gently press two M&Ms at the top of each cookie for bunny ears, two in the center for eyes, and one pink M&M or pink-iced white M&M for the nose. Work with a few cookies at a time so the icing remains tacky enough to hold the candies.
- 10
Set and serve
Allow the decorated cookies to rest undisturbed for at least 1 hour so the icing can dry and set completely. Once set, the cookies can be carefully stacked or stored in an airtight container. Serve at room temperature for the best texture and flavor experience.
Nutrition Facts
Per serving (estimated)
185 calories
Calories
25g
Carbs
2g
Protein
9g
Fat
0.5g
Fiber
85mg
Sodium
15g
Sugar


