Easy Easter Poke Cake Recipe for a Colorful Delight
This easy Easter poke cake recipe creates a stunning colorful dessert perfect for spring gatherings. Simple technique, make-ahead friendly, feeds a crowd.
cookwithlucia.com/recipes/easy-easter-poke-cake-recipe-for-a-colorful-delight
There's something magical about opening your refrigerator on a busy weekday and finding a beautiful, colorful dessert already prepared and waiting. Instead of scrambling to create something special for spring gatherings or weekend get-togethers, imagine having a stunning cake ready to serve at a moment's notice. This easy Easter poke cake recipe solves that exact problem, transforming your meal prep routine into something celebratory and fun.
The frustration of daily dessert preparation is real. Between juggling work, family, and everything else life throws at you, who has time to bake fresh treats every time guests arrive or the family craves something sweet? That's where the genius of this colorful poke cake comes in. With one focused afternoon of baking and decorating, you'll have a crowd-pleasing dessert that actually improves as it sits in the refrigerator.
This recipe is perfectly designed for advance preparation because the signature poke cake technique requires time for the flavored gelatin to seep into every crevice of the tender cake. Unlike many desserts that deteriorate over time, this one becomes more flavorful, more moist, and more visually stunning with each passing day. The pastel colors deepen, the cream topping sets beautifully, and the flavors marry into something truly special.
Picture this: a relaxed Sunday afternoon, your kitchen filled with the warm aroma of vanilla cake, and you spending just a couple of hours creating something that will bring smiles all week long. Whether you're preparing for a spring celebration, a family gathering, or simply want to have a beautiful dessert ready for impromptu visitors, this easy Easter poke cake recipe delivers on every level.
Why This Recipe Is Perfect for Meal Prep
The beauty of this easy Easter poke cake recipe lies in its unique structure that actually demands advance preparation. Unlike traditional layer cakes that can dry out or frostings that become crusty, poke cakes are specifically designed to be made ahead. The process of poking holes throughout the cake and saturating it with flavored liquid creates a dessert that needs several hours, or even better, overnight, to reach its full potential.
The ingredients in this colorful dessert are remarkably stable and shelf-friendly. The cake base itself is a simple vanilla or white cake that stays moist for days when properly covered. The gelatin mixture that creates those gorgeous pastel streaks doesn't separate or weep like some fillings might. The whipped topping forms a protective seal that keeps everything fresh while adding a creamy, indulgent layer that complements the fruity cake below.
Flavor development is another meal prep advantage you'll notice with this recipe. As the cake sits refrigerated, the gelatin flavors penetrate deeper into the crumb, creating an even distribution of taste throughout each slice. The sweetness balances out, and if you're using multiple colors of gelatin, the subtle flavor variations become more pronounced and interesting. By day two or three, you'll notice the cake is even more delicious than when freshly made.
Texture-wise, this dessert thrives in refrigeration. The cool temperature firms up the whipped topping into a frosting-like consistency while keeping the cake beneath impossibly tender and moist. There's no worry about soggy bottoms or dry edges because the entire concept relies on moisture. Each forkful delivers that perfect combination of cool, creamy topping and flavor-soaked cake that makes poke cakes so addictive.
What You'll Need
For the cake base, you'll need either a boxed white cake mix or the ingredients for a homemade white cake recipe. I recommend boxed mixes for meal prep purposes because they're foolproof, consistent, and save precious time during your prep session. Look for a mix that yields a 9x13 inch cake, which is the ideal size for this recipe. You'll also need the eggs, oil, and water specified on the box, so check those requirements before you start.
The star ingredients are your flavored gelatin packets in spring-appropriate colors. For a classic Easter look, grab packages in pastel shades like pink, blue, yellow, and green. Each small box (3 ounces) will create one color section in your cake. You'll need boiling water to dissolve the gelatin, so plan for about 4 cups total if you're using four different colors. The beauty of gelatin is its incredibly long shelf life, so you can stock up when you find the colors you want.
For the topping, you'll need either whipped cream that you make yourself from heavy cream and sugar, or store-bought whipped topping, which is my meal prep preference for its stability and convenience. If going the store-bought route, grab a large container (about 16 ounces) to ensure full coverage of your 9x13 inch cake. You can also use stabilized whipped cream if you prefer homemade but need it to hold up over several days.
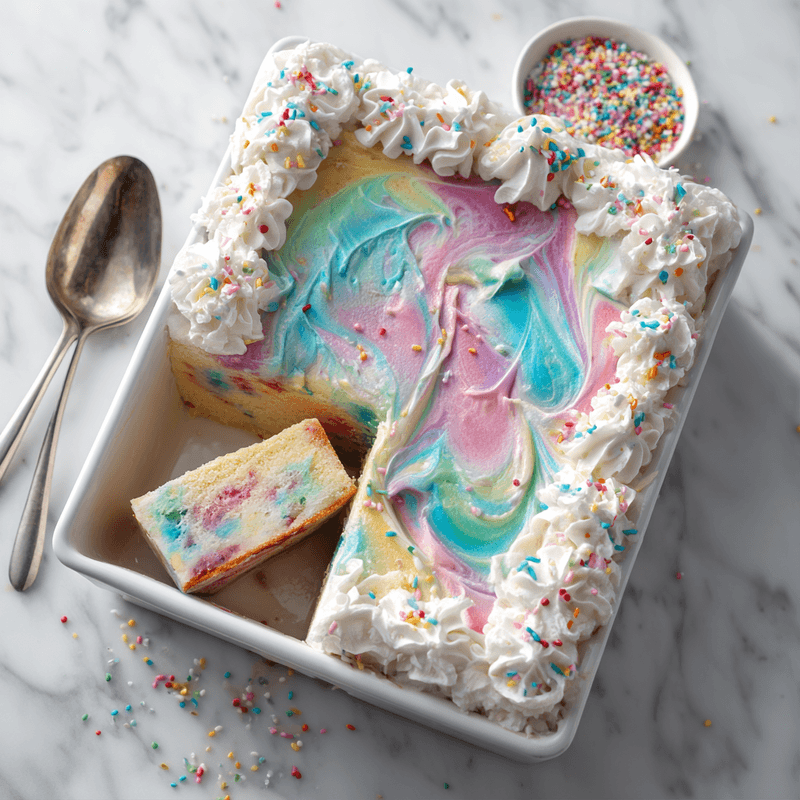
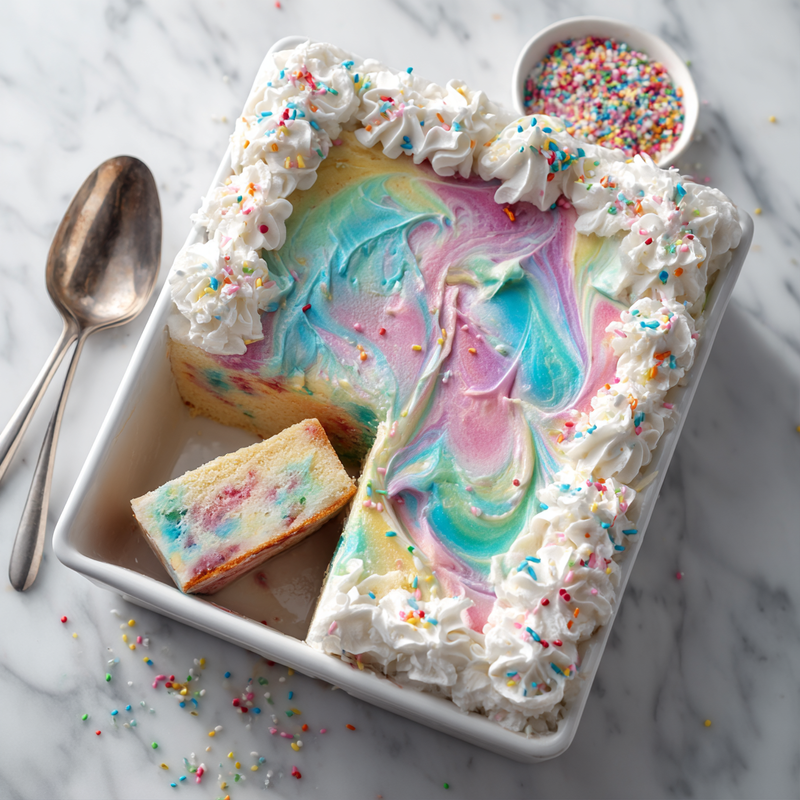
Decorations are where you can really customize this easy Easter poke cake recipe for your specific gathering. Pastel sprinkles, white chocolate shavings, coconut flakes, fresh berries, or small candies all work beautifully. Keep these stored separately until the day you plan to serve, as adding them too early can cause colors to bleed or textures to soften. For meal prep success, invest in a quality 9x13 inch baking pan with a matching lid, or plan to use a large cake carrier. Glass containers are ideal because they showcase those gorgeous color swirls and don't absorb odors or stains from the vibrant gelatin.
The Batch Cooking Method
Begin your prep session by preheating your oven and preparing your cake according to package or recipe directions. This initial baking phase takes about 25-30 minutes, and it's the perfect time to organize your gelatin station. While the cake bakes, arrange your four gelatin boxes, measuring cups, and spoons within easy reach. Boil your water in a kettle or large pot so it's ready the moment your cake comes out of the oven.
Timing is crucial for the poke and pour technique. As soon as your cake comes out of the oven, let it cool for exactly 15-20 minutes—not longer. You want it cool enough to handle safely but still quite warm, as the gelatin absorbs better into warm cake. Use the handle of a wooden spoon to poke holes throughout the entire cake, spacing them about one inch apart. Make these holes deep, going almost to the bottom of the pan, and poke generously. More holes mean more colorful swirls throughout your dessert.
Now comes the assembly-line portion that makes this recipe so efficient. Mix each gelatin flavor with 1 cup of boiling water, stirring until completely dissolved. Working with one color at a time, carefully pour the liquid gelatin over specific sections of your cake, watching it seep down into those holes you created. I like to divide my cake into quadrants and assign each section a different color, creating distinct regions that blend beautifully at the borders.
The simultaneous cooling and setting process is where meal prep magic happens. Once all your gelatin colors are poured, transfer the entire pan to your refrigerator and let it chill for at least 3 hours, though overnight is even better. This passive time requires zero effort from you but transforms your cake completely. The next day, or whenever your cake is fully chilled and set, spread your whipped topping evenly across the surface, seal it up, and you've got a stunning dessert ready for the entire week.
Total active cooking time for this easy Easter poke cake recipe is only about 45 minutes: 10 minutes to mix and pour the cake, 30 minutes of baking, and 5 minutes to poke, pour gelatin, and eventually spread the topping. The passive time of cooling and setting happens while you're doing anything else, making this one of the most efficient dessert prep recipes in your collection.
The Weekly Game Plan
Day one, ideally a Sunday or your designated meal prep day, is baking day. Set aside your afternoon or evening for the active portion of this recipe. Bake your cake, poke it, pour your colorful gelatin, and get it into the refrigerator by early evening. Don't add the whipped topping yet—letting the cake chill overnight allows the gelatin to fully set and the flavors to develop their full intensity.
Day two is when you'll add your whipped topping layer. By Monday morning or afternoon, your cake is perfectly set and ready for its creamy crown. Spread the topping evenly, working from the center outward to ensure complete coverage. At this point, you can add any shelf-stable decorations like sprinkles or coconut flakes, but save fresh fruit or delicate toppings for serving day. Cover the pan tightly with its lid or plastic wrap, ensuring the covering doesn't touch the topping surface.
Days three through seven are when you reap the rewards of your preparation. This colorful poke cake holds beautifully in the refrigerator for up to five days after the topping is added, though it rarely lasts that long in my experience. Each day, you can vary the presentation by cutting different sized portions, adding fresh garnishes, or serving it alongside different accompaniments like fresh berries, a drizzle of fruit sauce, or a scoop of vanilla ice cream.
For maximum variety throughout the week, consider cutting your first few portions from different sections of the cake to showcase the different gelatin colors. Monday might feature a predominantly pink slice, Tuesday could highlight the blue section, and so on. This simple variation keeps the dessert feeling fresh and interesting even though you're serving the same base recipe. You can also customize individual servings with different toppings—one day add fresh strawberries, another day dust with powdered sugar, and another day serve with a dollop of extra whipped cream.
Smart Storage and Reheating
Container selection makes or breaks your poke cake meal prep success. The gold standard is a 9x13 inch glass baking dish with a matching airtight lid, which allows you to bake, store, and serve from the same vessel. Glass doesn't absorb the vibrant colors from the gelatin and provides a crystal-clear window to admire your colorful creation. If you don't have a lid, heavy-duty aluminum foil works, but ensure it's tented above the topping so it doesn't stick and ruin your beautiful surface.
Plastic storage containers can work but choose carefully. Make sure they're food-grade and BPA-free, and be aware that the gelatin colors may permanently stain lighter-colored plastic. If using plastic, line the container with parchment paper on the sides to minimize staining, though the bottom will still come into contact with the cake. Compartmentalized containers don't work well for this recipe because you want to store the whole cake intact until serving time.
Exact refrigerator life for this easy Easter poke cake recipe is five to seven days when properly stored, though the whipped topping is best within the first five days. The cake itself remains moist and flavorful throughout the week, but the topping may begin to weep or separate slightly after day five. If you're planning to keep it longer, consider storing the cake without the topping and adding fresh whipped cream to individual portions as you serve them.
Freezer storage is possible but requires some strategy. Freeze individual pre-cut portions wrapped tightly in plastic wrap and then aluminum foil for up to two months. Freeze without decorations and add those fresh after thawing. Thaw frozen portions in the refrigerator overnight rather than at room temperature to maintain the best texture. The whipped topping will change slightly in texture after freezing, becoming a bit more icy, but the cake beneath holds up remarkably well.
Reheating isn't necessary for this dessert since it's meant to be served chilled, which is actually a huge meal prep advantage. Simply remove your desired portion from the refrigerator about 5 minutes before serving if you prefer it slightly less cold. For the best experience, serve this colorful poke cake thoroughly chilled, straight from the refrigerator, when the topping is at its creamiest and the cake is at its most refreshing.
Customization Ideas
The basic framework of this easy Easter poke cake recipe is endlessly adaptable to different flavor profiles and dietary needs. Swap the traditional gelatin flavors for tropical options like pineapple, mango, and passion fruit for a summer version, or use red and green for winter gatherings. You can even create an ombre effect by using different shades of the same color family—light pink to deep rose creates a stunning gradient.
For different dietary requirements, several modifications work beautifully. Use a gluten-free cake mix as your base, ensuring all other ingredients are certified gluten-free as well. Sugar-free gelatin and sugar-free whipped topping create a lower-sugar version that still delivers on visual impact and flavor. Dairy-free whipped toppings made from coconut cream work wonderfully for those avoiding dairy, and they add a subtle tropical note that complements fruit-flavored gelatins.
Scaling this recipe is straightforward and highly practical for meal prep purposes. The standard 9x13 inch pan serves 12-15 people depending on portion size, perfect for a week of family desserts or one large gathering. For smaller households, halve the recipe and use an 8x8 inch pan, which will still give you those gorgeous swirls in a more compact format. For feeding a crowd or prepping for multiple events, double the recipe and use two pans, perhaps with different color schemes to offer variety.
Flavor variations beyond gelatin colors can transform this dessert completely. Add a teaspoon of vanilla, almond, or coconut extract to your cake batter for extra depth. Mix mini chocolate chips or crushed cookies into your whipped topping for texture contrast. Create a citrus version by adding lemon or orange zest to the cake and using complementary gelatin flavors. The possibilities are truly endless while maintaining the meal-prep-friendly structure that makes this recipe so practical.
Meal Prep FAQ
How long does this colorful poke cake actually last in the refrigerator?
When stored properly in an airtight container or tightly covered pan, this easy Easter poke cake recipe stays fresh and delicious for five to seven days. The cake portion actually improves over the first three days as flavors meld, while the whipped topping maintains its best texture for about five days. After that point, the topping may begin to weep slightly, though the cake beneath remains perfectly edible.
What are the absolute best containers for storing poke cake?
A glass 9x13 inch baking dish with a matching airtight lid is the ultimate storage solution because it allows you to bake, store, and serve from one vessel. The lid prevents the topping from getting smashed and keeps odors out while maintaining moisture. If you don't have a fitted lid, create a tent with aluminum foil, supporting it with toothpicks stuck into the cake edges so the foil doesn't touch the whipped topping surface.
Can I reheat this cake or should it always be served cold?
This dessert is specifically designed to be served chilled, straight from the refrigerator, and reheating isn't recommended or necessary. The gelatin structure would break down with heat, the whipped topping would melt, and you'd lose the refreshing quality that makes poke cake so appealing. If your refrigerator runs very cold, let portions sit at room temperature for 5 minutes before serving to take the chill off slightly.
How can I make this work for packed lunches or work meals?
Cut individual portions and pack them in small airtight containers with secure lids for transport. Include a small ice pack in your lunch bag to keep the cake properly chilled until eating time. If your workplace has a refrigerator, store your portion there upon arrival. The sturdy structure of poke cake makes it more transport-friendly than many other desserts, as it won't shift or separate during travel.
What's the secret to keeping meal prep desserts from getting boring?
Variety in presentation and accompaniments is key to preventing meal prep fatigue with this easy Easter poke cake recipe. Change up your daily garnishes with fresh fruit one day, chocolate shavings the next, and toasted coconut another day. Serve different portion sizes—a small square after dinner one night, a larger piece for weekend dessert. Pair it with different beverages or serve it alongside complementary treats to keep each experience feeling fresh and special.
Can kids help with this meal prep project and is it lunchbox-friendly?
Absolutely! The poking step is particularly fun for children and gives them ownership of the final product. They can help choose gelatin colors, do the actual poking with supervision, watch the gelatin pour process, and help with decorating. For lunchboxes, pack small portions in leak-proof containers and include an ice pack. The stable structure and kid-friendly flavors make this a lunchbox winner, though be aware that some schools have restrictions on homemade treats, so check policies before sending.
Easy Easter Poke Cake Recipe for a Colorful Delight
A stunning make-ahead dessert featuring vanilla cake soaked with colorful gelatin and topped with fluffy whipped cream. Perfect for spring gatherings and designed to improve as it chills.
Prep Time
20 min
Cook Time
30 min
Total Time
4h 50m
Servings
12 servings
Ingredients
For 12 servings
- 1 box white cake mix (plus required eggs, oil, and water per package instructions)
- 1 package (3 oz) pink gelatin mix
- 1 package (3 oz) blue gelatin mix
- 1 package (3 oz) yellow gelatin mix
- 1 package (3 oz) green gelatin mix
- 4 cups boiling water, divided
- 1 container (16 oz) whipped topping, thawed
- Pastel sprinkles or decorations for garnish
Instructions
- 1
Prepare cake batter
Preheat your oven according to the cake mix package directions, typically 350°F. Grease a 9x13 inch baking pan thoroughly. Prepare the white cake batter according to package instructions, mixing the cake mix with eggs, oil, and water until smooth and well combined.
- 2
Bake the cake
Pour the prepared batter into the greased 9x13 inch pan, spreading it evenly to the edges. Bake according to package directions, usually 25-30 minutes, until a toothpick inserted in the center comes out clean and the top is lightly golden. Remove from oven and let cool for exactly 15-20 minutes.
- 3
Poke holes throughout
Using the handle of a wooden spoon or a similar round tool, poke holes throughout the entire surface of the warm cake, spacing them about 1 inch apart. Make the holes deep, going almost to the bottom of the pan, and create plenty of them for maximum color distribution and flavor penetration.
- 4
Prepare gelatin mixtures
In four separate bowls or large measuring cups, prepare each gelatin flavor by mixing each 3-ounce package with 1 cup of boiling water. Stir each mixture for about 2 minutes until the gelatin is completely dissolved and the liquid is clear with no granules remaining.
- 5
Pour gelatin colors
Working with one color at a time, carefully pour each prepared gelatin mixture over a different section of the poked cake. Divide the cake visually into quadrants or strips and assign each section a color, pouring slowly to allow the liquid to seep down into the holes you created.
- 6
Chill the cake
Transfer the entire pan to the refrigerator immediately after pouring all gelatin colors. Chill uncovered for at least 3-4 hours, though overnight is ideal for the best texture and flavor development. The gelatin needs this time to fully set and saturate the cake.
- 7
Add whipped topping
Once the cake is completely chilled and the gelatin is fully set, spread the whipped topping evenly over the entire surface. Use a spatula to create an even layer from edge to edge, working gently to avoid disturbing the colorful cake beneath.
- 8
Decorate and serve
Sprinkle your chosen decorations over the whipped topping layer—pastel sprinkles, coconut flakes, or other garnishes work beautifully. Cover the pan with a lid or plastic wrap and refrigerate until ready to serve. Cut into squares and serve chilled directly from the refrigerator for the best texture and flavor.
Nutrition Facts
Per serving (estimated)
285 calories
Calories
48g
Carbs
3g
Protein
9g
Fat
0g
Fiber
320mg
Sodium
35g
Sugar


