Easy Easter Poke Cake – Fun Spring Dessert
Learn how to make a stunning Easter poke cake with vibrant colors and creamy filling. Perfect for spring gatherings with simple techniques anyone can master.
cookwithlucia.com/recipes/easy-easter-poke-cake-fun-spring-dessert
There's something magical about slicing into a cake and revealing hidden pockets of color and flavor inside. The poke cake technique transforms an ordinary cake into an extraordinary centerpiece that looks as impressive as it tastes. When you master this simple method, you unlock endless possibilities for creating stunning desserts that wow every single time.
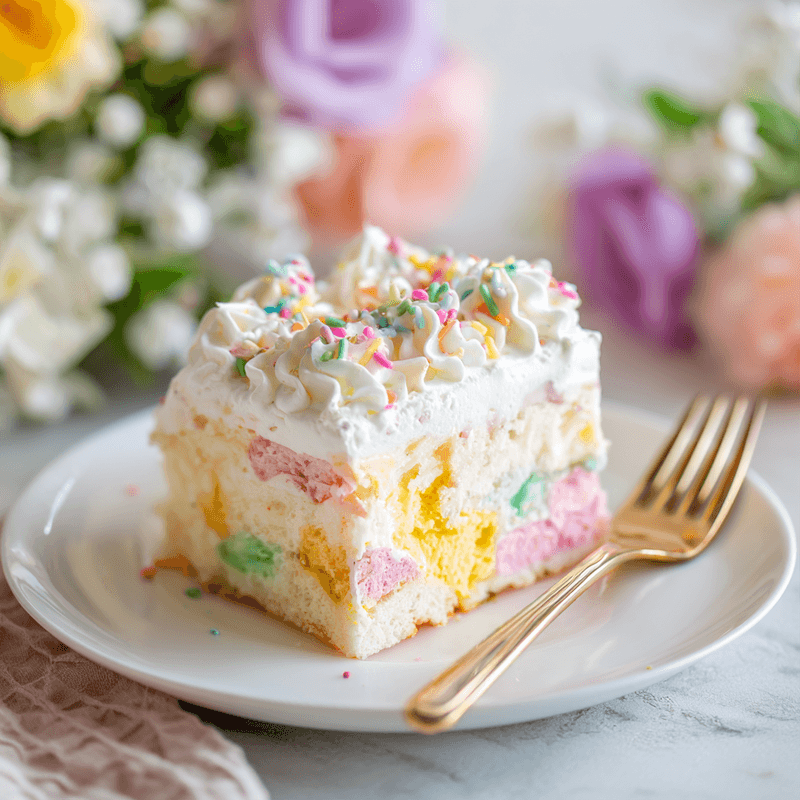
An Easter poke cake is the perfect introduction to this technique because it celebrates everything we love about spring: bright colors, light flavors, and that sense of joyful renewal. Picture a tender vanilla cake riddled with pools of pastel gelatin that create a beautiful stained-glass effect when you slice through. Each forkful delivers moist cake with sweet, fruity pockets that make every bite exciting.
I know the idea of poking holes in a perfectly good cake might seem counterintuitive at first. You spend all that time baking something beautiful, and then you're supposed to stab it repeatedly? But here's the beautiful secret: those holes are what transform your cake from simple to spectacular. They're the gateway for flavor, moisture, and visual drama.
Once you understand why this technique works and how the gelatin sets inside those little tunnels, you'll feel confident making poke cakes for any spring gathering or weekend celebration. The method is forgiving, the results are consistently impressive, and the flavor combinations are limited only by your imagination.
The Science Behind the Method
The magic of a poke cake happens at the intersection of structure and absorption. When you bake a cake, the proteins in eggs and flour create a network of air pockets throughout the crumb. These pockets give cake its tender, light texture. When you poke holes through that structure while the cake is still warm, you create intentional channels that run deep into the cake.
Here's where it gets interesting: when you pour liquid gelatin over those holes, gravity and capillary action work together to pull that flavored liquid down into the channels. The warm cake absorbs the gelatin solution readily because its starches are still soft and receptive. As the gelatin cools and sets, it creates firm pockets of concentrated flavor and color trapped inside the cake's structure.
This technique works because gelatin is a reversible hydrocolloid. When heated, it dissolves completely into water, creating a thin liquid that flows easily. As it cools below about 59°F, the gelatin molecules link together into a semi-solid gel that holds its shape. Inside your cake's tunnels, this transformation locks in moisture and flavor exactly where you want it.
Understanding this process makes you a more intuitive baker overall. You'll recognize how timing affects absorption, why temperature matters for setting, and how different cake textures interact with liquid additions. These insights translate to other techniques like soaking sponges for layered cakes or adding syrups to keep baked goods moist.
Tools and Ingredients You'll Need
The beauty of making an Easter poke cake lies in its accessibility. You don't need specialized equipment or hard-to-find ingredients. A 9x13-inch baking pan is your foundation, and honestly, this is the pan's moment to shine. Metal pans conduct heat more evenly than glass, but glass allows you to see the beautiful gelatin patterns from the sides, which is pretty delightful. Either works perfectly well.
For poking those essential holes, you have options. A wooden spoon handle works beautifully and creates holes about half an inch wide, perfect for substantial gelatin pockets. A chopstick makes slightly smaller holes for a more delicate pattern. Some bakers swear by plastic straws, though I find the spoon handle gives you better control and more consistent spacing. Whatever you choose, make sure it's clean and reaches almost to the bottom of the cake without piercing through.
Your cake base can be homemade or from a quality box mix, and there's absolutely no shame in using a mix for this recipe. The technique is the star here, not necessarily your from-scratch credentials. What matters most is a tender, moist crumb that will welcome the gelatin without becoming soggy. Vanilla or white cake works best because it showcases those gorgeous pastel colors.
For the gelatin, you'll want flavored gelatin powder in spring colors like lemon yellow, lime green, strawberry pink, and berry blue. The standard boxes work perfectly. You'll also need whipped topping for the frosting layer, though freshly whipped cream with a touch of sugar makes an even more luxurious finish if you have ten extra minutes. Finally, gather any decorative toppings you love: sprinkles, chocolate eggs, fresh berries, or shredded coconut all add that festive spring feeling.
The Method, Step by Step
Begin by preparing your cake according to package or recipe directions, baking it in your 9x13-inch pan. The key timing element comes next: you need to poke your holes while the cake is still warm from the oven, ideally within ten minutes of removing it. The warm cake is more receptive to absorbing liquid, and the structure is still soft enough to poke without crumbling. Let it cool for just five minutes, then start poking.
Create your hole pattern by spacing them about one inch apart across the entire surface. Push your tool straight down until you're about three-quarters through the cake's depth. You want channels, not complete perforations. Work systematically in rows so you don't miss any spots. When you're finished, you should have roughly 60 to 80 holes covering the surface. This might feel like a lot, but remember, these holes are what create that stunning stained-glass effect.
While your cake is cooling slightly more, prepare your gelatin mixtures. This is where your creative vision comes to life. For a classic Easter poke cake, I prepare three different colors in separate bowls. Here's the crucial adjustment: use only half the water called for on the package. Instead of two cups total, use just one cup of boiling water per package. This concentrated mixture creates more vibrant colors and firmer gelatin pockets that won't make your cake soggy.
Pour each gelatin color over different sections of the cake, working slowly and deliberately. Watch as the liquid disappears into those holes you created. Use a spoon or small ladle to guide the gelatin and ensure even coverage. Don't worry about being too precise with color boundaries; a little bleeding between colors creates a beautiful watercolor effect. The gelatin will pool on the surface initially, but give it a few minutes and it will sink down into those channels completely.
Once all your gelatin is poured, transfer the cake immediately to your refrigerator. This is critical: the gelatin needs to set completely before you add the topping, and this takes at least three hours, though overnight is even better. The cool temperature firms up those gelatin pockets, transforming them from liquid to gel. Rushing this step results in a soggy, undefined mess rather than distinct, jewel-like pockets.
When the gelatin is fully set and the cake is thoroughly chilled, spread your whipped topping evenly across the entire surface. Use an offset spatula if you have one, or a butter knife works just fine. The topping layer serves multiple purposes: it adds creamy richness, provides a beautiful blank canvas for decorations, and seals in all that moisture. Make sure you spread it all the way to the edges to prevent the cake from drying out.
Finish your Easter poke cake with whatever decorations speak to you. Keep it simple with pastel sprinkles scattered across the top, or go elaborate with chocolate eggs, fresh flowers, or themed toppers. The cake underneath is already doing the heavy lifting visually, so your decorations are just the finishing flourish. Return the finished cake to the refrigerator until about thirty minutes before serving.
Troubleshooting Guide
If your gelatin colors look washed out and pale, you likely used too much water in your gelatin mixture. Remember to halve the liquid called for on the package instructions. The concentrated mixture creates those vibrant, saturated colors that make an Easter poke cake so visually striking. If this happens, the flavor will still be good, but the visual impact suffers. Next time, measure carefully and remember that less water equals more color intensity.
Soggy cake is the most common complaint with poke cakes, and it usually happens when the gelatin hasn't set properly before adding the topping, or when too much liquid was used. If you notice sogginess, you probably didn't refrigerate long enough. The gelatin needs a full three to four hours to set into firm pockets rather than remaining as liquid that continues saturating the cake. Always plan ahead and give your cake that overnight chill if possible. It makes an enormous difference in texture.
If the gelatin doesn't sink into the holes but instead pools on the surface, your cake may have cooled too much before poking, or your holes weren't deep enough. The cake needs to be warm and receptive when you pour. If you catch this problem immediately, try re-poking the areas where gelatin is pooling, then gently press down with a spoon to encourage absorption. If the cake has already cooled completely, you can carefully warm it for just a minute or two in a low oven, then proceed.
Crumbly, dry cake after poking usually means you waited too long after baking to create your holes, or your cake was overbaked to begin with. An overbaked cake has a tight, closed crumb that resists absorption. The structure literally crumbles when you try to poke through it. Prevention is key here: set your timer for the minimum baking time and test with a toothpick. A few moist crumbs are perfect; completely clean means slightly overbaked for poke cake purposes.
When your colors bleed together too much, creating a muddy appearance rather than distinct sections, your gelatin was likely too hot when poured, or you poured too quickly. The gelatin should have cooled for about five minutes after mixing so it's still liquid but not steaming hot. Cooler gelatin is slightly thicker and stays where you pour it rather than running freely across the surface.
Taking It to the Next Level
Once you've mastered the basic Easter poke cake technique, try layering flavors for more complexity. Brush the warm cake with a simple syrup infused with vanilla bean or citrus zest before poking holes. This adds another dimension of moisture and flavor beneath the gelatin layer. Professional pastry chefs often use this multi-layer approach to build more interesting flavor profiles.
Experiment with cream fillings instead of just gelatin. After poking your holes and setting the gelatin, pipe sweetened cream cheese filling or pastry cream into alternate holes using a piping bag fitted with a round tip. This creates surprise pockets of richness that contrast beautifully with the fruit-flavored gelatin. The technique requires a steadier hand but delivers restaurant-quality results.
For a more sophisticated presentation, try an ombré effect with your gelatin colors. Mix three shades of the same color family, from pale to deep, and pour them in graduated sections across the cake. When sliced, this creates a stunning sunset or ocean wave effect. Pair this with complementary flavors like coconut cake with blue ombré gelatin for an elegant spring ocean theme.
Consider texture contrasts in your topping. Instead of plain whipped cream, fold in crushed cookies, toasted coconut, or finely chopped nuts. These additions provide delightful textural surprise and make each bite more interesting. Just be sure your mix-ins are small enough that they don't interfere with spreading the topping smoothly.
Storing Your Results
An Easter poke cake must live in the refrigerator from the moment it's assembled until serving time. The gelatin and whipped topping both require cold temperatures to maintain their structure and food safety. Cover your cake tightly with plastic wrap or aluminum foil, or use a cake carrier with a lid if you have one. Properly stored, your poke cake stays fresh and delicious for up to four days.
The texture actually improves after the first day as all the elements meld together. The cake continues absorbing moisture from the gelatin pockets, becoming increasingly tender without crossing into soggy territory. This makes an Easter poke cake an excellent make-ahead dessert for busy spring weekends. Prepare it completely the day before, and you're free to focus on other dishes.
Freezing poke cake is possible but not ideal. The gelatin pockets don't freeze well, often becoming weepy and losing their distinct texture when thawed. The whipped topping can also separate. If you must freeze, do so before adding the whipped topping layer. Wrap the cake tightly in plastic wrap, then aluminum foil, and freeze for up to one month. Thaw overnight in the refrigerator, then add fresh whipped topping before serving.
When transporting your Easter poke cake to a gathering, keep it cold. Use a cooler with ice packs if you're traveling more than twenty minutes. The cake is sturdy enough to travel well, but the dairy-based topping and gelatin need temperature control. Cut portions at your destination rather than transporting pre-sliced pieces, which tend to dry out at the edges.
Common Questions
Can I make this Easter poke cake with a homemade cake instead of a box mix?
Absolutely, and the results are wonderful with a tender homemade vanilla or white cake. Look for recipes specifically labeled as moist or tender, as these crumb structures absorb the gelatin best. Denser pound cake-style recipes don't work as well because they resist liquid absorption. Any recipe yielding a 9x13-inch cake works perfectly for this technique.
What if I don't have three different gelatin flavors for multiple colors?
You can create a beautiful Easter poke cake with just one or two colors. A single color creates an elegant, uniform look, while two colors can be poured in alternating rows or a checkerboard pattern. You can even divide one package of gelatin into portions and add food coloring to create custom shades. The technique works identically regardless of how many colors you use.
How far in advance can I make this cake before serving?
Your Easter poke cake is actually best made one to two days ahead. This gives all the flavors time to meld and the cake time to reach peak moisture. Make it up to three days in advance if needed, though the whipped topping may begin losing its fresh taste after that. Add decorative toppings like sprinkles or chocolate eggs the day of serving to keep them looking their best.
Can I use sugar-free gelatin for a lower-calorie version?
Yes, sugar-free gelatin works beautifully in an Easter poke cake and sets just as firmly as regular gelatin. The technique remains exactly the same. You can also use light or sugar-free whipped topping to reduce calories further. The visual impact and basic texture remain impressive even with these substitutions, making this a more guilt-free spring treat.
Why does my cake fall apart when I try to serve it?
This usually happens when the cake hasn't chilled long enough for the gelatin to set completely. Those liquid-filled pockets need time to firm up and actually help hold the cake together when properly set. Make sure you refrigerate for at least three hours, preferably overnight. Also, use a sharp knife wiped clean between slices, and cut with a gentle sawing motion rather than pressing straight down.
Can I make individual Easter poke cakes instead of one large pan?
Definitely! Bake your cake batter in a muffin tin for cupcake-sized poke cakes. Poke fewer holes in each one, about five or six per cupcake. Use less gelatin accordingly, and chill for the same amount of time. Top each individually and decorate. These single-serve versions are perfect for gatherings where people want their own portion and make serving much easier.
Easy Easter Poke Cake – Fun Spring Dessert
A stunning vanilla poke cake filled with colorful gelatin pockets and topped with fluffy whipped cream. Perfect for spring celebrations with its beautiful pastel colors and moist, flavorful crumb.
Prep Time
20 min
Cook Time
30 min
Total Time
4h 50m
Servings
12 servings
Ingredients
For 12 servings
- 1 box (15.25 oz) white or vanilla cake mix, plus ingredients called for on package (typically eggs, oil, and water)
- 1 package (3 oz) strawberry flavored gelatin
- 1 package (3 oz) lime flavored gelatin
- 1 package (3 oz) lemon flavored gelatin
- 3 cups boiling water, divided
- 1 container (8 oz) frozen whipped topping, thawed
- Pastel sprinkles for decoration
- Mini chocolate eggs or other spring decorations, optional
Instructions
- 1
Bake the Cake
Preheat oven according to cake mix package directions. Prepare the cake batter as directed and pour into a greased 9x13-inch baking pan. Bake according to package instructions until a toothpick inserted in center comes out with just a few moist crumbs. Remove from oven and let cool for 5 minutes only.
- 2
Poke Holes
While cake is still warm, use the handle of a wooden spoon or a chopstick to poke holes all over the surface, spacing them about 1 inch apart. Push down until you're about three-quarters through the cake. You should have 60-80 holes total covering the entire surface.
- 3
Prepare Gelatin Mixtures
In three separate bowls, prepare each gelatin flavor using only 1 cup of boiling water per package instead of the 2 cups called for on the package. Stir each mixture for 2 minutes until completely dissolved. Let cool for 5 minutes so gelatin is no longer steaming hot but still completely liquid.
- 4
Pour Gelatin Colors
Working with one color at a time, slowly pour each gelatin mixture over different sections of the cake, allowing it to sink into the holes. You can create distinct color sections or let them blend slightly for a watercolor effect. Use a spoon to guide the gelatin over specific areas. Watch as the liquid absorbs into the holes you created.
- 5
Chill to Set
Immediately transfer the cake to the refrigerator and chill for at least 3-4 hours, or preferably overnight. This allows the gelatin to set completely into firm pockets. Do not skip or shorten this step, as properly set gelatin is essential for the right texture.
- 6
Add Topping Layer
Once gelatin is completely set and cake is thoroughly chilled, spread the thawed whipped topping evenly over the entire surface using an offset spatula or butter knife. Make sure to spread all the way to the edges to seal in moisture. The layer should be smooth and even, about half an inch thick.
- 7
Decorate and Serve
Sprinkle pastel sprinkles over the whipped topping and add any additional decorations like mini chocolate eggs or fresh berries. Return to refrigerator until ready to serve, removing about 30 minutes before slicing for easiest cutting. Use a sharp knife, wiping clean between cuts, to reveal the beautiful colored gelatin pockets inside each slice.
Nutrition Facts
Per serving (estimated)
285 calories
Calories
48g
Carbs
3g
Protein
9g
Fat
0g
Fiber
320mg
Sodium
35g
Sugar


