Easy Easter Dirt Cake Casserole: Fun Dessert Ideas
This easy Easter dirt cake casserole combines cookies, pudding & whipped layers for a stunning dessert. Simple to make, beautiful to serve!
cookwithlucia.com/recipes/easy-easter-dirt-cake-casserole-fun-easter-meal-ideas-dessert-ideas
Picture this: you carry a beautiful casserole dish to the table, and instead of a savory main course, you reveal layers of chocolate heaven that look like they came straight from a bakery display case. Eyes widen, phones come out, and someone inevitably asks how long it took you to make this masterpiece. The answer? Less time than it takes to watch your favorite cooking show. This easy Easter dirt cake casserole is the kind of dessert that makes you look like a culinary genius while secretly being one of the most forgiving, straightforward recipes in your collection.
What I love most about this dessert is how it plays with expectations. The casserole format suggests something homey and comforting, which it absolutely delivers, but the layered presentation and rich chocolate flavor feel decidedly special. It's perfect for spring gatherings when you want something impressive but don't have hours to spend in the kitchen. The technique is simple enough for first-time bakers, yet the result looks so professional that experienced cooks will be just as proud to serve it.
The secret lies in the smart assembly method and the quality of your layers. Each component does its job beautifully, and when they come together, you get a dessert that's creamy, crunchy, sweet, and utterly irresistible. Whether you're hosting a large family meal or bringing something special to a potluck, this easy Easter dirt cake casserole will be the dish everyone remembers.
What Makes This a Showstopper
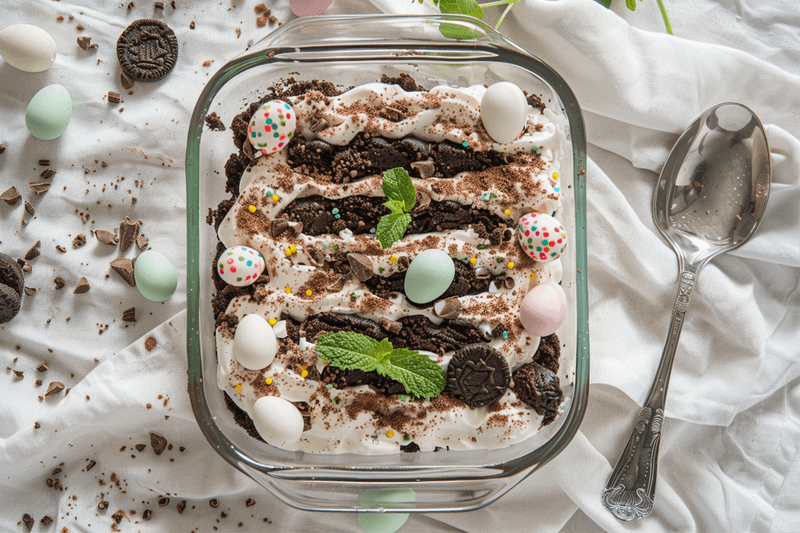
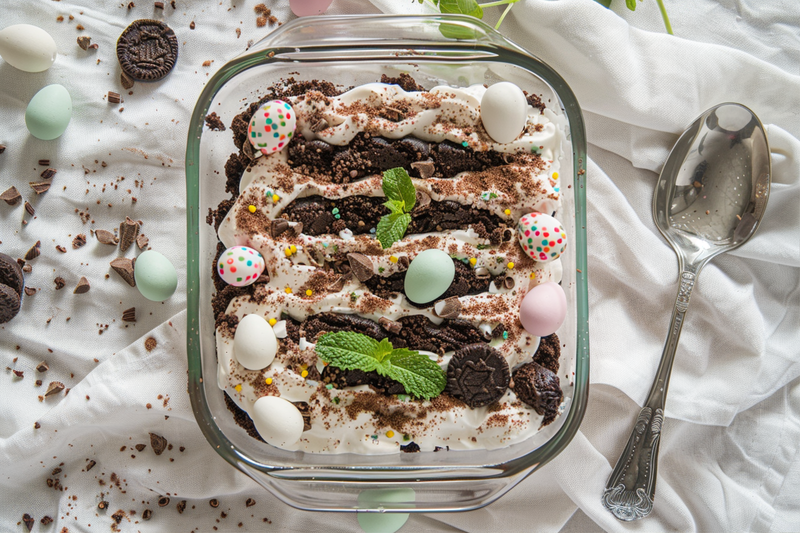
The visual impact of this easy Easter dirt cake casserole is undeniable. When you scoop into it with a serving spoon, you reveal distinct layers that cascade down the side of each portion: dark chocolate cookie crumbs that look like rich soil, creamy pudding layers that shine in the light, fluffy whipped topping that adds cloud-like texture, and optional colorful decorations that hint at springtime joy. It's a dessert that photographs beautifully from every angle, which explains why it's become such a popular choice for celebrations.
But the real magic happens with that first bite. Your spoon cuts through the soft layers easily, gathering a bit of everything in one perfect forkful. The cookie crumbs provide that satisfying crunch and deep chocolate flavor, while the pudding layer delivers smooth, creamy sweetness. The whipped topping adds lightness that keeps the dessert from feeling too heavy, and everything together creates a flavor profile that's reminiscent of the beloved cookies-and-cream combination that never goes out of style.
What truly sets this dessert apart is how it achieves restaurant-quality results without requiring any special equipment or advanced baking skills. You don't need a piping bag, a cake turntable, or even an oven. The casserole dish does all the heavy lifting when it comes to presentation, creating perfectly uniform layers that look intentional and polished. It's the kind of dessert you'd happily pay premium prices for at a fancy bakery, yet you can make it at home for a fraction of the cost and effort.
The Ingredients That Matter Most
The foundation of any exceptional easy Easter dirt cake casserole starts with your chocolate sandwich cookies. I always reach for a quality brand here because these cookies make up a significant portion of the dessert's flavor profile and provide that signature "dirt" texture. You'll want cookies with a deep chocolate flavor and crisp texture that crushes beautifully. Don't settle for stale cookies from the back of your pantry; fresh ones crush more evenly and taste significantly better.
Your pudding mix deserves attention too. Instant vanilla or chocolate pudding creates that luscious, creamy layer that holds everything together. I prefer vanilla because it provides a lovely contrast to the chocolate cookies, but chocolate pudding creates a more intensely chocolate dessert if that's your preference. The pudding should be mixed with cold whole milk for the richest, most stable texture. Lower-fat milk works in a pinch, but whole milk gives you that luxurious mouthfeel that elevates the entire dessert.
The cream cheese component is where this easy Easter dirt cake casserole gets its impressive creaminess. Full-fat cream cheese at room temperature blends smoothly with powdered sugar and whipped topping to create a layer that's both stable enough to hold its shape and soft enough to melt on your tongue. This is not the place to experiment with reduced-fat alternatives; the full-fat version provides the structure and richness this dessert needs.
Finally, your whipped topping brings lightness and volume. Whether you use a frozen whipped topping that's been thawed or make your own whipped cream with heavy cream and sugar, this layer keeps the dessert from feeling too dense. Fresh whipped cream adds a homemade touch that some people prefer, while frozen whipped topping offers convenience and stability that holds up better over several days in the refrigerator.
Building It Step by Step
The construction of this easy Easter dirt cake casserole follows a logical progression that ensures each layer sets properly and looks beautiful in the final presentation. Start by crushing your chocolate sandwich cookies into fine crumbs. I like to place them in a large resealable bag and use a rolling pin to crush them, which gives you control over the texture. Some people prefer a food processor, which works wonderfully for creating uniform crumbs quickly. Reserve about one cup of these crumbs for topping later, and press the remaining crumbs firmly into the bottom of your casserole dish to create a solid base layer.
Next comes the cream cheese layer, which requires some patience to get silky smooth. Beat your softened cream cheese with powdered sugar until it's completely lump-free and fluffy. This takes about three minutes with an electric mixer, and it's worth taking the time to do it right because any lumps will be visible in your finished dessert. Fold in about half of your whipped topping gently, using a rubber spatula and a folding motion rather than stirring, which deflates the airiness. Spread this mixture carefully over your cookie base, reaching all the way to the edges so every serving gets this delicious layer.
The pudding layer comes next and needs to be prepared according to package directions but mixed slightly longer than usual until it's thick and glossy. This extra mixing time ensures the pudding is firm enough to create a distinct layer rather than sinking into the cream cheese below. Pour it gently over the cream cheese layer and use an offset spatula to spread it evenly without disturbing the layer beneath. This is where patience really pays off in the final presentation.
For the top layers, spread your remaining whipped topping in soft peaks and swirls, creating visual interest and texture. Then sprinkle your reserved cookie crumbs over the top, letting some areas be more densely covered than others for a natural, organic look. The dessert needs at least four hours in the refrigerator to set completely, though overnight is even better. This chilling time allows all the layers to firm up while the flavors meld together beautifully.
Presentation and Plating Tips
When it comes to serving this easy Easter dirt cake casserole, presentation makes all the difference between a good dessert and a memorable one. I always use a clear glass casserole dish when making this because the layers look stunning from the side. If you don't have a clear dish, a white ceramic baking dish provides a classic backdrop that lets the dark chocolate colors pop. The dish should be at least three inches deep to accommodate all your layers comfortably.
For individual servings, use a large serving spoon or a cake server to cut down through all the layers at once, then lift the portion out carefully to preserve those beautiful stripes. Place each serving in a clear glass dessert cup or on a small plate, and you'll see how impressive each portion looks with all the layers visible. If you're serving a crowd, let guests help themselves directly from the casserole dish, which creates a casual, family-style atmosphere that encourages seconds.
Garnishes take this dessert from lovely to spectacular. Fresh mint leaves add a pop of green that screams springtime freshness. Colorful candies or chocolate eggs arranged on top create a festive look perfect for seasonal gatherings. You might also consider fresh berries like strawberries or raspberries, which add bright color and a hint of tartness that balances the rich chocolate and cream. A light dusting of cocoa powder around the edge of the serving plate adds a professional bakery touch.
Scaling Up for a Crowd
When you're feeding a larger group, this easy Easter dirt cake casserole scales beautifully without much additional effort. A standard recipe in a 9x13-inch dish serves about twelve people generously, but you can easily make two or even three dishes if you're hosting a big celebration. The beauty of this dessert is that multiple dishes take barely more time than making one, since you're just repeating the same layering process.
For maximum efficiency when scaling up, prepare all your components assembly-line style. Crush all your cookies at once and divide them between your dishes. Make double or triple batches of the cream cheese mixture and pudding in larger bowls, then divide these between your prepared pans. This approach is much faster than making each dish separately from start to finish, and it ensures consistency across all your desserts.
The advance preparation possibilities make this dessert ideal for entertaining. You can crush your cookies up to three days ahead and store them in an airtight container at room temperature. The entire assembled easy Easter dirt cake casserole can be made up to two days before your gathering and kept covered in the refrigerator. In fact, I find that the flavors deepen and improve after a day or two of chilling. Just wait to add any fresh garnishes until an hour or two before serving to keep them looking their best. If you're transporting the dessert, keep it level in a cooler with ice packs, and bring your garnishes separately to add on arrival.
Storing Any Leftovers
One of the practical advantages of this easy Easter dirt cake casserole is how well it stores, making it perfect for make-ahead entertaining or for enjoying over several days. Once assembled, cover the entire dish tightly with plastic wrap or aluminum foil, pressing it directly onto the surface to prevent the top from drying out or absorbing refrigerator odors. Stored this way, the dessert maintains its texture and flavor for up to five days in the refrigerator.
The layers hold up remarkably well over time, though the cookie crumbs on top will gradually soften as they absorb moisture from the creamy layers below. Some people actually prefer this slightly softened texture, as it becomes more cake-like. If you want to maintain that crunchy "dirt" texture, you can store the top layer of cookie crumbs separately in an airtight container and sprinkle them on each serving just before plating.
Freezing is possible but requires some consideration. The whipped topping and cream cheese layers freeze reasonably well, but the pudding layer can become slightly grainy upon thawing. If you do freeze portions, wrap them tightly in plastic wrap and then aluminum foil, and consume within one month for best quality. Thaw overnight in the refrigerator rather than at room temperature to maintain food safety and the best possible texture. Individual portions freeze more successfully than a whole casserole because they thaw more quickly and evenly.
Variations to Explore
The basic concept of this easy Easter dirt cake casserole is incredibly versatile, inviting all sorts of creative interpretations. For a peanut butter version, use peanut butter sandwich cookies instead of chocolate ones, and mix a half cup of creamy peanut butter into your cream cheese layer. The combination of peanut butter and chocolate pudding is absolutely divine and appeals to fans of that classic flavor pairing.
A mint chocolate variation transforms this into an elegant, refreshing dessert perfect for spring weather. Add a teaspoon of mint extract to your pudding layer and use chocolate pudding instead of vanilla. Top with crushed chocolate mint cookies and garnish with fresh mint leaves. The cool mint flavor cuts through the richness beautifully and leaves your palate feeling refreshed.
For individual servings that are easier to transport or serve at large gatherings, layer all the same components in clear plastic cups or small mason jars. These personal-sized portions look adorable, eliminate the need for serving utensils, and make portion control effortless. You can make dozens of these at once and store them in the refrigerator, pulling them out as needed.
If you want a simpler weeknight version when you're craving the flavors without the layered presentation, simply fold all the components together in a large bowl. You'll get a chocolate trifle-style dessert that tastes just as delicious even though it lacks the visual impact of the layered casserole. This shortcut version comes together in less than ten minutes and satisfies that craving immediately.
For a lighter option, consider using sugar-free pudding mix and reduced-sugar cookies. While I mentioned avoiding reduced-fat cream cheese in the main recipe for structure, the sugar-free version works quite well if you're watching sugar intake. You can also increase the ratio of whipped topping to cream cheese for a fluffier, less dense dessert that feels lighter after a big meal.
Questions You Might Have
Can I make this easy Easter dirt cake casserole the night before?
Absolutely, and I actually recommend it. Making this dessert the night before gives all the layers time to set properly and allows the flavors to meld together beautifully. The cookie crumbs will soften slightly overnight, creating a more cohesive texture that many people prefer. Just cover it tightly and refrigerate until about thirty minutes before serving.
What if my pudding layer is too thin?
If your pudding seems runny, you likely didn't whisk it long enough or didn't give it adequate time to set. Make sure you're using cold milk and whisking for at least two full minutes until the pudding thickens noticeably. Let it sit for five minutes before spreading it on your easy Easter dirt cake casserole, and it should be thick enough to create a distinct layer. If it's still too thin, pop it in the refrigerator for ten minutes to firm up before spreading.
Can I use homemade whipped cream instead of frozen topping?
Yes, homemade whipped cream works beautifully in this easy Easter dirt cake casserole. Whip two cups of heavy cream with a quarter cup of powdered sugar and a teaspoon of vanilla extract until stiff peaks form. The flavor will be even better than frozen topping, though the dessert should be consumed within two days as homemade whipped cream doesn't stabilize quite as long. For longer storage, stick with frozen whipped topping.
How do I transport this dessert safely?
Transporting this easy Easter dirt cake casserole requires a level surface and temperature control. Place the covered dish in a large cardboard box with towels wedged around it to prevent sliding during transport. If the weather is warm, transport it in a cooler with ice packs placed around but not directly on the dish. Keep any fresh garnishes separate and add them after arrival. The dessert can sit at room temperature for up to two hours, so timing your arrival accordingly helps.
What's the best way to crush the cookies evenly?
For the most uniform texture, use a food processor and pulse the cookies in short bursts until they reach the consistency you want. If you don't have a food processor, place the cookies in a heavy-duty resealable bag, press out the air, seal it, and use a rolling pin to crush them. Roll back and forth with even pressure rather than pounding, which can create uneven chunks. For the topping of your easy Easter dirt cake casserole, slightly coarser crumbs actually look more attractive and natural.
Can I substitute the cream cheese layer with something else?
While cream cheese provides the ideal texture and tangy flavor that balances the sweetness, you can substitute mascarpone cheese for a milder, slightly sweeter option. Greek yogurt mixed with powdered sugar creates a lighter, tangier version that reduces the overall richness. Whatever you choose, make sure it's at room temperature so it blends smoothly with the other ingredients in your easy Easter dirt cake casserole.
This dessert has earned its place as a favorite for gatherings because it delivers impressive results without demanding advanced skills or expensive ingredients. The layered presentation creates that wow factor everyone loves, while the familiar flavors of cookies and cream appeal to both children and adults. Whether you're looking for something special to serve at a spring celebration or simply want a make-ahead dessert that feeds a crowd, this easy Easter dirt cake casserole checks every box. It's forgiving enough for beginners, impressive enough for experienced bakers, and delicious enough that you'll find yourself making it again and again throughout the year, not just for seasonal occasions.
Easy Easter Dirt Cake Casserole
A stunning layered dessert featuring chocolate cookie crumbs, creamy pudding, and fluffy whipped layers. Simple to assemble with no baking required, perfect for spring gatherings.
Prep Time
25 min
Cook Time
0 min
Total Time
4h 25m
Servings
12 servings
Ingredients
For 12 servings
- 36 chocolate sandwich cookies, divided
- 8 ounces cream cheese, softened to room temperature
- 1 cup powdered sugar
- 16 ounces frozen whipped topping, thawed, divided
- 2 packages (3.4 ounces each) instant vanilla pudding mix
- 3 cups cold whole milk
- Fresh mint leaves for garnish, optional
- Colorful candy eggs for decoration, optional
Instructions
- 1
Crush the cookies
Place chocolate sandwich cookies in a food processor or large resealable plastic bag. Pulse in the food processor or crush with a rolling pin until you have fine crumbs. Reserve 1 cup of cookie crumbs for topping and set aside.
- 2
Create cookie base
Press the remaining cookie crumbs firmly into the bottom of a 9x13-inch glass or ceramic baking dish, creating an even layer. Use the bottom of a measuring cup to pack the crumbs down tightly so they form a solid base.
- 3
Prepare cream cheese layer
In a large mixing bowl, beat the softened cream cheese and powdered sugar with an electric mixer on medium speed for 3 minutes until completely smooth and fluffy with no lumps remaining. Gently fold in 8 ounces (half) of the whipped topping using a rubber spatula with a folding motion to maintain airiness.
- 4
Spread cream cheese mixture
Spread the cream cheese mixture evenly over the cookie crumb base, making sure to reach all the way to the edges of the dish. Use an offset spatula or the back of a spoon to create a smooth, even layer. Refrigerate while preparing the pudding.
- 5
Mix the pudding
In a medium bowl, whisk together the instant pudding mix and cold milk for 2-3 minutes until the mixture thickens and becomes glossy. Let it stand for 5 minutes to set completely before using.
- 6
Add pudding layer
Pour the thickened pudding over the cream cheese layer, spreading it gently and evenly to avoid disturbing the layer beneath. Use a spatula to smooth the top, working from the center outward to the edges.
- 7
Top with whipped topping
Spread the remaining 8 ounces of whipped topping over the pudding layer. Create soft peaks and swirls with the back of a spoon or spatula for visual interest and texture.
- 8
Add final cookie layer
Sprinkle the reserved 1 cup of cookie crumbs evenly over the whipped topping layer, letting some areas be more densely covered than others for a natural appearance. Vary the coverage to create visual interest.
- 9
Chill and set
Cover the dish tightly with plastic wrap or aluminum foil. Refrigerate for at least 4 hours or preferably overnight to allow all layers to set completely and flavors to meld together.
- 10
Garnish and serve
Just before serving, add optional garnishes like fresh mint leaves or colorful candy eggs. Use a large spoon or cake server to cut down through all layers at once, lifting portions out carefully to preserve the beautiful layered appearance.
Nutrition Facts
Per serving (estimated)
385 calories
Calories
52g
Carbs
5g
Protein
18g
Fat
1g
Fiber
420mg
Sodium
38g
Sugar


