
Easy Cherry Pie Bars with Buttery Crust & Glaze
Delicious cherry pie bars with a buttery crust and sweet glaze. Simple to make, perfect for gatherings, and loved by everyone. Get the recipe!
cookwithlucia.com/recipes/easy-cherry-pie-bars-with-buttery-crust-and-delicious-glaze
There's something absolutely magical about biting into a perfectly baked cherry pie bar—the way your teeth sink through that sweet, glossy glaze, followed by the soft, jammy cherry filling, and finally that buttery, crumbly crust that practically melts on your tongue. I still remember the first time I made these easy cherry pie bars with buttery crust and delicious glaze for a family gathering at my aunt's house. I was looking for something simpler than traditional pie but just as impressive, and these bars were an absolute revelation. Everyone kept asking for the recipe, and my cousin's little ones had cherry-stained smiles for the rest of the afternoon.
What I love most about these cherry pie bars is how they deliver all the nostalgic comfort of homemade pie without the fuss of rolling out dough or worrying about soggy bottoms. The buttery crust is foolproof, the cherry filling comes together in minutes, and that glaze on top? It's the crowning glory that transforms these bars from simple to spectacular. Whether you're planning a weekend gathering, need a dessert for a potluck, or simply want to treat yourself to something sweet and satisfying, these bars are your answer. In this post, I'll walk you through everything you need to know to create these delightful treats in your own kitchen, from ingredient selection to pro tips that'll make you look like a baking expert. Trust me, once you make these easy cherry pie bars with buttery crust and delicious glaze, they'll become a regular request in your household.
What are Easy Cherry Pie Bars with Buttery Crust and Delicious Glaze?
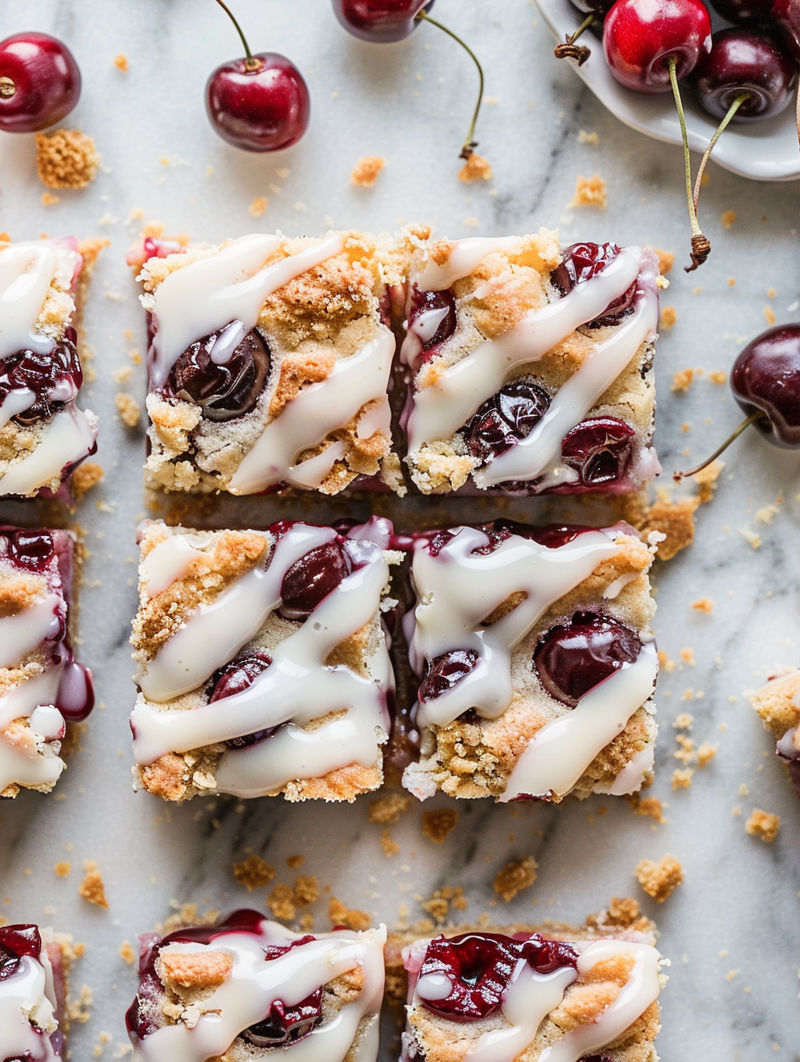
Have you ever wished you could capture all the deliciousness of a classic cherry pie but serve it in a way that's easier to share and transport? That's exactly what these cherry pie bars deliver. They're essentially a deconstructed cherry pie transformed into portable, hand-held squares that are perfect for serving a crowd. The base is a rich, buttery shortbread-style crust that's pressed into the pan—no rolling pin required. On top of that sits a layer of sweet-tart cherry filling that bakes into jammy perfection, and the whole thing is finished with a simple powdered sugar glaze that adds just the right amount of sweetness and a beautiful glossy finish.
These bars have their roots in American home baking tradition, where resourceful cooks learned to transform beloved pies into more practical bar cookies. The beauty of easy cherry pie bars with buttery crust and delicious glaze lies in their simplicity and versatility. They're sweet enough to satisfy dessert cravings but not so heavy that you can't enjoy them with afternoon tea. The cherry filling provides that classic fruity brightness we all crave, while the buttery crust grounds everything with its rich, comforting flavor. Ready to discover how easy it is to make these show-stopping bars in your own kitchen?
Why You'll Love This Easy Cherry Pie Bars with Buttery Crust and Delicious Glaze
Incredibly Simple to Make: Unlike traditional pie that requires rolling dough and crimping edges, these cherry pie bars come together with minimal effort. The crust is simply pressed into the pan with your fingers, the filling spreads easily, and the glaze takes just minutes to whisk together. Even if you've never made pie before, you'll feel like a confident baker with this recipe.
Budget-Friendly Ingredients: You probably have most of what you need already sitting in your pantry. Basic staples like flour, butter, sugar, and canned cherry pie filling mean you can whip up these easy cherry pie bars with buttery crust and delicious glaze without a special shopping trip or breaking the bank. It's an affordable way to serve dessert to a crowd.
Perfect for Any Gathering: Whether you're hosting weekend guests, attending a potluck, or just want something sweet on hand for the week, these bars are ideal. They cut into neat squares, travel beautifully, and look impressive on any dessert table. Unlike pie that can get messy when serving, these bars are tidy and easy to eat with your hands.
Customizable to Your Taste: While cherry is absolutely classic and delicious, this recipe is wonderfully adaptable. You can swap in different fruit fillings, adjust the sweetness level, add almond extract for a more sophisticated flavor, or even incorporate nuts into the crust. The basic formula is so reliable that you can make it your own.
Make-Ahead Friendly: These bars actually improve in flavor after sitting for a few hours, making them perfect for busy schedules. You can bake them the night before an event, and they'll stay fresh for several days when properly stored. The glaze sets beautifully and won't become sticky or messy.
Universally Loved: I've never met anyone who doesn't enjoy these cherry pie bars. The combination of buttery pastry, sweet-tart fruit, and vanilla glaze appeals to both kids and adults alike. They're reminiscent of classic bakery treats but taste so much better when homemade.
Key Ingredients and What They Bring
The foundation of these easy cherry pie bars with buttery crust and delicious glaze starts with high-quality butter. I always use unsalted butter so I can control the salt level precisely, and it's essential that it's softened to room temperature. The butter creates that melt-in-your-mouth texture in the crust and provides rich flavor that makes these bars taste indulgent. Don't even think about substituting margarine here—real butter makes all the difference in achieving that classic, nostalgic flavor.
All-purpose flour forms the structure of both the bottom crust and the crumbly topping. It provides just enough gluten development to hold the bars together while still maintaining that tender, shortbread-like quality. The flour also helps absorb some of the moisture from the cherry filling during baking, preventing soggy bottoms and ensuring every layer has the perfect texture.
Granulated sugar sweetens the crust and balances the tartness of the cherries. It also contributes to the tender crumb of the pastry by interfering with gluten development. I love how it creates little pockets of sweetness throughout the buttery base that contrast beautifully with the fruit filling.
Cherry pie filling is the star of the show, providing that gorgeous ruby color and sweet-tart flavor we all crave. I typically use canned cherry pie filling for convenience, but you can absolutely make your own if you have fresh or frozen cherries available. The filling thickens slightly as it bakes, creating a jammy layer that's neither too runny nor too stiff. Look for fillings that contain real cherry pieces for the best texture.
Vanilla extract appears in both the crust and the glaze, tying all the flavors together with its warm, aromatic notes. Pure vanilla extract is worth the investment here—it adds depth and complexity that artificial vanilla just can't match. The vanilla enhances the sweetness of the cherries and makes the glaze taste like something from a high-end bakery.
Powdered sugar, also called confectioners' sugar, creates that beautiful glaze that crowns these easy cherry pie bars with buttery crust and delicious glaze. When whisked with milk and vanilla, it forms a smooth, pourable glaze that sets into a slightly firm coating. The powdered sugar also adds extra sweetness and creates that professional-looking finish that makes these bars look as good as they taste.
A pinch of salt might seem insignificant, but it's crucial for balancing all the sweet flavors and making the butter taste even more buttery. Salt enhances the overall flavor profile and prevents the bars from tasting flat or one-dimensional. Never skip the salt—it's the secret ingredient that makes everything else shine.
How to Make Easy Cherry Pie Bars with Buttery Crust and Delicious Glaze — Quick Overview
The process of making these cherry pie bars is wonderfully straightforward and can be broken down into a few simple stages. First, you'll cream together softened butter and sugar until the mixture is light and fluffy, which incorporates air and creates that tender texture we're after. Then you'll mix in the flour and a pinch of salt until a soft dough forms. This dough gets divided, with most of it pressed into the bottom of your prepared baking pan to form the crust. The remaining dough is set aside for the crumbly topping.
Next comes the fun part—spreading the cherry filling over the crust in an even layer. The filling should reach almost to the edges, and you'll want to make sure it's distributed uniformly so every bite has plenty of cherry goodness. Then you'll crumble the reserved dough over the top, creating those rustic, bakery-style crumbles that add textural interest and extra buttery flavor. Into the oven it goes, where the magic happens as the crust turns golden, the filling bubbles gently, and your kitchen fills with the most incredible aroma.
Once the bars are baked and cooled, you'll whisk together a simple glaze using powdered sugar, milk, and vanilla. This glaze gets drizzled over the top in a beautiful crosshatch pattern or simply poured over and spread evenly. As it sets, it creates that glossy, bakery-worthy finish that makes these easy cherry pie bars with buttery crust and delicious glaze look absolutely irresistible. From start to finish, you're looking at about fifteen minutes of hands-on prep time and thirty to thirty-five minutes of baking—so simple, yet so impressive.
Top Tips for Perfecting Easy Cherry Pie Bars with Buttery Crust and Delicious Glaze
The temperature of your butter is absolutely crucial for achieving the perfect crust texture. Your butter should be softened to room temperature—when you press it with your finger, it should leave an indentation but still hold its shape. Butter that's too cold won't cream properly with the sugar, and butter that's too warm will make the dough greasy and difficult to work with. I usually take my butter out of the refrigerator about an hour before I plan to bake.
When pressing the crust into the pan, take your time to create an even layer that extends all the way to the corners and edges. Uneven crust means some areas will brown faster than others, and you might end up with spots that are overcooked or undercooked. I like to use the bottom of a measuring cup or a flat glass to press the dough firmly and evenly. A well-compacted crust will hold together beautifully when you cut the bars.
Don't overmix your dough once you add the flour. Overmixing develops too much gluten, which can make your crust tough instead of tender and crumbly. Mix just until the flour disappears into the butter mixture and you have a cohesive dough. Those few extra seconds of mixing can be the difference between a tender, melt-in-your-mouth crust and one that's disappointingly tough.
If you find your cherry pie filling is particularly liquidy, consider draining off a tablespoon or two of the excess syrup before spreading it over the crust. While some liquid is necessary for moisture, too much can make the bottom crust soggy. You want that perfect balance where the crust remains tender but isn't swimming in juice. The filling should be thick and jammy, not runny.
Let the bars cool completely before adding the glaze—this is perhaps the most challenging part because they smell so incredible fresh from the oven. If you glaze them while they're still warm, the heat will melt the glaze and make it absorb into the bars instead of creating that beautiful coating on top. Patience here results in much prettier, more professional-looking cherry pie bars.
For the cleanest cuts, use a sharp knife wiped clean between each slice. I also find that slightly warm bars cut more easily than completely cold ones from the refrigerator. If you've refrigerated them, let them sit at room temperature for about fifteen minutes before cutting. You can also use a plastic knife, which surprisingly creates very clean cuts in bar cookies because the filling doesn't stick to it as much as metal.
Consider adding a half teaspoon of almond extract to your cherry filling for an elevated flavor that tastes like you bought these from a fancy bakery. Almond and cherry are classic partners, and that subtle almond note adds sophisticated depth to these easy cherry pie bars with buttery crust and delicious glaze. Just a small amount transforms the flavor profile without overwhelming the cherry.
Variations and Flavor Twists
For a Mixed Berry Version, swap the cherry pie filling for a combination of blueberry, raspberry, and strawberry filling, or use a pre-made mixed berry pie filling. This creates a more complex fruit flavor with multiple layers of sweetness and tartness. The varied colors also make the bars more visually interesting, with jewel-toned berries peeking through the crumbly topping. This variation is especially wonderful during summer gatherings when you want something that feels fresh and fruity.
Try a Lemon Cherry Twist by adding the zest of one lemon to your crust dough and replacing the vanilla in the glaze with fresh lemon juice. The bright citrus notes cut through the sweetness beautifully and make the cherry flavor pop even more. This variation tastes incredibly refreshing and sophisticated, perfect when you want something a little lighter and more complex than the classic version.
Create Nutty Cherry Bars by adding a half cup of finely chopped almonds or pecans to the crumble topping. The nuts add wonderful texture and a slightly earthy flavor that complements the sweet cherries. Toast the nuts lightly before adding them to intensify their flavor and create more depth. This variation is perfect for those who love a bit of crunch in their desserts.
For a Chocolate Cherry Variation, add a quarter cup of cocoa powder to the crust dough and sprinkle a half cup of chocolate chips over the cherry filling before adding the crumble topping. The combination of chocolate and cherry is timeless and beloved, and these bars taste like a sophisticated version of chocolate-covered cherries. Use good-quality cocoa powder for the best chocolate flavor.
Make Spiced Cherry Bars by adding a teaspoon of cinnamon and a quarter teaspoon of nutmeg to the crust mixture. These warm spices complement the cherries beautifully and make the bars taste extra cozy and comforting. This variation is particularly wonderful during cooler months when you want something that feels warming and aromatic. The spices also make your kitchen smell absolutely incredible while these easy cherry pie bars with buttery crust and delicious glaze are baking.
What to Serve with Easy Cherry Pie Bars with Buttery Crust and Delicious Glaze
These cherry pie bars pair beautifully with a scoop of vanilla ice cream, especially when served slightly warm. The cold, creamy ice cream melting into the warm, jammy cherry filling creates an amazing temperature and texture contrast that elevates the entire dessert experience. The vanilla flavor also complements both the buttery crust and the sweet cherries without competing with them.
A dollop of fresh whipped cream adds lightness and elegance to each serving. The airy, barely sweet cream balances the richness of the buttery crust and provides a lovely visual contrast with the ruby-red cherries. You can flavor the whipped cream with a touch of vanilla or almond extract to tie the flavors together even more beautifully.
Serve these bars alongside a pot of hot tea or freshly brewed coffee for an afternoon treat. The slight bitterness of coffee or the subtle tannins in tea cut through the sweetness perfectly, making each bite taste even more delicious. Black tea, Earl Grey, or a smooth medium-roast coffee all work wonderfully with these easy cherry pie bars with buttery crust and delicious glaze.
For a more elaborate dessert presentation, create a dessert board with these bars as the centerpiece, surrounded by fresh cherries, strawberries, and other seasonal fruits. Add some nuts, a small bowl of extra glaze for drizzling, and perhaps some cheese like mild cheddar or cream cheese. This turns a simple bar cookie into an impressive spread that encourages guests to customize their own plates.
A glass of cold milk is the classic pairing that never fails, especially if you're serving these bars to children or anyone who loves nostalgic, comforting flavor combinations. The milk cleanses the palate between bites and provides protein to balance all that delicious sweetness. Sometimes the simplest pairings are truly the best.
Storing and Reheating Tips
Once your cherry pie bars have cooled completely and the glaze has set, store them in an airtight container at room temperature for up to two days. Layer parchment paper between stacked bars to prevent them from sticking together and to protect that beautiful glaze. Room temperature storage keeps the crust at its most tender and pleasant texture, though you'll want to keep them somewhere cool and dry, away from direct sunlight.
For longer storage, refrigerate the bars in an airtight container for up to five days. The cooler temperature helps preserve the cherry filling and prevents any potential spoilage, especially in warm weather. Refrigerated bars taste wonderful served cold, and the crust firms up slightly, creating a different but equally enjoyable texture. Let them sit at room temperature for ten to fifteen minutes before serving if you prefer a softer texture.
These easy cherry pie bars with buttery crust and delicious glaze freeze exceptionally well for up to three months. Wrap individual bars tightly in plastic wrap, then place them in a freezer-safe container or bag with as much air removed as possible. Frozen bars can be thawed overnight in the refrigerator or at room temperature for a few hours. The texture remains remarkably similar to fresh, making this an excellent make-ahead dessert option.
If you want to serve the bars warm, reheat them gently in a preheated oven at three hundred degrees for about eight to ten minutes. This warming brings out the buttery aroma and makes the cherry filling slightly more fluid and jammy. Avoid microwaving if possible, as it can make the crust tough, though in a pinch you can microwave individual bars for ten to fifteen seconds on fifty percent power.
The glaze may become slightly sticky in very humid conditions or if the bars are stored uncovered. If this happens, you can dust the tops lightly with additional powdered sugar to refresh their appearance, or simply embrace the rustic, homemade look. The flavor remains delicious regardless of minor cosmetic changes to the glaze.
Frequently Asked Questions
Can I Make These Cherry Pie Bars Ahead of Time?
Absolutely! These bars are actually perfect for making ahead since the flavors meld and improve after sitting for several hours or overnight. Bake and glaze them the day before your event, then store them covered at room temperature. They'll be just as delicious, if not more so, and you'll save yourself stress on the day of serving.
Can I Use Fresh Cherries Instead of Canned Pie Filling?
Yes, you can definitely use fresh cherries to make these easy cherry pie bars with buttery crust and delicious glaze. You'll need about three cups of pitted cherries tossed with half a cup of sugar, two tablespoons of cornstarch, and a tablespoon of lemon juice. This mixture should sit for fifteen minutes before spreading over the crust. Keep in mind that fresh cherry filling will be slightly less thick than canned, but it tastes wonderfully bright and fruity.
How Do I Know When the Bars Are Fully Baked?
The bars are done when the crust and crumble topping are golden brown and the cherry filling is bubbling around the edges. The center should look set rather than liquidy, though it will firm up more as it cools. Typically this takes thirty to thirty-five minutes in a preheated oven at three hundred fifty degrees, but ovens vary, so watch for visual cues.
Can I Double This Recipe for a Larger Crowd?
Definitely! This recipe doubles beautifully for larger gatherings. Simply double all ingredients and use a larger pan—a nine-by-thirteen-inch pan works perfectly for a double batch. The baking time may need to increase by five to ten minutes since there's more volume to heat through. Check for those same visual cues of golden crust and bubbling filling.
What's the Best Way to Cut Clean Squares?
For the neatest cuts, let the bars cool completely, then refrigerate them for thirty minutes to firm up. Use a large, sharp knife wiped clean with a damp cloth between each cut. You can also score the surface lightly before making full cuts, which helps guide your knife for more uniform pieces. Patience and a clean knife are your best tools for professional-looking squares.
Can I Make These Bars Without the Glaze?
Absolutely! While the glaze adds beautiful presentation and an extra touch of sweetness, these cherry pie bars are delicious without it. You can simply dust them with powdered sugar for a simpler finish, or serve them plain and let the buttery crust and cherry filling shine on their own. The glaze is wonderful but certainly optional based on your preference and the occasion.
Final Thoughts
There's something truly special about a dessert that combines simplicity with show-stopping results, and these easy cherry pie bars with buttery crust and delicious glaze do exactly that. They're the kind of recipe that makes you look like an expert baker while requiring minimal skill or time investment. The buttery, tender crust provides the perfect foundation for sweet-tart cherry filling, and that glossy glaze on top transforms simple bar cookies into something bakery-worthy.
What I love most about this recipe is its versatility and reliability. Whether you're baking for a weekend gathering, need a potluck contribution, or simply want to treat yourself and your family to something homemade and delicious, these bars deliver every single time. They travel well, please crowds of all ages, and can be customized endlessly to suit different tastes and occasions. The fact that they use mostly pantry staples and come together in less than an hour makes them even more appealing for busy home cooks.
I hope you'll give these easy cherry pie bars with buttery crust and delicious glaze a try in your own kitchen. Pay attention to those little details like butter temperature and even crust pressing, and you'll be rewarded with bars that look and taste absolutely incredible. Don't be surprised when everyone asks for the recipe—these bars have a way of becoming instant favorites. The combination of textures and flavors is simply irresistible, and the ease of preparation means you'll find yourself making them again and again. Happy baking, and I can't wait for you to experience how wonderful these cherry pie bars truly are!
Easy Cherry Pie Bars with Buttery Crust and Delicious Glaze
Delicious cherry pie bars featuring a buttery shortbread crust, sweet cherry filling, crumbly topping, and vanilla glaze. Perfect for gatherings and easier than traditional pie.
Prep Time
15 min
Cook Time
35 min
Total Time
50 min
Servings
16 bars
Ingredients
For 16 bars
- 1 cup unsalted butter, softened to room temperature
- 2 cups all-purpose flour
- 1/2 cup granulated sugar
- 1/4 teaspoon salt
- 1 teaspoon vanilla extract
- 1 can (21 ounces) cherry pie filling
- 1 cup powdered sugar
- 2 tablespoons milk
- 1/2 teaspoon vanilla extract
Instructions
- 1
Prepare the pan
Preheat your oven to 350 degrees Fahrenheit. Line a 9x9 inch baking pan with parchment paper, leaving an overhang on two sides for easy removal. Lightly grease the parchment paper with butter or cooking spray.
- 2
Make the crust dough
In a large mixing bowl, cream together the softened butter and granulated sugar using an electric mixer on medium speed for about 2 minutes until light and fluffy. Add the vanilla extract and mix until combined. The mixture should be pale and well-incorporated.
- 3
Add dry ingredients
Add the flour and salt to the butter mixture. Mix on low speed until a soft dough forms and no dry flour remains visible. Be careful not to overmix—stop as soon as the dough comes together.
- 4
Press the crust
Remove about one cup of the dough and set it aside in a small bowl for the topping. Press the remaining dough evenly into the bottom of your prepared baking pan, making sure to reach all corners and edges. Use the bottom of a measuring cup to create an even, compact layer.
- 5
Add cherry filling
Spread the cherry pie filling evenly over the pressed crust layer, distributing the cherries uniformly and spreading the filling all the way to the edges. Make sure the layer is even so every bar will have plenty of cherry filling.
- 6
Add crumble topping
Take the reserved cup of dough and crumble it over the cherry filling with your fingers, creating small, rustic pieces scattered across the top. Don't worry about perfect coverage—the rustic look is part of the charm. The pieces will spread slightly as they bake.
- 7
Bake the bars
Place the pan in the preheated oven and bake for 30 to 35 minutes, until the crust and crumble topping are golden brown and the cherry filling is bubbling around the edges. The top should be nicely colored and the kitchen will smell amazing.
- 8
Cool completely
Remove the pan from the oven and place it on a wire cooling rack. Allow the bars to cool completely in the pan for at least one hour. This cooling time is essential for the filling to set properly and for clean cutting later.
- 9
Make the glaze
In a small bowl, whisk together the powdered sugar, milk, and vanilla extract until smooth and well combined. The glaze should be thick but pourable—add a tiny bit more milk if it's too thick, or more powdered sugar if it's too thin.
- 10
Glaze and serve
Drizzle the glaze over the cooled bars in a back-and-forth motion, or spread it evenly with a spatula for complete coverage. Allow the glaze to set for about 15 minutes, then use the parchment paper overhang to lift the bars from the pan. Cut into 16 squares with a sharp knife and serve.
Nutrition Facts
Per serving (estimated)
245 calories
Calories
35g
Carbs
2g
Protein
12g
Fat
1g
Fiber
85mg
Sodium
22g
Sugar


