
Easy Bunny Butt Cookies: Adorable Meal Prep Treats
These easy bunny butt cookies are perfect for weekly meal prep! Soft, delicious, and adorable treats that stay fresh for days. Simple recipe inside!
cookwithlucia.com/recipes/easy-bunny-butt-cookies
There's something magical about opening your snack drawer mid-week and finding adorable, freshly-baked treats waiting for you. Instead of scrambling each day to satisfy sweet cravings or prepare special treats for gatherings, imagine dedicating just one afternoon to creating an entire week's worth of delightful cookies. These easy bunny butt cookies are the perfect solution for anyone who loves having homemade treats on hand without the daily time commitment.
The frustration of wanting freshly baked goods but lacking the energy to bake every single day is real. Between work, family responsibilities, and everything else on our plates, finding time to preheat the oven and measure ingredients feels impossible. But what if you could transform one relaxed Sunday afternoon into five or six days of sweet rewards? That's exactly what batch baking these charming cookies offers.
What makes easy bunny butt cookies especially ideal for meal prep is their forgiving nature and incredible shelf life. Unlike delicate pastries that crumble or frosted cakes that require careful handling, these whimsical cookies maintain their soft texture and adorable appearance throughout the week. They're sturdy enough to stack in containers, transport to gatherings, or tuck into lunch boxes without losing their charm.
Picture this: it's Sunday afternoon, your kitchen smells like vanilla and butter, and you're creating dozens of these sweet little treats in one focused session. By evening, you'll have portioned containers ready for the entire week ahead, each filled with cookies that look as delightful on Friday as they did on Sunday.
Why This Recipe Is Perfect for Meal Prep
The beauty of easy bunny butt cookies lies in their exceptional staying power. The dough base uses ingredients that create a stable, moisture-retaining cookie that doesn't dry out or become stale quickly. The combination of butter, sugar, and flour creates a tender crumb structure that actually benefits from a day or two of rest, allowing the flavors to deepen and meld together beautifully.
Unlike cookies with fresh fruit fillings or cream-based frostings that can separate or spoil, these cookies use shelf-stable decorating elements. The simple powdered sugar coating and minimal decorative touches mean there's no worry about melting, sliding, or degrading over time. The marshmallow centers that create the signature bunny tail remain perfectly soft and pillowy even after several days of storage.
Texture is where these cookies truly shine in a meal prep context. They maintain that perfect balance between soft and slightly crisp at the edges throughout the week. The dough recipe includes just enough fat to keep them tender without becoming greasy, and the structure holds up beautifully whether stored at room temperature or in the refrigerator. They won't stick together in containers, and they separate easily without crumbling.
From a nutritional standpoint, having portioned treats ready means better control over your weekly indulgences. Instead of grabbing random snacks or hitting the drive-through when cravings strike, you'll have measured portions of homemade sweetness waiting. Each cookie provides a satisfying treat without the guilt of impulsive choices, and you'll know exactly what ingredients went into them.
What You'll Need
The ingredient list for easy bunny butt cookies is wonderfully straightforward, which makes bulk preparation even more appealing. You'll need all-purpose flour as your foundation, unsalted butter for richness and texture, granulated sugar for sweetness and structure, and eggs to bind everything together. Each ingredient plays a specific role in creating cookies that not only taste wonderful but also store exceptionally well.
For the decorative elements that create those adorable bunny bottoms, you'll need powdered sugar for coating, mini marshmallows for the fluffy tails, and pink decorating gel or pink-tinted frosting for the paw pads. The genius of this design is that everything can be purchased in quantities that will last through multiple batches, making your cost per cookie incredibly economical when meal prepping.
When it comes to meal prep considerations, think about which components to prepare in advance versus add fresh. The cookie dough itself can be made ahead and refrigerated for up to three days before baking, or frozen for up to three months. This means you could dedicate one session to mixing multiple batches of dough, then bake fresh cookies throughout the month. The powdered sugar coating, however, should be added after baking but can be done immediately without affecting storage quality.
For storage, invest in airtight containers with tight-fitting lids. Rectangular containers work better than round ones for efficient refrigerator space usage, and choosing stackable options means you can prep multiple varieties without cluttering your shelves. Parchment paper sheets between layers prevent any potential sticking and make it easy to grab just one or two cookies without disturbing the rest. When buying ingredients in bulk, store extra flour in airtight containers, keep butter in the freezer, and ensure your baking powder or baking soda is fresh for optimal results.
The Batch Cooking Method
Batch baking easy bunny butt cookies follows a strategic timeline that maximizes your efficiency while minimizing active work time. Start by setting up your workspace with all ingredients measured and ready, a technique called mise en place that professional bakers swear by. This preparation phase takes about fifteen minutes but saves you from scrambling mid-recipe or discovering you're short on an ingredient.
Begin with the dough preparation, which takes approximately twenty minutes of active mixing and forming. Cream the butter and sugar together until light and fluffy, then add eggs and vanilla, followed by the dry ingredients. The key to meal prep success is making a double or triple batch of this dough at once. Your mixer can handle it, and the time investment is minimal compared to making single batches throughout the week.
While you're forming the dough into balls, preheat your oven and prepare multiple baking sheets. Here's where the assembly-line approach shines: roll all your dough balls at once, then go back and create the signature bunny shape by forming ovals with a slight indentation where the tail will go. This repetitive motion becomes almost meditative, and you'll find your speed increasing with each cookie.
The baking process itself is mostly passive time. Each sheet bakes for ten to twelve minutes, and if you have multiple racks in your oven, you can bake two sheets simultaneously. While one batch bakes, you can be rolling the next round of dough or preparing your decorating station. This overlapping workflow means that from start to finish, producing four to five dozen cookies takes approximately two to two and a half hours, but your actual hands-on time is closer to sixty minutes.
Once cookies emerge from the oven, let them cool for five minutes on the baking sheet before transferring to cooling racks. While they're still slightly warm but no longer hot, roll them in powdered sugar for that signature snowy coating. Add the mini marshmallow tail and tiny dots of pink decorating gel for paw pads. This decoration phase goes quickly when you set up a production line with all materials within arm's reach.
The Weekly Game Plan
Successful meal prep with easy bunny butt cookies starts with choosing your prep day wisely. Sunday afternoon works beautifully for most people, giving you the weekend relaxation mindset while setting up your week for success. Alternatively, if you have a weekday off, use that quieter time when stores are less crowded and your kitchen is entirely yours.
Day one is your power baking session. Dedicate two to three hours to mixing, baking, decorating, and portioning your cookies. Make at least four dozen if you're prepping for yourself, or scale up to six or eight dozen for family snacking. As you finish decorating each batch, let them cool completely before portioning into your storage containers. This cooling period is crucial because any residual warmth creates condensation in sealed containers, which can make cookies soggy.
Days two through four represent the sweet spot for cookie quality. Your easy bunny butt cookies will taste absolutely perfect during this window, with flavors fully developed and textures ideal. Store them in airtight containers at room temperature if your kitchen stays cool, or refrigerate them if you prefer a slightly firmer, almost shortbread-like texture. Some people actually prefer the chilled version with a cold glass of milk.
To keep things interesting throughout the week, consider varying how you serve these treats. Monday might be a simple afternoon snack with tea. Tuesday, pack a couple into lunch boxes for a midday surprise. Wednesday, arrange them on a pretty plate for an impromptu gathering with friends. Thursday, crumble one over vanilla ice cream for an elevated dessert. This variety in presentation makes the same cookie feel fresh and different each day.
By days five and six, you're nearing the end of optimal freshness for room temperature storage, though refrigerated cookies can easily last a full week. If you notice any cookies starting to firm up, a quick five-second warming in the microwave can restore their soft texture. Alternatively, transfer any remaining cookies to freezer-safe containers and freeze them for up to two months, creating a future stash for when you don't have time for another baking session.
Smart Storage and Reheating
Container selection makes an enormous difference in how well your easy bunny butt cookies maintain their quality throughout the week. Glass containers with rubber-sealed lids offer the best protection against moisture loss and unwanted odors, though they're heavier and more breakable. High-quality plastic containers with snap-tight lids work wonderfully and are lighter for transporting to work or gatherings. Look for BPA-free options with airtight seals.
Compartmentalized containers aren't necessary for these cookies since they're sturdy and don't require separation. However, layering cookies with parchment paper sheets between each level prevents the powdered sugar coating from rubbing off onto other cookies. You can fit approximately twelve to sixteen cookies per standard rectangular container, depending on size, making it easy to portion out daily or every-other-day amounts.
In the refrigerator, properly stored easy bunny butt cookies maintain excellent quality for seven to ten days. The cool temperature actually helps preserve the butter-based dough and prevents any potential softening in warm weather. Keep them on a middle shelf where temperature remains most consistent, away from the door which experiences temperature fluctuations. If you notice any moisture accumulation inside the container, simply wipe it dry and add a fresh sheet of parchment paper.
For longer-term storage, freezing is your friend. Place cookies in a single layer on a baking sheet and freeze until solid, about two hours, then transfer to freezer bags or containers. This flash-freezing method prevents them from sticking together. Frozen cookies stay delicious for up to three months. When you're ready to enjoy them, simply remove the number you want and let them thaw at room temperature for thirty to forty-five minutes.
Reheating isn't typically necessary for these cookies, but if you prefer them warm or want to soften cookies that have become slightly firm, use your microwave on medium power for just five to eight seconds. Any longer and the marshmallow tail might start to expand or melt. For a crisper edge, place cookies on a baking sheet in a preheated oven at three hundred degrees for three to four minutes. This gentle warming refreshes their just-baked quality without drying them out.
Customization Ideas
The beauty of easy bunny butt cookies lies in their adaptability to different tastes and dietary preferences. For a richer, more decadent version, substitute half the butter with cream cheese, creating a softer, tangier cookie base that some people prefer. The tanginess balances the sweetness beautifully and adds an interesting flavor dimension that develops even more over storage time.
If you're preparing these treats for various dietary needs, the recipe accommodates modifications well. Gluten-free all-purpose flour blends with xanthan gum work successfully in place of regular flour, though you may need to add an extra tablespoon or two of butter to maintain moisture. For dairy sensitivities, plant-based butter substitutes produce surprisingly similar results, though the flavor will be slightly less rich.
Flavor variations keep your weekly meal prep exciting. Add a half teaspoon of almond extract to the dough for a subtle nutty note that pairs beautifully with the vanilla. Incorporate finely grated citrus zest for a bright, fresh variation that feels perfect for warmer months. For chocolate lovers, replace two tablespoons of flour with cocoa powder to create chocolate bunny butt cookies with an entirely different character.
Scaling this recipe up or down is straightforward. For individual meal prep, make a half batch that yields about two dozen cookies, perfect for one person's weekly treats. For family meal prep, triple the recipe to produce approximately nine dozen cookies that can feed multiple family members throughout the week. When scaling up, consider using a stand mixer rather than a hand mixer to handle the larger dough volume efficiently.
Meal Prep FAQ
How long do easy bunny butt cookies really last?
When stored properly in airtight containers at room temperature, these cookies maintain optimal quality for five to seven days. Refrigerated, they extend to a full week or slightly longer, up to ten days. The powdered sugar coating may absorb slightly into the cookie over time, but flavor and texture remain excellent. For maximum freshness, add the powdered sugar coating just before serving rather than immediately after baking if you plan to store them longer than five days.
What containers work best for office meal prep?
For bringing easy bunny butt cookies to work, choose lightweight plastic containers with secure snap lids that won't pop open in your bag. Individual portion containers holding three to four cookies work perfectly for daily snacking and prevent you from bringing your entire weekly stash, which might tempt coworkers to help themselves. Look for containers that fit easily in lunch bags alongside other meal prep items, and consider insulated lunch boxes if your commute is long or you lack refrigeration at work.
Can I reheat these cookies in an office microwave?
Absolutely, though it's rarely necessary since these cookies taste wonderful at room temperature or chilled. If you prefer them warm, use medium power for just five seconds to avoid overheating the marshmallow center. Most office microwaves run hot, so start with less time rather than more. Alternatively, simply remove cookies from the refrigerator fifteen to twenty minutes before you plan to eat them, allowing them to naturally come to room temperature.
Are easy bunny butt cookies suitable for children's lunch boxes?
These cookies make delightful lunch box additions and hold up beautifully during transport. Pack them in small reusable containers or snack bags, and they'll arrive looking just as cute as when you packed them. The marshmallow tail stays intact, and the cookies themselves don't crumble easily. Parents appreciate that these homemade treats contain recognizable ingredients compared to processed alternatives, and children love the whimsical design that makes lunch feel special.
How do I avoid meal prep fatigue with the same cookies all week?
Variety is key to preventing meal prep boredom. Rather than making a massive single batch, consider preparing two or three different cookie varieties during your prep session and rotating them throughout the week. Alternatively, change how you serve your easy bunny butt cookies each day: plain on Monday, alongside fresh fruit on Tuesday, with a small square of chocolate on Wednesday, dunked in milk on Thursday, and crumbled over yogurt on Friday. This approach provides the efficiency of batch baking while keeping your palate interested.
Can I prep the dough ahead and bake fresh throughout the week?
This strategy works wonderfully and gives you the best of both worlds: meal prep efficiency with fresh-baked results. Prepare your cookie dough, portion it into balls, and store them on parchment-lined baking sheets in the refrigerator for up to three days or in the freezer for up to three months. When you want fresh cookies, simply bake the pre-portioned dough balls straight from the refrigerator, adding one to two extra minutes to the baking time. Frozen dough balls need an additional three to four minutes in the oven and can be baked without thawing first.
The investment of one focused afternoon transforms your entire week, replacing the daily decision of what to snack on with the simple pleasure of reaching for something homemade and delightful. These easy bunny butt cookies prove that meal prep doesn't have to mean boring or repetitive food. With proper storage techniques, smart planning, and a bit of Sunday afternoon dedication, you'll discover that batch baking creates not just efficiency, but genuine joy. Each time you open your container and see those adorable treats waiting, you'll remember why meal prep has become such a beloved practice for busy home cooks everywhere.
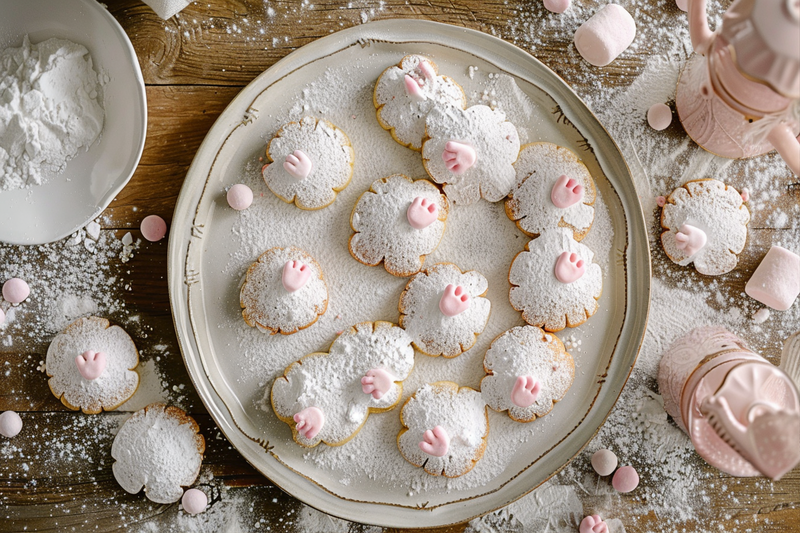
Easy Bunny Butt Cookies
Adorable and delicious cookies shaped like little bunny bottoms, featuring a soft sugar cookie base, powdered sugar coating, marshmallow tails, and pink paw pad details. Perfect for batch baking and meal prep.
Prep Time
20 min
Cook Time
12 min
Total Time
32 min
Servings
24 cookies
Ingredients
For 24 cookies
- 2 and 3/4 cups all-purpose flour
- 1 cup unsalted butter, softened to room temperature
- 1 cup granulated sugar
- 2 large eggs, room temperature
- 2 teaspoons pure vanilla extract
- 1 teaspoon baking powder
- 1/2 teaspoon salt
- 1 cup powdered sugar, for coating
- 24 mini marshmallows, for tails
- Pink decorating gel or pink-tinted frosting, for paw pads
Instructions
- 1
Prepare oven and sheets
Preheat your oven to 350°F (175°C). Line two large baking sheets with parchment paper or silicone baking mats to prevent sticking and ensure even baking. Set aside while you prepare the dough.
- 2
Cream butter and sugar
In a large mixing bowl or stand mixer, beat the softened butter and granulated sugar together on medium speed for 3-4 minutes until light, fluffy, and pale in color. This creaming process incorporates air and creates the tender texture these cookies are known for.
- 3
Add eggs and vanilla
Add the eggs one at a time, beating well after each addition until fully incorporated. Mix in the vanilla extract until evenly distributed throughout the mixture. The dough should look smooth and creamy at this stage.
- 4
Combine dry ingredients
In a separate medium bowl, whisk together the flour, baking powder, and salt until evenly combined. This ensures the leavening agent distributes evenly throughout the dough for consistent cookie rise and texture.
- 5
Mix dough together
Gradually add the dry ingredient mixture to the butter mixture, mixing on low speed or stirring by hand until just combined. Avoid overmixing, which can create tough cookies. The dough should be soft, slightly sticky, and hold together when pressed.
- 6
Shape bunny bottoms
Scoop about 2 tablespoons of dough and roll into a ball, then shape into a slight oval. Place on the prepared baking sheet and use your thumb or finger to create a small indentation on one end where the marshmallow tail will go. Space cookies about 2 inches apart as they will spread slightly during baking.
- 7
Bake the cookies
Bake for 10-12 minutes until the edges are just set and very lightly golden. The centers may look slightly underdone, but they will continue cooking on the hot baking sheet after removal. Do not overbake or cookies will become dry rather than tender.
- 8
Cool briefly on sheet
Allow cookies to cool on the baking sheet for 5 minutes. This resting period lets them firm up enough to handle without breaking while they're still warm enough for the powdered sugar to adhere properly.
- 9
Coat with powdered sugar
Place powdered sugar in a shallow bowl. While cookies are still slightly warm, gently roll each one in the powdered sugar until completely coated, creating that signature snowy appearance. Tap off any excess sugar and return to the cooling rack.
- 10
Add marshmallow tails
While cookies are still warm, gently press one mini marshmallow into the indentation you created earlier. The residual warmth will help the marshmallow adhere slightly without melting completely.
- 11
Create paw pads
Using pink decorating gel or pink-tinted frosting in a piping bag or squeeze bottle, add three small dots on the opposite end from the marshmallow tail to represent bunny paw pads. These can be three ovals arranged in a triangle pattern for an authentic look.
- 12
Cool completely before storing
Allow decorated cookies to cool completely on a wire rack for at least 30 minutes before storing. This prevents condensation inside storage containers which could make cookies soggy. Once fully cooled, transfer to airtight containers where they'll stay fresh for up to one week.
Nutrition Facts
Per serving (estimated)
165 calories
Calories
22g
Carbs
2g
Protein
8g
Fat
0.5g
Fiber
95mg
Sodium
12g
Sugar


