Easy Oreo Dirt Cake Cups Recipe | Cookie Crumb Dessert
These individual Oreo dirt cake cups layer creamy pudding with chocolate cookie crumbs for the perfect make-ahead dessert. Ready in 20 minutes!
cookwithlucia.com/recipes/easter-oreo-dirt-cake-cups-baking-you-happier
There's something magical about the moment you sink a spoon through layers of creamy vanilla pudding and rich chocolate cookie crumbs, watching the "dirt" cascade down the sides of your cup. These individual dessert cups bring pure joy to any gathering, transforming simple pantry ingredients into something that looks impressive but comes together with almost no effort. The contrast between the silky-smooth cream and the crunchy chocolate wafers creates a texture experience that keeps everyone coming back for seconds.
I've always been drawn to desserts that look elaborate but hide an incredibly simple method underneath. These layered cups check every box: they're budget-friendly, require zero baking, and can be assembled hours or even a day ahead of your gathering. What sets this version apart is the perfect ratio of cookie to cream—I've tested it dozens of times to find that sweet spot where you get crunch in every bite without the mixture becoming dry or the cream getting lost.
In this guide, you'll learn exactly how to build these stunning individual desserts from the bottom up. I'll walk you through ingredient choices that make the biggest difference, assembly techniques that create those picture-perfect layers, and timing strategies that let you prepare everything in advance. By the end, you'll have a foolproof recipe for a crowd-pleasing dessert that tastes like it came from a fancy bakery but costs a fraction of the price and takes just twenty minutes of hands-on work.
The Story Behind This Dish
Dirt cake has been a staple at family gatherings across America since the 1980s, when creative home bakers started layering chocolate sandwich cookies with instant pudding mixtures in flower pots for a whimsical presentation. The dessert captured imaginations because it looked like garden soil but tasted like pure indulgence. Over the decades, home cooks adapted the concept from large communal pots to individual serving cups, making portion control easier and presentation more elegant.
What started as a playful dessert for spring gatherings evolved into a year-round favorite, with bakers customizing the recipe for different occasions by changing the cookie flavors or adding colorful toppings. The genius of this dessert lies in its accessibility—every ingredient can be found at any grocery store, and the no-bake method means anyone can make it successfully, regardless of baking skill level.
The homemade version surpasses anything you'd find in a bakery case because you control the freshness and quality of every layer. Store-bought versions often sit for days, allowing the cookies to become soggy and the cream to develop that refrigerator taste. When you make these Oreo dirt cake cups at home, you decide exactly when to assemble them for optimal texture, and you can adjust the sweetness level to match your preferences perfectly.
What Makes This Recipe Special
Individual Portions Mean Perfect Presentation: Serving these in clear cups or jars lets every guest see those beautiful layers while keeping portions controlled. No messy scooping or uneven servings—each person gets an Instagram-worthy dessert that looks as good as it tastes.
No-Bake Simplicity for Stress-Free Entertaining: Your oven stays off while you create something impressive. This matters enormously when you're juggling multiple dishes or hosting during warm weather. The entire assembly process happens at room temperature, then everything chills while you focus on other preparations.
Make-Ahead Magic That Actually Improves: Unlike many desserts that must be served immediately, these cups benefit from several hours in the refrigerator. The cookies soften slightly, creating a cake-like texture while maintaining enough structure to provide that satisfying crunch. You can prepare them the night before your gathering and simply pull them from the fridge when needed.
Budget-Friendly Ingredients Stretch Your Dollar: A package of chocolate sandwich cookies, instant pudding mix, cream cheese, and whipped topping cost less than ten dollars total but yield eight to twelve impressive servings. This recipe proves that spectacular desserts don't require expensive ingredients or specialty items.
Endless Customization Possibilities: Once you master the basic technique, you can swap in different cookie flavors, add layers of caramel or fruit, or create themed versions for any gathering. The foundation remains the same while your creativity takes the lead.
Texture Contrast That Keeps Things Interesting: The magic happens in that interplay between the velvety cream mixture and the crunchy cookie crumbs. Each spoonful delivers both elements, preventing palate fatigue and making these surprisingly light despite their richness.
Breaking Down the Ingredients
Chocolate sandwich cookies form the foundation of these dirt cake cups, providing both flavor and that essential "dirt" appearance. I always use a full package of name-brand cookies rather than generic versions because the cocoa content makes a noticeable difference—you want that deep chocolate flavor and dark color that mimics rich garden soil. The cookies get crushed into fine crumbs, which means their quality directly impacts every layer of your dessert.
Cream cheese brings richness and tanginess that prevents the dessert from becoming one-dimensionally sweet. Using full-fat brick-style cream cheese at room temperature ensures it whips smoothly into the pudding mixture without lumps. This ingredient transforms basic pudding into something that tastes luxurious and bakery-quality, adding body and a slight tang that balances all that chocolate.
Instant vanilla pudding mix creates structure in the cream layer while adding sweetness and vanilla notes that complement the chocolate cookies. The instant variety works better than cook-and-serve because it thickens quickly with cold milk, maintaining the no-bake simplicity. I prefer vanilla over chocolate pudding because it creates visual contrast with the dark cookie layers and prevents the dessert from becoming too heavy.
Cold milk activates the pudding mix and determines the final consistency of your cream layer. Whole milk produces the richest result, but two-percent works beautifully if that's what you have on hand. The key is using very cold milk straight from the refrigerator—this helps the pudding set quickly and maintains the fluffy texture when you fold in the whipped topping.
Whipped topping adds airiness and volume to the cream mixture, creating that cloud-like texture between cookie layers. An eight-ounce container of frozen whipped topping, thawed in the refrigerator overnight, incorporates more easily than the type from an aerosol can. This ingredient lightens the cream cheese and pudding mixture, making the dessert feel less dense despite its impressive appearance.
Powdered sugar sweetens and stabilizes the cream mixture just enough without making it cloying. A half-cup stirred into the cream cheese base helps everything blend smoothly and adds structure that holds up beautifully during assembly and storage. This small addition makes a significant difference in the final texture and prevents the cream from becoming runny after sitting.
The Cooking Process Explained
The journey begins with crushing your chocolate sandwich cookies into fine crumbs that resemble dark soil. I seal the cookies in a large zip-top bag and use a rolling pin to crush them, working from one end to the other until no large pieces remain. This method controls the mess and lets you see exactly when you've achieved that perfect crumb consistency—you want fine particles with just a few slightly larger pieces for textural interest.
Next comes creating the luxurious cream filling that transforms simple pudding into something special. Beat the softened cream cheese with powdered sugar using an electric mixer until completely smooth and fluffy, about two minutes on medium speed. This step incorporates air and ensures no cream cheese lumps survive to interrupt your silky layers. The mixture should look pale and feel light when you test it with a spatula.
Once your cream cheese base is perfectly smooth, you'll whisk together the cold milk and instant pudding mix in a separate bowl, beating for about two minutes until it begins to thicken noticeably. Immediately fold this pudding into your cream cheese mixture along with half of the whipped topping, using gentle folding motions rather than vigorous stirring. This technique preserves the airiness you've built into the mixture while fully incorporating all the components into one cohesive cream.
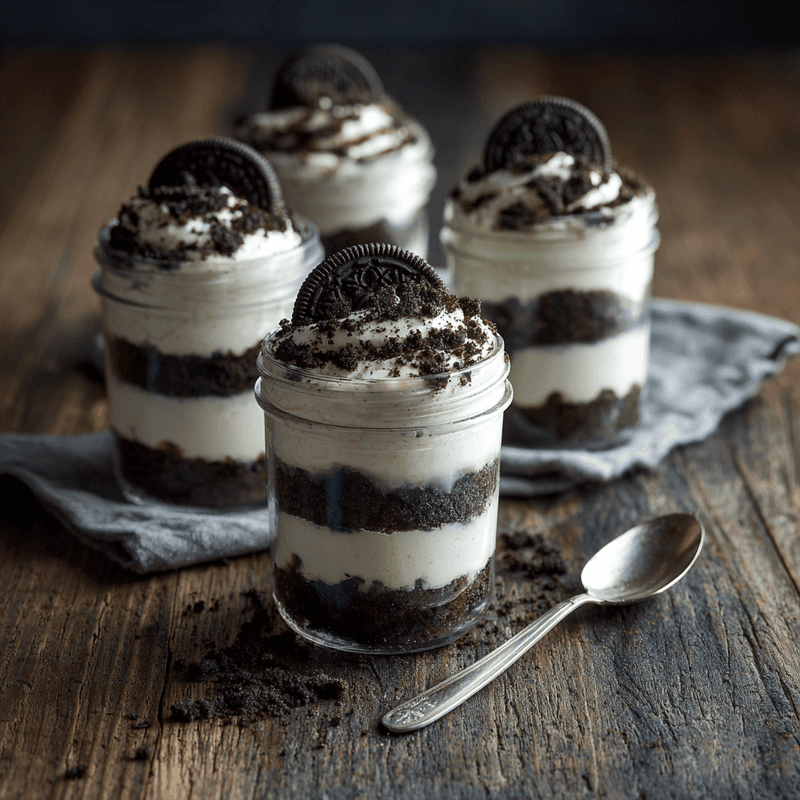
Assembly is where these Oreo dirt cake cups come together visually and texturally. Start with a generous layer of cookie crumbs in the bottom of each clear cup—about two tablespoons works perfectly for standard eight-ounce cups. Add a thick layer of the cream mixture, then another layer of cookie crumbs, and finish with a final cream layer topped with more crumbs. The key is making distinct layers rather than swirling them together, which creates that stunning visual effect when viewed from the side.
The final and most important step is chilling. These cups need at least three hours in the refrigerator for the flavors to meld and the cookies to soften slightly. During this time, the moisture from the cream mixture works its way into the cookie crumbs just enough to create a cake-like consistency while maintaining crunch. Cover each cup with plastic wrap to prevent the dessert from absorbing refrigerator odors, then let time work its magic while you prepare the rest of your meal.
Mistakes to Avoid
Don't skip softening your cream cheese to true room temperature before mixing. Cold cream cheese creates lumps that refuse to smooth out no matter how long you beat the mixture, resulting in an inconsistent texture throughout your dessert. Take the cream cheese out of the refrigerator at least one hour before you plan to start, or soften it in the microwave for ten seconds at a time, checking frequently.
Avoid crushing your cookies into powder so fine that they lose all texture. While you want mostly fine crumbs, some slightly larger pieces add important textural interest and prevent the layers from becoming pasty. Stop crushing when most pieces are pea-sized or smaller, with just a few larger chunks remaining—this creates the perfect balance.
Never assemble these Oreo dirt cake cups more than twenty-four hours in advance, despite the temptation to check them off your list days early. Beyond that timeframe, the cookies absorb too much moisture and the distinct layers begin to blur together, losing that appealing contrast between crisp crumbs and smooth cream. The sweet spot is assembling them eight to twelve hours before serving.
Don't use an excessive amount of cream filling in each layer, thinking more is better. Too much cream overwhelms the chocolate cookie flavor and makes the dessert feel heavy rather than balanced. Aim for roughly equal volumes of cookie crumbs and cream across all layers, measuring by eye or using a cookie scoop for consistency.
Avoid serving these directly from the refrigerator. Let the cups sit at room temperature for about five minutes before serving, which allows the cream filling to soften slightly and makes the entire dessert more pleasant to eat. This small waiting period enhances the creamy texture and lets the chocolate cookie flavor bloom fully.
How to Serve This
Pair these Oreo dirt cake cups with fresh berries arranged on top or alongside for a pop of color and a bright, tart contrast to the rich chocolate and cream. Strawberries and raspberries work especially well, cutting through the sweetness while adding visual appeal. The fruit also makes the dessert feel lighter and more balanced, turning it into something appropriate even for warm weather gatherings.
Serve them alongside strong coffee or espresso for an adult-friendly dessert course that mimics the classic cookies-and-cream combination. The bitter notes in good coffee complement the sweet chocolate cookies beautifully, creating a sophisticated pairing that elevates these playful cups into something dinner-party worthy.
For casual family gatherings, offer these cups on a large tray with long spoons, letting everyone grab their own serving buffet-style. This presentation method keeps things relaxed and allows guests to help themselves when they're ready for dessert, without you needing to plate individual servings.
Consider adding a drizzle of chocolate sauce or a dollop of extra whipped topping just before serving for added visual impact. A light dusting of cocoa powder or some crushed cookie pieces sprinkled on top creates an elegant finish that makes the cups look professionally crafted.
These work beautifully as a finale to grilled meals during warm months because they require no last-minute preparation. Simply pull them from the refrigerator when dinner ends, and you have an impressive dessert ready to go without turning on the oven or heating up your kitchen.
Make-Ahead and Storage Guide
These dirt cake cups store beautifully in the refrigerator for up to three days when covered tightly with plastic wrap or fitted lids. The cookies will continue to soften gradually, transforming from distinct layers into something more cake-like by day three. While this changes the texture, many people actually prefer the dessert after it's had forty-eight hours to meld together.
For optimal texture and presentation, assemble these Oreo dirt cake cups eight to twelve hours before serving. This timing allows the flavors to develop and the cookies to soften just enough while maintaining those beautiful distinct layers. I typically make them the evening before a gathering, then refrigerate them overnight for stress-free entertaining the next day.
Freezing works for the cream mixture alone but not for assembled cups, since the cookies become unpleasantly soggy when thawed. If you want to prep ahead, make the cream filling up to two days in advance and store it in an airtight container in the refrigerator. Crush your cookies and store them separately, then assemble the cups the day of your event.
When storing multiple cups, avoid stacking them directly on top of each other, which can crush the delicate layers or cause the toppings to stick to the covering of the cup above. Instead, arrange them in a single layer on a tray, or use a sturdy cardboard layer between levels if you must stack them.
If you have leftover cream filling but have run out of cookies, store the mixture in an airtight container for up to four days and use it as a dip for fresh fruit, spread it on graham crackers, or layer it with granola for a quick parfait. The filling remains versatile and delicious even when not used in the original recipe.
Reader Questions Answered
Can I make these in one large dish instead of individual cups?
Absolutely! Use a nine-by-thirteen-inch pan or a large trifle bowl to create family-style Oreo dirt cake that serves a crowd. Layer the cookie crumbs and cream mixture just as you would in individual cups, starting and ending with cookie crumbs. The flavor remains identical, though you lose some of the visual impact and portion control that individual cups provide.
What if I don't have instant pudding mix?
You can substitute prepared pudding cups by draining any excess liquid and folding them into the whipped cream cheese mixture. Use two standard pudding cups in place of one package of instant pudding mix and the milk. The texture will be slightly less stable, so consume these versions within twenty-four hours for best results.
Can I use a different type of cookie?
Certainly! Vanilla sandwich cookies create a lighter-colored "dirt" that works beautifully, while chocolate graham crackers offer a different texture profile. Peanut butter sandwich cookies add another flavor dimension. Just ensure whatever cookie you choose crushes into reasonably fine crumbs and complements the vanilla cream filling.
How do I prevent the layers from mixing together during assembly?
Use a light hand when adding each layer and avoid tapping or shaking the cups, which causes settling. Spread each cream layer gently using the back of a spoon or a small offset spatula, working from the center outward. Let each layer rest for a minute before adding the next to allow slight setting, especially if your kitchen is warm.
Can I reduce the sugar in this recipe?
You can cut the powdered sugar in half or eliminate it entirely if you prefer less sweetness, though this will slightly affect the cream mixture's stability and texture. The instant pudding mix already contains sugar, so the dessert will still taste sweet even without the additional powdered sugar in the cream cheese base.
What size cups work best for this recipe?
Eight-ounce clear plastic cups or small mason jars provide the ideal size for individual servings, allowing room for all the layers while keeping portions reasonable. You can also use smaller four-ounce cups for more delicate portions at large gatherings, or go up to twelve-ounce cups for seriously indulgent servings. Adjust your layer thicknesses based on the cup size you choose.
Oreo Dirt Cake Cups
Individual layered dessert cups featuring crushed chocolate sandwich cookies and a creamy vanilla pudding mixture. A no-bake treat that's perfect for gatherings and can be made ahead.
Prep Time
20 min
Cook Time
0 min
Total Time
3h 20m
Servings
10 servings
Ingredients
For 10 servings
- 1 package (14.3 oz) chocolate sandwich cookies (such as Oreos)
- 8 oz cream cheese, softened to room temperature
- 1/2 cup powdered sugar
- 1 package (3.4 oz) instant vanilla pudding mix
- 2 cups cold whole milk
- 8 oz frozen whipped topping, thawed
- 10 clear plastic cups (8 oz each) or small mason jars
Instructions
- 1
Crush the cookies
Place the chocolate sandwich cookies in a large zip-top bag and seal, removing as much air as possible. Use a rolling pin to crush the cookies into fine crumbs, working systematically across the bag until mostly fine with a few larger pieces remaining. Set aside.
- 2
Beat cream cheese mixture
In a large mixing bowl, beat the softened cream cheese and powdered sugar together using an electric mixer on medium speed. Continue beating for about 2 minutes until the mixture is completely smooth, fluffy, and light in color with no lumps remaining.
- 3
Prepare the pudding
In a separate medium bowl, whisk together the cold milk and instant vanilla pudding mix. Beat vigorously for about 2 minutes until the mixture begins to thicken noticeably. The consistency should be pourable but starting to set.
- 4
Combine cream mixtures
Add the prepared pudding mixture to the cream cheese mixture along with half of the thawed whipped topping (reserve the other half for another use or as extra topping). Fold gently using a spatula with sweeping motions from the bottom up, being careful not to deflate the mixture. Continue until everything is fully combined and smooth.
- 5
Start layering cups
Place your clear cups or jars on a work surface. Spoon about 2 tablespoons of crushed cookie crumbs into the bottom of each cup, creating an even layer. Gently tap the cups on the counter once to settle the crumbs without packing them down.
- 6
Add first cream layer
Spoon or pipe a generous layer of the cream mixture over the cookie crumbs in each cup, using about 1/4 cup per serving. Spread gently with the back of a spoon to create an even layer, being careful not to disturb the cookie crumbs underneath.
- 7
Create middle cookie layer
Add another layer of crushed cookie crumbs over the cream layer, using about 1-2 tablespoons per cup. This middle layer provides that classic dirt cake appearance when viewed from the side of clear cups.
- 8
Add final layers
Top with another layer of cream mixture, followed by a final generous sprinkle of cookie crumbs on top. Reserve a small amount of cookie crumbs to add fresh just before serving if desired for extra crunch and visual appeal.
- 9
Chill thoroughly
Cover each cup tightly with plastic wrap or fitted lids. Refrigerate for at least 3 hours or up to 24 hours before serving. This chilling time allows the flavors to meld and the cookies to soften slightly for the perfect texture.
- 10
Serve
Remove the cups from the refrigerator about 5 minutes before serving to take the chill off. Add any additional toppings if desired, such as extra whipped topping or fresh cookie crumbs, then serve with long spoons for easy eating.
Nutrition Facts
Per serving (estimated)
385 calories
Calories
52g
Carbs
5g
Protein
18g
Fat
1g
Fiber
420mg
Sodium
38g
Sugar


