
Easter M&M Chocolate Chip Cookies Recipe Guide
Master colorful M&M chocolate chip cookies with this complete guide. Learn the science, techniques, and tips for perfectly chewy cookies every time.
cookwithlucia.com/recipes/easter-mm-chocolate-chip-cookies-baking-you-happier
There's something magical about pulling a tray of perfectly golden cookies from the oven, their edges crisp and centers gloriously soft, studded with colorful candy-coated chocolates that stayed perfectly round through the heat. These M&M chocolate chip cookies represent more than just a treat—they're a masterclass in understanding how fat, sugar, and heat transform simple pantry staples into something that brings joy to every gathering. Whether you're baking for a spring celebration, a weekend family gathering, or simply because the craving strikes, learning to make these cookies unlocks an entire world of baking confidence.
I know the hesitation that comes with cookie baking. You've seen the Pinterest-perfect results and wondered why yours spread too thin, or stayed too thick, or turned out hard as hockey pucks. But here's the truth I want you to embrace: cookie baking isn't mysterious once you understand what's actually happening in that oven. Every ingredient plays a specific role, every temperature matters, and every visual cue tells you exactly what's going on. These colorful M&M chocolate chip cookies are the perfect teacher because they're forgiving enough for beginners yet sophisticated enough to teach you principles you'll use in hundreds of other recipes.
The beauty of mastering this particular cookie is how it combines multiple textures and flavors in one bite. You get the buttery richness of brown sugar caramel notes, the slight crunch from properly creamed butter and sugar, the melt-in-your-mouth quality of chocolate chips, and those delightful pops of color and candy shell from the M&Ms. When you nail the technique, you create a cookie that stays chewy for days, never feels greasy, and has that coveted wrinkled top that bakery cookies command premium prices for. Let me walk you through exactly how to achieve this every single time.
The Science Behind the Method
Understanding what transforms your cookie dough from a bowl of separate ingredients into a cohesive, delicious treat is the key to baking confidence. When you cream butter and sugar together, you're not just mixing—you're creating thousands of tiny air pockets as the sugar crystals cut through the fat. These pockets expand during baking, giving your M&M chocolate chip cookies that perfect rise and tender crumb structure. The longer you cream (within reason), the lighter and cakier your cookies become. Less creaming time yields denser, chewier results.
The Maillard reaction is your secret weapon for flavor development. This chemical process occurs when proteins and sugars are exposed to heat above 280°F, creating hundreds of new flavor compounds that give baked goods their characteristic golden color and complex taste. Those brown edges on your cookies aren't just pretty—they're packed with caramelized, nutty flavors that make the difference between a good cookie and an unforgettable one. The ratio of brown sugar to white sugar directly impacts this process, with brown sugar contributing moisture and deeper molasses notes.
Gluten development is the balancing act that determines texture. When flour meets liquid and gets stirred, gluten proteins link together forming elastic networks. In bread, we want lots of gluten for structure. In these M&M chocolate chip cookies, we want just enough to hold the shape without creating toughness. This is why we mix the flour in last and just until combined—overmixing creates tough, dense cookies. Understanding this principle means you'll instinctively know when to stop stirring, giving you tender results every time.
Tools and Ingredients You'll Need
The right tools make the difference between frustration and joy in cookie baking. A stand mixer or hand mixer is ideal for properly creaming butter and sugar, but a sturdy wooden spoon and some elbow grease work perfectly well—it just takes an extra three to four minutes of vigorous stirring. You'll need mixing bowls (glass or stainless steel both work beautifully), measuring cups and spoons, and a rubber spatula for scraping down bowl sides. A cookie scoop is truly the secret to professional-looking results because it ensures every cookie is identical in size, which means they all bake at the same rate.
For baking, invest in heavy-gauge aluminum sheet pans if you can—thin pans create hot spots that burn cookie bottoms before the centers cook through. Parchment paper or silicone baking mats are essential for even browning and easy cleanup. I always keep both on hand because parchment is perfect for these M&M chocolate chip cookies, preventing any sticking while allowing proper heat transfer. A cooling rack is non-negotiable because cookies continue cooking on hot pans, and you need air circulation underneath to stop that process at exactly the right moment.
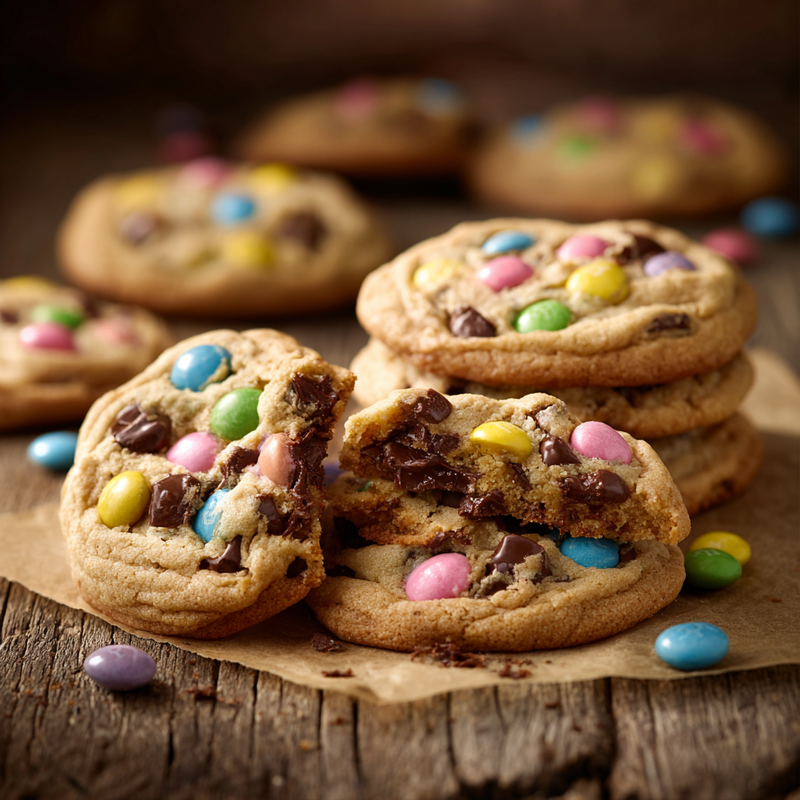
Ingredient quality genuinely matters here. Unsalted butter lets you control sodium levels precisely, and it should be at true room temperature—not cold, not melted, but soft enough that when you press it, your finger leaves an indent. All-purpose flour is the standard, but make sure it's fresh because flour does go stale and affects flavor. Pure vanilla extract outperforms imitation every time, contributing complex aromatic notes you'll taste in the finished cookie. For the stars of the show, use a mix of semi-sweet chocolate chips and colorful M&Ms in whatever spring shades appeal to you—the variety in size and texture creates interest in every bite.
The Method, Step by Step
Begin by bringing your butter to room temperature, which takes about sixty to ninety minutes on the counter. This step cannot be rushed in the microwave without affecting texture—cold butter won't incorporate air properly, and melted butter creates flat, greasy cookies. While the butter softens, measure out your dry ingredients so everything is ready when you need it. Preheat your oven to 350°F, positioning the rack in the center where heat circulation is most even. This temperature is the sweet spot for M&M chocolate chip cookies, hot enough to set the edges while keeping centers soft.
In your mixing bowl, cream the softened butter with both white and brown sugars for three to four minutes until the mixture looks noticeably lighter in color and fluffy in texture. This is where those air pockets form that give you lift and tenderness. Scrape down the bowl sides at least twice during this process because unmixed butter creates dense spots in your finished cookies. You'll know you've creamed long enough when the mixture no longer looks grainy and has increased slightly in volume.
Add your eggs one at a time, beating well after each addition until fully incorporated, then mix in the vanilla extract. The mixture might look slightly curdled at this point—don't worry, this is completely normal and will smooth out once the flour is added. In a separate bowl, whisk together your flour, baking soda, and salt. The whisking distributes the leavening agent evenly so every cookie rises uniformly. Now add the dry ingredients to the wet mixture in two or three additions, mixing on low speed or stirring by hand just until no flour streaks remain.
This is the crucial moment where overmixing becomes a real risk. Stop as soon as the dough comes together, even if it looks slightly rough. Fold in your chocolate chips and M&Ms using a spatula, distributing them throughout the dough with just a few strokes. The dough should feel slightly soft but hold its shape when scooped. If it seems too soft, refrigerate for fifteen to twenty minutes—this also helps prevent excessive spreading during baking.
Using a cookie scoop or spoons, portion the dough onto your prepared baking sheets, leaving two inches between each mound because these M&M chocolate chip cookies spread during baking. For extra visual appeal, press a few additional M&Ms onto the top of each dough ball—these stay vibrant and create that bakery-style appearance. Bake for ten to twelve minutes, watching carefully. The edges should be set and lightly golden while the centers still look slightly underdone and puffy.
This is the hardest part: resist the urge to overbake. Cookies continue cooking on the hot pan after you remove them from the oven, a process called carryover cooking. Pull them out when they look almost but not quite done. Let them rest on the pan for five full minutes, during which they'll firm up and finish cooking through, then transfer to a cooling rack. Within thirty minutes, you'll have perfectly chewy M&M chocolate chip cookies with that coveted combination of crispy edges and soft centers.
Troubleshooting Guide
If your cookies spread too thin and merge into one giant cookie sheet, your butter was likely too warm or even melted. Butter should be soft but still hold its shape—around 65-67°F is ideal. The fix for next time is being patient with that room temperature step, and if your kitchen is very warm, refrigerate the dough for thirty minutes before baking. You can also try reducing your oven temperature by twenty-five degrees and baking slightly longer, which gives the structure time to set before excessive spreading occurs.
When cookies turn out hard and crunchy instead of chewy, overbaking is usually the culprit. Remember that these M&M chocolate chip cookies need to come out looking slightly underdone. Set a timer for the minimum baking time and check them—it's better to add thirty seconds than to overbake by even one minute. Also check your oven temperature with an independent thermometer because many ovens run hot, meaning your "350°F" might actually be 375°F or higher.
If the centers sink or look raw even after cooling, you may have used too much leavening agent or your oven temperature was too high, causing the outside to set before the inside cooked through. Measure baking soda precisely using leveled measuring spoons, and verify your oven runs true to temperature. Another cause is underbaking—if the cookies still look wet and glossy in the center when you pull them, give them another minute or two.
Flat, greasy-looking cookies that lack that beautiful domed shape often result from insufficient chilling or using melted butter. The solution is to refrigerate your dough for at least thirty minutes before baking, which solidifies the fats and gives you more control over spread. Additionally, make sure you're measuring flour correctly by spooning it into the measuring cup and leveling off, rather than scooping directly from the bag which compacts the flour and gives you less than the recipe needs.
When your M&Ms or chocolate chips sink to the bottom instead of staying distributed throughout, the dough was likely too warm or too soft. Chill the dough before baking, and make sure you're using enough flour. You can also reserve some of the mix-ins to press gently into the tops right before baking, which guarantees beautiful color on the surface of your M&M chocolate chip cookies.
Taking It to the Next Level
Once you've mastered the basic technique, there are countless ways to elevate these M&M chocolate chip cookies into something truly extraordinary. Try browning your butter before creaming it with the sugar—this adds an incredible nutty, toffee-like depth that professional bakers use to create complexity. Simply melt the butter in a saucepan over medium heat, swirling occasionally, until the milk solids turn golden brown and smell like toasted hazelnuts, then let it cool back to room temperature before proceeding with the recipe.
Experiment with different types of chocolate and candy combinations. Mix dark chocolate chunks with the colorful M&Ms for a more sophisticated flavor profile, or try white chocolate chips for extra sweetness. Some bakers add a sprinkle of flaky sea salt on top right after baking, which creates an addictive sweet-salty contrast that makes these cookies impossible to stop eating. A tiny bit of espresso powder—just half a teaspoon mixed with the dry ingredients—intensifies chocolate flavor without making the cookies taste like coffee.
For bakery-style thick cookies, increase the flour by two tablespoons and chill the dough for at least two hours or overnight. Shape the dough into taller mounds rather than flat disks before baking, and bake at 375°F for just eight to ten minutes. This higher heat sets the outside quickly while keeping the inside gloriously underbaked. The result is a cookie with dramatic height and an almost molten center that rivals anything you'd pay premium prices for at a specialty bakery.
Storing Your Results
Proper storage keeps your M&M chocolate chip cookies tasting fresh-baked for days. Once completely cooled, transfer them to an airtight container, placing a sheet of parchment paper between layers if you're stacking them. The key to maintaining that perfect chewy texture is keeping air exposure to a minimum—even a slightly open container will cause cookies to harden within twenty-four hours. Stored this way at room temperature, they'll stay delicious for four to five days, though in my experience they rarely last that long.
If you want to extend freshness even longer, add a slice of bread to your cookie container. This old baker's trick works because the cookies will absorb moisture from the bread, keeping them soft while the bread hardens. Replace the bread slice every couple of days. Alternatively, you can freeze baked cookies for up to three months. Place them in a freezer-safe container or bag, separating layers with parchment. Thaw at room temperature for about thirty minutes, or microwave individual cookies for ten to fifteen seconds to recreate that warm, fresh-from-the-oven experience.
The absolute best option for always having fresh cookies available is freezing the dough rather than baked cookies. Scoop the dough into portions, freeze them on a baking sheet until solid, then transfer to a freezer bag. These frozen dough balls can go straight into the oven from frozen—just add two to three extra minutes to the baking time. This means you can bake exactly the number of M&M chocolate chip cookies you need, whenever the craving strikes, without committing to a full batch or dealing with stale leftovers.
Common Questions
Can I make these M&M chocolate chip cookies without a mixer?
Absolutely! A sturdy wooden spoon and some determination work perfectly well for this recipe. The key is to really put effort into the creaming step, stirring vigorously for about five to seven minutes until the butter and sugar mixture looks noticeably lighter and fluffy. Your arm might get tired, but you'll develop the dough properly and get excellent results. Some bakers actually prefer the hand-mixing method because it's harder to overmix the flour, which means more tender cookies.
Why do my cookies look different each time I bake them?
Consistency in baking comes down to precise measuring and controlling variables. Invest in measuring cups and spoons you trust, and use the spoon-and-level method for flour rather than scooping directly. Environmental factors matter too—on humid days, flour absorbs moisture from the air and you might need slightly less liquid or more flour. Your oven temperature can also fluctuate, so using an oven thermometer ensures you're baking at true 350°F every time, which gives you reliable results with these M&M chocolate chip cookies.
Can I make the dough ahead of time?
This is actually one of the best tricks for incredible cookies. Dough can be refrigerated for up to seventy-two hours, and many bakers swear the flavor improves with this rest time as the flour fully hydrates and the flavors meld. Just bring it back to cool room temperature before scooping and baking, or add a couple extra minutes to the baking time if you're working with cold dough. For longer storage, freeze portioned dough balls as mentioned earlier—they keep for months and bake beautifully straight from the freezer.
How do I adjust this recipe for high altitude?
Baking above 3,000 feet requires some modifications because lower air pressure affects how cookies rise and set. Reduce the baking soda by about one-quarter and increase the flour by two to three tablespoons to provide more structure. You might also need to increase your oven temperature by fifteen to twenty-five degrees to help the cookies set before they spread too much. Each altitude is slightly different, so keep notes on what works in your specific location, and these M&M chocolate chip cookies will turn out perfectly once you dial in your adjustments.
Can I substitute margarine or oil for the butter?
While you technically can, butter is really the ingredient that makes these cookies special. Butter contains milk solids that caramelize during baking, creating complex flavors that margarine or oil simply cannot replicate. Butter also has the right balance of fat and water to create proper texture. If you absolutely must substitute due to dietary restrictions, look for high-quality baking margarine specifically formulated for baking, not the spreadable type. The texture won't be quite the same, but you'll get closer to the intended result than with oil.
What's the secret to getting those perfectly round cookies like bakeries make?
The secret is actually quite simple: using a cookie scoop ensures uniform size and shape from the start, and the brief rest time after baking allows the cookies to settle into that perfect round shape. If your cookies come out misshapen, you can use a large circular cookie cutter or even a wide-mouth glass to gently shape them while they're still hot on the pan. Simply place the cutter around each cookie and move it in a circular motion to nudge the edges into a perfect circle. This technique works beautifully with these M&M chocolate chip cookies and creates that professional bakery appearance that impresses everyone.
Easter M&M Chocolate Chip Cookies
Perfectly chewy chocolate chip cookies studded with colorful M&Ms, featuring crispy edges and soft centers. These bakery-style cookies stay fresh for days.
Prep Time
15 min
Cook Time
12 min
Total Time
27 min
Servings
24 cookies
Ingredients
For 24 cookies
- 1 cup (226g) unsalted butter, softened to room temperature
- 3/4 cup (150g) granulated white sugar
- 3/4 cup (165g) packed light brown sugar
- 2 large eggs, at room temperature
- 2 teaspoons pure vanilla extract
- 2 1/4 cups (280g) all-purpose flour, spooned and leveled
- 1 teaspoon baking soda
- 1 teaspoon fine salt
- 1 cup (175g) semi-sweet chocolate chips
- 1 cup (175g) colorful M&Ms candies, plus extra for topping
Instructions
- 1
Prepare for baking
Preheat your oven to 350°F (175°C) and position the oven rack in the center. Line two large baking sheets with parchment paper or silicone baking mats. Ensure your butter has been sitting at room temperature for 60-90 minutes until soft but not melted.
- 2
Cream butter and sugars
In a large mixing bowl, combine the softened butter, granulated sugar, and brown sugar. Using a stand mixer or hand mixer, beat on medium speed for 3-4 minutes until the mixture is light, fluffy, and noticeably paler in color. Scrape down the bowl sides at least twice during this process to ensure even mixing.
- 3
Add eggs and vanilla
Add the eggs one at a time, beating well after each addition until fully incorporated. Mix in the vanilla extract. The mixture may look slightly curdled at this point, which is completely normal and will smooth out when you add the flour.
- 4
Combine dry ingredients
In a separate medium bowl, whisk together the flour, baking soda, and salt until evenly distributed. This whisking step ensures the leavening agent is spread uniformly throughout the flour for even rising.
- 5
Mix in flour
Add the dry ingredients to the wet mixture in two or three additions, mixing on low speed or stirring by hand just until no flour streaks remain. Stop mixing as soon as the dough comes together to avoid developing too much gluten, which would make the cookies tough.
- 6
Fold in mix-ins
Using a rubber spatula, gently fold in the chocolate chips and M&Ms until evenly distributed throughout the dough. If the dough feels too soft, refrigerate it for 15-20 minutes to make it easier to scoop and prevent excessive spreading during baking.
- 7
Portion the dough
Using a 2-tablespoon cookie scoop or two spoons, portion the dough onto the prepared baking sheets, spacing them about 2 inches apart. For bakery-style appearance, press a few extra M&Ms onto the top of each dough ball so they remain visible after baking.
- 8
Bake the cookies
Bake for 10-12 minutes until the edges are set and lightly golden while the centers still look slightly underdone and puffy. The cookies will appear too soft, but they continue cooking on the hot pan after removal from the oven.
- 9
Cool and serve
Let the cookies rest on the baking sheet for 5 full minutes to firm up and finish cooking through. This resting period is crucial for achieving the perfect texture. Transfer the cookies to a wire cooling rack and let cool completely, or enjoy warm for the ultimate experience.
Nutrition Facts
Per serving (estimated)
215 calories
Calories
28g
Carbs
3g
Protein
11g
Fat
1g
Fiber
180mg
Sodium
18g
Sugar


