Easy Easter Dirt Cake Recipe: Budget-Friendly Dessert
Make this fun and festive dirt cake dessert for spring gatherings! Easy layered pudding dessert with cookies and candy toppings. Under $2 per serving!
cookwithlucia.com/recipes/easter-dirt-cake-easy-and-fun-recipe-for-a-festive-dessert
Let me tell you something that changed how I approach desserts for spring celebrations: you don't need expensive ingredients or fancy baking skills to create something that will have everyone talking. This layered dessert is the perfect example of how simple pantry staples can transform into a show-stopping treat that looks impressive but costs just pennies per serving.
What I love most about this dessert is how it breaks all the rules while delivering pure joy. Instead of delicate layers that require precision, you're literally crushing cookies and piling everything into a dish. The result? A fun, interactive dessert that costs around $1.50 per serving and tastes better than anything you'd find at a bakery. The crushed chocolate cookies create that distinctive "dirt" appearance, while creamy pudding layers provide richness without the need for expensive cream or butter.
This is the kind of recipe that proves budget cooking doesn't mean sacrificing flavor or presentation. You'll be using ingredients you can find at any grocery store, many of which you might already have in your pantry. No specialty items, no hard-to-find components, just straightforward ingredients that come together in about twenty minutes of active work. The best part? Most of that time is just stirring and layering, which means even beginners can nail this dessert on their first try.
Why This Recipe Is a Budget Winner
The economics of this dessert are honestly remarkable when you break them down. A standard package of chocolate sandwich cookies costs around three dollars and provides all the "dirt" you need. The pudding component relies on instant pudding mix, which runs about a dollar per box, and milk, which you likely already have. Compare that to a similar dessert from a bakery or restaurant, where individual portions can easily cost six to eight dollars each.
What makes this recipe even more budget-friendly is its incredible yield. A single batch serves ten to twelve people generously, which means you're feeding a crowd for less than the cost of a single takeout dessert. When you factor in how impressive it looks, with layers of dark cookie crumbs contrasting against creamy pudding, the value becomes even clearer. This is the kind of dessert that makes people think you spent hours and a small fortune, when in reality you invested maybe twenty dollars total.
The ingredient list works heavily in your favor because everything is shelf-stable or long-lasting. Cookies keep for weeks, pudding mix lasts for months, and even the whipped topping can be purchased frozen and used as needed. This means you can watch for sales and stock up, bringing your per-serving cost down even further. There's also zero waste involved since you use complete packages of everything, with no odd leftover amounts that spoil before you can use them.
Another budget advantage is the flexibility to scale portions. Hosting a smaller gathering? Cut the recipe in half and use a smaller dish. Feeding a larger crowd? Double everything and use a deep trifle bowl. The cost per serving remains consistent regardless of batch size, giving you complete control over your dessert budget without compromising on impact or flavor.
Affordable Ingredients, Maximum Impact
Let's talk about the star ingredient: chocolate sandwich cookies. The name-brand version works beautifully, but here's a money-saving secret that actually improves the recipe. Store-brand chocolate sandwich cookies often have a deeper chocolate flavor and cost thirty to forty percent less. I've tested both extensively, and honestly, the generic versions sometimes create better texture because they crush into finer crumbs. Buy two packages when they go on sale and you're set.
Instant pudding mix is where this dessert really shines from a value perspective. A single box costs about a dollar and creates enough pudding for substantial layers. Vanilla and chocolate are the traditional choices, but banana, cheesecake, or even butterscotch flavors work wonderfully and often go on sale. The instant variety is key here because it sets up quickly without cooking, saving you both time and energy costs. Mix it with regular whole milk for the creamiest results, though two-percent works fine if that's what you have on hand.
Whipped topping is the next layer, and you have options based on your budget. Frozen whipped topping in a tub is the most economical choice, costing around two dollars for enough to cover this entire recipe. Let it thaw in the refrigerator overnight and it's ready to use. If you prefer making your own, heavy cream goes on sale regularly, and homemade whipped cream adds a luxurious touch for just slightly more cost. Either way, this layer adds incredible richness without the expense of butter or eggs that traditional desserts require.
Cream cheese is the ingredient that transforms this from simple to sublime. A single eight-ounce block, which typically costs less than three dollars, adds tangy richness that balances the sweetness perfectly. Buy the full-fat version rather than reduced-fat, as it whips more smoothly and creates better texture. The cream cheese layer is what makes this dessert taste expensive while keeping your actual costs minimal. It's the secret weapon that elevates every bite.
For toppings, you have complete flexibility based on what's affordable and seasonal. Gummy candies in pastel colors are classic and cost-effective, especially if you buy them from bulk bins where you pay only for exactly what you need. Chocolate eggs or candy-coated chocolates work beautifully and often go on sale after spring celebrations. Fresh edible flowers from your garden cost nothing and look stunning. The beauty of this recipe is that toppings are completely customizable based on your budget and what catches your eye at the store.
How to Make It
The process begins with cookie crushing, which is surprisingly therapeutic and requires zero special equipment. Place your chocolate sandwich cookies in a large zip-top bag, seal it with most of the air pressed out, and use a rolling pin to crush them. If you don't have a rolling pin, a heavy can or even the bottom of a sturdy glass works perfectly. Aim for varied textures, some fine crumbs and some larger pieces, which creates more interesting layers and better mimics the appearance of actual soil. Set aside about a cup of these crumbs for the top layer.
Next comes the creamy base, which involves just two ingredients and a mixing bowl. Beat softened cream cheese with an electric mixer until it's completely smooth and fluffy, about two minutes. Fold in half of your thawed whipped topping, mixing gently until everything is uniform and creamy. This mixture becomes the rich foundation that makes every bite luxurious. The combination of tangy cream cheese and sweet whipped topping creates a flavor profile that's more complex than either ingredient alone.
Prepare your pudding according to package directions, which typically means whisking the mix with cold milk for two minutes. Let it sit for about five minutes to thicken properly. This step is crucial because properly set pudding creates distinct layers rather than blending with the other components. While the pudding sets, you can start assembling your first layer of cookie crumbs in the bottom of your serving dish. A clear trifle bowl or glass baking dish works beautifully because it shows off all those gorgeous layers.
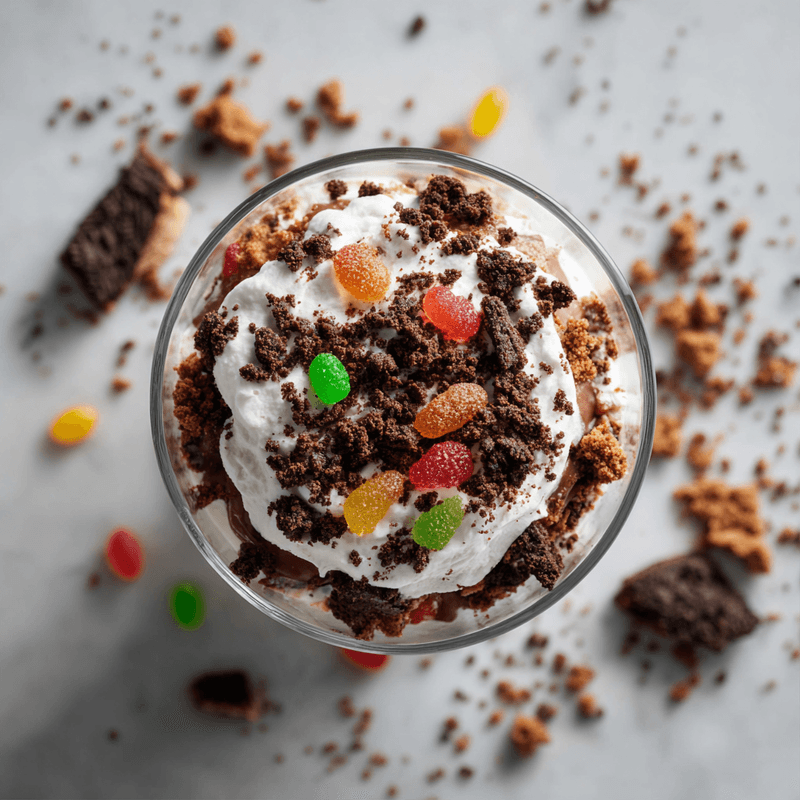
Layering is where the magic happens, and there's honestly no wrong way to do it. Start with half the cookie crumbs pressed gently into the bottom of your dish. Spread half the cream cheese mixture over the crumbs, then half the pudding, then half the remaining whipped topping. Repeat these layers once more, using up all your components except that reserved cup of cookie crumbs. The final step is sprinkling those reserved crumbs generously over the top to create that distinctive dirt appearance. Press your candy decorations into the top layer, creating whatever scene appeals to you.
Stretching It Further
One of the most brilliant aspects of this dessert is how leftovers actually improve with time, making it perfect for advance preparation. Make it two days before your gathering and the flavors meld together while the cookies soften slightly, creating an almost cake-like texture that's incredibly appealing. This means you can take advantage of sales on ingredients whenever you spot them, prepare the dessert ahead, and have one less thing to worry about on the day of your event.
For maximum budget stretching, consider making individual portions in small cups or jars. A single batch yields approximately fifteen individual servings when portioned this way, and you can customize toppings for different preferences or dietary needs. These individual portions are perfect for packed lunches, after-school treats, or grab-and-go desserts throughout the week. They also eliminate the need for serving utensils and plates, saving on cleanup time and costs.
The ingredient ratios in this recipe are incredibly forgiving, which means you can bulk it up with more affordable components. Adding an extra cup of whipped topping to each layer stretches the recipe without significantly impacting flavor. You can also increase the cookie layers while keeping other components the same, creating more servings for just a few dollars more. Some cooks add a layer of sliced bananas, which are often very inexpensive and add natural sweetness plus extra servings.
Freeze individual portions in airtight containers for up to three months, and you've essentially created a stockpile of ready-made desserts for future gatherings. Pull them from the freezer the night before you need them, let them thaw in the refrigerator, and add fresh toppings just before serving. This strategy means you can make multiple batches when ingredients are at their cheapest, storing portions for months of easy entertaining.
Smart Swaps and Variations
The pudding flavor offers your easiest customization point, and switching varieties doesn't change the cost at all. Vanilla pudding creates a lighter, more delicate dessert that appeals to those who find chocolate too rich. Banana pudding adds a classic flavor combination that works beautifully with chocolate cookies. Cheesecake pudding intensifies the tangy element and creates an almost tiramisu-like flavor profile. Pistachio pudding might sound unusual, but it creates a stunning green color and sophisticated flavor that adults particularly enjoy.
For a significantly cheaper version that works wonderfully for larger crowds, eliminate the cream cheese layer entirely. Mix your pudding with the whipped topping to create a lighter, mousse-like texture that still tastes delicious. This variation cuts your cost per serving by nearly half while maintaining the fun presentation and good flavor. You can also use all pudding and skip the whipped topping, though I find the combination provides better texture contrast.
Cookie variations open up even more possibilities based on what's on sale. Vanilla sandwich cookies create a lighter "sand" appearance that's perfect for different themes. Chocolate graham crackers cost less than sandwich cookies and create similar texture with slightly different flavor. Gingersnaps add spicy warmth that's particularly nice when using vanilla or butterscotch pudding. Peanut butter sandwich cookies create a completely different flavor profile that's equally delicious.
Seasonality affects topping costs significantly, so adjust your decorations based on what's affordable when you're shopping. In spring, pastel candies and chocolate eggs are plentiful and often discounted. Summer calls for fresh berries or gummy worms. Fall invites candy corn or chocolate pieces. Winter works beautifully with crushed peppermint or white chocolate chips. The base recipe remains constant while toppings change with the seasons and sales.
For an adult variation that adds no cost, incorporate a tablespoon of instant coffee into your chocolate pudding before mixing. This deepens the chocolate flavor and adds sophisticated complexity. A teaspoon of vanilla extract in the cream cheese layer similarly elevates flavor without impacting budget. Fresh orange zest mixed into the whipped topping adds brightness and uses something you might already have.
Storage and Reheating
This dessert keeps beautifully in the refrigerator for up to five days when covered tightly with plastic wrap or stored in an airtight container. The flavors actually improve over the first two days as everything melds together, so don't hesitate to make it well in advance. The cookies soften gradually, transforming from crunchy crumbs into tender, cake-like layers that many people prefer to the original texture. Just add fresh toppings before serving if you want them to look their crispest.
Freezing works surprisingly well for this dessert, though there are a few considerations. Freeze it before adding delicate candy toppings, as many candies become sticky or discolored when frozen. Wrap the entire dish tightly in plastic wrap, then aluminum foil, and freeze for up to three months. Thaw overnight in the refrigerator rather than at room temperature to maintain the best texture. The pudding and cream cheese layers freeze and thaw beautifully, though the whipped topping may separate slightly. A quick stir usually brings everything back together.
Individual portions in small containers with tight-fitting lids freeze even more successfully than large batches. The smaller volume means more even freezing and thawing, which preserves texture better. Label each container with the date so you can use older portions first. These frozen individual servings are perfect for unexpected guests or those moments when you need dessert immediately.
If your dessert seems too soft after storage, it likely means the pudding wasn't fully set before layering. Next time, let the pudding sit for the full five minutes and give it a quick stir before using to ensure it's properly thickened. You can salvage a too-soft dessert by serving it in bowls rather than trying to slice it, calling it a "parfait" instead and no one will know the difference. The flavor remains excellent regardless of texture firmness.
Your Questions Answered
Can I make this without cream cheese to save money?
Absolutely, and you'll still have a delicious dessert. Mix the pudding with the whipped topping to create a lighter, mousse-like texture throughout. This version costs about thirty percent less and works beautifully for casual gatherings. The cream cheese adds richness and tang, but it's not essential to the core concept of layered cookies and pudding.
What's the cheapest way to feed a crowd of twenty or more?
Double the recipe and use two nine-by-thirteen-inch pans rather than one large bowl. This presentation is less dramatic but much more practical for serving large groups. You can also make the cream cheese layer thinner by mixing one block of cream cheese with the full amount of whipped topping, stretching it across more servings. Focus your budget on the cookie and pudding layers since those provide the most impact.
Do the cookies get soggy, and is that okay?
The cookies definitely soften over time, transforming from crunchy crumbs to tender, almost cake-like layers. This is completely normal and many people prefer the softer texture. If you want maximum crunch, add the cookie layers within a few hours of serving. For advance preparation, embrace the softer texture or add a fresh layer of crushed cookies on top just before serving for textural contrast.
Can I use fresh whipped cream instead of frozen topping?
Fresh whipped cream works beautifully and adds a luxurious touch. Whip one and a half cups of heavy cream with three tablespoons of sugar until stiff peaks form. This costs slightly more than frozen topping but less than you might think, especially if you catch cream on sale. The flavor is noticeably better, though frozen topping holds up longer in storage.
What if I don't have a clear bowl to show the layers?
Any deep dish works perfectly, from regular baking pans to ceramic bowls. You lose the visual impact of seeing the layers from the side, but the taste remains identical. When serving from an opaque dish, make sure to scoop deep enough to get all the layers in each portion. You can also make this in individual cups, which look impressive regardless of whether they're clear.
How can I make this more nutritious without increasing cost?
Layer in sliced bananas, which add potassium, fiber, and natural sweetness for very little cost. Use sugar-free pudding mix, which costs the same as regular but reduces sugar content significantly. Replace half the cookies with graham crackers for less sugar and slightly more whole grains. Add a layer of Greek yogurt mixed with a bit of honey for protein and probiotics. These modifications maintain the fun presentation while boosting nutritional value without impacting your budget.
Easy Layered Dirt Cake Dessert
A fun, budget-friendly layered dessert featuring crushed chocolate cookies, creamy pudding, and whipped topping. Perfect for spring gatherings and family celebrations.
Prep Time
20 min
Cook Time
0 min
Total Time
20 min
Servings
12 servings
Ingredients
For 12 servings
- 2 packages (14.3 oz each) chocolate sandwich cookies, crushed
- 8 oz cream cheese, softened to room temperature
- 16 oz frozen whipped topping, thawed and divided
- 2 packages (3.4 oz each) instant vanilla pudding mix
- 3 cups cold whole milk
- 1 cup gummy candies or candy-coated chocolates for decoration
- Fresh edible flowers for garnish, optional
Instructions
- 1
Crush the cookies
Place chocolate sandwich cookies in a large zip-top bag and seal, pressing out excess air. Use a rolling pin or heavy can to crush cookies into varied textures, creating both fine crumbs and larger pieces. Reserve 1 cup of crushed cookies for the top layer and set aside.
- 2
Prepare cream cheese mixture
In a large mixing bowl, beat softened cream cheese with an electric mixer on medium speed for about 2 minutes until completely smooth and fluffy. Gently fold in 8 oz of the whipped topping until mixture is uniform and creamy, being careful not to overmix.
- 3
Make the pudding
In a separate bowl, whisk together both packages of instant pudding mix with the cold milk for 2 minutes. Let the mixture sit for 5 minutes to thicken properly. The pudding should be thick enough to hold its shape when spooned but still spreadable.
- 4
Create first layer
Spread half of the crushed cookies evenly across the bottom of a 9x13-inch glass baking dish or large trifle bowl, pressing down gently to create a compact layer. This forms the foundation for your dessert.
- 5
Add cream cheese layer
Spread half of the cream cheese mixture over the cookie layer, using an offset spatula or the back of a spoon to distribute it evenly. Reach all the way to the edges of the dish for clean, defined layers.
- 6
Spread pudding layer
Carefully spoon half of the prepared pudding over the cream cheese layer, spreading gently to avoid disturbing the layers beneath. Work from the center outward for the most even distribution.
- 7
Add whipped topping
Spread half of the remaining whipped topping over the pudding layer in an even, smooth layer. This creates a light, creamy contrast to the denser layers below.
- 8
Repeat layers
Repeat the layering process with the remaining ingredients: cookies, cream cheese mixture, pudding, and whipped topping. Each layer should be distinct and even for the best presentation and texture in every serving.
- 9
Create dirt topping
Sprinkle the reserved cup of crushed cookies generously over the top layer, covering the entire surface to create the signature "dirt" appearance. Press down very gently so the crumbs adhere to the whipped topping.
- 10
Decorate and chill
Arrange gummy candies, candy-coated chocolates, or edible flowers on top of the cookie crumbs, creating any design you like. Cover the dish tightly with plastic wrap and refrigerate for at least 2 hours before serving, though overnight is even better for flavor development.
Nutrition Facts
Per serving (estimated)
385 calories
Calories
52g
Carbs
6g
Protein
18g
Fat
2g
Fiber
425mg
Sodium
38g
Sugar


