Easter Dirt Cake Casserole – Easy No-Bake Dessert
Learn to make this crowd-pleasing no-bake dirt cake casserole! Layers of chocolate pudding, cookies, and cream create a fun dessert perfect for gatherings.
cookwithlucia.com/recipes/easter-dirt-cake-casserole-easy-no-bake-dessert-for-kids-crowds
Introduction
Mastering the art of layered no-bake desserts opens up a world of possibilities for home cooks who want impressive results without turning on the oven. This chocolate and cream dessert technique—building alternating layers of rich pudding, crushed cookies, and fluffy cream—creates a showstopping dish that looks like it took hours but comes together in just minutes. The beauty lies in the contrast: crunchy chocolate cookie crumbs that look like garden soil, smooth pudding that melts on your tongue, and billowy whipped topping that lightens every bite.
I know the idea of assembling a layered dessert can feel intimidating if you've never done it before. You might worry about getting the proportions right, achieving clean layers, or having everything slide around when you serve it. But here's what I want you to understand: this technique is genuinely foolproof once you grasp the simple principles behind it. There's no precise timing to nail, no temperature to monitor, and no risk of burning or underbaking. The magic happens through simple assembly, and the refrigerator does the work of melding those layers into something special.
Once you understand why each layer matters and how they work together, you'll find yourself creating variations for every gathering. The method stays the same whether you're making this dessert in a casserole dish for a crowd, individual cups for elegant presentation, or a trifle bowl to show off those beautiful striations. This is the kind of recipe that builds your confidence and gets requested again and again.
The Science Behind the Method
What makes this no-bake dirt cake casserole work so beautifully is the interplay between moisture, texture, and temperature. When you layer dry cookie crumbs with creamy pudding and whipped topping, something fascinating happens during the chilling process. The cookie crumbs begin to absorb moisture from the surrounding creamy layers, softening just enough to become tender while still maintaining their structure and that essential chocolatey crunch.
The pudding layer serves as both a flavor component and a binding agent. As it sets in the refrigerator, the starches in the pudding continue to hydrate and create a stable gel network. This network helps lock the layers in place and prevents everything from sliding into a messy heap when you scoop portions. The cream cheese addition—which many cooks incorporate into their whipped topping layer—adds stability through its protein and fat content, creating a mousse-like texture that holds its shape beautifully.
Temperature plays a crucial role in the final texture of this dirt cake casserole. Cold ingredients maintain their distinct layers better than room-temperature ones. The chilling period allows flavors to meld while textures remain pleasantly varied. Understanding this principle means you'll know exactly why rushing the refrigeration time leads to runny layers, and why letting it chill overnight produces the best results. This isn't just following instructions—it's applying food science to create the perfect balance of creamy, crunchy, and smooth in every spoonful.
Tools and Ingredients You'll Need
The beauty of this no-bake dirt cake casserole lies in its minimal equipment requirements. You'll need a 9x13-inch casserole dish or baking pan—glass works wonderfully because it allows you to see those gorgeous layers from the side, but ceramic or metal pans work equally well. If you don't have a large casserole, you can divide the recipe among individual serving cups or glasses for a more elegant presentation. A large mixing bowl is essential for combining your pudding mixture, and a separate bowl for whipping cream if you're going homemade rather than using prepared topping.
For tools, a hand mixer or stand mixer makes quick work of beating the cream cheese and incorporating air into your pudding mixture, though a sturdy whisk and some elbow grease can achieve similar results. You'll need a food processor or rolling pin with a sealed plastic bag to crush your chocolate sandwich cookies into those dirt-like crumbs. A rubber spatula helps you spread layers evenly and scrape every bit of goodness from your mixing bowls.
Ingredient-wise, quality matters but perfection isn't required. Chocolate sandwich cookies form the foundation—the classic option works perfectly, and you'll need about two standard packages. Instant chocolate pudding mix creates your creamy layer when combined with cold milk. Cream cheese adds richness and stability, while whipped topping provides that cloud-like texture. Some versions incorporate butter for richness in the cookie layer. For decorative elements, gummy candies shaped like creatures can add a playful touch for gatherings with children.
Budget-conscious cooks can substitute homemade whipped cream for prepared topping, use store-brand cookies and pudding mix, and skip any elaborate decorations. The technique remains the same, and the results are still spectacular. What you're investing in is mostly time for assembly and chilling—the ingredient cost stays remarkably low for such an impressive dessert.
The Method, Step by Step
Begin with your cookie crumbs, which form the foundation of this dirt cake casserole. Take your chocolate sandwich cookies—you can leave the cream filling intact, as it adds sweetness and helps the crumbs clump slightly when moistened. Pulse them in a food processor until they resemble coarse soil, with some finer powder and some larger pebble-sized pieces. This varied texture is exactly what you want. If using a rolling pin, place cookies in a sturdy zip-top bag, press out the air, and crush them with firm, even pressure. You're aiming for about four cups of crumbs total, which you'll divide between layers.
Next, prepare your creamy pudding mixture, which brings moisture and rich chocolate flavor. In a large bowl, beat softened cream cheese with a hand mixer until it's completely smooth with no lumps—this takes about two minutes of mixing. Those lumps won't disappear once you add other ingredients, so take your time here. Gradually add your instant pudding mix and cold milk, beating on low speed to start, then increasing to medium. The mixture will begin to thicken immediately as the pudding mix hydrates and the cream cheese incorporates. Fold in about half of your whipped topping gently, using a rubber spatula to maintain as much airiness as possible. You want this mixture to be fluffy and mousselike, not dense.
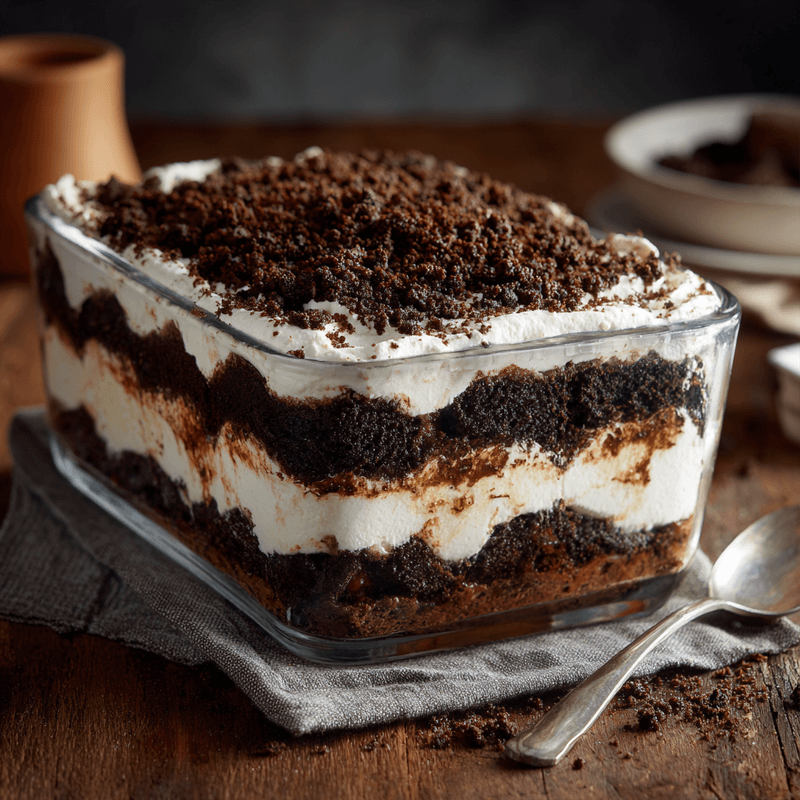
Now comes the layering, which is where this dirt cake casserole truly takes shape. Sprinkle about one-third of your cookie crumbs evenly across the bottom of your 9x13 casserole dish. Don't pack them down—just let them settle naturally. Spread half of your pudding mixture over the crumbs, using an offset spatula or the back of a spoon to create an even layer that reaches into the corners. The pudding will push some crumbs aside, and that's perfectly fine. Those mixed areas create interesting texture.
Add another third of the cookie crumbs over the pudding layer, again keeping your distribution even but not pressing down. Spread the remaining pudding mixture over this second cookie layer, smoothing the top as best you can. For your final topping, spread the remaining whipped topping in an even layer that seals everything beneath. This creates a blank canvas for your final cookie crumb topping. Sprinkle the remaining crumbs over the whipped topping, creating that signature dirt appearance. You can leave it evenly distributed or create small hills and valleys for a more naturalistic garden soil look.
Cover your assembled dirt cake casserole with plastic wrap, being careful not to let it touch the top layer of crumbs—you can tent it slightly or use toothpicks at the corners to create space. Refrigerate for at least four hours, though overnight is ideal. During this chilling time, the layers settle and marry, the cookie crumbs soften slightly from the moisture, and all the flavors meld together. The wait is difficult when you can see this beautiful creation in your refrigerator, but patience rewards you with the perfect texture in every layer.
When ready to serve, remove the plastic wrap and admire how the layers have set. Use a large spoon or spatula to scoop portions, making sure to dig down through all the layers so each serving includes crumbs, pudding, and cream. The dirt cake casserole will hold its layers well for the first few servings, then become slightly more rustic-looking as you continue—this is part of its charm. If you've added gummy decorations, press them gently into the top layer just before serving so they look fresh and appealing.
Troubleshooting Guide
If your pudding mixture turns out runny and refuses to set properly, the likely culprit is warm ingredients or insufficient mixing. Cream cheese must be softened to room temperature for easy beating, but your milk should be cold from the refrigerator. The contrast helps the pudding mix activate properly. If you've already assembled your dessert and notice it's too loose, all isn't lost—additional chilling time often allows the pudding to firm up, especially if you can let it sit overnight. For future batches, make sure you're using instant pudding mix rather than cook-and-serve variety, and beat the mixture for the full time specified.
When the cookie crumbs become soggy and lose all their texture, you've likely used crumbs that were too fine or allowed too much moisture contact. The solution is grinding your cookies more coarsely next time—you want varied particle sizes, not powder. Some moisture absorption is expected and desirable, but the crumbs should retain a slight resistance when you bite into them. If making this dirt cake casserole ahead, consider reserving the top layer of crumbs and adding them just a few hours before serving, which keeps that layer especially crunchy.
Lumpy cream cheese creates an unpleasant grainy texture throughout your pudding layer. This happens when the cream cheese is too cold when you begin mixing, or when you don't beat it long enough before adding other ingredients. The fix: always let cream cheese sit at room temperature for thirty to forty minutes before using. Beat it solo until it's completely smooth and fluffy before introducing pudding mix or milk. If you discover lumps after assembly, you can't easily fix them, but you can disguise them by describing your dessert as having texture variation.
If your layers slide apart when serving rather than holding together in distinct striations, the issue is usually insufficient chilling time or a pudding mixture that's too thin. Make sure you're measuring your milk accurately—too much liquid prevents proper setting. The cream cheese addition helps stabilize everything, so don't skip it or reduce the amount. Allow the full chilling time, and consider refrigerating your serving utensil too, which helps portions hold together better when scooping.
For a dirt cake casserole that tastes bland or one-note, the problem is usually insufficient chocolate flavor or missing the salt component that makes chocolate taste more complex. Use chocolate pudding rather than vanilla, consider using chocolate whipped topping if available, and don't hesitate to add a quarter teaspoon of salt to your pudding mixture. The salt won't make the dessert taste salty—it'll make the chocolate taste more intense and prevent that flat, overly sweet profile.
Taking It to the Next Level
Once you've mastered the basic dirt cake casserole technique, you can explore sophisticated variations that elevate this simple dessert. Try incorporating different cookie varieties—mint chocolate cookies create a refreshing twist, while peanut butter sandwich cookies add nutty richness. You can even use half chocolate and half vanilla pudding for a marble effect, swirling them together before layering. Professional bakers sometimes add a tablespoon of instant espresso powder to the pudding mixture, which intensifies the chocolate flavor without making the dessert taste like coffee.
For textural interest, consider folding mini chocolate chips, toffee bits, or crushed candy pieces into your cream mixture. These create pockets of surprise throughout the dessert. A thin layer of melted chocolate between the cookie crumbs and pudding adds richness and creates a more defined barrier between layers. Some advanced cooks brush this melted chocolate onto the bottom of the pan before adding any crumbs, creating a chocolate shell that makes serving neater.
Presentation techniques can transform this casual dessert into something suitable for sophisticated gatherings. Individual mason jars or clear cups show off the layers beautifully and eliminate serving challenges. For a truly impressive display, assemble the dirt cake casserole in a trifle bowl, creating visible striations around the sides. You can pipe the whipped topping layer using a pastry bag for a more polished look, or create decorative patterns in the top cookie layer. Fresh mint leaves, chocolate shavings, or a dusting of cocoa powder adds an elegant finishing touch that shows attention to detail.
Storing Your Results
This no-bake dirt cake casserole actually improves with proper storage, making it an ideal make-ahead dessert. Keep it covered tightly in the refrigerator, where it will maintain its best quality for three to four days. The cookie crumbs continue to soften slightly over time, which some people prefer—the texture becomes more unified and cake-like rather than distinctly layered. If you prefer crunchier crumbs, consume within the first day or two after assembly.
Use plastic wrap pressed directly against the surface if you've already served portions and have leftovers, or keep the entire casserole covered with its original wrapping. The airtight seal prevents the whipped topping from absorbing refrigerator odors and keeps the pudding layer from forming a skin. Glass or ceramic dishes work better than metal for extended storage, as metal can sometimes impart a slight metallic taste to dairy-based desserts over time.
Freezing this dessert is possible but comes with texture trade-offs. The whipped topping and pudding layers freeze reasonably well, but the cookie crumbs can become unpleasantly hard when frozen and slightly mealy when thawed. If you do freeze portions, wrap individual servings very well in plastic wrap and then aluminum foil, and consume within one month. Thaw overnight in the refrigerator rather than at room temperature for the best texture recovery. For gatherings, I recommend making this dirt cake casserole fresh rather than freezing, since assembly is so quick that there's little advantage to freezing ahead.
Common Questions
Can I make this dirt cake casserole without a mixer?
Absolutely—a sturdy whisk and some determined stirring work perfectly fine. The key is making sure your cream cheese is very soft before you begin, which makes manual mixing much easier. Let it sit at room temperature for at least an hour, then mash it thoroughly with a fork before whisking. Add your pudding mix and milk gradually while whisking constantly, and you'll achieve a smooth mixture. It takes a bit more effort than using a mixer, but the results are equally delicious.
How do I adjust this recipe for high altitude locations?
The beauty of a no-bake dirt cake casserole is that altitude barely affects it since there's no leavening or baking involved. The only consideration is that liquids evaporate faster at high altitudes, so your pudding mixture might thicken slightly more quickly. You may want to add an extra tablespoon or two of milk to keep the consistency creamy. The chilling time remains the same, and the assembly process doesn't change at all. This is one recipe where mountain dwellers have no disadvantages.
Can I double this recipe for a very large gathering?
You certainly can, though I recommend making two separate casseroles rather than one enormous one. Doubling in a single extra-large pan makes the layers so thick that the texture balance gets thrown off—you end up with too much pudding relative to cookie crumbs. Two standard 9x13 pans give you better proportions and make serving easier since you can place them at different ends of a buffet table. The assembly time doesn't increase much since you're already doing all the steps once.
What causes the pudding layer to separate or look curdled?
Separation typically happens when the cream cheese is too cold and forms tiny solid bits rather than incorporating smoothly, or when you add the milk too quickly and shock the mixture. Always bring cream cheese to room temperature and beat it until completely smooth before adding anything else. Add milk gradually while mixing, giving the pudding time to hydrate evenly. If you see any separation beginning, stop adding liquid and beat vigorously until the mixture comes back together. Adding a spoonful of whipped topping and folding gently can also help reunify a separated mixture.
Can I prepare components ahead and assemble later?
This works beautifully as a strategy for this dirt cake casserole. Crush your cookies up to two days ahead and store in an airtight container at room temperature. Prepare your pudding mixture the morning of your event and keep it refrigerated, covered directly with plastic wrap. Whipped topping keeps for days in the refrigerator in its original container. When you're ready to assemble—even just two to three hours before serving—everything comes together in minutes. This staged approach makes the recipe even more stress-free for busy cooks.
Why does my dessert look messy when I try to serve it?
Layered desserts naturally become less pristine-looking as you serve them, which is part of their rustic charm. For neater portions, use a large spoon or ice cream scoop rather than a spatula, and wipe the edge clean between servings. Chilling your serving utensil in the freezer for ten minutes before using helps portions hold together better. If neatness is a priority, assemble individual portions in cups or jars instead of one large casserole. Remember that this dirt cake casserole is meant to look like soil and earth—a little messiness actually enhances the theme rather than detracting from it.
No-Bake Chocolate Dirt Cake Casserole
A crowd-pleasing layered dessert featuring chocolate sandwich cookie crumbs, creamy chocolate pudding, and fluffy whipped topping. Perfect for gatherings and completely no-bake.
Prep Time
20 min
Cook Time
0 min
Total Time
4h 20m
Servings
12 servings
Ingredients
For 12 servings
- 2 packages (14.3 oz each) chocolate sandwich cookies, crushed into crumbs
- 8 oz cream cheese, softened to room temperature
- 2 packages (3.9 oz each) instant chocolate pudding mix
- 3 cups cold whole milk
- 12 oz whipped topping, thawed and divided
- 1/4 teaspoon salt
Instructions
- 1
Crush the cookies
Place chocolate sandwich cookies in a food processor and pulse until they form coarse crumbs with varied sizes, resembling soil. Alternatively, place cookies in a sealed plastic bag and crush with a rolling pin. You should have approximately 4 cups of crumbs. Set aside in a bowl.
- 2
Beat the cream cheese
In a large mixing bowl, beat the softened cream cheese with a hand mixer or stand mixer on medium speed for about 2 minutes until completely smooth and fluffy with no lumps remaining. Scrape down the sides of the bowl to ensure even mixing.
- 3
Prepare pudding mixture
Add the instant chocolate pudding mix, cold milk, and salt to the cream cheese. Beat on low speed initially to prevent splattering, then increase to medium speed. Mix for 2-3 minutes until the mixture is smooth and begins to thicken. The pudding will continue to set as it chills.
- 4
Fold in whipped topping
Gently fold half of the whipped topping (about 6 oz) into the pudding mixture using a rubber spatula. Use a folding motion rather than stirring to maintain airiness. The mixture should be light, fluffy, and mousse-like in texture.
- 5
Create first cookie layer
Sprinkle one-third of the cookie crumbs evenly across the bottom of a 9x13-inch casserole dish or baking pan. Do not press down or pack the crumbs—just let them settle naturally to maintain texture and prevent sogginess.
- 6
Add first pudding layer
Spread half of the pudding mixture evenly over the cookie crumbs, using an offset spatula or the back of a large spoon. Spread gently to avoid disturbing the cookie layer too much, making sure to reach into all corners of the dish. The layer should be smooth and even.
- 7
Repeat cookie and pudding layers
Sprinkle another third of the cookie crumbs over the pudding layer, distributing evenly. Spread the remaining pudding mixture over this second cookie layer, smoothing the top as evenly as possible. These middle layers create the beautiful striations when served.
- 8
Add whipped topping layer
Spread the remaining whipped topping in an even layer over the pudding, creating a smooth, white surface. Use gentle spreading motions to avoid mixing the layers beneath. This layer acts as a barrier and creates a nice contrast with the final cookie topping.
- 9
Create dirt topping
Sprinkle the remaining cookie crumbs evenly over the whipped topping layer to create the signature dirt appearance. You can distribute evenly or create small mounds and valleys for a more naturalistic garden soil effect. If desired, add gummy candy decorations at this point.
- 10
Chill the dessert
Cover the casserole with plastic wrap, tenting it slightly or using toothpicks at corners to prevent the wrap from touching the cookie crumb topping. Refrigerate for at least 4 hours, or preferably overnight. This chilling time allows the layers to set and flavors to meld perfectly.
- 11
Serve the dessert
Remove plastic wrap and use a large spoon or serving spatula to scoop portions, making sure to dig down through all layers so each serving includes cookie crumbs, pudding, and cream. Wipe the serving utensil between scoops for neater presentation. Store any leftovers covered in the refrigerator for up to 4 days.
Nutrition Facts
Per serving (estimated)
385 calories
Calories
52g
Carbs
5g
Protein
18g
Fat
2g
Fiber
445mg
Sodium
38g
Sugar


