Easter Dirt Cake Casserole Recipe - Easy & Fun Dessert
Make this delightful Easter Dirt Cake Casserole with layers of cookies, cream, and gummy treats. Perfect for family gatherings and spring celebrations!
cookwithlucia.com/recipes/easter-dirt-cake-casserole
There's something magical about a dessert that makes everyone smile before they even take their first bite. I remember the first time I saw a dirt cake casserole at a spring gathering—layers of dark cookie crumbs topped with colorful gummy decorations that looked like a miniature garden right there on the dessert table. The combination of creamy pudding, whipped topping, and crunchy chocolate cookies creates a texture experience that keeps both kids and adults coming back for seconds. What drew me to perfect this Easter Dirt Cake Casserole was the sheer joy it brings to any celebration, combined with how surprisingly simple it is to assemble.
This dessert has become my go-to for spring family gatherings because it checks every box: it's make-ahead friendly, serves a crowd without breaking the bank, and requires zero baking skills. The contrast between the silky vanilla pudding mixture and the crumbly chocolate cookies creates layers of flavor that taste far more sophisticated than the playful presentation suggests. When you dig your spoon through all those layers and get a bit of everything in one bite, you understand why this Easter Dirt Cake Casserole has remained a beloved tradition for generations.
By the time you finish reading this guide, you'll know exactly how to create picture-perfect layers, achieve the ideal cookie-to-cream ratio, and customize your Easter Dirt Cake Casserole to delight your own family. Let's dig in and discover why this whimsical dessert deserves a permanent spot in your recipe collection.
The Story Behind This Dish
Dirt cake emerged in American kitchens during the 1980s as home bakers discovered the creative potential of combining simple pantry ingredients in unexpected ways. The original concept was brilliantly straightforward: layer chocolate sandwich cookies with a rich cream cheese and pudding mixture to create something that looked like potting soil but tasted like heaven. What started as a novelty dessert quickly became a staple at gatherings across the country because it delivered maximum impact with minimal effort.
Home cooks embraced this dessert because it broke all the traditional rules—you assembled it in a casserole dish or even a flower pot, decorated it with gummy treats, and served it with a garden trowel. The Easter Dirt Cake Casserole variation took this concept and gave it a spring twist, incorporating pastel decorations and seasonal themes that made it perfect for spring celebrations. Over the years, families have adapted the basic formula to include different cookie bases, flavored puddings, and creative toppings that reflect their own tastes.
The homemade version surpasses any store-bought alternative because you control the quality of each layer and can adjust sweetness levels to your preference. When you make your own Easter Dirt Cake Casserole, you can use real cream cheese, premium cookies, and fresh whipped topping to create something far superior to pre-made desserts that often taste artificial and overly sweet.
What Makes This Recipe Special
Incredibly Easy Assembly sets this Easter Dirt Cake Casserole apart from fussy layered desserts that require precise timing and temperature control. You simply mix, layer, and chill—no oven required, no complicated techniques to master, and no stress about whether it will turn out right.
Budget-Friendly Ingredients mean you can serve a crowd without spending a fortune. The core components—chocolate sandwich cookies, cream cheese, pudding mix, and whipped topping—are affordable staples available at any grocery store, making this Easter Dirt Cake Casserole accessible for families cooking on any budget.
Make-Ahead Magic transforms your party prep from stressful to effortless. This dessert actually improves after sitting in the refrigerator overnight as the cookies soften slightly and all the flavors meld together, which means you can cross dessert off your to-do list a full day before your gathering.
Crowd-Pleasing Appeal ensures that this Easter Dirt Cake Casserole satisfies guests of all ages. Kids love the playful presentation and hunting for gummy treats, while adults appreciate the balanced sweetness and nostalgic flavors that remind them of simpler times.
Endlessly Customizable nature means you can adapt this base recipe to match any theme or dietary preference. Swap in different cookie flavors, add layers of fresh fruit, or incorporate mint extract for a refreshing twist—the possibilities are limited only by your imagination.
Visual Impact guarantees that your Easter Dirt Cake Casserole becomes the centerpiece of your dessert spread. The dark cookie layers contrasted with white cream and topped with colorful spring decorations create an Instagram-worthy presentation that makes everyone eager to dig in.
Breaking Down the Ingredients
Chocolate sandwich cookies form the foundation of your Easter Dirt Cake Casserole, providing both the "dirt" appearance and a crucial textural element. I use about two full packages because you need enough to create substantial layers that won't disappear once the cookies begin absorbing moisture from the cream mixture. The cookies should be crushed into fine crumbs for the dirt effect, though leaving a few slightly larger pieces adds welcome texture variation. Don't waste money on premium brands here—standard chocolate sandwich cookies work perfectly and actually have the ideal balance of chocolate flavor and structural integrity for this application.
Cream cheese brings richness and tangy depth that prevents the Easter Dirt Cake Casserole from becoming one-dimensionally sweet. The full-fat version is essential because reduced-fat cream cheese doesn't whip as smoothly and can result in a grainy texture. Make sure your cream cheese sits at room temperature for at least an hour before you begin—this ensures it blends seamlessly with the other ingredients without leaving lumps that ruin the silky consistency you're aiming for.
Instant vanilla pudding mix provides structure to the cream layer while contributing a classic flavor that complements rather than competes with the chocolate cookies. The instant variety is non-negotiable here because cook-and-serve pudding won't set properly when combined with the other ingredients. Some cooks use cheesecake-flavored pudding for extra richness, but I find vanilla creates a cleaner flavor profile that lets every component shine.
Whipped topping contributes airiness and a subtle sweetness that lightens the entire Easter Dirt Cake Casserole. While you can certainly whip your own cream, the stabilized nature of store-bought whipped topping helps the dessert maintain its structure during transport and extended refrigeration. I always buy an extra container because you'll use some in the cream mixture and reserve the rest for decorative topping.
Whole milk binds the pudding mix and helps achieve the perfect consistency in your cream layer. The fat content matters here—skim milk will result in a thinner mixture that doesn't hold up well between the cookie layers. Cold milk straight from the refrigerator ensures the pudding mix activates properly and begins setting immediately when you start mixing.
Powdered sugar sweetens the cream cheese base while dissolving completely into the mixture without adding graininess. Granulated sugar simply doesn't incorporate as smoothly and can leave your Easter Dirt Cake Casserole with an unpleasant gritty texture that distracts from the otherwise creamy experience.
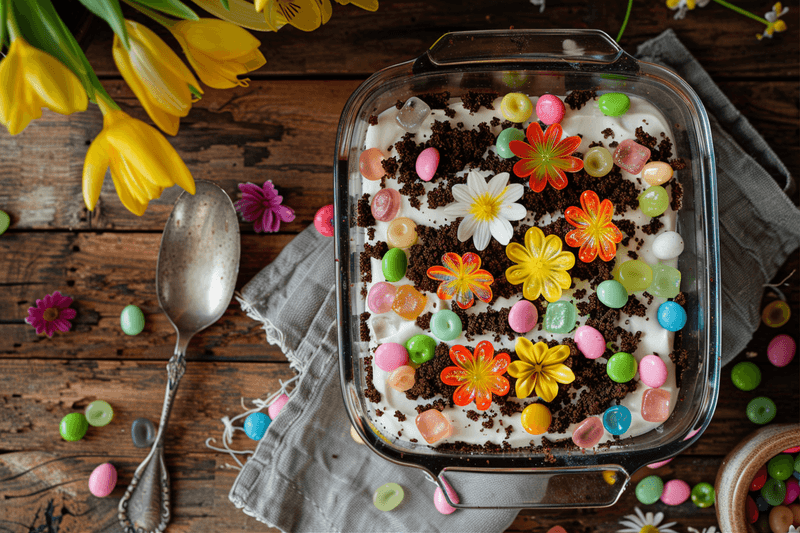
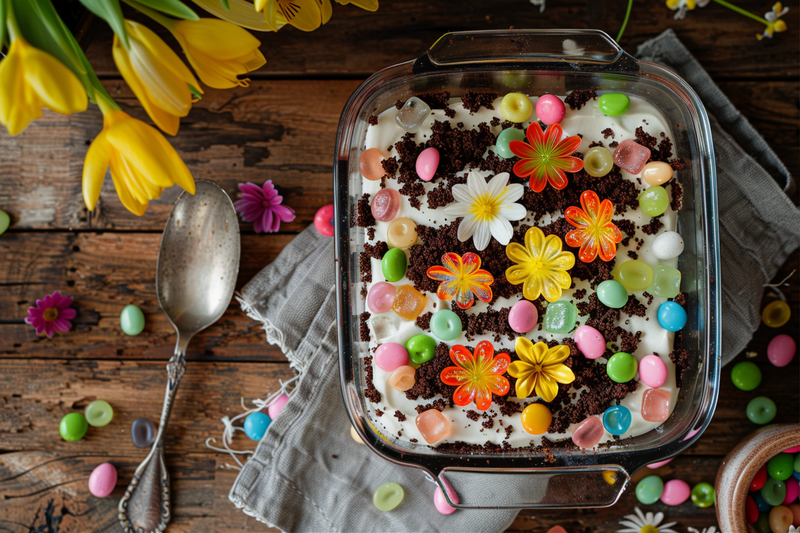
Gummy decorations transform this from a simple layered dessert into a themed centerpiece perfect for spring gatherings. I use flower-shaped gummies, pastel jelly beans, and chocolate eggs to create a garden scene on top, but you can customize these decorations based on what appeals to your family and fits your celebration.
The Cooking Process Explained
Begin by crushing your chocolate sandwich cookies into fine crumbs using a food processor or by placing them in a sealed plastic bag and rolling over them with a rolling pin. The food processor creates the most uniform crumbs, but the manual method works perfectly well if you don't mind a few minutes of therapeutic crushing. Reserve about one cup of crumbs for the final topping layer, then set the rest aside while you prepare the cream mixture. This step can be done up to two days in advance if you store the crumbs in an airtight container.
The cream layer comes together through a two-bowl method that ensures perfect texture. In your first bowl, beat the room-temperature cream cheese with powdered sugar until completely smooth and fluffy—this takes about two minutes with an electric mixer and removes any lumps that would mar the final texture. In the second bowl, whisk together the cold milk and instant pudding mix for exactly two minutes, watching as the mixture transforms from liquid to thick and creamy. Fold the pudding into the cream cheese mixture along with half of your whipped topping, creating a cloud-like filling that holds its shape beautifully between cookie layers.
Assembly follows a simple rhythm: cookies, cream, cookies, cream, finishing with cookies on top. Spread half of your cookie crumbs across the bottom of a 9x13 inch casserole dish, pressing them down gently to create an even base layer. Spoon the entire cream mixture over the cookies and spread it to the edges, creating a smooth surface that will showcase your decorations. The key here is achieving even layers—uneven distribution means some portions will be all cream while others are overwhelmingly cookie-heavy.
Top your Easter Dirt Cake Casserole with the remaining cookie crumbs, spreading them evenly across the cream layer to create that signature "dirt" appearance. At this point, you can add your decorative elements or wait until just before serving—I usually wait so the gummies don't bleed color into the cookies during refrigeration. Press candy flowers gently into the "dirt" to create a garden scene, scatter pastel eggs across the surface, or arrange decorations however your creativity guides you.
Refrigeration is the final crucial step that transforms separate components into a cohesive Easter Dirt Cake Casserole. Cover the dish tightly with plastic wrap and refrigerate for at least four hours, though overnight is ideal. During this time, the cookies absorb just enough moisture from the cream layer to become tender while maintaining some texture, and all the flavors meld into a harmonious whole that tastes better than the sum of its parts.
Mistakes to Avoid
Using warm cream cheese ranks as the most common mistake that sabotages an otherwise perfect Easter Dirt Cake Casserole. When cream cheese is too cold, it forms lumps that never fully incorporate no matter how long you beat the mixture. Set your cream cheese on the counter for a full hour before you plan to start, or soften it in the microwave using 10-second intervals at 50% power—just don't let it become hot or melted, which will make the mixture too thin.
Over-mixing the pudding mixture activates too much of the thickening agent and can result in a rubbery texture that feels unpleasant on the tongue. Whisk the milk and pudding mix together for exactly two minutes—set a timer if you need to—then stop immediately even if it doesn't look completely thick yet. The mixture will continue setting as it sits, and you'll fold it with other ingredients that provide additional body.
Skipping the chilling time produces a Easter Dirt Cake Casserole that hasn't had time to set properly or develop its full flavor potential. I know it's tempting to serve this dessert immediately after assembly, especially when you're working on a tight schedule, but the minimum four-hour refrigeration period is genuinely essential. If you're truly pressed for time, freeze the assembled casserole for 90 minutes rather than refrigerating for less than four hours.
Adding decorations too far in advance can cause color bleeding that turns your beautiful "dirt" layer into a muddy mess. Gummy candies and jellybeans often contain dyes that leach out when they sit on moist surfaces for extended periods. Add your decorative elements no more than two hours before serving to maintain that crisp visual contrast between dark cookies and bright candies.
Using cook-and-serve pudding instead of instant pudding will absolutely ruin the texture of your Easter Dirt Cake Casserole. Cook-and-serve pudding requires heat activation and won't set properly when mixed cold with cream cheese and whipped topping, leaving you with a runny mess instead of structured layers. Always double-check that you're buying instant pudding mix—the boxes look similar and it's easy to grab the wrong one.
How to Serve This
Pair your Easter Dirt Cake Casserole with fresh coffee or mint tea to balance the sweetness with something refreshing that cleanses the palate between bites. The slight bitterness of coffee complements the chocolate cookies beautifully, while mint tea echoes the spring theme and provides a light counterpoint to the rich cream layers. For younger guests, serve alongside cold milk which remains the classic pairing for anything cookie-based.
Present individual portions in small clear cups or mason jars when you want a more elegant presentation that still maintains the playful spirit of this dessert. Layer the cookie crumbs and cream mixture in each container, top with a sprinkle of crumbs and a single gummy flower, and you've transformed a casual casserole into a sophisticated plated dessert perfect for sit-down dinners.
Serve your Easter Dirt Cake Casserole alongside fresh fruit salad to add a bright, acidic element that cuts through the richness. Strawberries, blueberries, and melon work particularly well because their natural sweetness complements without competing, and the juicy texture provides welcome contrast to the creamy dessert. This combination turns your dessert course into a more balanced offering that doesn't feel overwhelmingly heavy.
Garnish each serving with a small dollop of extra whipped topping and a fresh mint leaf for an restaurant-quality finish that takes seconds to execute. The additional whipped topping reinforces the creamy element, while the mint adds a pop of color and a subtle aromatic note that enhances the overall sensory experience. Keep these garnishes simple—the Easter Dirt Cake Casserole itself is already visually striking and doesn't need elaborate decoration.
Make-Ahead and Storage Guide
Refrigerator storage keeps your Easter Dirt Cake Casserole fresh and delicious for up to four days when properly covered. Press plastic wrap directly against the surface before adding a layer of aluminum foil over the entire dish—this double protection prevents the dessert from absorbing refrigerator odors and keeps the top layer of cookie crumbs from drying out. The texture actually improves over the first 24 hours as the cookies continue softening to the ideal consistency, making this dessert perfect for advance preparation.
Freezing works surprisingly well for this dessert if you need to prepare it even further ahead. Assemble the Easter Dirt Cake Casserole completely but skip the decorative candy toppings, then wrap tightly in plastic wrap followed by aluminum foil and freeze for up to one month. Thaw the frozen casserole in the refrigerator for 24 hours before serving, then add your gummy decorations during the last hour of thawing. The texture remains remarkably close to freshly made, though the cream layer may be slightly softer after freezing.
Reheating isn't necessary or recommended for this Easter Dirt Cake Casserole since it's designed to be served cold. In fact, removing it from the refrigerator more than 15 minutes before serving can cause the cream layer to become too soft and the decorations to slide around. Keep the casserole refrigerated until the moment you're ready to serve, then return any leftovers to the refrigerator within two hours to maintain food safety.
Component preparation allows you to spread the work across multiple days if your schedule is particularly hectic. Crush the cookies up to three days ahead and store them in an airtight container at room temperature. Make the cream mixture up to 24 hours in advance and keep it refrigerated in a covered bowl. When you're ready to assemble, simply layer the components as directed—this approach gives you all the benefits of a make-ahead dessert while breaking the work into manageable tasks.
Reader Questions Answered
Can I make this Easter Dirt Cake Casserole in individual serving cups?
Absolutely—individual portions work beautifully and actually make serving easier at large gatherings. Use clear plastic cups or small mason jars to show off the layers, and plan on the recipe filling about 12-15 individual servings depending on cup size. The assembly process remains the same, just divide your cookie crumbs and cream mixture evenly among your containers and refrigerate as directed.
What can I substitute for the cream cheese to make this lighter?
Greek yogurt can replace up to half of the cream cheese while maintaining a creamy texture and adding protein and tang. Use full-fat Greek yogurt rather than low-fat versions, and expect a slightly softer set and more pronounced tangy flavor. Another option is to use Neufchâtel cheese, which has one-third less fat than regular cream cheese but whips up similarly and provides almost identical results in the finished Easter Dirt Cake Casserole.
My family doesn't enjoy vanilla pudding—what other flavors work well?
Cheesecake-flavored instant pudding creates an extra-rich version that intensifies the dessert's decadence, while chocolate pudding turns this into a double-chocolate experience that serious chocolate lovers will adore. Pistachio pudding offers an unexpected twist that pairs surprisingly well with chocolate cookies and gives the cream layer a pale green tint perfect for spring themes. Whatever flavor you choose, stick with instant pudding and use the same quantity specified in the recipe.
How far in advance can I add the gummy decorations?
Add candy decorations no more than two hours before serving to prevent color bleeding and maintain their texture. If you're making the Easter Dirt Cake Casserole a day ahead, assemble everything except the decorations, then add the gummies during those final hours before guests arrive. You can arrange the decorations on a separate plate ahead of time so you can simply transfer them to the chilled casserole quickly when the time comes.
Can I use homemade whipped cream instead of store-bought whipped topping?
Yes, but stabilize it first to ensure your Easter Dirt Cake Casserole maintains its structure during refrigeration. Whip heavy cream with powdered sugar and a small amount of gelatin or cornstarch to prevent it from weeping and deflating over time. Use the same volume of stabilized whipped cream as you would store-bought topping, and be aware that the flavor will be lighter and less sweet, which some people prefer while others find it lacks the nostalgic taste they expect from this dessert.
What's the best way to transport this dessert to a gathering?
Keep the Easter Dirt Cake Casserole in its original assembly dish, cover it tightly with plastic wrap, and place the entire dish in a large, flat-bottomed cooler with ice packs positioned around the sides rather than directly on top. This prevents the decorations from getting crushed and keeps everything cold during transport. If you're traveling more than 30 minutes, add the gummy decorations after you arrive rather than before you leave home to ensure they look fresh and vibrant when it's time to serve.
Easter Dirt Cake Casserole
A fun, no-bake layered dessert featuring chocolate sandwich cookies, creamy vanilla pudding mixture, and whipped topping, decorated with colorful gummy treats for spring gatherings.
Prep Time
20 min
Cook Time
0 min
Total Time
4h 20m
Servings
12 servings
Ingredients
For 12 servings
- 2 packages (28 ounces total) chocolate sandwich cookies, crushed into fine crumbs
- 8 ounces cream cheese, softened to room temperature
- 1/2 cup powdered sugar
- 2 packages (3.4 ounces each) instant vanilla pudding mix
- 3 cups whole milk, cold
- 12 ounces whipped topping, divided
- Gummy flower candies, for decoration
- Pastel jelly beans, for decoration
- Small chocolate eggs, for decoration
Instructions
- 1
Crush the cookies
Place the chocolate sandwich cookies in a food processor and pulse until they form fine crumbs, or place them in a sealed plastic bag and crush with a rolling pin. Reserve 1 cup of cookie crumbs for the top layer and set the remaining crumbs aside.
- 2
Prepare cream cheese mixture
In a large mixing bowl, beat the softened cream cheese and powdered sugar together with an electric mixer on medium speed for 2 minutes until completely smooth and fluffy. Make sure there are no lumps remaining, as they won't incorporate once you add the other ingredients.
- 3
Make pudding mixture
In a separate bowl, whisk together the cold milk and instant vanilla pudding mix for exactly 2 minutes until thick and creamy. The mixture will continue to thicken as it sits, so don't over-mix or it may become too stiff.
- 4
Combine mixtures
Gently fold the pudding mixture into the cream cheese mixture until well combined. Add 8 ounces of the whipped topping and fold until smooth and evenly incorporated, creating a light, fluffy cream layer.
- 5
Create first cookie layer
Spread half of the cookie crumbs (excluding the reserved cup) evenly across the bottom of a 9x13 inch casserole dish. Press down gently with your hands or the back of a spoon to create a compact, even base layer.
- 6
Add cream layer
Spoon the entire cream cheese and pudding mixture over the cookie crumb base. Spread it evenly to the edges of the dish using a spatula, smoothing the top to create a flat surface that will showcase your decorations nicely.
- 7
Add remaining cookie crumbs
Sprinkle the remaining cookie crumbs evenly over the cream layer, covering it completely to create the signature 'dirt' appearance. You can add the reserved 1 cup of crumbs now as well, or save it to freshen up the top just before serving.
- 8
Chill the casserole
Cover the casserole dish tightly with plastic wrap and refrigerate for at least 4 hours or overnight. This chilling time allows the cookies to soften slightly and all the flavors to meld together into a cohesive dessert.
- 9
Add decorations
Within 2 hours of serving, remove the plastic wrap and decorate the top with gummy flowers, pastel jelly beans, and chocolate eggs to create a festive spring garden scene. Press the decorations gently into the cookie crumbs so they stay in place.
- 10
Serve and enjoy
Keep the casserole refrigerated until ready to serve. Scoop portions with a large spoon, making sure to get all the layers in each serving. Top individual servings with a dollop of the remaining whipped topping if desired.
Nutrition Facts
Per serving (estimated)
425 calories
Calories
58g
Carbs
6g
Protein
20g
Fat
2g
Fiber
520mg
Sodium
42g
Sugar


