Easy Easter Dirt Cake Recipe – Fun Dessert in Minutes
This Easter Dirt Cake comes together in 20 minutes with pudding, cookies, and whipped cream. No baking required—perfect for spring gatherings!
cookwithlucia.com/recipes/easter-dirt-cake
We've all been there—guests arriving soon, a long list of dishes to prepare, and suddenly you realize you forgot dessert. Between preparing the main course and setting the table, who has time to bake an elaborate cake from scratch? That's exactly where this dirt cake swoops in to save your spring celebration.
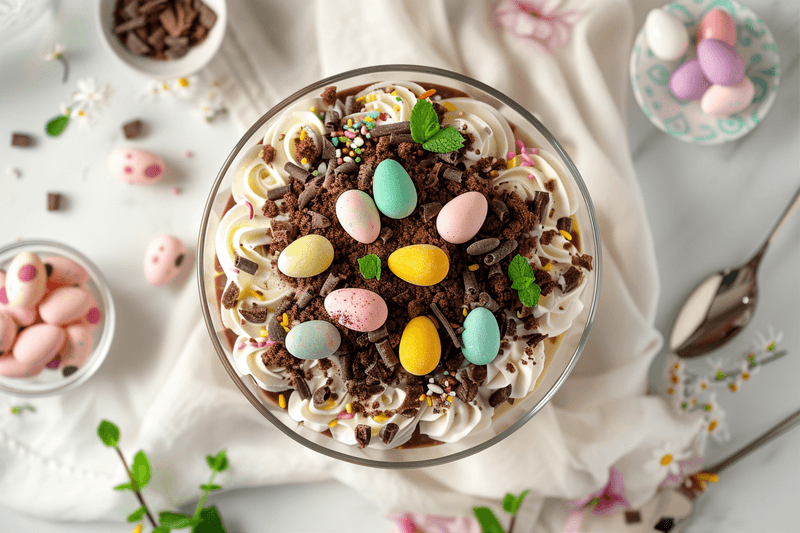
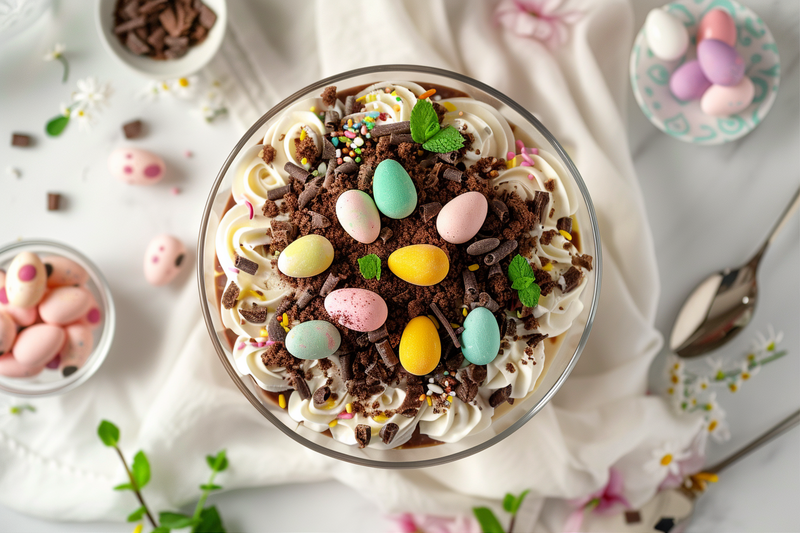
This dessert is a showstopper that looks impressive but requires zero baking skills and minimal hands-on time. Layers of rich chocolate pudding, fluffy whipped cream, and crushed chocolate cookies create a texture that's simultaneously creamy and crunchy. The magic happens when you decorate the top with colorful candy eggs and perhaps a few gummy decorations, transforming simple pantry ingredients into a festive centerpiece that'll have everyone asking for the recipe.
I'm promising you right now: from opening your first package to placing this beauty on your table, you'll spend less than twenty-five minutes of actual work. There's no oven preheating, no precise temperature monitoring, no worry about overbaking or underbaking. Just layer, chill, and serve. This is the kind of recipe that makes you look like a kitchen hero while giving you plenty of time to actually enjoy your gathering instead of being stuck behind the stove.
Why This Is Your New Weeknight Go-To
No Baking Required: The biggest advantage of dirt cake is that your oven stays off. On warm spring days when you're already juggling multiple dishes, this no-bake approach keeps your kitchen cool and your energy bills lower. You'll simply mix, layer, and refrigerate—that's the entire process.
Uses Everyday Ingredients: Walk into any grocery store and you'll find everything you need in the baking and dairy aisles. Instant pudding mix, sandwich cookies, whipped topping, and cream cheese are ingredients most of us already have on hand or can grab in a single shopping trip. Nothing exotic, nothing that requires hunting through specialty stores.
Kid-Approved Every Time: Children absolutely love the playful presentation of this dessert. The crushed cookies look like actual dirt, and when you add candy decorations on top, it becomes an interactive treat that gets them excited about dessert. It's sweet enough to satisfy young taste buds but not so sugary that parents need to worry.
Make-Ahead Magic: This dirt cake actually improves when made several hours ahead, making it perfect for stress-free entertaining. The cookies soften slightly as they absorb moisture from the pudding layers, creating a cake-like texture that's easier to scoop and more cohesive than when freshly assembled.
Minimal Cleanup: You'll use one mixing bowl, one electric mixer (or a whisk if you're feeling energetic), and your serving dish. No cake pans to scrub, no mixer attachments covered in sticky batter, no cooling racks taking up counter space. Mix everything in stages using the same bowl, and you're done.
Feeds a Crowd Easily: The recipe scales beautifully whether you're serving six people or twenty. Simply adjust your ingredient quantities and choose a larger serving vessel. A clear trifle bowl works beautifully for showcasing those gorgeous layers, while individual cups create perfect portion control for buffet-style gatherings.
Simple Ingredients, Big Flavor
The foundation of any great dirt cake starts with chocolate sandwich cookies. I typically reach for the classic cream-filled variety because they're universally loved and create that signature "dirt" appearance when crushed. You'll need about one full package, which you'll pulse in a food processor or crush in a sealed bag with a rolling pin. Don't pulverize them into dust—you want a mix of fine crumbs and slightly larger pieces for textural interest.
Instant chocolate pudding mix is your flavor powerhouse here. The instant variety is non-negotiable because it sets up quickly without cooking, which is essential for a no-bake dessert. I prefer chocolate for the traditional dirt cake look, but vanilla or even butterscotch works if you want to experiment. You'll typically need two packages for a standard 9x13 dish, prepared according to package directions with cold milk.
Cream cheese adds richness and a subtle tang that balances the sweetness of the other components. Make sure it's softened to room temperature before you begin—this usually takes about thirty minutes on the counter. Cold cream cheese will create lumps that are nearly impossible to smooth out, no matter how long you beat the mixture. The tanginess cuts through the sweetness and gives the dessert a more sophisticated flavor profile.
Whipped topping is the cloud-like component that lightens the entire dessert. You can use the frozen variety (thawed completely) or the refrigerated tub—both work equally well. If you're feeling ambitious, homemade whipped cream works beautifully too, though you'll want to stabilize it with a tablespoon of powdered sugar to prevent weeping. The whipped element creates airiness that keeps this dessert from feeling too heavy.
Powdered sugar sweetens the cream cheese mixture without adding graininess. Granulated sugar won't fully dissolve when you're working with room-temperature ingredients and no heat, leaving you with an unpleasant sandy texture. Just a half cup blends seamlessly into the cream cheese and creates the perfect level of sweetness.
Vanilla extract might seem like a small player, but it rounds out all the flavors and adds warmth to the overall taste. Use pure vanilla extract rather than imitation—the flavor difference is noticeable in a dessert this simple where each ingredient plays a starring role.
For decoration, candy eggs are the seasonal touch that makes this dessert spring-appropriate. Look for the small chocolate eggs wrapped in colorful foil, or the speckled malted milk variety. Jelly beans work wonderfully too, as do any candy decorations shaped like flowers or other springtime motifs. This is where you can get creative and personalize the dessert for your gathering.
Step-by-Step in Plain English
Stage One: Prep Your Cookies: Start by crushing your chocolate sandwich cookies into crumbs. If using a food processor, pulse them about ten times until you achieve a mix of fine crumbs and pea-sized pieces—this should take about twenty seconds total. If you're going the manual route, place cookies in a large zip-top bag, seal it completely (trust me on this), and roll over them firmly with a rolling pin or the bottom of a heavy pan. Set aside about one cup of crumbs for the top layer, and reserve the rest for your base and middle layers.
Stage Two: Whip Your Cream Cheese Mixture: In a large mixing bowl, beat the softened cream cheese with an electric mixer on medium speed until it's completely smooth and fluffy, about two minutes. You shouldn't see any lumps at all. Add the powdered sugar and vanilla extract, then beat for another minute until everything is fully incorporated and the mixture looks light and airy. Gently fold in your whipped topping using a rubber spatula, being careful not to deflate all that beautiful airiness you just created. The mixture should look like sweetened cream cheese clouds.
Stage Three: Prepare Your Pudding: In a separate bowl (or the same bowl if you've transferred your cream cheese mixture out), whisk together your instant pudding mix and cold milk according to package directions. This usually means whisking vigorously for about two minutes, then letting it stand for another two minutes to thicken. The pudding should be thick enough to coat the back of a spoon but still pourable. If it seems too thick, you can thin it with a tablespoon or two of additional cold milk.
Stage Four: Layer Your Masterpiece: Now comes the fun part—assembly. Sprinkle about half of your reserved cookie crumbs across the bottom of your serving dish, creating an even layer. Spread half of the cream cheese mixture over the crumbs, smoothing it gently to the edges. Top with half of the chocolate pudding, spreading it carefully so you don't disturb the cream cheese layer too much. Repeat these layers one more time—cookie crumbs, cream cheese mixture, pudding. Finish with your reserved cup of cookie crumbs on the very top, covering the pudding layer completely to create that dirt effect.
Stage Five: Chill and Decorate: Cover your assembled dirt cake with plastic wrap and refrigerate for at least two hours, though four hours or overnight is even better. This chilling time allows the layers to set properly and the cookies to soften into a more cake-like texture. Just before serving, add your candy egg decorations, pressing them gently into the top cookie layer. You can arrange them in a pattern, scatter them randomly, or even create a little scene with additional decorations. That's it—you're ready to serve!
Pro Shortcuts and Time-Savers
The absolute fastest approach to dirt cake is assembling it the night before your gathering. Not only does this spread out your kitchen tasks, but the extended chilling time actually improves the texture significantly. The cookie layers absorb moisture from the pudding and cream, transforming from crunchy crumbs into something more cohesive and cake-like. You'll also avoid that last-minute rush when you're trying to finish multiple dishes simultaneously.
Invest in a food processor if you don't already own one—it crushes cookies in seconds and saves your arms from the workout of manual crushing. A mini food processor works fine for smaller batches, but a full-sized model handles an entire package of cookies at once. The pulsing action gives you better control over the final texture than smashing cookies in a bag, where it's easy to end up with either dust or chunks with no in-between.
For gatherings where you need individual servings, assemble this dirt cake in clear plastic cups or small mason jars during a weekend prep session. You can make two or three dozen individual portions, cover them with plastic wrap, and stack them carefully in your refrigerator. Come party time, you'll just add the decorative candy topping and set them out. This approach also helps with portion control and eliminates the need for serving utensils and dessert plates.
Consider making a double batch of the cream cheese mixture and pudding if you're feeding more than eight people. It's easier to mix two batches' worth in one session than to clean your mixing bowl and start over. Just store the extra in covered containers in your refrigerator and assemble additional dirt cakes as needed throughout the week. The prepared components keep well for three to four days before assembly.
Use instant pudding mix exclusively—never the cook-and-serve variety. The instant type sets up without heat in just minutes, while cook-and-serve pudding requires stovetop preparation and cooling time that defeats the entire purpose of this quick dessert. Check your package carefully before purchasing to avoid this common mistake that can derail your timeline.
Ways to Switch It Up
Next time you're craving something lighter, try making a lemon version of this dirt cake that's perfect for warm weather gatherings. Swap the chocolate pudding for lemon instant pudding, use vanilla sandwich cookies instead of chocolate, and add a tablespoon of lemon zest to your cream cheese mixture. The bright citrus flavor feels refreshing and still looks festive when topped with yellow and white candy eggs. This variation is especially popular with guests who find traditional chocolate desserts too heavy.
For coffee lovers, transform this into a mocha dirt cake by dissolving two tablespoons of instant espresso powder into your milk before mixing the chocolate pudding. Replace the chocolate sandwich cookies with coffee-flavored cookies or even graham crackers for a different textural element. The coffee undertones add sophistication and depth that adults particularly appreciate at evening gatherings.
Create a peanut butter version that'll satisfy any nut butter enthusiast in your life. Mix half a cup of creamy peanut butter into your cream cheese layer, use peanut butter sandwich cookies for the crumbs, and consider chocolate-peanut butter instant pudding if you can find it. Top with mini peanut butter cups cut in half instead of candy eggs for a dessert that works year-round, not just for spring celebrations.
Vegetarians and those avoiding certain ingredients can easily adapt dirt cake by checking your cookie package carefully—some chocolate sandwich cookies contain different formulations, so read labels to ensure they meet your dietary requirements. The rest of the ingredients are typically suitable, but always verify pudding mix and whipped topping ingredients if you have specific dietary needs. You can also make homemade whipped cream from scratch using heavy cream and powdered sugar for complete control over every ingredient.
For a truly show-stopping presentation, layer your dirt cake in a large clean flowerpot lined with plastic wrap. Press fresh mint leaves around the edges to look like sprouting plants, and stand some mint stems upright in the center. Add candy eggs around the base and perhaps a few gummy decorations. This theatrical presentation never fails to get reactions at spring gatherings, and it reinforces the playful "dirt" theme of the dessert.
Storing Leftovers the Right Way
Dirt cake keeps beautifully in the refrigerator for up to four days when stored properly. Cover your serving dish tightly with plastic wrap, pressing it directly against the surface to prevent the top layer from drying out. Alternatively, transfer portions to an airtight container if your serving dish doesn't have a matching lid. The cookie layers will continue to soften as the dessert sits, eventually transforming into something that resembles an icebox cake—still delicious, just with a slightly different texture than when freshly made.
Freezing dirt cake is technically possible, though I only recommend it if absolutely necessary. The whipped topping can become slightly watery upon thawing, and the cream cheese layer may separate somewhat. If you must freeze it, wrap individual portions tightly in plastic wrap, then place them in a freezer-safe container or bag. Freeze for up to one month, and thaw overnight in the refrigerator rather than at room temperature. The texture won't be quite as perfect as fresh, but it's still perfectly edible.
When it comes to reheating—well, you don't. This is a chilled dessert that should always be served cold, straight from the refrigerator. In fact, letting it sit at room temperature for more than thirty minutes can cause the layers to become too soft and lose their structure. If you're serving it at an outdoor gathering on a warm day, consider setting your serving dish in a larger bowl filled with ice to keep everything properly chilled.
Leftover dirt cake makes an excellent breakfast treat the next morning—don't judge until you've tried it. The sweetness feels appropriate for a morning meal, and the cream cheese component has protein that makes it more substantial than you'd expect. I've been known to enjoy a small bowl with my coffee the morning after a gathering, savoring the quiet moment before the day's activities begin.
For repurposing leftovers creatively, crumble any remaining dirt cake and layer it in glasses with fresh whipped cream and sliced strawberries for an impromptu trifle. The chocolate cookie and pudding flavors pair beautifully with fresh berries, and this transformation feels like an entirely new dessert rather than obvious leftovers. You can also press crumbled dirt cake into the bottom of a springform pan, top with softened ice cream, and refreeze for an easy ice cream cake that'll surprise your family on a regular weeknight.
Quick Answers to Common Questions
Can I make dirt cake three days ahead?
Absolutely, and in fact this dessert is one of the rare cases where advance preparation actually improves the final result. The extended refrigeration time allows the cookie crumbs to fully soften and meld with the creamy layers, creating a more cohesive texture that's easier to serve. Just wait to add your candy decorations until a few hours before serving so they don't bleed color into the cookie crumbs or become sticky from condensation.
What if I don't have an electric mixer?
You can definitely make dirt cake without electric equipment, though your arm will get a workout. Use a sturdy whisk and plenty of elbow grease to beat the cream cheese until it's smooth and lump-free—this might take five to seven minutes of vigorous whisking. Make absolutely certain your cream cheese is fully softened to room temperature, as cold cream cheese is nearly impossible to smooth by hand. The pudding layer is easy to whisk manually since instant pudding is designed to thicken with simple stirring.
Can I double this recipe for a crowd?
Doubling works perfectly for dirt cake, and I do it regularly when serving more than ten people. Use a large roasting pan, a deep trifle bowl, or two separate 9x13 dishes for your layers. Keep in mind that if you're creating significantly deeper layers in a single large dish, you'll need to extend the chilling time to at least four hours to ensure the center sets properly. The ingredient ratios scale up seamlessly without any adjustments needed beyond simple multiplication.
How do I make this less sweet?
Reduce the powdered sugar in the cream cheese layer to a quarter cup instead of a half cup, and choose a dark chocolate pudding mix if you can find it—the deeper cocoa flavor has less perceived sweetness. You can also use slightly bitter chocolate cookies instead of the standard sweet sandwich cookies, or substitute graham crackers for half of the cookie crumbs. Another approach is adding a tablespoon of unsweetened cocoa powder to the cream cheese mixture for more chocolate intensity without additional sugar.
What's the best dish for serving dirt cake?
A clear glass trifle bowl shows off those gorgeous layers and makes the dessert part of your table's visual appeal. If you don't have a trifle bowl, a 9x13 glass baking dish works perfectly and makes serving straightforward with a large spoon. For more casual gatherings, I love using a clean terracotta pot lined with plastic wrap—it reinforces the dirt theme and always gets laughs. Individual mason jars or clear plastic cups are ideal when you need portable portions or want to control serving sizes for a larger crowd.
Can I use a different type of cookie?
Definitely experiment with cookie varieties to create completely different flavor profiles. Vanilla sandwich cookies make a lighter-colored "dirt" that works well with vanilla or lemon pudding. Graham crackers create a slightly less sweet base with a hint of honey flavor. Chocolate chip cookies add texture with their chips, while gingersnaps bring warm spice notes that pair surprisingly well with vanilla pudding. Just avoid anything too hard like biscotti, which won't soften properly during the chilling time, or anything too delicate like wafer cookies, which dissolve too completely and lose their textural contribution.
Easter Dirt Cake
A no-bake layered dessert with chocolate pudding, cream cheese, whipped topping, and crushed chocolate cookies, decorated with colorful candy eggs for spring gatherings.
Prep Time
20 min
Cook Time
0 min
Total Time
2h 20m
Servings
12 servings
Ingredients
For 12 servings
- 1 package (14.3 oz) chocolate sandwich cookies, crushed
- 8 oz cream cheese, softened to room temperature
- 1/2 cup powdered sugar
- 1 teaspoon pure vanilla extract
- 12 oz whipped topping, thawed if frozen
- 2 packages (3.9 oz each) instant chocolate pudding mix
- 3 cups cold whole milk
- 1 cup colorful candy eggs or jelly beans for decoration
Instructions
- 1
Crush the cookies
Place chocolate sandwich cookies in a food processor and pulse 10 times until you have a mixture of fine crumbs and pea-sized pieces, about 20 seconds total. Alternatively, place cookies in a large zip-top bag, seal completely, and crush with a rolling pin. Set aside 1 cup of crumbs for the top layer.
- 2
Prepare cream cheese mixture
In a large mixing bowl, beat the softened cream cheese with an electric mixer on medium speed until completely smooth and fluffy, about 2 minutes. Add powdered sugar and vanilla extract, then beat for another minute until fully incorporated and light.
- 3
Fold in whipped topping
Gently fold the whipped topping into the cream cheese mixture using a rubber spatula, being careful not to deflate the mixture. Continue folding until no white streaks remain and the mixture is uniform and fluffy.
- 4
Make the pudding
In a separate bowl, whisk together instant chocolate pudding mix and cold milk vigorously for 2 minutes. Let stand for 2 minutes to thicken until the pudding coats the back of a spoon but remains pourable.
- 5
Create first layers
Sprinkle half of the crushed cookie crumbs across the bottom of a 9x13 inch serving dish. Spread half of the cream cheese mixture over the crumbs, smoothing gently to the edges. Top with half of the chocolate pudding, spreading carefully to avoid disturbing the cream cheese layer.
- 6
Add remaining layers
Repeat the layering process with remaining ingredients: sprinkle the rest of the cookie crumbs (except the reserved cup), spread the remaining cream cheese mixture, then top with remaining pudding.
- 7
Top with cookie dirt
Sprinkle the reserved 1 cup of cookie crumbs evenly over the top pudding layer, covering it completely to create the signature dirt appearance. Use the back of a spoon to spread crumbs into any gaps.
- 8
Chill the dessert
Cover the dish tightly with plastic wrap and refrigerate for at least 2 hours, though 4 hours or overnight is ideal. This chilling time allows the layers to set and the cookies to soften into a cake-like texture.
- 9
Decorate and serve
Just before serving, arrange candy eggs or jelly beans on top of the dirt cake, pressing them gently into the cookie crumbs. Serve chilled directly from the refrigerator, scooping through all layers to get the full effect.
Nutrition Facts
Per serving (estimated)
385 calories
Calories
52g
Carbs
6g
Protein
18g
Fat
2g
Fiber
425mg
Sodium
38g
Sugar


