
Easy Coconut Balls Recipe – Fluffy Coconut Treats
Learn how to make fluffy coconut balls with just a few ingredients. These sweet coconut treats are perfect for family gatherings and weekend celebrations.
cookwithlucia.com/recipes/easter-bunny-coconut-tails-easy-coconut-balls-and-bunny-tail-treats-emmas-cake-studio
There's something magical about treats that look impressive but are surprisingly simple to make. These fluffy coconut balls deliver exactly that — sweet, snowy spheres of coconut heaven that melt on your tongue and bring smiles to everyone who tries them. They're the kind of dessert that makes people ask for your secret, when really, the secret is just good ingredients and a little bit of patience.
I love making these coconut treats because they require minimal equipment, no baking, and come together in about thirty minutes from start to finish. The texture is what makes them special — light and almost cloud-like on the inside, with a delicate sweetness that never feels overwhelming. Rolling them in extra coconut gives each ball a beautiful snowy appearance that looks stunning on any dessert table.
Whether you're planning a family gathering, looking for a weekend project to do with kids, or simply craving something sweet and satisfying, these coconut balls are your answer. They store beautifully in the refrigerator, making them perfect for preparing ahead. And the best part? Every single person who tastes them will think you spent hours in the kitchen, when you'll know it took less time than watching your favorite show.
The Magic of Coconut in Sweet Treats
Coconut has been treasured in desserts across cultures for centuries, and for good reason. The natural sweetness and unique texture of coconut creates a foundation for treats that feel indulgent without being heavy. When you work with shredded coconut, you're harnessing both flavor and structure — those fine strands bind together beautifully when combined with the right ingredients.
What makes coconut balls so universally beloved is their versatility. They can be adapted to suit different flavor profiles, dressed up with coatings, or kept beautifully simple. The sweetened condensed milk acts as both sweetener and binder, creating a base that holds together perfectly while keeping everything moist and tender.
The science behind these treats is actually quite simple. As the mixture chills, the fats in the coconut and condensed milk firm up just enough to make the balls hold their shape, while still maintaining that soft, almost fudgy interior. It's this balance between structure and tenderness that makes each bite so satisfying.
What Makes These Coconut Treats Special
Let's talk about what goes into making these coconut balls so irresistible. Sweetened shredded coconut forms the heart of this recipe — I prefer the finely shredded variety because it creates a smoother texture and binds together more cohesively. You'll need both for mixing into the base and for rolling the finished balls, giving them that beautiful snowy coating.
Sweetened condensed milk is the magic ingredient that brings everything together. This thick, sweet milk product acts as both the binding agent and the primary sweetener. It coats every strand of coconut, creating a mixture that's easy to shape and holds together beautifully. The natural sugars in condensed milk also contribute to the creamy mouthfeel.
A small amount of vanilla extract elevates the entire flavor profile. While coconut is wonderful on its own, vanilla adds depth and warmth that makes these treats taste more complex and refined. I always use pure vanilla extract rather than imitation — the difference is noticeable in delicate recipes like this.
A pinch of salt might seem unnecessary in a sweet treat, but it's essential. Salt enhances all the other flavors, preventing the coconut balls from tasting one-dimensional or overly sweet. It's a tiny addition that makes a significant impact on the final result.
Some recipes call for cream cheese or butter to add richness, and you can certainly experiment with these additions. They create a slightly different texture — more fudge-like and dense. For the lightest, fluffiest coconut balls, I stick with the streamlined ingredient list, but feel free to customize based on your preferences.
Creating the Perfect Coconut Ball Mixture
The process of making these coconut treats is wonderfully straightforward, but there are a few techniques that ensure success every time. Start by combining your sweetened shredded coconut with the condensed milk in a large mixing bowl. I recommend using a bowl that's bigger than you think you need — this gives you plenty of room to mix thoroughly without ingredients flying everywhere.
Use a sturdy spatula or wooden spoon to fold the coconut and condensed milk together. You want every strand of coconut to be evenly coated with the sticky condensed milk. This takes a bit of muscle — the mixture will be thick and somewhat resistant at first. Keep folding and pressing until you achieve a uniform consistency where no dry coconut remains visible.
Once you've added your vanilla extract and salt, mix again to distribute these ingredients evenly throughout. The mixture should be cohesive enough to hold together when you press a small amount between your fingers. If it feels too dry and crumbly, you can add a tablespoon more of condensed milk. If it's too wet and sticky to handle, fold in a bit more shredded coconut.
At this point, I recommend chilling the mixture for about fifteen to twenty minutes. This step isn't absolutely mandatory, but it makes the rolling process so much easier. The chilled mixture firms up just enough to shape into balls without sticking to your hands excessively. Cover the bowl with plastic wrap and pop it in the refrigerator while you prepare your coating station.
Set up a small bowl with additional shredded coconut for rolling. You'll also want a plate or tray lined with parchment paper where you can place the finished coconut balls. Having everything ready before you start rolling makes the process smooth and enjoyable rather than messy and frustrating.
Rolling and Shaping Techniques
Now comes the fun part — transforming your coconut mixture into perfect little spheres. I find it helpful to portion out the mixture first before rolling. Use a small cookie scoop or tablespoon to measure out equal amounts. This ensures all your coconut balls are uniform in size, which not only looks more professional but also means they'll store and serve more consistently.
For rolling, lightly dampen your hands with cool water. This prevents the mixture from sticking to your palms while you work. Take one portion and roll it between your palms using a gentle, circular motion. Don't squeeze too hard — you want to compress the mixture just enough to form a cohesive ball, not pack it so tightly that it becomes dense.
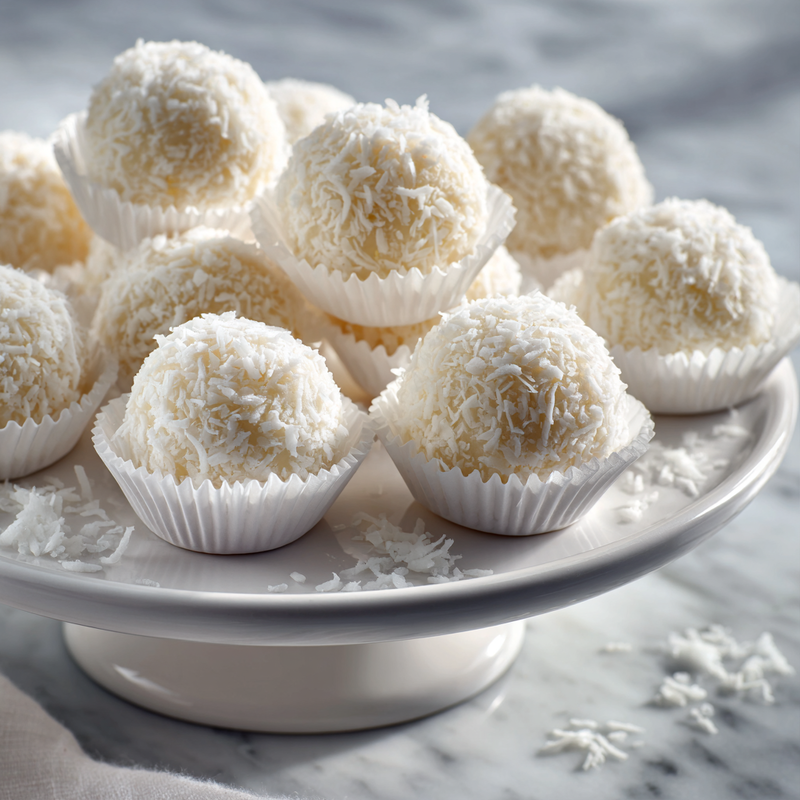
As you form each ball, immediately roll it in the additional shredded coconut. Press gently so the coconut adheres to the surface, then continue rolling to ensure even coverage. The exterior coating serves both an aesthetic and textural purpose — it looks beautiful and provides a slightly different mouthfeel than the creamy interior.
Place each finished coconut ball on your prepared tray, spacing them slightly apart. They won't spread or change shape, but giving them a bit of room makes them easier to pick up later. If at any point your hands become too sticky, simply rinse them with cool water, pat dry, and continue. Some people like to wear food-safe gloves for this process, which also works beautifully.
The size of your coconut balls is entirely up to you. I prefer making them about one inch in diameter — substantial enough to be satisfying but small enough that they feel like an elegant treat rather than a heavy dessert. This size also makes them perfect for serving at gatherings where guests might be trying multiple desserts.
Secrets for Fluffy, Perfect Results
The key to achieving that signature fluffy texture lies in how you handle the mixture. Overmixing or compressing too firmly will result in dense, heavy balls rather than light, tender ones. Think of it like making meatballs — a gentle touch yields better results than aggressive handling.
Temperature control matters more than you might expect. Working with a chilled mixture gives you much more control over shaping, and storing the finished coconut balls in the refrigerator helps them maintain their structure. I've found that coconut treats keep their best texture when stored between 35 and 40 degrees Fahrenheit.
The quality of your coconut makes a noticeable difference. Fresh, moist shredded coconut creates superior results compared to coconut that's been sitting in your pantry for months. If your coconut seems dry, you can revive it slightly by mixing in a tablespoon of coconut milk before adding the condensed milk.
Consider the moisture content of your condensed milk as well. Different brands can vary slightly in thickness and sweetness. If you notice your mixture is too wet after combining everything, don't panic — simply fold in more shredded coconut a tablespoon at a time until you reach the right consistency.
For the most beautiful presentation, pay attention to your rolling technique. Consistent, smooth motions create perfectly round spheres, while rushed or uneven rolling results in lumpy, irregular shapes. Taking an extra few seconds with each ball makes a visible difference in the final presentation.
Finally, resist the urge to make these coconut balls too sweet. The condensed milk already provides substantial sweetness, and the coconut itself contains natural sugars. Some recipes call for additional powdered sugar, but I find this often pushes them into overly sweet territory. Trust the natural sweetness of your ingredients.
Flavor Variations and Creative Twists
While the classic coconut ball is perfection in its simplicity, there's plenty of room for creativity once you've mastered the basic technique. Adding a tablespoon of cocoa powder to the mixture creates chocolate coconut balls that taste like your favorite coconut candy bar. The cocoa adds depth and richness that pairs beautifully with the sweet coconut.
For a citrus twist, incorporate the zest of one lemon or lime into your mixture. The bright, acidic notes cut through the sweetness and create a more complex flavor profile. This variation is particularly refreshing and feels lighter on the palate.
You can also experiment with different coatings beyond plain shredded coconut. Try rolling some balls in finely chopped nuts like pistachios or almonds for added crunch and visual interest. Toasted coconut creates a deeper, more caramelized flavor that's absolutely delicious.
A small amount of rose water or orange blossom water adds an elegant, aromatic quality that transforms these simple treats into something more sophisticated. Use these floral waters sparingly — just half a teaspoon is enough to perfume the entire batch without overwhelming the coconut flavor.
For special occasions, you might press a whole almond or cashew into the center of each ball before rolling in coconut. This creates a delightful surprise in the middle and adds textural contrast. Just make sure your nuts are fresh and preferably lightly toasted for the best flavor.
Serving and Presentation Ideas
These coconut balls are naturally beautiful, but thoughtful presentation elevates them even further. Arrange them on a white or light-colored platter where their snowy appearance can really shine. I like to place them in paper candy cups — this makes them easy to serve and adds a professional bakery touch.
For gatherings, consider creating a tiered display using cake stands at different heights. This creates visual interest and makes it easy for guests to help themselves. The contrast of the white coconut against darker serving pieces is particularly striking.
These coconut treats pair wonderfully with tea or coffee. The sweetness complements the slight bitterness of these beverages perfectly. I often serve them as part of a dessert spread alongside fresh fruit and other small sweets, allowing guests to sample a variety of flavors.
You can also package these coconut balls as gifts. Place them in small boxes lined with tissue paper, or arrange them in clear cellophane bags tied with ribbon. They travel well and maintain their texture for several days when properly stored, making them ideal for sharing.
For a truly elegant presentation, dust the platter lightly with edible pearl dust or arrange a few fresh mint leaves around the coconut balls. These small touches show attention to detail and make even simple homemade treats feel special.
Storage and Make-Ahead Tips
One of the best things about these coconut balls is how well they store. Keep them in an airtight container in the refrigerator, where they'll maintain their texture and flavor for up to two weeks. Layer them between sheets of parchment paper to prevent sticking if you're stacking them.
You can also freeze these treats for longer storage. Arrange them in a single layer on a baking sheet and freeze until solid, then transfer to a freezer-safe container or bag. They'll keep for up to three months frozen. Thaw in the refrigerator overnight before serving — this gradual thawing prevents condensation from making them soggy.
If you're making these coconut balls ahead for a gathering, I recommend preparing them one to two days in advance. This gives the flavors time to meld and develop, often resulting in even better-tasting treats. Plus, having them ready means one less thing to worry about on the day of your event.
The mixture itself can also be made ahead and stored in the refrigerator for up to three days before rolling. In fact, some people prefer working with mixture that's been chilled overnight, as it firms up even more and becomes easier to handle.
When you're ready to serve coconut balls that have been refrigerated, let them sit at room temperature for about ten minutes. This slight warming brings out the flavors more fully and creates a more pleasant texture. They should still be cool but not cold from the refrigerator.
Perfect Pairings and Complete Dessert Spreads
These coconut balls work beautifully as part of a larger dessert offering. They pair wonderfully with fresh berries — the tartness of raspberries or strawberries provides a perfect counterpoint to the sweet coconut. Arrange them together on a platter for a beautiful color contrast.
Consider serving them alongside other no-bake treats like date balls or chocolate truffles. This creates variety in your dessert spread while keeping preparation simple. The different textures and flavors give guests options without requiring you to spend all day in the kitchen.
For beverage pairings, these coconut treats are delightful with mint tea or chamomile. The herbal notes complement the sweetness without competing with the coconut flavor. A strong cup of coffee also works beautifully, as the bitterness balances the treats' sweetness.
You might also serve them with a small bowl of fresh tropical fruit like mango or pineapple chunks. This creates a theme around tropical flavors and makes the entire presentation feel cohesive and thoughtful.
Answers to Your Questions
Can I use unsweetened coconut instead of sweetened?
Yes, you can substitute unsweetened shredded coconut, but you'll need to add additional sweetener to compensate. I recommend adding about half a cup of powdered sugar to the mixture and tasting as you go. The texture will be slightly different since sweetened coconut tends to be moister, so you may need to adjust the amount of condensed milk as well.
Why are my coconut balls falling apart?
This usually happens when there isn't enough binding agent or the mixture is too dry. Make sure you're thoroughly coating all the coconut with condensed milk and that you're using enough condensed milk for the amount of coconut. Pressing the balls firmly (but not too firmly) as you roll them also helps them stay together. Chilling the mixture before rolling makes a big difference too.
Can I make these without condensed milk?
Condensed milk is really the magic ingredient that makes these work, but you can create a substitute by combining regular milk with sugar and reducing it down until thick. Alternatively, you could use a combination of honey or maple syrup with a bit of cream cheese to bind everything together, though the texture and flavor will be different from the traditional version.
How do I prevent the coconut coating from falling off?
Make sure the surface of each ball is slightly sticky when you roll it in the coating coconut. If your balls have been refrigerated and the surface has dried out, you can lightly brush them with a tiny bit of water or condensed milk before rolling in fresh coconut. Pressing gently as you roll helps the coating adhere better too.
Can I add other mix-ins to these coconut balls?
Absolutely! Mini chocolate chips, chopped dried fruit, or finely chopped nuts all work wonderfully mixed into the base. Just remember that adding too many mix-ins can affect the structural integrity of the balls, so limit additions to about a quarter cup total for a standard batch.
Do these need to be refrigerated or can they sit at room temperature?
While they can sit at room temperature for a few hours without issues, I recommend refrigerating them for best texture and food safety, especially if your kitchen is warm. The condensed milk is shelf-stable but once mixed with other ingredients, refrigeration is safest. They taste best when served slightly chilled anyway.
Why These Coconut Balls Deserve a Place in Your Recipe Collection
In a world of complicated desserts that require special equipment and advanced techniques, these coconut balls are a refreshing reminder that simple can be spectacular. They prove that you don't need hours of work or a culinary degree to create something that tastes amazing and looks impressive.
What I love most about this recipe is its reliability. Unlike temperamental cakes or finicky pastries, these coconut treats deliver consistent results every single time. They're the recipe you can count on when you need something sweet in a hurry or when you want to involve kids in the kitchen.
The minimal cleanup is another huge advantage. One bowl, a spoon, and a tray — that's essentially all you need. No mixers to wash, no multiple pans, no complicated cleanup. For busy cooks, this efficiency is invaluable.
These coconut balls also have a way of bringing people together. There's something about their homemade charm that invites sharing and conversation. They're approachable and unpretentious, yet universally loved across age groups and taste preferences.
Whether you make them for a family gathering, a weekend treat, or just because you're craving something sweet and coconutty, these little spheres of joy deliver every time. They're proof that the best recipes are often the simplest ones, and that a few quality ingredients combined with a little care can create something truly special. Keep this recipe in your collection, and you'll find yourself turning to it again and again.
Easy Coconut Balls
Fluffy, sweet coconut balls made with shredded coconut and sweetened condensed milk. These no-bake treats are perfect for family gatherings and special occasions.
Prep Time
20 min
Cook Time
0 min
Total Time
20 min
Servings
24 balls
Ingredients
For 24 balls
- 3 cups sweetened shredded coconut, divided
- 1 can (14 ounces) sweetened condensed milk
- 1 teaspoon pure vanilla extract
- 1/8 teaspoon salt
- 1 cup additional sweetened shredded coconut for rolling
Instructions
- 1
Prepare mixing bowl
In a large mixing bowl, combine 3 cups of sweetened shredded coconut with the entire can of sweetened condensed milk. Use a bowl larger than you think you need to give yourself plenty of room for mixing without making a mess.
- 2
Mix ingredients thoroughly
Using a sturdy spatula or wooden spoon, fold the coconut and condensed milk together until every strand of coconut is evenly coated. This will take a few minutes of folding and pressing, as the mixture is quite thick. Continue mixing until no dry coconut remains visible.
- 3
Add flavorings
Add the vanilla extract and salt to the coconut mixture. Fold everything together again until the vanilla and salt are evenly distributed throughout. The mixture should be cohesive and hold together when pressed.
- 4
Chill the mixture
Cover the bowl with plastic wrap and refrigerate for 15 to 20 minutes. This chilling step makes the mixture easier to handle and shape. While it chills, prepare your rolling station with a bowl of shredded coconut and a parchment-lined tray.
- 5
Portion the mixture
Remove the chilled mixture from the refrigerator. Using a small cookie scoop or tablespoon, portion out equal amounts of the mixture. This ensures all your coconut balls will be uniform in size and appearance.
- 6
Shape into balls
Lightly dampen your hands with cool water to prevent sticking. Take one portion and roll it between your palms using gentle, circular motions. Apply just enough pressure to form a cohesive ball without compressing it too tightly, which would make it dense rather than fluffy.
- 7
Coat with coconut
Immediately after forming each ball, roll it in the additional shredded coconut. Press gently so the coconut adheres to the surface, then continue rolling to ensure even coverage all around. The exterior coating should be generous and complete.
- 8
Arrange and chill
Place each finished coconut ball on the parchment-lined tray, spacing them slightly apart. Once all balls are formed and coated, refrigerate the tray for at least 30 minutes to allow them to firm up completely before serving.
- 9
Store properly
Transfer the chilled coconut balls to an airtight container, layering them between sheets of parchment paper if stacking. Store in the refrigerator for up to two weeks, or freeze for up to three months. Let them sit at room temperature for 10 minutes before serving for the best flavor and texture.
Nutrition Facts
Per serving (estimated)
120 calories
Calories
15g
Carbs
1g
Protein
7g
Fat
1g
Fiber
35mg
Sodium
13g
Sugar


