Crispy Lemon Herb Chicken Tenders Recipe | Cook With Lucia
Learn how to make perfectly crispy lemon herb chicken tenders with this detailed guide. Golden, juicy, and bursting with fresh flavor every time.
cookwithlucia.com/recipes/crispy-lemon-herb-chicken-tenders
There's something universally beloved about a perfectly executed chicken tender—that golden, crackling exterior giving way to succulent, juicy meat inside. When you elevate this comfort food classic with bright lemon zest and aromatic herbs, you transform a simple weeknight staple into something truly special. These crispy lemon herb chicken tenders represent the perfect marriage of technique and flavor, where careful preparation meets bold seasoning to create a dish that appeals to both children and adults alike.
I'll be honest with you: achieving that restaurant-quality crunch at home requires understanding a few key principles. But once you master the three-stage breading process and learn the ideal frying temperature, you'll never settle for store-bought tenders again. The lemon adds a sophisticated brightness that cuts through the richness of the fried coating, while fresh herbs bring an aromatic complexity that makes each bite interesting.
This recipe does require some active time in the kitchen—there's no getting around the hands-on nature of proper breading and frying. But the reward is substantial: tenders that stay crispy even as they cool, with meat so tender it practically melts, all wrapped in a coating bursting with citrus and herb notes. Whether you're preparing these for a family gathering or a casual weekend dinner, mastering this technique will give you a foolproof method for creating crowd-pleasing chicken every single time.

The Origins and History
Chicken tenders, as we know them today, emerged from the American South's rich tradition of fried chicken, though the specific cut—the tenderloin muscle that runs along the breastbone—has always been prized for its exceptional tenderness. Commercial chicken tender production exploded in the 1980s and 1990s as fast-food chains recognized the appeal of this naturally tender, boneless cut that could be eaten with hands and appealed to younger diners. What started as a children's menu staple has evolved into a gourmet offering at restaurants worldwide.
The addition of lemon and herbs to fried chicken has deeper Mediterranean and Middle Eastern roots, where citrus has long been paired with poultry to add brightness and aid digestion. Greek cooks have been coating chicken with lemon and oregano for centuries, while Lebanese cuisine celebrates the combination of chicken with lemon, garlic, and fresh herbs. These flavor profiles have gradually merged with American fried chicken techniques to create fusion dishes that honor both traditions.
In modern home kitchens, crispy lemon herb chicken tenders represent a perfect example of how traditional techniques can be elevated with simple but thoughtful ingredient choices. The basic breading method remains unchanged from classic Southern fried chicken, but the seasoning profile reflects our contemporary desire for brighter, more complex flavors. Regional variations now exist from coast to coast, with some cooks adding garlic powder, others incorporating different herb combinations, and many experimenting with various citrus options beyond lemon.
Understanding the Flavor Profile
The magic of crispy lemon herb chicken tenders lies in the dynamic interplay between richness and brightness. The chicken itself provides a mild, savory foundation—a blank canvas that absorbs the flavors you introduce. The fried coating delivers that satisfying richness and textural contrast we crave, with its golden-brown exterior offering nutty, toasted notes from the perfectly cooked flour and breadcrumbs.
What elevates these tenders beyond ordinary is the citrus element. Fresh lemon zest contains aromatic oils that perfume the coating with bright, sunny notes that cut through the richness of frying. Unlike lemon juice, which can make breading soggy, zest delivers pure citrus essence without added moisture. The herbs—typically a combination of parsley, thyme, and oregano—add layers of aromatic complexity, with each herb contributing its own personality. Parsley brings freshness, thyme offers earthy warmth, and oregano provides a slightly peppery, Mediterranean character.
When you bite into a properly prepared tender, you experience multiple sensations simultaneously. The initial crunch gives way to steam and the first burst of lemon aroma. As you chew, the herbs release their oils, the savory notes of the seasoned coating develop, and finally, the tender, juicy chicken itself delivers its mild, satisfying flavor. The texture should offer resistance on the outside while remaining impossibly tender within—never dry, never rubbery, with natural chicken juices still intact.
Essential Ingredients Explained
The chicken tenderloins themselves are the star, and quality matters tremendously here. Look for fresh, never-frozen tenders with a pale pink color and no off odors. Each tenderloin has a white tendon running through it that should be removed before cooking—it becomes unpleasantly chewy when cooked. Organic or free-range chicken will offer superior flavor and texture, though conventional tenders work perfectly well when fresh.
Fresh lemons are non-negotiable for this recipe. You'll need the zest specifically, which contains concentrated essential oils that deliver far more flavor than juice ever could. When selecting lemons, choose fruits that feel heavy for their size with thin, bright yellow skin—thick-skinned lemons yield less zest and often have less aromatic oil. Wash them thoroughly before zesting to remove any wax or residue.
The herb combination creates the aromatic backbone of these tenders. Fresh parsley provides bright, grassy notes and beautiful green flecks in the coating. Fresh thyme contributes subtle earthiness and pairs naturally with both lemon and chicken. Dried oregano works better than fresh here, as its concentrated flavor distributes more evenly through the breading and withstands high-heat cooking. If you cannot find fresh thyme, dried works, but reduce the quantity by two-thirds since dried herbs are more concentrated.
All-purpose flour forms the foundation of your breading station, creating the initial dry layer that helps subsequent coatings adhere. Buttermilk is essential for the wet dredge—its acidity tenderizes the chicken while its thickness helps the final breading cling tenaciously. If buttermilk is unavailable, you can make a substitute by adding one tablespoon of lemon juice to one cup of regular milk and letting it sit for five minutes.
Panko breadcrumbs create superior crunch compared to regular breadcrumbs because of their larger, airier structure. These Japanese-style crumbs fry up incredibly crispy and maintain their texture longer. Regular breadcrumbs can substitute in a pinch, but the results will be less dramatically crunchy. Some cooks mix half regular breadcrumbs with half panko for a coating that's both crunchy and substantial.
Garlic powder and onion powder might seem like supporting players, but they add crucial savory depth that makes the coating taste complex rather than one-dimensional. These dried aromatics distribute evenly through the breading and bloom in the hot oil, creating layers of savory flavor. Always use powder rather than salt versions to control your sodium levels independently.
The frying oil deserves careful consideration. You need an oil with a high smoke point that won't impart off-flavors. Vegetable oil, canola oil, or peanut oil all work excellently. Avoid olive oil, which smokes at temperatures too low for proper frying. You'll need enough oil to come at least halfway up the sides of the tenders—shallow frying rather than deep frying works perfectly for this recipe.
Mastering the Technique
The foundation of exceptional crispy lemon herb chicken tenders begins with proper preparation of the chicken itself. Start by removing the white tendon from each tenderloin—use a sharp knife to make a small cut at one end, then hold the tendon firmly with a paper towel while scraping the meat away with your knife held at a low angle. Pat each tender completely dry with paper towels, as any surface moisture will prevent the breading from adhering properly. Season the naked chicken lightly with salt and let it rest for fifteen minutes, which helps the meat retain moisture during cooking.
The three-stage breading process is where magic happens, and order matters tremendously. Set up three shallow dishes in a row: seasoned flour in the first, buttermilk beaten with a bit of salt in the second, and the herbed panko mixture in the third. Working with one tender at a time, coat it thoroughly in flour, shaking off any excess—this creates a dry foundation that helps the wet buttermilk cling. Next, submerge it completely in buttermilk, letting excess drip off but keeping the coating generous. Finally, press it firmly into the panko mixture on both sides, using your hands to press crumbs onto any bare spots.
The resting period after breading is one of the most overlooked steps in achieving professional results. Once all tenders are breaded, place them on a wire rack set over a baking sheet and refrigerate uncovered for at least twenty minutes, or up to two hours. This resting time allows the coating to set and adhere to the chicken, dramatically reducing the likelihood of the breading falling off during frying. The slight drying of the surface also promotes better crisping.
Frying temperature control separates mediocre tenders from extraordinary ones. Heat your oil to exactly 350°F (175°C), verified with a cooking thermometer—guessing leads to greasy, undercooked tenders or burnt exteriors with raw interiors. When you add chicken to the oil, the temperature will drop; adjust your heat to maintain steady temperature around 325-340°F during cooking. Don't crowd the pan—fry only three or four tenders at a time to maintain oil temperature and allow room to flip them easily.
The cooking process requires vigilance and gentle handling. Slide tenders into the hot oil carefully to avoid splashing, and resist the urge to move them for the first two minutes—premature flipping can tear away the coating before it sets. After two to three minutes, when the bottom is deep golden brown, flip each tender once using tongs or a slotted spatula. Cook the second side for another two to three minutes until equally golden. The internal temperature should reach 165°F, though these thin cuts usually reach that temperature well before the coating achieves perfect color.
The final crucial stage is the resting and draining process. Transfer finished tenders to a wire rack set over a baking sheet—never drain on paper towels, which trap steam and make the bottom soggy. Let them rest for three to five minutes before serving. During this time, the juices redistribute throughout the meat, the coating sets to maximum crispness, and the temperature equalizes. If you must hold them warm, place the rack in a 200°F oven for up to fifteen minutes, though they're truly best served immediately.
Common Pitfalls and How to Fix Them
One of the most frustrating problems home cooks encounter is breading that falls off during frying, leaving you with naked chicken and clumpy coating floating in your oil. This almost always results from skipping the drying step before breading or not allowing adequate resting time after breading. The solution is twofold: always pat chicken completely dry and always refrigerate breaded tenders for at least twenty minutes before frying. If you're consistently having this issue, try adding a tablespoon of flour to your buttermilk to create a slightly thicker, stickier coating.
Greasy, oil-soaked tenders that lack the satisfying crunch you're seeking indicate that your frying temperature was too low. When oil isn't hot enough, the breading absorbs oil rather than immediately forming a crispy seal. Always verify your oil temperature with a thermometer, and be patient letting it return to temperature between batches. If you've already cooked greasy tenders, you can partially rescue them by placing them on a rack in a 425°F oven for five to seven minutes to crisp up and render out some excess oil.
Overcooked, dry chicken is the opposite problem but equally disappointing. Chicken tenderloins are lean and cook quickly—they can go from perfect to dry in just sixty seconds. The solution is removing them from oil when they reach 160°F internally, as carryover cooking will bring them to the safe 165°F during resting. If you've already overcooked a batch, serve them with a flavorful dipping sauce to add moisture back, and adjust your timing for the next round.
Unevenly browned tenders with some spots pale and others too dark signal either overcrowding in your pan or oil that isn't deep enough. When tenders touch each other or rest on the bottom of the pan, those spots can't brown properly. Use a larger pan or work in smaller batches, and ensure your oil is deep enough that tenders float slightly rather than sitting flat on the pan bottom. Flipping halfway through cooking also ensures even coloring on both sides.
If your coating tastes bland despite following the recipe, the issue is likely underseasoning at multiple stages. The flour, buttermilk, and panko mixture should all be independently seasoned—tasting your panko mixture before breading is a good practice. Remember that breading dilutes the impact of seasonings, so what seems well-seasoned as a mixture will taste milder once it coats the chicken. Don't be shy with salt, herbs, and lemon zest in the coating itself.
Regional Twists Worth Trying
The Mediterranean approach to these crispy lemon herb chicken tenders amplifies the lemon and introduces garlic more prominently. Add two teaspoons of garlic powder to your panko mixture and increase the lemon zest to three tablespoons. Replace oregano with fresh dill and add a teaspoon of ground coriander for warmth. After frying, these tenders pair beautifully with a yogurt-based sauce flavored with cucumber, garlic, and more dill—the cooling dairy perfectly complements the bright, garlicky coating.
For a North African-inspired variation, incorporate warm spices into the breading mixture. Add one teaspoon each of ground cumin and coriander, half a teaspoon of paprika, and a quarter teaspoon of cayenne pepper to your panko mixture. Reduce the lemon zest slightly to let the spices shine, and replace the parsley with cilantro. The result is tenders with complex warmth and subtle heat that pair wonderfully with a tahini-based dipping sauce or a fresh tomato and onion salad.
The Southeast Asian twist transforms these tenders into something entirely different while maintaining the core technique. Replace the Italian herbs with fresh cilantro and Thai basil, and use lime zest instead of lemon. Add one tablespoon of finely grated fresh ginger and one teaspoon of garlic powder to the panko mixture. A pinch of white pepper adds subtle heat. Serve these with a sweet chili dipping sauce and lime wedges for squeezing.
A Middle Eastern version celebrates the region's love of bright flavors and aromatic spices. Add one teaspoon of sumac, one teaspoon of za'atar blend, and half a teaspoon of ground cumin to your panko mixture. Use lemon zest as directed but add a teaspoon of dried mint as well. The tangy sumac and herbal za'atar create an unmistakably Middle Eastern flavor profile that pairs beautifully with a tahini sauce or simply with lemon wedges and fresh vegetables.
The Perfect Spread
When planning a complete meal around crispy lemon herb chicken tenders, consider dishes that complement rather than compete with the bright, herby flavors. A simple green salad dressed with lemon vinaigrette creates harmony with the chicken while providing fresh, crisp contrast to the fried coating. Include tender lettuces, thinly sliced cucumbers, and fresh herbs like parsley or mint. The acidity of the dressing refreshes the palate between bites of rich, crispy chicken.
Roasted or grilled vegetables offer both visual appeal and textural variety on the plate. Asparagus, zucchini, or bell peppers roasted with olive oil and a touch of garlic provide a sophisticated accompaniment that feels lighter than traditional fried chicken sides. For a heartier option, roasted potatoes seasoned simply with olive oil, salt, and herbs echo the herby notes in the chicken without overwhelming the dish. The creamy interior of a perfectly roasted potato provides textural contrast to the crispy chicken.
For a more substantial spread suitable for gatherings, consider a grain-based salad that can be served at room temperature. Couscous or bulgur wheat tossed with chopped vegetables, fresh herbs, lemon juice, and olive oil creates a complete meal when served alongside the tenders. This approach works particularly well for casual entertaining since the grain salad can be prepared ahead and actually improves as it sits. Add toasted nuts or seeds for additional texture and nutty flavor that complements the fried chicken.
Dipping sauces complete the experience and offer guests the opportunity to customize their meal. A garlic herb sauce made with thick yogurt, minced garlic, lemon juice, and fresh herbs provides cooling richness. A spicy option might include a sriracha-spiked mayonnaise or a harissa-yogurt blend. For those who prefer sweeter profiles, a honey mustard sauce offers tangy sweetness that pairs surprisingly well with the lemon herb coating.
Keeping and Reheating
Proper storage begins the moment your crispy lemon herb chicken tenders cool to room temperature. Never store them while still hot, as trapped steam will make the coating soggy. Once cooled, arrange tenders in a single layer in an airtight container lined with paper towels, which absorb any residual moisture. They'll keep in the refrigerator for up to three days, though texture quality begins declining after the second day as the coating gradually loses its signature crispness.
Freezing is an excellent option for longer storage, and properly frozen tenders maintain quality for up to two months. The key is preventing freezer burn by wrapping each tender individually in plastic wrap before placing them all in a freezer-safe bag with as much air removed as possible. Flash-freezing them on a baking sheet for an hour before wrapping helps maintain shape and prevents them from sticking together. Label the bag with the date to track freshness.
Reheating requires careful technique to restore as much of the original texture as possible—never use the microwave, which will make the coating soggy and rubbery. The oven method produces the best results: preheat your oven to 375°F, place tenders on a wire rack set over a baking sheet, and heat for twelve to fifteen minutes if refrigerated, or twenty to twenty-five minutes if frozen. The circulating air around the rack helps the coating crisp up on all sides rather than steaming against a pan.
For the absolute best reheating results, consider a two-stage process. Start in a 350°F oven to gently warm the chicken through, then finish under the broiler for one to two minutes to re-crisp the coating. Watch carefully during broiling, as the coating can burn quickly. This method comes closest to replicating the fresh-fried texture, though nothing truly matches tenders straight from the oil.
If you're planning to serve these at a gathering where they won't be eaten immediately, keep them warm in a 200°F oven on a wire rack for up to thirty minutes. They'll gradually lose some crispness but remain significantly better than if they'd been covered or stacked. For longer holding times, it's better to fry them slightly underdone, refrigerate, and then finish them in a hot oven just before serving.
Your Questions Answered
Can I bake these chicken tenders instead of frying them?
Yes, though the texture will differ from the fried version. Preheat your oven to 425°F, place breaded tenders on a wire rack over a baking sheet, spray them lightly with cooking oil, and bake for eighteen to twenty-two minutes, flipping halfway through. The coating will be crispy but won't achieve quite the same golden crunch as frying. The lemon and herb flavors will still shine through beautifully, making this a worthwhile lighter option.
How do I prevent the lemon flavor from becoming bitter?
Bitterness comes from the white pith beneath the colored zest, so use a microplane or fine grater and remove only the bright yellow outer layer of the lemon. Press lightly as you zest, moving the lemon frequently to avoid grating down to the white pith. If you accidentally include some pith, the small amount used in this recipe shouldn't create noticeable bitterness, especially since the herbs and other seasonings balance the flavor.
Can I prepare the breaded tenders in advance?
Absolutely, and this actually improves results. Bread the tenders up to four hours ahead, arrange them on a wire rack over a baking sheet, and refrigerate uncovered. The extended resting time helps the coating adhere even better and dry slightly, which promotes superior crisping during frying. Don't bread them more than four hours ahead, though, as the coating may become soggy from moisture released by the chicken.
What's the best way to scale this recipe for a large gathering?
The breading and seasoning scale up perfectly—just maintain the same ratios. The challenge is frying capacity, as you can only cook a few tenders at a time without dropping the oil temperature. If serving a crowd, consider frying all the tenders an hour or two before guests arrive, then reheating them in a 375°F oven for ten minutes just before serving. Alternatively, set up two pans with oil so you can fry twice as many simultaneously.
Can I use chicken breast instead of tenderloins?
Yes, though you'll need to modify your approach. Slice chicken breasts into strips about three-quarters of an inch thick, trying to keep them uniform in size for even cooking. Because breast meat is slightly less tender than tenderloins, consider pounding the strips gently to an even thickness and marinating them in the buttermilk for thirty minutes before breading. The cooking time will be similar, but verify with a thermometer that each piece reaches 165°F internally.
How can I make the coating extra crispy?
For maximum crispness, try a few techniques: add two tablespoons of cornstarch to your panko mixture, which creates an extra-crispy texture; use a combination of half panko and half crushed cornflakes for added crunch; or double-bread the tenders by repeating the buttermilk and panko steps for an extra-thick coating. Also ensure your oil stays at the proper temperature and that you drain the finished tenders on a wire rack rather than paper towels, which trap steam and soften the coating.
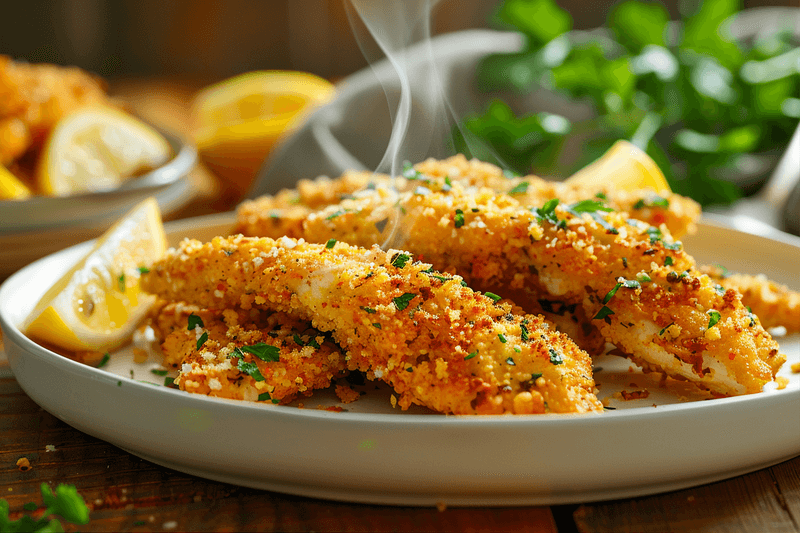
Crispy Lemon Herb Chicken Tenders
Golden, perfectly crispy chicken tenders infused with bright lemon zest and aromatic herbs. These restaurant-quality tenders feature a crunchy panko coating and juicy, tender chicken inside.
Prep Time
25 min
Cook Time
20 min
Total Time
45 min
Servings
4 servings
Ingredients
For 4 servings
- 1.5 pounds chicken tenderloins, tendons removed
- 1 cup all-purpose flour
- 2 teaspoons salt, divided
- 1 teaspoon black pepper, divided
- 1 teaspoon garlic powder
- 1 teaspoon onion powder
- 1.5 cups buttermilk
- 2 cups panko breadcrumbs
- 3 tablespoons fresh lemon zest (about 3 lemons)
- 3 tablespoons fresh parsley, finely chopped
- 1 tablespoon fresh thyme leaves, finely chopped
- 2 teaspoons dried oregano
- 1/2 teaspoon paprika
- Vegetable oil for frying (about 2 cups)
- Lemon wedges for serving
Instructions
- 1
Prepare the chicken
Remove the white tendon from each chicken tenderloin by making a small cut at one end and scraping the meat away while holding the tendon with a paper towel. Pat each tender completely dry with paper towels and season lightly with salt. Let rest for 15 minutes at room temperature.
- 2
Set up breading station
Prepare three shallow dishes. In the first, combine flour, 1 teaspoon salt, 1/2 teaspoon black pepper, garlic powder, and onion powder. In the second, whisk buttermilk with 1/2 teaspoon salt. In the third, combine panko breadcrumbs, lemon zest, parsley, thyme, oregano, paprika, remaining 1/2 teaspoon salt, and remaining 1/2 teaspoon black pepper.
- 3
Bread the tenders
Working with one tender at a time, coat thoroughly in seasoned flour and shake off excess. Dip into buttermilk, allowing excess to drip off. Press firmly into the panko mixture on both sides, using your hands to ensure an even coating with no bare spots. Place on a wire rack set over a baking sheet.
- 4
Rest the breaded chicken
Once all tenders are breaded, refrigerate them uncovered on the wire rack for at least 20 minutes and up to 2 hours. This allows the coating to set and adhere properly to the chicken, preventing it from falling off during frying.
- 5
Heat the oil
Pour vegetable oil into a large, heavy-bottomed skillet or Dutch oven to a depth of about 1 inch. Heat over medium-high heat until a cooking thermometer registers 350°F. Adjust heat as needed to maintain temperature between 325-340°F during cooking.
- 6
Fry the first batch
Carefully place 3-4 tenders in the hot oil without crowding the pan. Fry undisturbed for 2-3 minutes until the bottom is deep golden brown. Flip gently using tongs and fry the second side for another 2-3 minutes until equally golden and the internal temperature reaches 165°F.
- 7
Drain and rest
Transfer cooked tenders to a clean wire rack set over a baking sheet to drain. Never place on paper towels as this traps steam and makes the coating soggy. Let rest for 3-5 minutes while you fry remaining batches, allowing the oil to return to 350°F between batches.
- 8
Serve immediately
Serve the crispy lemon herb chicken tenders hot with fresh lemon wedges for squeezing. Offer your choice of dipping sauces such as garlic herb yogurt sauce, honey mustard, or spicy mayonnaise alongside fresh salad or roasted vegetables.
Nutrition Facts
Per serving (estimated)
425 calories
Calories
38g
Carbs
42g
Protein
12g
Fat
2g
Fiber
680mg
Sodium
4g
Sugar


