
Coffee Filter Roses: Easy DIY Paper Flower Tutorial
Learn how to make stunning coffee filter roses with this simple step-by-step tutorial. Perfect for home decor, gifts, and special occasions!
cookwithlucia.com/recipes/coffee-filter-roses-easy-diy-paper-flower-tutorial
I still remember the first time I stumbled upon coffee filter roses at a local craft fair—delicate, ethereal blooms that looked almost too beautiful to be made from something as ordinary as coffee filters. The vendor smiled when I asked about them, revealing that these stunning paper flowers were incredibly simple to create at home. That moment sparked a creative journey that has brought so much joy to my crafting table and transformed the way I think about everyday materials. There's something magical about taking humble coffee filters and transforming them into elegant roses that rival the beauty of fresh flowers, all while lasting indefinitely without wilting or requiring water. Whether you're looking to add a personal touch to your home decor, create thoughtful handmade gifts, or simply explore a new creative outlet, coffee filter roses are the perfect project that combines simplicity with stunning results. In this comprehensive tutorial, I'll walk you through everything you need to know to create your own gorgeous coffee filter roses, from selecting the right materials to mastering the techniques that will make your blooms look professionally crafted. You'll discover tips for adding color, creating different rose styles, and even turning your creations into beautiful arrangements that will impress everyone who sees them. Let's dive into this wonderful world of paper flowers together!
What Are Coffee Filter Roses?
Have you ever looked at a coffee filter and thought it could become something truly beautiful? Coffee filter roses are charming handmade paper flowers crafted from ordinary coffee filters—those thin, porous paper circles we typically use for brewing our morning cup. This clever craft technique originated in the DIY and crafting community as makers discovered that the delicate, slightly textured nature of coffee filters perfectly mimics the soft petals of real roses. The beauty of coffee filter roses lies in their versatility and accessibility—you can create them in their natural white state for an elegant, shabby-chic look, or dye them in any color imaginable to match your decor or event theme. These paper blooms feature layers of gently shaped petals that curl and overlap just like authentic roses, with a realistic appearance that's surprisingly easy to achieve. The porous nature of coffee filters allows them to absorb dyes beautifully while maintaining enough structure to hold their shape once formed. What makes coffee filter roses truly special is that they require minimal supplies, most of which you probably already have at home, and the technique is forgiving enough for beginners while offering endless possibilities for experienced crafters to experiment with different styles and finishing touches.
Why You'll Love These Coffee Filter Roses
Budget-Friendly Creativity: One of the most appealing aspects of coffee filter roses is how incredibly affordable they are to make. A pack of coffee filters costs just a few dollars and can yield dozens of beautiful blooms, making this one of the most economical craft projects you'll ever undertake. Unlike fresh flowers that wilt within days or expensive silk flowers that can strain your budget, these paper roses give you maximum beauty for minimal investment.
Simple Enough for Anyone: You don't need to be a skilled crafter or artist to create stunning coffee filter roses. The technique is wonderfully forgiving, and even your first attempt will likely result in a bloom you're proud to display. There's no complicated origami folding or intricate cutting involved—just simple shaping and layering that anyone can master within minutes.
Endless Customization Options: Coffee filter roses offer unlimited creative possibilities. You can make them in any color by dyeing the filters with food coloring, watercolors, or craft dyes. Create tiny rosebuds or full, luxurious blooms. Add glitter for sparkle, distress the edges for a vintage look, or leave them pristine white for elegant simplicity. Each rose can be unique, reflecting your personal style and the specific purpose you have in mind.
Long-Lasting Beauty: Unlike real roses that fade and die, your coffee filter roses will maintain their beauty indefinitely with proper care. They're perfect for creating permanent decorative arrangements, keepsake gifts, or decor elements that you can enjoy year after year without replacement. This makes them ideal for sentimental projects where longevity matters.
Perfect for Multiple Occasions: These versatile blooms work beautifully for home decor, special gatherings, gift toppers, wreath embellishments, and so much more. Create a bouquet for someone special, design a stunning centerpiece for family dinners, or craft individual stems to brighten various rooms throughout your home. The possibilities are truly endless, and each coffee filter rose you create adds a personal, handmade touch that purchased decorations simply cannot match.
Key Materials and What They Bring
The foundation of every coffee filter rose is, of course, the coffee filter itself. Standard white basket-style coffee filters work best because their cone shape and flexible paper quality make them easy to manipulate into petal shapes. The slight texture of the paper adds dimension to your finished roses, and the porous nature allows for beautiful color absorption if you choose to dye your blooms. I recommend using unbleached or standard white filters depending on the look you're going for—unbleached filters have a warm, vintage tone while bright white filters create a crisp, modern appearance.
Floral wire or pipe cleaners serve as the stem for your coffee filter roses and provide the structural support needed to hold your layered petals in place. Green floral wire gives the most realistic appearance and can be found at any craft store, but pipe cleaners work wonderfully too and are easier for younger crafters to manipulate. The wire needs to be sturdy enough to support multiple filter layers without bending, yet flexible enough to twist and secure the base of your bloom.
Floral tape is essential for creating a polished, professional-looking stem. This slightly waxy, stretchy tape adheres to itself when pulled and wrapped, covering the base of your flower and the wire stem in a smooth, uniform coating. Green floral tape blends seamlessly with your wire stem and helps secure each layer of petals as you build your rose. The stretching action activates the tape's adhesive properties, so remember to pull gently as you wrap.
Dyes or colorants transform plain white coffee filters into vibrant blooms in any shade imaginable. Food coloring diluted in water creates soft, watercolor-like hues perfect for pastel roses. Liquid watercolors produce more vibrant, saturated colors, while craft dyes offer the most intense pigmentation. You can also use markers to add color directly to dry filters for more control over placement and shading. Each coloring method produces different effects, allowing you to customize the look of your coffee filter roses to match your vision perfectly.
Scissors are necessary for trimming filters to size and creating perfectly rounded petal edges. A sharp pair of craft scissors works best, as clean cuts help your petals look more polished and professional. You'll use scissors to remove the flat bottom edge from filters, trim petals to different sizes for a more realistic graduated look, and potentially cut filters in half for creating smaller rosebuds.
Glue or a hot glue gun provides extra security for attaching petals and can be especially helpful when creating larger, more elaborate coffee filter roses. While twisting and taping alone can hold your roses together beautifully, a small dab of glue at the base of each petal layer ensures everything stays perfectly in place, even with handling. Hot glue dries quickly and creates a strong bond, though white craft glue works well if you prefer a cooler option or are crafting with children.
How to Make Coffee Filter Roses—Quick Overview
Creating coffee filter roses is a delightfully straightforward process that unfolds in just a few simple stages. You'll begin by preparing your coffee filters, which involves flattening them out and optionally dyeing them if you want colored roses—this step allows the filters to absorb your chosen colors beautifully, creating soft, natural-looking variations in tone across each petal. If you're keeping your roses white, you can skip straight to shaping, which involves folding filters in half and then in half again, creating a wedge shape that you'll gently round at the top to form petal-like curves.
Once your filters are shaped, you'll start building your rose by wrapping the first tightly folded filter around the top of your floral wire to create the center bud—this tight inner core gives your coffee filter rose its realistic heart. From there, you'll continue adding layers of increasingly loose petals, securing each layer with floral tape and gently fluffing and shaping as you go to create dimension and that signature rose silhouette. The entire process takes just ten to fifteen minutes per rose once you get the hang of it, though you might find yourself working more slowly on your first few attempts as you learn the feel of the paper and how tightly or loosely to secure each layer.
The final stage involves wrapping your stem completely with floral tape for a polished finish and then taking a moment to fluff, curl, and adjust each petal until your coffee filter rose looks exactly how you envisioned. You'll gently pull petals outward, curl edges back slightly with your fingers, and arrange layers so they overlap naturally, mimicking the organic growth pattern of real roses. The beauty of this craft is that there's no single "right" way to shape your petals—each rose will have its own character and charm.
Top Tips for Perfecting Coffee Filter Roses
Layer Gradually for Realistic Dimension: The secret to creating coffee filter roses that look authentically full and dimensional is to add petals gradually, working from tight inner layers to progressively looser outer petals. Start with your first few filters folded quite tightly around your wire center, then allow each subsequent layer to be slightly more relaxed and open. This gradual transition creates the natural progression you see in real roses, where inner petals curve inward protectively while outer petals spread wide and welcoming.
Embrace Imperfection in Your Petals: Real roses aren't perfectly uniform, and neither should your coffee filter roses be. Allow some petals to be slightly larger or positioned a bit differently than others. Let edges curl naturally rather than forcing them into identical shapes. These small irregularities actually make your finished blooms look more organic and realistic rather than overly crafted or artificial.
Secure Layers Thoroughly Before Adding More: One common mistake is rushing through the layering process without adequately securing each addition. Take your time wrapping floral tape around the base after adding each new filter or two, ensuring everything is held firmly before you continue building. This prevents petals from slipping out of position and makes the entire construction process much more manageable and less frustrating.
Experiment with Filter Sizes and Styles: While standard basket coffee filters are most commonly used for coffee filter roses, don't be afraid to try different sizes for varied effects. Smaller filters create charming rosebuds perfect for delicate arrangements, while larger cone-style filters can produce dramatic, oversized blooms. You can even mix sizes within a single rose, using smaller filters for the center and larger ones for outer petals to create impressive dimension.
Control Color Intensity Through Dilution: When dyeing your coffee filters, remember that wet filters appear much darker than they will once dried. Start with diluted dyes and test on a single filter first, allowing it to dry completely before committing to dyeing your entire batch. You can always add more color by dipping again, but you cannot remove excess dye once applied. For ombre effects, dip only the edges of your filters, allowing the color to bleed naturally into the center for gorgeous graduated tones.
Shape Petals After Assembly: While it's tempting to try to shape each petal perfectly before attaching it to your rose, you'll actually achieve better results by doing most of your shaping after your coffee filter rose is fully assembled. Once all layers are secured, use your fingers to gently pull petals outward from the center, curl edges back, and adjust the overall silhouette. This final shaping stage is where your rose truly comes to life and develops its unique personality.
Add Texture for Visual Interest: For coffee filter roses with extra dimension and vintage charm, try gently crumpling filters before smoothing them back out and shaping them into petals. This creates subtle creases and texture that catch light beautifully and add sophisticated depth to your blooms. You can also distress petal edges by tearing slightly rather than cutting cleanly, or use ink pads to add darker shading along edges for an antique rose appearance.
Consider Your Wire Gauge Carefully: The thickness of your floral wire matters more than you might think when creating coffee filter roses. Wire that's too thin will bend under the weight of multiple filter layers, causing your rose to droop sadly. Wire that's too thick becomes difficult to wrap tape around smoothly and may be too stiff for creating natural-looking curved stems. Medium-gauge floral wire (typically 18 to 20 gauge) strikes the perfect balance of strength and flexibility for most coffee filter rose projects.
Variations and Flavor Twists
Vintage Tea-Stained Roses: Create beautifully aged-looking coffee filter roses by dyeing your filters in strong brewed tea or coffee before assembling. This technique produces gorgeous antique ivory and tan tones perfect for vintage-inspired decor or rustic arrangements. The natural variations in the staining create authentic-looking age spots and color gradations that make each petal unique, and the subtle brown tones pair wonderfully with burlap, lace, and weathered wood elements.
Glittery Glamour Roses: Transform ordinary coffee filter roses into sparkling showpieces by misting assembled blooms lightly with spray adhesive and dusting with fine glitter in coordinating or contrasting colors. Gold glitter on white roses creates elegant sophistication, while iridescent glitter adds magical shimmer to any color. For a subtler effect, apply glitter only to petal edges using a small brush and craft glue, creating a delicate rim of sparkle that catches light beautifully without overwhelming the flower's natural beauty.
Rainbow Ombre Roses: Create stunning gradient effects by dyeing each filter for a single rose in progressively deeper shades of the same color family, using the lightest filters for the center and darkest for outer petals. This ombre technique produces coffee filter roses with incredible depth and visual interest. You can also create rainbow roses by using different colors for different petal layers, transitioning from warm tones in the center to cool tones on the outside, or vice versa.
Miniature Rosebud Clusters: Instead of creating large, full blooms, fashion tiny rosebuds by using just two or three filters per flower, keeping them tightly folded and compact. These petite coffee filter roses are perfect for delicate wreaths, gift toppers, hair accessories, or creating fuller-looking arrangements where you can cluster multiple small blooms together. The smaller scale also makes them ideal for projects where you need many flowers but have limited space or materials.
Two-Tone Petal Tips: Achieve a sophisticated two-tone effect by dipping just the edges of your coffee filters into dye, leaving centers white or in a contrasting color. This technique works especially beautifully with pink-tipped white roses reminiscent of classic rose varieties, or deep burgundy tips on cream filters for dramatic impact. The natural bleeding of the dye as it dries creates soft, natural-looking color transitions that appear painted by nature itself rather than deliberately crafted.
What to Display with Coffee Filter Roses
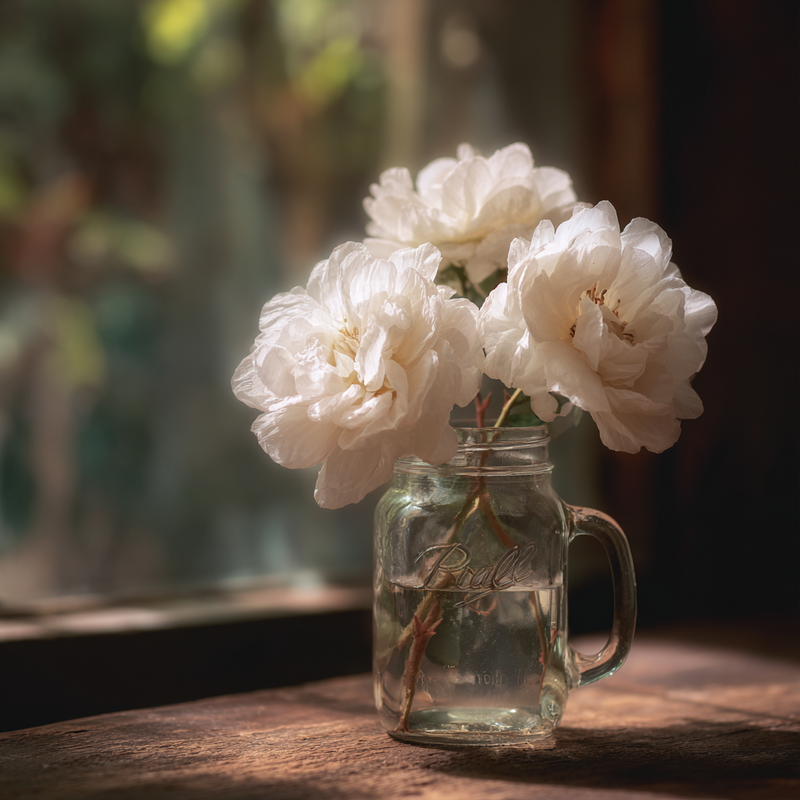
Coffee filter roses look absolutely stunning when arranged in vintage glass bottles or mason jars, where their delicate, handmade quality complements the nostalgic charm of repurposed containers. Group several jars of varying heights together, each holding one to three roses, to create an appealing vignette for mantels, dining tables, or entryway consoles. The transparency of glass vessels allows the wrapped stems to become part of the display rather than something to hide, especially when you've wrapped them neatly with floral tape.
Pair your coffee filter roses with natural elements like eucalyptus stems, fern fronds, or dried baby's breath to create fuller, more complex arrangements that balance the paper flowers' crisp edges with organic textures. These natural additions provide lovely contrast and help coffee filter roses integrate seamlessly into arrangements that feel collected and thoughtfully composed rather than obviously crafted. Dried elements work particularly well since they share the longevity of paper flowers.
Display coffee filter roses alongside candles of varying heights to create romantic, layered tablescapes perfect for special family dinners or intimate gatherings. The soft candlelight enhances the delicate translucence of the coffee filter petals, making them almost glow from within. Cluster roses around candle bases or arrange them in low bowls between taper candles for elegant symmetry that draws the eye across the entire table.
Incorporate your coffee filter roses into wreath designs, attaching them to grapevine, foam, or wire wreath frames along with ribbon, burlap bows, or seasonal greenery. The dimensional quality of the blooms adds wonderful depth to wreaths, and because they're not affected by moisture or temperature, coffee filter roses work equally well for indoor or covered outdoor displays. Space roses evenly around your wreath or cluster them asymmetrically in one section for a different aesthetic.
Combine coffee filter roses with framed photos or meaningful quotes on gallery walls or shelf displays, where they add softness and dimension to otherwise flat arrangements. Lean a small vase of roses next to frames, or attach individual blooms directly to frames using hot glue for permanent decorative accents. This integration of floral elements into gallery displays creates cohesive, well-styled spaces that feel intentionally designed.
Storing and Caring for Your Coffee Filter Roses
Because coffee filter roses are made entirely from paper and wire, they require minimal maintenance but do benefit from proper storage and gentle handling to maintain their beauty over time. When not on display, store your coffee filter roses in a cool, dry location away from direct sunlight, which can cause colored blooms to fade over time. A closet shelf, storage box, or drawer works perfectly for keeping them safe between uses. If you've created many roses, consider storing them upright in a tall box or container so petals don't get crushed under weight.
Dust is the primary enemy of coffee filter roses during display. The porous nature of coffee filters can trap dust particles, dulling the appearance of your blooms over time. Prevent dust accumulation by displaying roses under glass cloches or in cabinets when possible, or plan to dust them monthly using a soft, dry paintbrush or can of compressed air designed for electronics. Gently brush or blow dust away from petals, working from the center outward to avoid accidentally damaging the delicate paper.
If coffee filter roses do become crushed or flattened during storage or transport, you can usually restore their shape with patient, gentle manipulation. Hold the base of the flower firmly in one hand while using your other hand to carefully pull petals outward and reshape them. For stubborn creases, try holding the petal briefly above steam from a kettle or humidifier—the moisture will relax the paper fibers slightly, making them more pliable. Allow the filter to dry completely in its reshaped position before handling further.
Avoid displaying coffee filter roses in areas with high humidity, such as bathrooms or near kitchen sinks, as prolonged exposure to moisture can cause the paper to become limp, discolored, or moldy. Similarly, keep them away from heat sources like radiators, fireplaces, or heating vents that might dry out and brittle the paper fibers or, in extreme cases, pose a fire risk. The ideal display location offers moderate temperature and humidity with protection from direct environmental extremes.
Frequently Asked Questions
Can I make coffee filter roses with children?
Absolutely! Coffee filter roses are an excellent craft project for children, though the appropriate age depends on the techniques you use. Children as young as five or six can participate by helping dye filters, folding paper, and holding pieces while adults secure them. Older children and teens can typically complete entire coffee filter roses independently with minimal supervision. For younger crafters, consider using pipe cleaners instead of floral wire for safer handling, and substitute white craft glue for hot glue to avoid burn risks. The forgiving nature of this craft means even imperfect attempts result in charming blooms.
How many coffee filters do I need for one rose?
A typical full, lush coffee filter rose requires approximately four to eight filters, depending on how large and full you want your bloom to appear. Smaller, tighter rosebuds might use just two or three filters, while extra-large statement roses could incorporate ten or more filters for maximum fullness. I recommend starting with five or six filters for your first attempt, which creates a nicely balanced bloom that's substantial without being overwhelming. You can always add more filters to any rose if it looks too sparse once assembled.
Can I use colored coffee filters instead of dyeing white ones?
While colored or printed coffee filters might seem like a convenient shortcut, I actually don't recommend using them for coffee filter roses in most cases. Colored filters designed for brewing often have chemical dyes that may not be lightfast, meaning your roses could fade unpredictably over time. Additionally, commercially colored filters typically come in limited, often garish colors that don't resemble natural rose tones. Dyeing white filters yourself gives you complete control over the exact shade and intensity, allows for beautiful ombre and variegated effects, and generally produces more sophisticated, realistic-looking blooms.
How do I make my coffee filter roses look more realistic?
Realism in coffee filter roses comes from attention to three key details: color variation, petal arrangement, and final shaping. For color, create subtle variations by using slightly different dye concentrations for different filters, or by dipping edges more deeply than centers. For arrangement, remember that real roses have tighter inner petals and gradually more open outer petals—replicate this by securing your first few filters tightly, then allowing subsequent layers to relax increasingly. For shaping, spend time after assembly gently curling petal edges backward, creating slight waves and irregularities that mimic nature's imperfection rather than craft's precision.
Can coffee filter roses get wet?
Coffee filter roses should be kept dry as the paper will absorb moisture, potentially causing colors to run, petals to become limp, and the overall structure to weaken or collapse. If your rose does get lightly misted or splashed, gently blot excess moisture with a paper towel and allow it to air dry completely in a well-ventilated area, reshaping petals as needed once dry. However, coffee filter roses are not suitable for outdoor use in uncovered areas or anywhere they might encounter rain, heavy humidity, or direct water exposure. If you need weather-resistant flowers for outdoor decor, consider fabric or plastic blooms instead.
How can I make my coffee filter roses smell like real flowers?
One delightful finishing touch for coffee filter roses is adding fragrance to make them appeal to multiple senses. The easiest method is lightly misting your completed, dried roses with a floral room spray or linen spray in your preferred scent—rose, lavender, and jasmine work particularly well. Alternatively, apply a tiny drop of essential oil to a cotton ball and tuck it into the center of your rose, refreshing periodically as the scent fades. For longer-lasting fragrance, add a few drops of essential oil to your dye water before coloring filters, allowing the scent to infuse throughout the paper as it dries, though this method produces more subtle fragrance than direct application to finished blooms.
Coffee Filter Roses
Beautiful handmade paper roses crafted from ordinary coffee filters. These stunning blooms are easy to make and perfect for home decor, gifts, and special occasions.
Prep Time
10 min
Cook Time
0 min
Total Time
15 min
Servings
1 rose
Ingredients
For 1 rose
- 4-8 white basket-style coffee filters
- 1 piece of 18-gauge floral wire, 12 inches long
- Green floral tape
- Optional: food coloring or liquid watercolors for dyeing
- Optional: small bowl of water for dyeing
- Scissors
- Optional: hot glue gun and glue sticks
Instructions
- 1
Prepare coffee filters
Flatten your coffee filters completely and remove them from their stacked package. If you want colored roses, prepare a dyeing station now by mixing a few drops of food coloring or liquid watercolor into a shallow bowl of water. Dip filters one at a time into the dye, allowing them to absorb color for 10-30 seconds depending on desired intensity, then lay flat on paper towels to dry completely (about 30-60 minutes). For white roses, skip the dyeing step entirely.
- 2
Trim and shape filters
Once filters are dry (or if using undyed white filters), use scissors to trim off the flat, crimped bottom edge of each filter, leaving just the rounded cup portion. Fold each filter in half, then in half again to create a wedge shape with four layers. Using scissors, round off the pointed top edge to create a curved petal shape when unfolded.
- 3
Create the rose center
Take your first prepared filter and keep it folded in quarters. Wrap it tightly around the top of your floral wire, with the rounded edge at the top and the pointed base wrapping around the wire. This creates the tight center bud of your coffee filter rose. Hold it firmly in place while wrapping the base several times with floral tape to secure it to the wire stem.
- 4
Add first outer layer
Take your second filter (still folded in quarters) and wrap it around the center bud, positioning it slightly lower and looser than the first filter. The rounded petal edge should extend just above the center bud. Secure this layer by wrapping the base tightly with floral tape, making sure to overlap previous tape layers.
- 5
Build additional layers
Continue adding filters one at a time, positioning each layer slightly lower and looser than the previous one. Each filter should be wrapped around the growing bloom and secured with floral tape at the base. For a full rose, add 4-6 more filters, spacing them evenly around the circumference and allowing each layer to open progressively wider, creating the classic rose silhouette.
- 6
Wrap the stem
Once all filter layers are attached and you're happy with the fullness of your coffee filter rose, wrap the entire stem with floral tape from just below the base of the flower all the way down to the bottom of the wire. Pull the tape gently as you wrap to activate its adhesive properties, overlapping slightly with each rotation to create a smooth, uniform stem covering.
- 7
Shape and fluff petals
Now comes the most important step for achieving a realistic look—shaping your coffee filter rose. Gently pull outer petals away from the center, spreading them outward and downward. Use your fingers to curl petal edges backward slightly, creating natural-looking curves. Adjust inner petals to stand more upright while outer petals spread wider, mimicking the growth pattern of real roses.
- 8
Final adjustments and display
Examine your coffee filter rose from all angles, making final adjustments to petal positions until you're satisfied with its appearance. Fluff and rearrange as needed to ensure even spacing and a balanced, full bloom. If any petals feel loose, add a tiny dot of hot glue at their base to secure them permanently. Your coffee filter rose is now complete and ready to display in a vase, use in an arrangement, or incorporate into your next craft project.
Nutrition Facts
Per serving (estimated)
0 calories
Calories
0g
Carbs
0g
Protein
0g
Fat
0g
Fiber
0mg
Sodium
0g
Sugar


