
Chicken Caesar Wrap Recipe: Easy & Delicious
This Chicken Caesar Wrap features tender chicken, crisp romaine, and creamy dressing in a soft tortilla. Perfect for lunch or dinner in 20 minutes!
cookwithlucia.com/recipes/chicken-caesar-wrap
There's something magical about the first bite of a perfectly assembled wrap—the way the soft tortilla gives way to crisp lettuce, the tang of Caesar dressing meeting tender chicken, the satisfying crunch that echoes through every mouthful. I've always been drawn to recipes that deliver restaurant-quality flavors with minimal fuss, and this chicken Caesar wrap has become my go-to answer for those days when time is short but satisfaction is non-negotiable.
What sets this version apart is the attention to texture—every element plays a crucial role in creating that perfect bite. The chicken is seasoned and cooked just right, never dry or bland. The romaine stays crisp because we handle it properly. The Caesar dressing clings to every ingredient without making the wrap soggy. And the tortilla? Warmed just enough to become pliable and slightly fragrant, creating the perfect vessel that holds everything together.
This isn't just another lunch recipe—it's a complete meal that works for busy weeknights, weekend gatherings, or meal prep sessions. You'll walk away with a foolproof method for creating wraps that taste better than takeout, cost a fraction of the price, and come together in about twenty minutes from start to finish. Plus, I'll share all the little tricks that transform this from good to genuinely crave-worthy.
The Story Behind This Dish
The Caesar salad itself has a fascinating origin story, created in the 1920s by Italian-American chef Caesar Cardini in Tijuana, Mexico. What started as a tableside salad preparation became an international sensation, inspiring countless variations over the decades. The transition from salad to wrap represents the modern evolution of classic dishes—home cooks and busy professionals seeking portable, mess-free versions of beloved flavors.
The chicken Caesar wrap emerged during the wrap craze of the 1990s and has maintained its popularity because it simply works. It takes everything people love about Caesar salad—that irresistible combination of creamy, tangy, savory, and crisp—and makes it infinitely more practical. You can eat it with your hands, pack it for lunch, serve it at casual gatherings, or enjoy it as a quick dinner without any guilt.
What makes the homemade version superior to anything you'll find at a restaurant or cafe is control. You decide how much dressing goes in, ensuring it's flavorful but not dripping. You choose the quality of your chicken and how it's seasoned. You can adjust every element to your preference, creating a wrap that's perfectly balanced to your taste rather than settling for someone else's idea of what it should be.
What Makes This Recipe Special
Perfectly Seasoned Chicken: The chicken in this chicken Caesar wrap isn't an afterthought—it's seasoned with garlic powder, black pepper, and a touch of paprika before cooking, creating layers of flavor that complement the Caesar dressing rather than competing with it. Every bite delivers juicy, flavorful protein.
The Right Lettuce-to-Filling Ratio: Too much lettuce and you're eating a salad that happens to be wrapped. Too little and you lose that essential crunch. This recipe strikes the perfect balance, ensuring every bite has textural contrast while keeping the wrap substantial and satisfying.
Restaurant-Style Caesar Dressing: Whether you're using store-bought or homemade, I'll show you how to enhance it with a squeeze of fresh lemon juice and a pinch of black pepper, elevating even basic bottled dressing to something special. The dressing is distributed evenly, coating every ingredient without creating sogginess.
Wrap Assembly Technique: The way you build this chicken Caesar wrap matters enormously. Layering ingredients in the correct order—starting with dressing on the tortilla, then lettuce, then chicken, then cheese—ensures structural integrity and prevents the dreaded soggy-bottom syndrome that plagues lesser wraps.
Meal Prep Friendly: These wraps adapt beautifully to batch cooking. You can prepare all the components in advance and assemble them fresh, or wrap them tightly and store them for grab-and-go convenience. They hold up remarkably well for 2-3 days when wrapped properly.
Budget-Conscious Without Compromise: Using simple ingredients you likely have on hand, this recipe delivers gourmet flavors without the gourmet price tag. A batch of four wraps costs less than a single wrap from most cafes, making it both delicious and economical.
Breaking Down the Ingredients
The foundation of any great chicken Caesar wrap starts with the chicken itself. I prefer boneless, skinless chicken breasts because they cook quickly and slice beautifully, but chicken thighs work wonderfully too if you prefer darker meat with more natural moisture. The key is cooking it just until it reaches internal temperature, then letting it rest before slicing—this keeps all those flavorful juices inside the meat rather than on your cutting board.
Romaine lettuce is absolutely non-negotiable in this recipe. Its crisp, sturdy leaves provide the signature crunch that defines a Caesar, and unlike delicate greens, romaine doesn't wilt immediately when dressed. The tight, crunchy ribs running through each leaf create textural contrast against the tender chicken and soft tortilla. Always use the inner, paler leaves when possible—they're sweeter and more tender than the dark outer leaves.
Caesar dressing brings everything together with its distinctive tangy, savory, umami-rich profile. A quality store-bought dressing works perfectly well here, or you can make your own from mayonnaise, lemon juice, garlic, and grated parmesan. The dressing should be thick enough to cling to ingredients but not so thick that it becomes pasty. A little goes a long way—about two tablespoons per wrap is ideal.
Parmesan cheese adds that essential salty, nutty dimension that makes Caesar flavor so distinctive. Freshly grated parmesan melts slightly from the warmth of the chicken and tortilla, creating creamy pockets throughout the wrap. Pre-shredded works in a pinch, but freshly grated from a block delivers superior flavor and texture.
The tortillas serve as more than just a wrapper—they're an integral part of the eating experience. Large flour tortillas, about 10 inches in diameter, provide enough surface area to hold generous filling without tearing. Warming them briefly in a dry skillet or directly over a gas flame makes them pliable and adds a subtle toasted flavor that elevates the entire wrap.
Garlic powder, black pepper, and paprika season the chicken with warmth and depth. These dried spices form a light crust on the chicken as it cooks, creating another layer of flavor and texture. The paprika adds a hint of smokiness and beautiful color, while garlic powder provides savory depth that bridges the chicken and the Caesar dressing beautifully.
The Cooking Process Explained
The journey to a perfect chicken Caesar wrap begins with preparing your chicken. Pat the chicken breasts completely dry with paper towels—this step is crucial for getting a nice golden exterior. Season both sides generously with garlic powder, black pepper, paprika, and a pinch of salt. Heat a skillet over medium-high heat with a drizzle of olive oil, and once it's shimmering, add your chicken. Cook for 6-7 minutes on the first side without moving it, allowing a beautiful golden crust to form, then flip and cook another 5-6 minutes until the internal temperature reaches 165°F.
While the chicken rests on a cutting board—and it must rest for at least 5 minutes—prepare your lettuce. Wash the romaine thoroughly and dry it completely using a salad spinner or clean kitchen towels. Any water clinging to the leaves will dilute your dressing and create sogginess. Chop the lettuce into thin ribbons about half an inch wide. This size is perfect for wraps—large enough to maintain crunch but small enough to distribute evenly and make eating manageable.
Now comes the critical assembly phase where technique truly matters. Warm your tortillas one at a time in a dry skillet over medium heat for about 15-20 seconds per side, just until they're pliable and show a few light brown spots. Place the warmed tortilla on a clean work surface and spread about two tablespoons of Caesar dressing in a horizontal line across the center, leaving about two inches bare on each side. The dressing acts as both flavor and a light adhesive that helps everything stick together.
Layer your chopped romaine over the dressed area, then slice your rested chicken into thin strips and arrange them over the lettuce. Sprinkle generous amounts of grated parmesan cheese over the chicken—don't be shy here, as the cheese adds crucial flavor and helps bind everything together. At this point, you can add an extra drizzle of dressing if you like your wraps particularly creamy, though be careful not to oversaturate.
The folding technique determines whether your wrap stays together or falls apart mid-meal. Fold the sides of the tortilla inward over the filling, then grab the edge closest to you and fold it up and over the filling, tucking it under the ingredients as you roll away from yourself. Keep the roll tight but not so tight that filling squeezes out the ends. The final wrap should be compact and neat, with the seam side down. For the cleanest eating experience, slice the wrap in half diagonally with a sharp knife, which also makes for beautiful presentation.
Mistakes to Avoid
The most common mistake with any chicken Caesar wrap is overcooking the chicken, which results in dry, tough meat that no amount of dressing can salvage. Invest in an instant-read thermometer and pull your chicken off the heat the moment it reaches 165°F internally. Remember that carryover cooking will add another few degrees as it rests, so erring on the side of slightly underdone while it's in the pan actually leads to perfectly cooked chicken after resting.
Don't skip warming your tortillas—this seemingly small step makes an enormous difference in both taste and functionality. Cold tortillas straight from the package are stiff and prone to cracking when you try to fold them. They also taste flat and add nothing to the overall experience. Just 30 seconds of warming transforms them into pliable, slightly toasty wraps that contribute their own subtle flavor to every bite.
Using wet lettuce is a cardinal sin in wrap-making. Water and oil-based dressing don't mix, and any moisture on your lettuce will prevent the dressing from adhering properly while simultaneously making your tortilla soggy. Take the extra minute to thoroughly dry your lettuce—your future self will thank you when you're enjoying a crisp, non-soggy wrap.
Overfilling is perhaps the most tempting mistake, especially when all your ingredients look so delicious. But a wrap that's stuffed beyond capacity is impossible to fold properly and uncomfortable to eat. Stick to the portions in the recipe—they've been carefully calibrated to create a satisfying wrap that holds together. You can always make another wrap if you're extra hungry.
Finally, don't assemble these too far in advance unless you're planning to wrap them extremely well. The chicken Caesar wrap tastes best when the tortilla still has a bit of warmth and everything is freshly combined. If you must make them ahead, wrap each one tightly in plastic wrap or foil, pressing out as much air as possible, and store them seam-side down in the refrigerator. Even with perfect wrapping, they're best consumed within 24 hours of assembly.
How to Serve This
A chicken Caesar wrap is wonderfully complete on its own, but pairing it with the right sides elevates it from quick lunch to proper meal. A handful of crispy sweet potato fries or baked potato wedges adds warmth and substance—the slight sweetness of the potatoes contrasts beautifully with the savory, tangy Caesar flavors. Seasoned with paprika and garlic powder to echo the chicken's seasoning, they create a cohesive flavor experience.
For a lighter accompaniment, consider a simple tomato and cucumber salad dressed with lemon juice and olive oil. The fresh, bright vegetables provide a cooling counterpoint to the rich, creamy wrap, and the acidity helps cleanse your palate between bites. This combination works particularly well during warmer months when you want something satisfying but not heavy.
A bowl of soup transforms your chicken Caesar wrap into a more substantial dinner. Tomato soup, lentil soup, or even a light vegetable broth-based soup pairs wonderfully, creating that classic soup-and-sandwich combination that feels both comforting and complete. The warm soup contrasts nicely with the cool, crisp elements of the wrap.
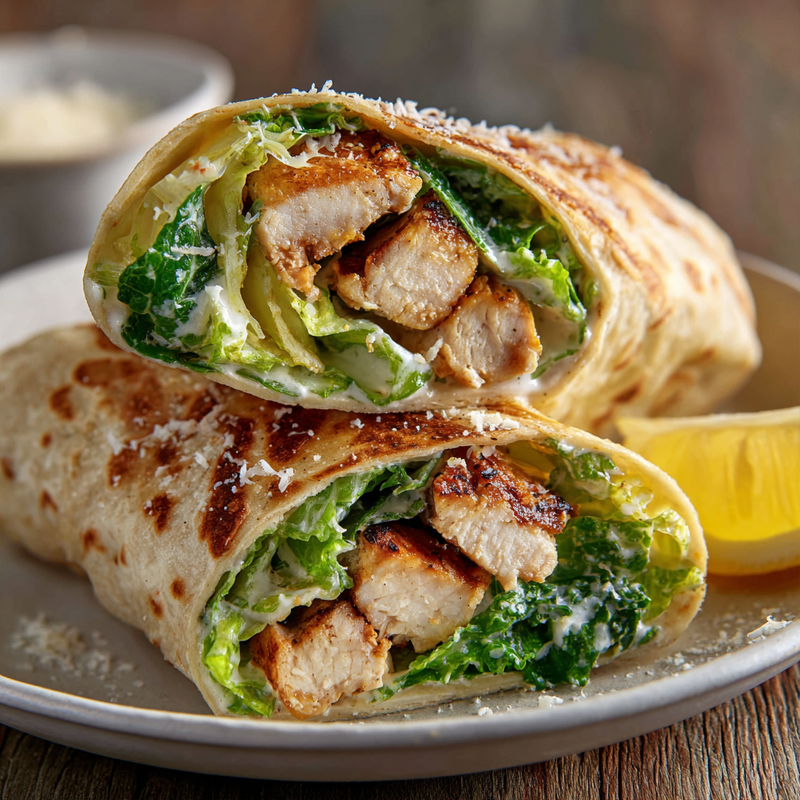
For visual appeal and practical eating, always slice your wraps on a diagonal and stand them cut-side up on the plate. This shows off the beautiful layers of green lettuce, golden chicken, and creamy dressing. Garnish the plate with a lemon wedge and a sprinkle of parmesan cheese for a restaurant-style presentation that takes seconds but looks impressive.
When serving for a gathering, arrange the wraps on a large platter, alternating directions to create visual interest. You can also offer a small bowl of extra Caesar dressing on the side for those who like their wraps particularly saucy, along with extra parmesan cheese and lemon wedges for customization.
Make-Ahead and Storage Guide
The beauty of this chicken Caesar wrap lies in its flexibility for advance preparation. You can cook the chicken up to three days ahead and store it in an airtight container in the refrigerator. When you're ready to assemble your wraps, simply slice the cold chicken—it actually slices more cleanly when chilled—and it will come to a pleasant temperature from the warmth of the tortilla and your hands during assembly.
Washed and dried lettuce keeps well for 2-3 days when stored properly. Layer the chopped romaine between paper towels in an airtight container or zip-top bag, which absorbs any residual moisture while keeping the lettuce crisp. This setup makes assembling wraps incredibly quick—you can literally go from refrigerator to eating in under five minutes.
Fully assembled wraps can be stored in the refrigerator for up to two days if wrapped tightly in plastic wrap or foil. The key is eliminating air exposure, which causes the tortilla to dry out and the lettuce to wilt. Wrap each one individually, pressing out air as you go, and store them seam-side down. When you're ready to eat, you can enjoy them cold or warm them briefly in a low oven (300°F for about 5 minutes) if you prefer.
Freezing assembled wraps isn't recommended because the lettuce and dressing don't survive the thaw well—they become watery and limp. However, you can absolutely freeze the cooked, seasoned chicken for up to three months. Thaw it overnight in the refrigerator, then proceed with fresh assembly using freshly prepared lettuce and dressing.
For reheating leftover chicken specifically, the microwave works well—place slices on a microwave-safe plate, cover with a damp paper towel, and heat in 20-second intervals until just warmed through. Alternatively, you can warm slices in a skillet over medium-low heat for a minute or two per side. Avoid overheating, which will dry out the chicken and undo all your careful cooking from before.
Reader Questions Answered
Can I make this chicken Caesar wrap with rotisserie chicken?
Absolutely! Rotisserie chicken is a fantastic shortcut that cuts your prep time in half. Simply shred or slice the breast meat and use it as directed in the recipe. The rotisserie chicken is already seasoned and cooked, so you're just assembling. This makes the recipe even more accessible for busy weeknights when cooking chicken from scratch feels like too much effort.
What's the best way to pack these wraps for lunch?
Wrap each one tightly in foil or plastic wrap, making sure to press out air pockets as you wrap. Store them seam-side down in your lunch bag with an ice pack to keep everything fresh and food-safe. If you're concerned about sogginess, you can pack the dressing separately in a small container and add it just before eating, though properly assembled wraps hold up well for several hours.
Can I use a different type of lettuce?
While romaine is traditional and provides the best texture, you can substitute with other sturdy greens if necessary. Iceberg lettuce offers similar crunch but less flavor. Mixed baby greens work in a pinch but lack the signature crunch—they create a different but still pleasant wrap experience. Avoid delicate lettuces like butter lettuce or mesclun, which wilt too quickly and don't provide enough structure.
How do I make this recipe lower in calories?
Use a light Caesar dressing or reduce the amount to one tablespoon per wrap instead of two. Choose whole wheat or low-carb tortillas, which often have fewer calories and more fiber than standard flour tortillas. You can also increase the lettuce-to-chicken ratio slightly, which adds volume and crunch without adding calories. These simple swaps can reduce the calorie count by 100-150 calories per wrap while maintaining satisfying flavors.
Can I add other vegetables to this wrap?
Definitely! Thinly sliced tomatoes add juicy freshness, though place them closer to the chicken rather than the tortilla to prevent sogginess. Thinly sliced cucumber adds extra crunch and a cooling element. Shredded carrots contribute color and subtle sweetness. Just be mindful not to overstuff the wrap, which makes folding difficult and eating messy. Add one or two additional vegetables at most to maintain structural integrity.
What size tortillas work best for this recipe?
Large 10-inch flour tortillas are ideal—they provide enough surface area to hold generous filling while still being manageable to fold and eat. Smaller 8-inch tortillas work but require less filling, resulting in a less substantial wrap. Burrito-size 12-inch tortillas can work but may feel unwieldy and create an unbalanced filling-to-tortilla ratio. Stick with the 10-inch size for the best results and most satisfying proportions.
Chicken Caesar Wrap
A delicious chicken Caesar wrap featuring tender seasoned chicken, crisp romaine lettuce, creamy Caesar dressing, and parmesan cheese wrapped in a warm flour tortilla. Perfect for lunch or dinner.
Prep Time
10 min
Cook Time
15 min
Total Time
25 min
Servings
4 wraps
Ingredients
For 4 wraps
- 1 pound boneless, skinless chicken breasts
- 1 teaspoon garlic powder
- 1/2 teaspoon black pepper
- 1/2 teaspoon paprika
- 1/2 teaspoon salt
- 1 tablespoon olive oil
- 4 large flour tortillas (10-inch)
- 4 cups romaine lettuce, washed, dried, and chopped into thin ribbons
- 1/2 cup Caesar dressing, plus more for serving
- 3/4 cup freshly grated parmesan cheese
- 1 lemon, cut into wedges for serving (optional)
Instructions
- 1
Prepare the chicken
Pat the chicken breasts completely dry with paper towels. This helps achieve a golden crust during cooking. Season both sides generously with garlic powder, black pepper, paprika, and salt, pressing the seasonings into the meat.
- 2
Cook the chicken
Heat olive oil in a large skillet over medium-high heat until shimmering. Add the seasoned chicken breasts and cook for 6-7 minutes on the first side without moving them, allowing a golden crust to form. Flip and cook for another 5-6 minutes until the internal temperature reaches 165°F.
- 3
Rest the chicken
Transfer the cooked chicken to a cutting board and let it rest for at least 5 minutes. This allows the juices to redistribute throughout the meat, ensuring moist, tender chicken. After resting, slice the chicken into thin strips.
- 4
Prepare the lettuce
While the chicken rests, wash the romaine lettuce thoroughly and dry it completely using a salad spinner or clean kitchen towels. Any water on the lettuce will make the wrap soggy. Chop the lettuce into thin ribbons about half an inch wide.
- 5
Warm the tortillas
Heat a dry skillet over medium heat. Warm each tortilla for about 15-20 seconds per side, just until pliable and showing a few light brown spots. This makes them easier to fold and adds subtle toasted flavor.
- 6
Apply the dressing
Place one warmed tortilla on a clean work surface. Spread about 2 tablespoons of Caesar dressing in a horizontal line across the center of the tortilla, leaving about 2 inches bare on each side. The dressing acts as both flavor and a light adhesive.
- 7
Layer the filling
Place about 1 cup of chopped romaine lettuce over the dressed area. Top with one-quarter of the sliced chicken strips, arranging them evenly over the lettuce. Sprinkle about 3 tablespoons of grated parmesan cheese over the chicken.
- 8
Fold the wrap
Fold the left and right sides of the tortilla inward over the filling. Then grab the edge closest to you and fold it up and over the filling, tucking it tightly under the ingredients as you roll away from yourself. Keep the roll tight but not so tight that filling squeezes out.
- 9
Slice and serve
Place the wrap seam-side down and slice it in half diagonally with a sharp knife for easier eating and beautiful presentation. Repeat the assembly process with the remaining three tortillas and ingredients. Serve immediately with lemon wedges and extra Caesar dressing if desired.
Nutrition Facts
Per serving (estimated)
485 calories
Calories
38g
Carbs
35g
Protein
20g
Fat
3g
Fiber
890mg
Sodium
3g
Sugar


