
Burger Bowls: Easy Meal Prep for the Whole Week
Transform your week with burger bowls that taste amazing after 5 days! Complete guide to batch cooking, storing, and customizing this perfect meal prep recipe.
cookwithlucia.com/recipes/burger-bowls
Picture this: it's Sunday afternoon, and instead of dreading the upcoming week of scrambling to throw together last-minute dinners, you're about to invest just one hour in your kitchen that will pay dividends for the next five days. That's the magic of meal prepping with burger bowls. These deconstructed beauties capture everything you love about a classic burger—savory seasoned beef, crisp vegetables, tangy pickles, and that signature sauce—but in a format that actually improves as it sits in your fridge. No more soggy buns, no more guilt about grabbing takeout on Tuesday night when you're exhausted. Instead, you'll have perfectly portioned, completely satisfying meals waiting for you, ready to reheat and devour in minutes. Whether you're packing lunch for the office, feeding yourself after a long day, or planning ahead for your family's busy schedule, burger bowls deliver on convenience without sacrificing a single bit of flavor.
Why This Recipe Is Perfect for Meal Prep
The genius of burger bowls lies in their ingredient architecture. Every single component is designed to withstand time. The seasoned ground beef actually tastes better on day three than it does fresh, as the spices have time to penetrate deeper into the meat. The crisp lettuce, when stored separately or added fresh, maintains its crunch. The cheese, tomatoes, and pickles all hold their integrity beautifully in the refrigerator. Unlike traditional burgers where the bun becomes a soggy mess within hours, these bowls keep each element distinct and delicious.
From a nutritional standpoint, burger bowls offer complete macronutrient balance in every container. You're getting quality protein from the beef, complex carbohydrates from your chosen base (whether that's rice, quinoa, or roasted potatoes), healthy fats from cheese and sauce, and vital micronutrients from the fresh vegetables. This isn't just convenient food—it's genuinely nourishing food that will keep you satisfied for hours.
The texture profile is another meal prep victory. You've got the tender, juicy meat contrasting with crisp vegetables, creamy sauce against fluffy grains, and those little pops of acidity from pickles throughout. Even after several days in the fridge, these contrasts remain distinct. The flavors don't blur together into one homogeneous mass the way some meal prep recipes do. Each bite still delivers complexity and interest, which means you won't suffer from meal prep fatigue halfway through the week.
What You'll Need
Let's talk about the foundation of great burger bowls, starting with the protein. You'll want two pounds of ground beef with an 85/15 or 80/20 fat ratio. Don't go too lean here—that fat keeps the meat juicy throughout the week and carries all those beautiful seasonings. If you're buying in bulk, this is your moment. Ground beef freezes exceptionally well, so stock up when it's on sale.
For your base layer, I recommend preparing four cups of cooked rice, quinoa, or diced roasted potatoes. Each option brings something different to the table. Rice is classic and budget-friendly, quinoa adds extra protein and a nuttier flavor, while roasted potatoes give you that satisfying, hearty feeling that really mimics the experience of burger and fries. Choose based on your nutritional goals and what you're craving.
The vegetable selection is where you can exercise some creativity, but I always include shredded lettuce, diced tomatoes, sliced pickles, and diced red onion. Buy whole heads of lettuce rather than pre-shredded bags—they last longer and maintain better texture. For tomatoes, Roma or grape varieties hold up better than beefsteak. Keep pickles in their brine in a separate small container; they'll stay perfect all week.
Cheese is non-negotiable in my burger bowls. Shredded cheddar is classic, but you could also use American cheese slices, pepper jack for heat, or even crumbled blue cheese if you're feeling adventurous. Buy a block and shred it yourself—pre-shredded cheese contains anti-caking agents that affect melting and texture.
For containers, invest in glass meal prep containers with divided sections if possible. The four-compartment style lets you keep wet ingredients separate from dry ones, which extends the life of everything significantly. If you're using single-compartment containers, that works too, but you'll want some small containers on the side for sauce and any ingredients you want to keep especially fresh.
The Batch Cooking Method
The key to efficient burger bowl meal prep is working in stations and letting multiple things happen simultaneously. Start by getting your base cooking first—whether that's rice in a rice cooker, quinoa on the stovetop, or potatoes in the oven. This is your longest passive cooking time, so initiate it before anything else. While that's happening, you can focus entirely on the other components without watching a pot.
Once your base is underway, turn your attention to browning the ground beef. Use your largest skillet over medium-high heat, breaking the meat into small crumbles as it cooks. This isn't the time for large chunks—smaller pieces mean more surface area for seasoning and better distribution in your bowls. Season generously with salt, pepper, garlic powder, onion powder, and a touch of smoked paprika. I also add a tablespoon of tomato paste directly to the cooking meat for depth and that classic burger sauce essence.
While the beef is browning (this takes about eight to ten minutes), set up your vegetable prep station. Wash and shred your lettuce, dice your tomatoes, slice your onions, and portion out your pickles. If you're organized, you can knock out all this chopping in the time it takes the meat to cook through. Work on a large cutting board and have all your containers ready nearby—this assembly line approach is what turns an overwhelming task into a smooth operation.
The moment your beef is fully cooked and your base is done, it's time to start portioning. I work with five large glass containers lined up on my counter. First, divide the base evenly among all five containers. Then comes the seasoned beef, distributed equally. At this point, you have a decision to make: add the vegetables now, or keep them separate to add fresh each day. For maximum convenience, I add everything except the lettuce and tomatoes immediately, then keep those in separate containers to add fresh daily. The sauce always goes in its own small container—never pour it over in advance or everything gets soggy.
The Weekly Game Plan
Sunday afternoon is your power hour. This is when you'll do all the heavy lifting: cooking the protein and base, prepping the vegetables, portioning everything into containers, and getting your entire week organized. Set aside sixty to seventy-five minutes of uninterrupted time. Put on some music, pour yourself something cold to drink, and embrace this investment in your future self. By dinnertime Sunday, you'll have five complete burger bowl meals lined up in your refrigerator, and the relief you'll feel is absolutely worth the effort.
Monday through Wednesday are your prime eating days. The burger bowls during this window are at their absolute peak—the flavors have melded beautifully overnight, but everything is still fresh and vibrant. On these days, simply grab a container from the fridge, reheat the beef and base together (leaving vegetables to the side if you packed them separately), add any fresh elements you're storing separately, drizzle with sauce, and enjoy. Total time from fridge to table: four minutes.
Thursday and Friday require just a touch more attention to keep things interesting. By this point, you might be experiencing a bit of flavor fatigue, so this is when I switch up the toppings or sauce. Maybe Monday through Wednesday you used a classic burger sauce, but Thursday you switch to ranch dressing or a spicy mayo. Perhaps you add some fresh avocado or a different type of pickle. These tiny variations make a massive difference in preventing meal prep burnout while still honoring the work you did on Sunday.
If you're prepping for a family or want to extend your efforts beyond five days, consider doing a mid-week refresh on Wednesday evening. Spend just twenty minutes cooking a fresh batch of beef or grilling some chicken to swap in for variety. You can reuse the same base and vegetables, but that hit of freshly cooked protein makes Thursday and Friday feel like brand new meals rather than leftovers.
Smart Storage and Reheating
Container choice genuinely matters for burger bowl success. Glass containers with snap-lock lids are my gold standard—they don't absorb odors, they're microwave-safe, and they allow you to see exactly what you're grabbing without opening the fridge. The divided containers I mentioned earlier are perfect because you can keep the hot components (beef and base) in the large section, with smaller compartments for pickles, onions, and cheese. This separation prevents everything from turning into a uniform temperature mush.
If you're using plastic containers, make sure they're BPA-free and genuinely microwave-safe. Lower quality plastic can warp or leach chemicals when heated repeatedly. I've found that the heavier, more rigid plastic containers hold up better than the flimsy takeout-style ones. Whatever material you choose, make sure the lids seal completely—you don't want any air exposure that will dry out your ingredients or allow fridge odors to penetrate.
For refrigerator storage, your fully assembled burger bowls will maintain excellent quality for five days. The beef and base stay delicious for the full workweek, the hard vegetables like onions and pickles last even longer, and cheese holds up beautifully. Lettuce and tomatoes are the only components I recommend storing separately and adding fresh—they'll last the full five days in their own containers but get a bit wilted if mixed with the warm ingredients from day one.
Reheating technique varies based on your setting. At home, I transfer the beef and base to a skillet over medium heat for three to four minutes, stirring occasionally until everything is heated through and slightly crispy on the edges. This method gives you the best texture and takes no longer than microwaving. In an office setting, microwave on high for ninety seconds, stir, then continue for another sixty seconds. The key is not overheating the beef or it becomes tough. For the vegetables and cheese, add those after reheating—the residual heat will warm them gently without cooking them further.
Freezer storage is your secret weapon for extending this meal prep beyond one week. The seasoned beef freezes exceptionally well for up to three months. Portion it into individual servings in freezer-safe bags, press out all the air, and lay them flat for efficient storage. Your base also freezes well, though the texture of rice and quinoa is slightly better than potatoes after freezing. Vegetables generally don't freeze well, so always keep those fresh. When you're ready to use frozen components, thaw in the refrigerator overnight, then reheat as normal.
Customization Ideas
The beauty of burger bowls is that the template accepts endless variations. For protein alternatives, ground turkey or chicken work beautifully with the same seasoning profile—just be extra careful not to overcook them as they dry out faster than beef. For a vegetarian version, seasoned black beans or lentils capture that hearty, savory quality surprisingly well. I've even made these with crumbled tempeh for plant-based eaters, and the feedback was enthusiastic.
Your base layer is incredibly flexible depending on your dietary approach. If you're following a lower-carb lifestyle, replace the grains entirely with cauliflower rice or a double portion of lettuce for a true salad-style bowl. For those focused on whole grains, farro or bulgur wheat add wonderful chewy texture and nutty flavor. Sweet potato cubes, roasted until caramelized, bring a touch of sweetness that plays beautifully against the savory beef and tangy pickles.
Sauce variations completely transform the flavor profile while keeping your prep work identical. A classic burger sauce made with mayonnaise, mustard, and a touch of relish is the traditional choice. But you could just as easily go with ranch dressing for a bacon cheeseburger vibe, tahini sauce for Mediterranean flair, or a spicy sriracha mayo if you like heat. I often make two different sauces on Sunday and alternate them throughout the week to keep my palate interested.
For scaling purposes, this recipe multiplies beautifully. If you're meal prepping for two people, simply double everything and you'll have ten meals ready to go. The cooking time increases only marginally—you might need an extra five minutes to brown four pounds of beef instead of two, but that's it. For families with children, consider making a milder version without onions or pickles, letting everyone customize their own bowls with toppings they enjoy. The modular nature of burger bowls makes them exceptionally kid-friendly since picky eaters can skip what they don't like.
Meal Prep FAQ
How long do burger bowls really last in the fridge?
When stored properly in airtight containers, burger bowls maintain excellent quality for five full days. The cooked ground beef and grain base are the most perishable components, and they stay safe and delicious through that five-day window. After day five, the food is technically still safe if your fridge maintains proper temperature below 40°F, but the quality starts to decline noticeably. The flavors become more muted and the textures less appealing. For maximum freshness and food safety, I don't recommend pushing beyond five days—if you need longer meal prep coverage, use your freezer instead.
What containers work best for taking burger bowls to work?
For office lunch situations, I strongly recommend insulated lunch bags with ice packs, especially if you don't have immediate access to refrigeration. Glass containers with secure, leak-proof lids are ideal because they go straight from fridge to microwave without any transfers. The three-compartment style keeps everything properly separated until you're ready to heat and eat. If your workplace has limited microwave access during peak lunch hours, consider bringing your burger bowl cold and eating it as a composed salad—it's genuinely delicious that way too, especially in warmer months. Just make sure your sauce is well-sealed in a separate small container to prevent any lunchbox disasters.
Can kids take burger bowls in their lunchboxes?
Absolutely, and kids often love the deconstructed format because they can eat each component separately or mixed together based on their preference. For school lunchboxes, you'll want to pack the burger bowl cold rather than heating it, which actually works perfectly well. Use an insulated lunch box with an ice pack to keep everything at safe temperatures. Consider packing the beef and base in one container, vegetables in another, and cheese plus sauce in small separate containers. Many kids enjoy assembling their own bowls at lunchtime, which gives them a sense of control and makes them more likely to actually eat what you've packed. Skip the onions and pickles if your child is sensitive to strong flavors, and consider adding some cut fruit or veggie sticks on the side for a complete meal.
How do I avoid getting tired of eating the same thing all week?
Meal prep fatigue is real, but burger bowls offer built-in solutions. The most effective strategy is varying your sauce daily—five different sauces make five different meals even when the base components are identical. I also recommend keeping a variety of quick-add toppings available: one day add avocado, another day add jalapeños, another day throw on some crispy onions for crunch. If you're particularly sensitive to food boredom, prep just three days of burger bowls instead of five, and plan a completely different meal for the other days. You can also alternate proteins mid-week by cooking a fresh batch of ground turkey or chicken on Wednesday to replace the beef in your Thursday and Friday containers. The modular nature of this recipe means you're never locked into monotony.
Do the flavors really get better after a day or two?
Yes, and this is one of my favorite aspects of burger bowls as a meal prep choice. The seasoned ground beef undergoes a genuine flavor improvement as it rests. The spices—garlic powder, onion powder, paprika, salt, and pepper—penetrate deeper into the meat rather than just sitting on the surface. The savory, umami qualities intensify. The meat also reabsorbs some of its own juices as it cools, making it more moist and flavorful. By day two or three, you're eating a more cohesive, developed version of the dish than what you had fresh out of the pan. This is why burger bowls are actually superior to cooking fresh every day—you're literally getting a better product through strategic meal prep. The vegetables maintain their fresh crunch if stored properly, and the contrast between the deeply flavored meat and the bright vegetables becomes even more pronounced and delicious.
Can I freeze individual portions for longer storage?
Freezing is an excellent strategy for extending your burger bowl meal prep beyond one week. The ground beef component freezes beautifully for up to three months—portion it into individual serving sizes in freezer-safe bags or containers, label them with the date, and stack them efficiently in your freezer. Your grain base also freezes well, though I find the texture is slightly better with rice and quinoa than with potatoes. The crucial rule is to never freeze the fresh vegetables or cheese—these components don't survive freezing and should always be added fresh. When you're ready to eat a frozen burger bowl, transfer it to the refrigerator the night before to thaw slowly, then reheat as normal and add your fresh vegetables, cheese, and sauce. This approach lets you prep multiple weeks of burger bowls in one ambitious cooking session, giving you a freezer full of ready-to-go meals for those weeks when life gets too chaotic for any cooking whatsoever.
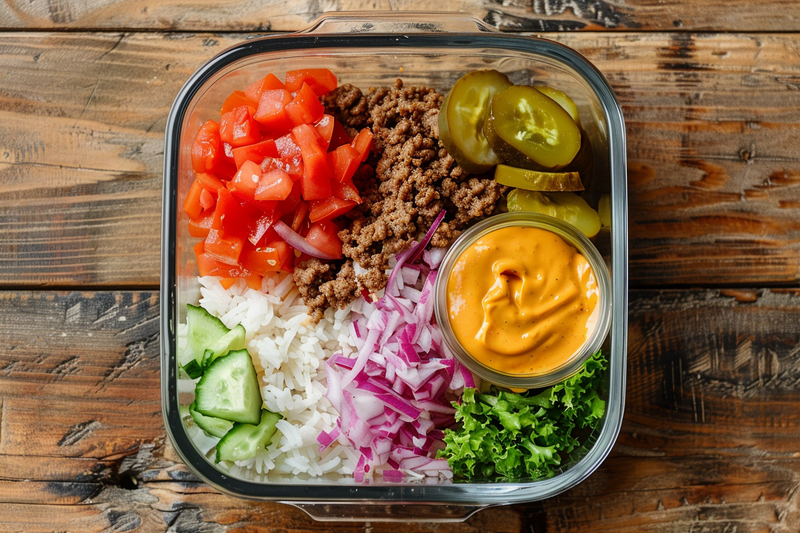
Burger Bowls
Deconstructed burger bowls with seasoned ground beef, fresh vegetables, cheese, and your choice of base, perfect for weekly meal prep. All the flavor of a classic burger in a convenient, healthy bowl format.
Prep Time
20 min
Cook Time
25 min
Total Time
45 min
Servings
5 servings
Ingredients
For 5 servings
- 2 pounds ground beef (85/15 or 80/20 fat ratio)
- 1 tablespoon tomato paste
- 2 teaspoons garlic powder
- 2 teaspoons onion powder
- 1 teaspoon smoked paprika
- 1.5 teaspoons salt
- 1 teaspoon black pepper
- 4 cups cooked rice, quinoa, or diced roasted potatoes
- 4 cups shredded lettuce
- 2 cups diced tomatoes
- 1 cup sliced dill pickles
- 1 cup diced red onion
- 2 cups shredded cheddar cheese
- 1 cup burger sauce or dressing of choice
Instructions
- 1
Prepare the base
Cook your chosen base according to package directions. For rice, use 2 cups uncooked rice with 4 cups water or broth. For quinoa, use 1.5 cups uncooked quinoa with 3 cups liquid. For potatoes, dice 2 pounds of potatoes into half-inch cubes and roast at 425°F for 25-30 minutes until golden. Set aside to cool slightly while you prepare the other components.
- 2
Brown the beef
Heat a large skillet over medium-high heat. Add the ground beef and break it into small crumbles using a wooden spoon or spatula. Cook for 8-10 minutes, stirring occasionally, until the beef is completely browned with no pink remaining. Break the meat into small, uniform pieces for easy eating and even distribution in your meal prep bowls.
- 3
Season the meat
Once the beef is fully browned, add the tomato paste, garlic powder, onion powder, smoked paprika, salt, and black pepper directly to the skillet. Stir thoroughly to coat every piece of meat with the seasoning mixture. Cook for an additional 2-3 minutes to toast the spices and let the tomato paste caramelize slightly, which deepens the flavor significantly.
- 4
Drain excess fat
Carefully tilt the skillet and spoon out excess fat, leaving just enough to keep the meat moist but not greasy. You want to remove about half to two-thirds of the rendered fat. This step is crucial for meal prep because excess fat can separate and pool in your containers during storage, affecting both texture and appearance.
- 5
Prep the vegetables
While the beef cools slightly, prepare all your vegetables. Wash and thoroughly dry the lettuce, then shred or chop it into bite-sized pieces. Dice the tomatoes, removing excess seeds if they're particularly watery. Slice the pickles if using whole ones, and dice the red onion into small pieces. Keep each vegetable in separate prep bowls for easy assembly.
- 6
Set up assembly station
Line up five large meal prep containers on your counter. Have all your components ready: cooked base, seasoned beef, shredded cheese, and prepared vegetables. This assembly-line approach makes portioning quick and ensures each container gets exactly the same amount of every ingredient for consistent meals throughout the week.
- 7
Layer the base
Divide the cooked base evenly among all five containers, placing about three-quarters to one cup in each. Pack it down slightly to create a stable foundation. If you're using rice or quinoa, fluff it with a fork first so it doesn't clump. For roasted potatoes, arrange them in a single layer when possible so they reheat evenly.
- 8
Add the protein
Portion the seasoned ground beef evenly across all five containers, placing it directly on top of the base layer. You should have roughly six to seven ounces of cooked beef per container. Make sure the beef is still slightly warm when you portion it so it settles nicely, but not so hot that it creates condensation in sealed containers.
- 9
Add vegetables strategically
Here you have two options: add all vegetables now for maximum convenience, or keep lettuce and tomatoes separate to add fresh daily for best texture. Add the pickles, onions, and shredded cheese to all containers immediately—these ingredients hold up perfectly throughout the week. If adding lettuce and tomatoes now, place them in a separate compartment if using divided containers.
- 10
Portion the sauce
Never pour sauce directly over the burger bowls in advance. Instead, portion your burger sauce or chosen dressing into five small containers with tight-sealing lids—about 2-3 tablespoons per container. Store these separately and add the sauce right before eating to maintain the perfect texture of all other ingredients.
- 11
Cool and store
Allow the containers to cool to room temperature for about 15-20 minutes before sealing and refrigerating. This prevents condensation buildup that can make ingredients soggy. Once cooled, seal all containers tightly and stack them efficiently in your refrigerator where you can easily grab one each day.
- 12
Reheat and serve
When ready to eat, remove the container from the refrigerator. If you stored vegetables separately, remove them temporarily. Microwave the beef and base for 90 seconds on high, stir, then heat for another 60 seconds until steaming hot throughout. Alternatively, transfer to a skillet and reheat over medium heat for 3-4 minutes. Add any fresh vegetables, sprinkle cheese on top to melt from residual heat, drizzle with sauce, and enjoy immediately.
Nutrition Facts
Per serving (estimated)
485 calories
Calories
38g
Carbs
35g
Protein
21g
Fat
4g
Fiber
890mg
Sodium
5g
Sugar


