
Bunny Paw Print Cookies: Adorable Treats for Any Occasion
These adorable Bunny Paw Print Cookies feature soft vanilla cookies with chocolate pad details. Perfect for spring gatherings and family fun!
cookwithlucia.com/recipes/bunny-paw-print-cookies
Picture this: you walk into the room carrying a platter of perfectly golden cookies, each one topped with the sweetest little bunny paw prints pressed gently into the surface. Eyes light up instantly. Someone gasps with delight. Before you even set the tray down, hands are reaching, phones are snapping photos, and everyone's asking how you managed to create something so absolutely charming. These Bunny Paw Print Cookies deliver that exact moment of joy every single time.
The beauty of these cookies lies not just in their undeniable cuteness, but in how surprisingly simple they are to make. You don't need any fancy equipment, professional piping skills, or hours of intricate decorating. The technique is straightforward enough that even baking beginners can achieve picture-perfect results on their first attempt. The secret is in the clever use of simple chocolate pieces arranged to mimic those adorable bunny paw pads.
What makes these Bunny Paw Print Cookies truly special is the combination of tender, buttery cookie base with sweet chocolate accents that melt just slightly into the warm surface. The texture is soft without being cakey, with just enough structure to hold its shape beautifully. They're the kind of cookies that disappear from the plate at family gatherings, weekend afternoon tea parties, or cozy evenings when you want something sweet that brings smiles along with flavor. Let me walk you through everything you need to know to create these delightful treats in your own kitchen.
What Makes This a Showstopper
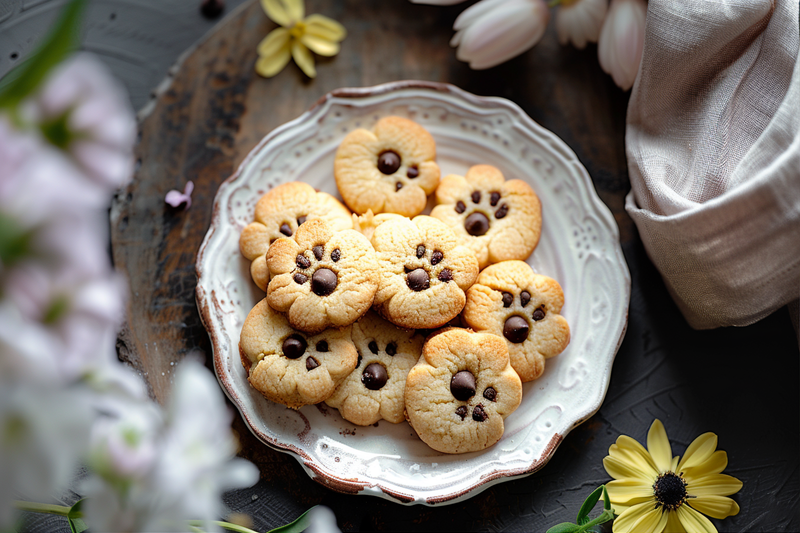
The visual impact of Bunny Paw Print Cookies is immediate and irresistible. Each cookie becomes a tiny canvas showcasing three perfectly placed chocolate drops arranged as toe pads, with a larger chocolate piece forming the main paw pad below. The contrast between the pale golden cookie surface and the rich chocolate creates dimension and character that makes each cookie look like a miniature work of art. They photograph beautifully from every angle, which is why they've become such a favorite for sharing on social media and bringing to gatherings where presentation matters.
Beyond their adorable appearance, the flavor experience delivers exactly what you want from a premium cookie. That first bite reveals a tender crumb with rich vanilla notes and the unmistakable taste of real butter. The chocolate paw pads add pockets of sweetness that complement rather than overwhelm the cookie base. The texture contrast between the soft cookie and the smooth chocolate creates interest in every bite, keeping you reaching for just one more.
These cookies impress without requiring the skills of a pastry chef or the budget of a specialty bakery. You're working with familiar ingredients and straightforward techniques, yet the finished product looks like something you'd find in an upscale bakery window with a premium price tag. The charm factor is off the charts, but the actual process is forgiving and flexible. Even if your paw prints aren't perfectly symmetrical, they'll still be adorable. That's the magic of Bunny Paw Print Cookies: they look sophisticated while being genuinely accessible to home bakers at any skill level.
The Ingredients That Matter Most
The foundation of exceptional Bunny Paw Print Cookies starts with quality butter. This is where I encourage you to splurge just a bit. Real butter with a high butterfat content creates that melt-in-your-mouth texture and rich flavor that margarine simply cannot replicate. The butter should be softened to room temperature so it creams beautifully with the sugar, creating those tiny air pockets that give the cookies their tender structure. I always leave mine on the counter for about an hour before I begin.
Pure vanilla extract is your second non-negotiable ingredient. The vanilla flavor shines through clearly in these cookies since the flavor profile is intentionally simple and elegant. Imitation vanilla will work in a pinch, but the warmth and depth of real vanilla extract elevates these from ordinary to memorable. I use a full tablespoon to ensure that vanilla note carries through every bite.
For the chocolate paw pads, semi-sweet chocolate chips work wonderfully and are readily available everywhere. However, I've also had excellent results with dark chocolate chips for a more sophisticated flavor, or milk chocolate for sweeter appeal especially when making these for younger family members. The key is using chips that will soften slightly when pressed into the warm cookies but still hold their shape as they cool. Mini chocolate chips work perfectly for the three small toe pads, while regular-sized chips create the larger main pad.
All-purpose flour forms the structure, and I recommend measuring by weight if you have a kitchen scale, or using the spoon-and-level method if measuring by volume. Too much flour makes the cookies dry and crumbly, while too little leaves them spreading too thin. Eggs should be large size and at room temperature so they incorporate smoothly into the butter mixture. Finally, a touch of baking powder gives just enough lift to create cookies with a soft, pillowy texture rather than flat crisps. These simple ingredients, when chosen thoughtfully and measured accurately, create Bunny Paw Print Cookies that taste as wonderful as they look.
Building It Step by Step
Creating perfect Bunny Paw Print Cookies follows a logical progression that builds confidence as you go. The process begins with creaming your softened butter and sugar together until the mixture becomes pale and fluffy, usually taking about three minutes with an electric mixer. This step is crucial because you're incorporating air that will help create that tender texture. You'll know it's ready when the mixture lightens in color and increases slightly in volume. Then you'll add your eggs one at a time, followed by that generous pour of vanilla extract, beating well after each addition until everything is completely smooth and unified.
The dry ingredients get whisked together separately before being gradually added to the butter mixture. I like to add the flour mixture in three stages, mixing on low speed just until the flour disappears into the dough. This is where restraint pays off. Overmixing at this stage develops too much gluten, which creates tough cookies instead of tender ones. The dough will be soft and slightly sticky, but it should hold together beautifully. If it seems too soft to handle, refrigerate it for twenty minutes to firm up before shaping.
Shaping the cookies is where your personal touch comes in. I roll the dough into balls about the size of a walnut, roughly one and a half tablespoons each. Place them on your prepared baking sheet with plenty of space between them since they'll spread as they bake. Here's the magic moment: before the cookies go into the oven, you'll gently press them down slightly with the palm of your hand to flatten them just a bit. This creates a nice surface area for your paw prints and ensures even baking.
The baking stage requires attention to timing. These Bunny Paw Print Cookies need to come out of the oven when they're just barely beginning to turn golden at the edges but still look slightly underdone in the center. They'll continue cooking on the hot pan after you remove them from the oven. Let them rest on the baking sheet for exactly two minutes, then comes the most fun part: pressing in your chocolate chips to create those adorable paw prints. The residual heat from the cookies will soften the chocolate slightly, helping them adhere perfectly. Work quickly but gently, pressing three mini chips in an arc for the toes, and one regular chip below for the main pad. Let them cool completely on the pan so the chocolate sets properly and the cookies firm up to the perfect texture.
Presentation and Plating Tips
Presenting your Bunny Paw Print Cookies with intention transforms them from sweet treats into conversation starters. I love arranging them on a simple white serving platter or a rustic wooden board, which allows the golden color of the cookies and the chocolate paw prints to really stand out. Layer them in overlapping circles, or create neat rows that showcase each adorable paw print. The key is giving each cookie enough visibility so guests can appreciate the details you've crafted.
For an extra touch of whimsy, consider nestling the cookies on a bed of shredded paper in pastel colors, or surrounding them with fresh flowers like daisies or small roses. A light dusting of powdered sugar over the entire platter creates a soft, dreamy effect that makes the chocolate paw prints pop even more. Just use a fine-mesh strainer and tap gently to avoid heavy-handed coverage. You want a whisper of sweetness, not a snowstorm.
If you're packaging these Bunny Paw Print Cookies as gifts or contributions to a gathering, clear cellophane bags tied with ribbon show them off beautifully. Stack three or four cookies per bag so the paw prints are visible through the cellophane. For transport to events, I use a shallow container with a single layer arrangement, placing small pieces of parchment paper between cookies if I need to stack them. The chocolate paw prints are fairly sturdy once set, but avoiding pressure on them keeps them looking pristine.
Scaling Up for a Crowd
When you need to multiply your Bunny Paw Print Cookies for a larger gathering, the recipe doubles and triples beautifully without any adjustments to technique or baking time. I've successfully made quadruple batches using my stand mixer, though you may need to mix in stages if your bowl capacity is limited. The key is maintaining those same careful measurements and mixing techniques regardless of batch size. Quality doesn't diminish with quantity when you stay attentive to the fundamentals.
Advance preparation is your best friend when baking large quantities. The cookie dough can be made up to two days ahead and stored tightly wrapped in the refrigerator. In fact, chilled dough is often easier to work with because it's less sticky and holds its shape better during scooping. You can even portion all your dough balls, arrange them on baking sheets, cover them well, and refrigerate overnight. The next day, you simply pull them out, let them sit at room temperature for ten minutes, then bake as directed. This strategy spreads the work across multiple days, making a large batch feel manageable.
For the most efficient workflow when baking dozens of Bunny Paw Print Cookies, set up an assembly line approach. Have one oven rack dedicated to baking while you're preparing the next tray. Keep your chocolate chips measured and ready in small bowls so you can quickly add paw prints to each batch as it comes out. The two-minute window after baking is ideal for pressing in the chocolate, so having everything organized prevents rushed, messy work. With good planning, you can produce several dozen picture-perfect cookies in a single afternoon without feeling overwhelmed.
Storing Any Leftovers
Proper storage keeps your Bunny Paw Print Cookies tasting fresh and looking beautiful for days after baking. Once the cookies have cooled completely and the chocolate has fully set, store them in an airtight container at room temperature. I like to place sheets of parchment paper between layers to prevent the cookies from sticking together and to protect those chocolate paw prints from getting smudged. Stored this way, they'll maintain their soft texture and fresh flavor for up to five days, though I'll admit they rarely last that long in my kitchen.
For longer storage, these cookies freeze exceptionally well. Arrange them in a single layer on a baking sheet and freeze until solid, about two hours. Then transfer the frozen cookies to freezer-safe containers or heavy-duty freezer bags, again layering parchment between them. Frozen Bunny Paw Print Cookies will keep their quality for up to three months. When you're ready to enjoy them, simply remove the number you want and let them thaw at room temperature for about thirty minutes. They'll taste remarkably fresh, with that same tender texture and clear chocolate definition.
If you're planning to transport these cookies or keep them at their absolute best for a special event, avoid refrigerating them if possible. The cold, dry environment of a refrigerator can make the cookies lose some of their soft texture, becoming slightly firm and less appealing. Room temperature storage or freezing both work better for maintaining that just-baked quality that makes these treats so special.
Variations to Explore
Once you've mastered the classic Bunny Paw Print Cookies, a world of creative variations opens up. Try adding a quarter teaspoon of almond extract along with the vanilla for a subtle nutty undertone that pairs beautifully with the chocolate. You can also experiment with different chocolate combinations: white chocolate paw prints on the golden cookies create a soft, elegant look, while a mix of milk and dark chocolate chips adds visual interest and flavor complexity.
For a citrus twist, add the finely grated zest of one lemon or orange to your cookie dough. The bright, aromatic oils in the zest infuse the entire cookie with subtle fruit flavor that feels lighter and more refreshing, perfect for warm weather gatherings. These citrus-scented versions pair wonderfully with dark chocolate paw prints that provide a sophisticated contrast to the bright notes.
If you want to create individual mini versions, use a small cookie scoop to portion smaller dough balls, reducing the baking time by about two minutes. These bite-sized Bunny Paw Print Cookies are perfect for serving large crowds where guests might want to sample multiple treats. Use only mini chocolate chips for all the paw pad components to keep the proportions adorable on the smaller cookies.
For those weeknight moments when you want the flavor without the decorative fuss, simply roll the dough into logs, chill them, slice into rounds, and bake. You'll get the same delicious vanilla-butter cookie taste in a fraction of the time. Or press the entire batch of dough into a parchment-lined square pan, bake as cookie bars, and cut into squares once cooled. Sometimes simple is exactly what you need, and the flavor will still shine through beautifully.
Questions You Might Have
Can I make the dough ahead and bake later?
Absolutely! The cookie dough for Bunny Paw Print Cookies actually benefits from some time in the refrigerator. You can prepare the dough up to three days in advance, wrap it tightly in plastic wrap, and refrigerate until you're ready to bake. Cold dough is also easier to portion and handle. Just let it sit at room temperature for about ten minutes before scooping if it's become very firm, so you can work with it more easily.
What if my chocolate chips won't stick to the cookies?
The chocolate adheres best when pressed into cookies that are still warm from the oven. If your cookies have cooled too much, the chocolate won't have the residual heat needed to soften and bond to the surface. The solution is to press the chocolate into each batch within that two-minute window after removing them from the oven. If you've missed the window on a batch, you can use a tiny dot of melted chocolate as "glue" to attach the paw print pieces.
How do I prevent the cookies from spreading too much?
Excessive spreading usually comes from dough that's too warm or butter that was too soft when mixed. Make sure your butter is softened but still holds its shape when pressed. If your kitchen is very warm, chill the portioned dough balls for fifteen minutes before baking. Also verify that your oven temperature is accurate with an oven thermometer, since baking at too low a temperature causes cookies to spread before they set.
Can I substitute the chocolate chips with something else?
While chocolate chips create the classic look of Bunny Paw Print Cookies, you can experiment with other options. White chocolate chips work beautifully and create a softer, more subtle appearance. You could also use small candies, though be mindful of ingredients to ensure everything remains halal-compliant. The key is choosing something that will maintain its shape when pressed into the warm cookie and won't melt completely.
How many cookies does this recipe make?
The standard batch yields approximately twenty-four to thirty cookies, depending on how large you make your dough balls. I aim for walnut-sized portions, which give you cookies that are substantial but not oversized. If you're planning for a specific number of guests, figure about two to three Bunny Paw Print Cookies per person as part of a larger dessert spread, or four to five if these are the featured sweet treat.
What's the best way to transport these to an event?
These cookies travel remarkably well if packed properly. Use a rigid container rather than a flexible bag, and arrange the cookies in a single layer if possible. If you must stack, place parchment paper between layers and fill any empty spaces with crumpled parchment to prevent shifting during transport. The chocolate paw prints are fairly durable once set, but avoiding movement and pressure keeps them looking their best. For longer trips, pack the container in a cooler with ice packs around (not touching) the container to keep everything fresh and prevent any chocolate softening in warm weather.
Bunny Paw Print Cookies
Adorable soft vanilla butter cookies decorated with chocolate chips arranged to look like bunny paw prints. Perfect for spring gatherings and family events.
Prep Time
20 min
Cook Time
12 min
Total Time
32 min
Servings
28 cookies
Ingredients
For 28 cookies
- 1 cup (226g) unsalted butter, softened to room temperature
- 3/4 cup (150g) granulated sugar
- 2 large eggs, at room temperature
- 1 tablespoon pure vanilla extract
- 2 3/4 cups (344g) all-purpose flour
- 1 teaspoon baking powder
- 1/2 teaspoon salt
- 1/2 cup (85g) mini semi-sweet chocolate chips, for toe pads
- 1/2 cup (85g) regular semi-sweet chocolate chips, for main pads
Instructions
- 1
Prepare baking sheets
Preheat your oven to 350°F (175°C). Line two large baking sheets with parchment paper or silicone baking mats. This prevents sticking and ensures even browning on the bottom of your cookies.
- 2
Cream butter and sugar
In a large mixing bowl, beat the softened butter and granulated sugar together using an electric mixer on medium speed for 3-4 minutes. The mixture should become pale in color, light, and fluffy. Scrape down the sides of the bowl as needed to ensure even mixing.
- 3
Add eggs and vanilla
Add the eggs one at a time to the butter mixture, beating well after each addition until fully incorporated. Pour in the vanilla extract and beat until the mixture is smooth and well combined. The mixture should look creamy and unified.
- 4
Combine dry ingredients
In a separate medium bowl, whisk together the all-purpose flour, baking powder, and salt until evenly distributed. This ensures the leavening agent is spread throughout the flour for consistent rising.
- 5
Mix dough
Add the dry ingredients to the wet ingredients in three separate additions, mixing on low speed just until the flour disappears after each addition. Do not overmix, as this can create tough cookies. The dough should be soft and slightly sticky but hold together well.
- 6
Shape cookie dough
Using a cookie scoop or tablespoon, portion the dough into balls about 1.5 tablespoons each (approximately 25-28g). Roll each portion between your palms to create smooth balls. Place them on the prepared baking sheets, spacing them about 2 inches apart to allow for spreading.
- 7
Flatten cookies
Gently press down on each dough ball with the palm of your hand to flatten it slightly to about 1/2 inch thickness. This creates a nice surface for the paw prints and ensures even baking throughout the cookie.
- 8
Bake cookies
Bake in the preheated oven for 10-12 minutes, or until the edges just barely begin to turn golden but the centers still look slightly soft and pale. Do not overbake, as the cookies will continue to cook on the hot pan after removal and firm up as they cool.
- 9
Add paw prints
Remove the baking sheet from the oven and let the cookies rest for exactly 2 minutes. While they're still warm, quickly press three mini chocolate chips into the top of each cookie in a small arc to create the three toe pads. Then press one regular-sized chocolate chip below the toes to create the main paw pad.
- 10
Cool completely
Allow the cookies to cool completely on the baking sheet for about 15-20 minutes. This cooling time allows the cookies to firm up to the perfect soft texture and lets the chocolate paw prints set properly. Once cooled, transfer to a serving plate or storage container.
Nutrition Facts
Per serving (estimated)
145 calories
Calories
18g
Carbs
2g
Protein
7g
Fat
1g
Fiber
65mg
Sodium
9g
Sugar


