
Bunny Oreo Balls – Cute No Bake Treat Idea
These adorable Bunny Oreo Balls are the perfect no-bake treat! Creamy Oreo filling shaped into cute bunnies with simple decorations.
cookwithlucia.com/recipes/bunny-oreo-balls-cute-no-bake-easter-treat-idea
There's something magical about the moment you pull a batch of no-bake treats from the refrigerator, perfectly chilled and ready to transform into something adorable. The sweet scent of cream cheese mingling with crushed cookies fills the kitchen, and suddenly you're transported to a place where baking doesn't require an oven and creativity takes center stage. These Bunny Oreo Balls have become one of my absolute favorite treats to prepare when I want something that's both impressive and incredibly simple to make.
What drew me to perfect this particular version was the realization that you don't need complex baking skills to create something that makes people smile. The combination of crushed Oreos and cream cheese creates a truffle-like texture that's impossibly smooth and rich, while the bunny decorations add a playful touch that appeals to kids and adults alike. The key to these treats is the ratio of cookies to cream cheese, which I've tested extensively to ensure they hold their shape while remaining melt-in-your-mouth tender.
By the end of this guide, you'll have mastered the technique for creating perfectly round, evenly coated Bunny Oreo Balls that look like they came from a professional confectionery. You'll learn the secrets to achieving the ideal consistency, the best methods for coating them smoothly, and creative decoration techniques that bring these little bunnies to life. Whether you're preparing treats for a springtime gathering, a weekend family project, or simply because you want something adorable and delicious, this recipe will become your go-to.
The Story Behind This Dish
Oreo balls, also known as Oreo truffles, emerged from the American tradition of no-bake desserts that gained popularity in home kitchens during the mid-20th century. These treats represent the ingenuity of home bakers who discovered that crushed sandwich cookies combined with cream cheese could create an elegant confection without ever turning on an oven. The simplicity of the base recipe made it a favorite for busy cooks who wanted to impress without spending hours in the kitchen.
Over the generations, creative home cooks have transformed the basic Oreo ball into countless variations, decorating them for different occasions and seasons. The bunny version represents this evolution perfectly, taking a classic treat and giving it personality through simple additions like candy ears and decorated faces. What makes these Bunny Oreo Balls so special is how they bridge the gap between everyday snacking and special occasion treats.
The homemade version surpasses anything you might find at a bakery or store because you control every element, from the ratio of filling to coating, to the quality of chocolate you use. Store-bought versions often use inferior chocolate coatings and artificial decorations, while your homemade Bunny Oreo Balls can feature real chocolate and thoughtful touches that make each bunny unique and special.
What Makes This Recipe Special
No Baking Required means these Bunny Oreo Balls are perfect for hot days when you don't want to heat up your kitchen, or for young helpers who can participate fully in the process without worrying about hot ovens or complicated techniques.
Simple Ingredient List keeps this recipe accessible and budget-friendly. With just Oreos, cream cheese, and coating chocolate as your base, you're working with pantry staples that are easy to find and affordable, making these treats perfect for feeding a crowd without breaking the bank.
Make-Ahead Friendly nature means you can prepare these Bunny Oreo Balls days in advance, storing them in the refrigerator until you're ready to serve. They actually improve slightly after a day or two as the flavors meld together and the texture becomes even more luxurious.
Customizable Decorations allow each bunny to have its own personality. You can vary the ear shapes, add different facial expressions, or even tint the coating chocolate to create bunnies in different colors, making the decorating process as creative as you want it to be.
Crowd-Pleasing Appeal comes from the familiar Oreo flavor that everyone loves, presented in an adorable package that makes people smile. The rich, creamy texture combined with the sweet chocolate coating creates an indulgent bite-sized treat that disappears quickly at any gathering.
Perfect Project for Young Helpers because the steps are straightforward and forgiving. Children love rolling the mixture into balls and helping decorate the bunny faces, making these Bunny Oreo Balls an excellent activity for family time in the kitchen.
Breaking Down the Ingredients
The foundation of these Bunny Oreo Balls starts with Oreo cookies, which provide both the deep chocolate flavor and the structure for the mixture. I use a full package of regular Oreos, including the cream filling, which adds sweetness and helps bind everything together. The cookies need to be crushed into fine crumbs to ensure a smooth, truffle-like texture in the final product, with no large chunks that would make rolling difficult.
Cream cheese serves as the binding agent that transforms dry cookie crumbs into a moldable mixture with a luxurious, creamy texture. Using full-fat cream cheese at room temperature is crucial because it blends smoothly with the cookie crumbs without requiring excessive mixing, which can make the mixture too soft. The cream cheese also adds a subtle tanginess that balances the sweetness of the cookies and coating.
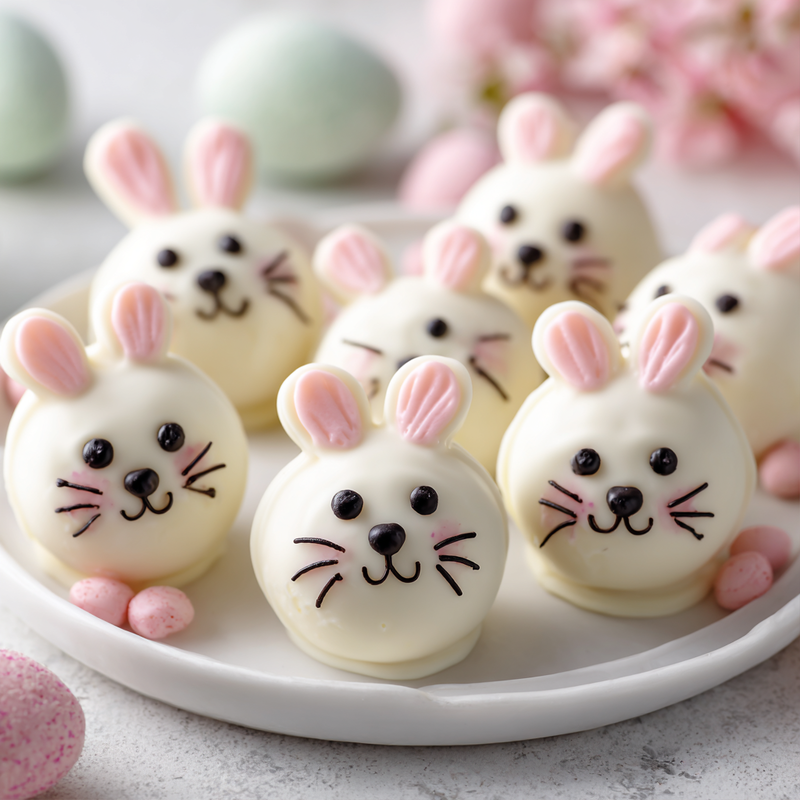
White chocolate or candy melts form the outer coating that gives these Bunny Oreo Balls their smooth, professional appearance. I prefer using quality white chocolate because it melts smoothly and has a rich flavor, though vanilla-flavored candy melts work well if you want a slightly sweeter coating that's easier to work with. The coating needs to be properly tempered or thinned to achieve that glossy finish.
Pink candy melts or white chocolate tinted with food coloring create the inner ears and cheeks that give these treats their bunny character. Just a small amount goes a long way, and having this contrasting color makes the bunny faces instantly recognizable and adorable.
Mini marshmallows provide the easiest solution for bunny ears, requiring just a simple diagonal cut to create the perfect ear shape. Their soft texture complements the firm chocolate coating, and they're much simpler than trying to pipe or mold ears from chocolate.
Black decorating gel or melted dark chocolate creates the facial features that bring personality to each Bunny Oreo Ball. I find that decorating gel offers more control for drawing delicate features like whiskers and eyes, though melted chocolate creates a more natural look if you're comfortable working with piping bags.
The Cooking Process Explained
Creating these Bunny Oreo Balls begins with crushing your Oreos into fine, uniform crumbs using a food processor or by placing them in a sealed bag and crushing with a rolling pin. The goal is to achieve a texture similar to fine sand, with no large pieces remaining that would make your mixture lumpy or difficult to roll. This step takes about two minutes in a food processor, pulsing until you have completely uniform crumbs.
Next, you'll blend the softened cream cheese into the cookie crumbs until the mixture becomes cohesive and resembles cookie dough. This is where patience pays off because you want to mix just until combined, working the mixture with a spatula or your hands until it holds together when pressed. Overmixing will make the mixture too soft and sticky, while undermixing leaves dry pockets that won't hold their shape.
The rolling stage requires chilled hands and a gentle touch as you portion the mixture into uniform balls, typically about one tablespoon each. I like to scoop all the portions first using a small cookie scoop, then roll each one quickly between my palms to create smooth, round spheres. Placing these on a parchment-lined baking sheet and refrigerating them for at least thirty minutes firms them up enough for coating without them falling apart.
Melting your coating chocolate requires careful attention to temperature, whether you're using a double boiler or microwave method. For microwave melting, work in thirty-second intervals, stirring between each, until the chocolate is just melted and smooth. The chocolate should be warm but not hot, flowing easily off a spoon but not so thin that it won't coat properly.
The coating process works best when you use a fork or dipping tool to lower each chilled Oreo ball into the melted chocolate, then lift it out and tap gently to remove excess coating. This creates a thin, even layer that sets with a beautiful sheen. Working quickly but carefully ensures each Bunny Oreo Ball gets a smooth coat before the chocolate begins to set.
Mistakes to Avoid
Don't skip chilling the rolled balls before coating them, even if you're in a hurry. Room temperature Oreo balls will absorb too much chocolate, fall apart during dipping, or develop an uneven coating that looks messy rather than professional. Give them at least thirty minutes in the refrigerator, or even better, an hour for the firmest results.
Avoid overheating your coating chocolate, which can cause it to seize or become grainy and unusable. Whether you're using white chocolate or candy melts, gentle heat is your friend, and it's always better to heat in shorter intervals and stir more frequently than to blast it with high heat that ruins the texture.
Don't try to decorate the bunny faces while the coating is still wet and glossy. Wait until the white chocolate has set completely, which takes about ten to fifteen minutes at room temperature or five minutes in the refrigerator. Decorating too early causes the features to bleed and blur, losing the crisp details that make these Bunny Oreo Balls so charming.
Resist the urge to use cold cream cheese straight from the refrigerator, which will create lumps and require excessive mixing to incorporate properly. Let your cream cheese sit at room temperature for at least thirty minutes before using it, or soften it in the microwave for just ten seconds if you're short on time.
Never store these treats uncovered or in a warm environment, which will cause the chocolate coating to bloom and develop a dull, streaky appearance. Keep them in an airtight container in the refrigerator, and they'll maintain their glossy finish and perfect texture for up to two weeks.
How to Serve This
Present these Bunny Oreo Balls on a simple white platter or cake stand to make their adorable decorations the star of the display. The contrast between the white serving dish and the chocolate-coated treats creates an elegant presentation that works beautifully for springtime gatherings or weekend dessert tables. Consider arranging them in rows with their faces all pointing forward for maximum cuteness.
Pair these sweet treats with fresh strawberries or other seasonal fruits to add color contrast and provide a refreshing counterpoint to the rich, creamy chocolate flavor. The natural acidity of berries cuts through the sweetness beautifully, creating a more balanced dessert experience that guests appreciate.
Serve alongside vanilla ice cream for an indulgent dessert combination that plays with temperature and texture contrasts. The cold, creamy ice cream complements the firm chocolate coating and soft interior of the Bunny Oreo Balls, creating an experience that's greater than the sum of its parts.
For beverage pairings, consider offering cold milk, which is the classic accompaniment to anything Oreo-related, or hot tea for a more sophisticated presentation. The warmth of tea actually enhances the chocolate flavors while providing a pleasant temperature contrast.
Create a dessert board featuring these Bunny Oreo Balls alongside other no-bake treats like chocolate-covered pretzels, fruit skewers, and small cookies. This approach gives guests variety while keeping your preparation simple, and the bunny decorations add a whimsical focal point to the arrangement.
Make-Ahead and Storage Guide
These Bunny Oreo Balls store beautifully in the refrigerator for up to two weeks when kept in an airtight container with layers separated by parchment paper. The cool temperature maintains the firmness of the cream cheese filling and prevents the chocolate coating from softening, ensuring they taste fresh and look perfect even days after preparation.
For freezing, arrange the completed Bunny Oreo Balls in a single layer on a baking sheet and freeze until solid, then transfer to a freezer-safe container or bag with layers separated by parchment. They'll maintain their quality for up to three months, making them an excellent make-ahead option when you're planning for a future gathering or want to prepare treats in batches.
When you're ready to serve frozen Bunny Oreo Balls, transfer them to the refrigerator and let them thaw slowly overnight rather than leaving them at room temperature. This gradual thawing prevents condensation from forming on the chocolate coating, which would create a dull, spotty appearance and compromise the glossy finish you worked to achieve.
You can also prepare these treats in stages if you prefer to spread out the work. Roll and chill the Oreo balls up to three days before coating and decorating them, storing the uncoated balls in an airtight container in the refrigerator. This approach works well when you want to do the more time-consuming decoration work closer to your event.
For transporting these Bunny Oreo Balls to a gathering, keep them chilled until the last possible moment and transport them in a cooler if you'll be traveling more than fifteen minutes. The chocolate coating can soften in warm temperatures, and keeping them cool ensures they arrive looking as perfect as when you packed them.
Reader Questions Answered
Can I use different cookie flavors instead of regular Oreos?
Absolutely! These treats work beautifully with any Oreo variety, from golden Oreos to mint-flavored or even the specialty flavors that come out seasonally. Just keep in mind that different flavors will change the final taste, and some varieties like mint create a different color filling that might require adjustments to your decorating approach.
How can I make these nut-free for guests with allergies?
This recipe is naturally nut-free as written, which makes it safe for most allergy concerns. Just verify that your Oreos and chocolate coating haven't been processed in facilities that also handle nuts if you're serving someone with severe allergies, and you'll have a completely safe treat that everyone can enjoy.
What's the best way to get smooth, professional-looking chocolate coating?
The secret lies in the consistency of your melted chocolate and the temperature of your Oreo balls. Make sure your balls are thoroughly chilled, your chocolate is properly melted and fluid, and you're tapping off excess coating on the edge of your bowl after dipping. Adding a teaspoon of coconut oil or vegetable shortening to your melted chocolate can also help create a thinner, more flowing coating.
Can I make these without a food processor?
Definitely! Place your Oreos in a large, sturdy zip-top bag, seal it with most of the air removed, and crush them with a rolling pin or the bottom of a heavy pot. It takes a bit more time and effort, but you'll achieve the same fine crumbs needed for smooth, rollable Bunny Oreo Balls.
How far in advance can I make these for an event?
These Bunny Oreo Balls actually taste better after sitting for a day or two as the flavors meld, so making them two to three days ahead is ideal. They'll stay fresh and beautiful for up to a week in the refrigerator, giving you plenty of flexibility for party planning and allowing you to spread out your preparation work.
What if my mixture is too sticky to roll?
If your mixture feels too soft and sticky, refrigerate it for fifteen to twenty minutes before trying to roll it again. You can also dust your hands lightly with powdered sugar while rolling, though using chilled hands and working quickly usually solves the problem without adding extra ingredients that might affect the flavor.
Bunny Oreo Balls – Cute No Bake Treat Idea
Adorable no-bake bunny treats made with crushed Oreos and cream cheese, coated in white chocolate and decorated to look like cute bunnies. Perfect for springtime gatherings and family fun.
Prep Time
30 min
Cook Time
0 min
Total Time
2h 30m
Servings
24 bunny balls
Ingredients
For 24 bunny balls
- 1 package (14.3 oz) Oreo cookies
- 8 oz cream cheese, softened to room temperature
- 16 oz white chocolate or vanilla candy melts
- 4 oz pink candy melts or white chocolate tinted with pink food coloring
- 12 mini marshmallows, cut diagonally for ears
- Black decorating gel or melted dark chocolate for facial features
- 1 teaspoon coconut oil or vegetable shortening, optional for thinning chocolate
Instructions
- 1
Crush the Oreos
Place the entire package of Oreo cookies, including the cream filling, into a food processor. Pulse until the cookies are crushed into fine, uniform crumbs resembling sand, about 1-2 minutes. Alternatively, place cookies in a sealed zip-top bag and crush with a rolling pin until finely ground.
- 2
Mix with cream cheese
Add the softened cream cheese to the cookie crumbs in a large mixing bowl. Use a spatula or your hands to mix until fully combined and the mixture holds together when pressed, similar to cookie dough consistency. Be careful not to overmix, which can make the mixture too soft.
- 3
Portion and roll
Using a small cookie scoop or tablespoon, portion out the mixture into uniform pieces of about 1 tablespoon each. Roll each portion between your palms to create smooth, round balls. Place the balls on a parchment-lined baking sheet as you work.
- 4
Chill the balls
Transfer the baking sheet with the rolled Oreo balls to the refrigerator and chill for at least 1 hour, or up to overnight. This chilling step is crucial for making the balls firm enough to coat without falling apart.
- 5
Melt white chocolate
Place the white chocolate or vanilla candy melts in a microwave-safe bowl. Microwave in 30-second intervals, stirring between each, until completely melted and smooth. If the chocolate seems too thick, stir in the coconut oil or shortening to thin it slightly for easier coating.
- 6
Coat the balls
Remove the chilled Oreo balls from the refrigerator. Using a fork or dipping tool, dip each ball into the melted white chocolate, turning to coat completely. Lift out, tap gently on the edge of the bowl to remove excess chocolate, then place back on the parchment-lined baking sheet.
- 7
Add marshmallow ears
While the white chocolate coating is still slightly wet but beginning to set, cut mini marshmallows diagonally to create two ear shapes from each marshmallow. Gently press two ears onto the top of each coated ball. Allow the coating to set completely, about 15 minutes at room temperature or 5 minutes in the refrigerator.
- 8
Add pink details
Melt the pink candy melts or tinted white chocolate in the microwave using the same method as before. Using a toothpick or small spoon, add a small dot of pink to the center of each marshmallow ear and two small dots on the lower portion of the bunny face for cheeks.
- 9
Draw facial features
Once all chocolate has set completely, use black decorating gel or melted dark chocolate in a piping bag or plastic bag with a tiny corner cut off to draw eyes, a small nose, and whiskers on each bunny face. Work with a light hand for delicate, cute features.
- 10
Final chill
Return the decorated Bunny Oreo Balls to the refrigerator for at least 15 minutes to ensure all chocolate and decorations are completely set. Store in an airtight container in the refrigerator until ready to serve, up to 2 weeks.
Nutrition Facts
Per serving (estimated)
165 calories
Calories
21g
Carbs
2g
Protein
9g
Fat
0.5g
Fiber
95mg
Sodium
16g
Sugar


