Baked Protein Pancake Bowls (No Banana!) | Meal Prep Magic
Fluffy baked protein pancake bowls perfect for meal prep! No banana needed. Easy, customizable, and packed with protein for busy mornings.
cookwithlucia.com/recipes/baked-protein-pancake-bowls-great-for-meal-prep-and-no-banana-needed-eliya-eats
There's something magical about waking up to a breakfast that's already prepared, waiting for you with open arms. That's exactly what these baked protein pancake bowls offer—a fluffy, tender texture that's somewhere between a traditional pancake and a soft muffin, with a protein punch that keeps you satisfied until lunch. The best part? No banana required, which means no overpowering banana flavor masking your carefully chosen toppings.
I'll never forget the morning I created these baked protein pancake bowls out of pure necessity. I was training for a half-marathon and needed quick, protein-rich breakfasts I could grab on my way out the door. Traditional pancakes required standing at the stove, and protein shakes left me hungry an hour later. One Sunday evening, inspiration struck while I was preparing my weekly meal prep. What if I could bake pancake batter in individual portions? The result was beyond my expectations—golden, perfectly portioned pancake bowls that stayed fresh all week and reheated beautifully. My family now requests these every single week, and I've made countless batches, perfecting the texture and flavor.
This recipe is special because it solves so many breakfast dilemmas at once. It's meal-prep friendly, naturally customizable, budget-conscious, and doesn't rely on bananas for binding or sweetness. Whether you're feeding a busy family, fueling your fitness goals, or simply want to streamline your morning routine, these baked protein pancake bowls will transform your breakfast game. In this post, I'll walk you through everything you need to know—from the science behind the ingredients to pro tips for achieving that perfect fluffy texture every single time.
Let me show you how easy it is to have a week's worth of delicious, protein-packed breakfasts ready in just one hour.

What Are Baked Protein Pancake Bowls?
Have you ever wished you could enjoy pancakes without the hassle of flipping each one individually? That's exactly where baked protein pancake bowls come into play. These clever creations take everything you love about traditional pancakes—the fluffy texture, the slightly sweet flavor, the endless topping possibilities—and bake them in individual portions right in your oven. The result is a hybrid between a pancake and a protein muffin that's perfectly portioned and incredibly convenient.
Originally inspired by the meal prep movement and the growing demand for high-protein breakfasts, baked protein pancake bowls have become a favorite among fitness enthusiasts, busy parents, and anyone who values convenience without sacrificing nutrition. Unlike banana-based versions that dominate many recipes, this version uses Greek yogurt and eggs as the primary binders, giving you a neutral flavor base that works with any topping combination you can imagine. The flavor profile is subtly sweet with a tender, cake-like crumb that's denser than a traditional pancake but lighter than a muffin.
What makes these baked protein pancake bowls stand out is their incredible versatility and the fact that they taste absolutely delicious both fresh from the oven and reheated throughout the week. Ready to discover why these will become your new breakfast obsession?
Why You'll Love This Baked Protein Pancake Bowl Recipe
Effortlessly Meal-Prep Friendly: These baked protein pancake bowls are a meal prepper's dream come true. Instead of spending precious morning minutes cooking breakfast, you'll invest just one hour on the weekend to have grab-and-go breakfasts ready for the entire week. Pop them in the microwave for 30 seconds, add your favorite toppings, and you're out the door with a nutritious meal that actually keeps you full.
No Banana Means Total Flavor Freedom: While I love bananas in many recipes, they can completely dominate the flavor profile and limit your topping choices. These baked protein pancake bowls use Greek yogurt and eggs instead, creating a neutral, slightly sweet base that pairs beautifully with everything from fresh berries to nut butter to savory toppings. You're not locked into "banana-flavored" breakfast every single day.
Protein-Packed and Satisfying: Each serving delivers a substantial protein boost that keeps your energy stable and hunger at bay for hours. The combination of protein powder, Greek yogurt, and eggs creates a powerhouse breakfast that supports muscle recovery, promotes satiety, and prevents that mid-morning energy crash that leaves you reaching for sugary snacks.
Budget-Friendly and Simple: With basic pantry staples and no expensive or hard-to-find ingredients, these baked protein pancake bowls won't break the bank. The recipe uses everyday ingredients you likely already have, and because they freeze beautifully, you can make double batches when ingredients are on sale and always have a stash ready.
Customizable for Every Preference: Whether you're feeding picky eaters, accommodating dietary restrictions, or simply want variety, this recipe adapts beautifully. Swap the protein powder flavor, adjust the sweetness level, add mix-ins like chocolate chips or blueberries, or keep them plain for a versatile base. Each family member can customize their own bowl with different toppings.
Perfect Texture Every Time: Unlike stovetop pancakes that can burn on the outside while staying raw in the middle, these baked protein pancake bowls cook evenly in the oven, developing a golden exterior with a fluffy, moist interior. They're foolproof, even for novice bakers, and deliver consistent results batch after batch.
Key Ingredients and What They Bring
Protein powder forms the foundation of these baked protein pancake bowls and does much more than just boost the protein content. It provides structure, helps achieve that signature fluffy texture, and contributes subtle sweetness depending on your chosen flavor. I typically use vanilla whey protein, but plant-based options work beautifully too. The key is choosing a quality protein powder that dissolves smoothly and doesn't have a chalky aftertaste. This ingredient transforms ordinary pancake batter into a nutrient-dense breakfast that actually sustains you.
Greek yogurt serves as the moisture hero in this recipe, replacing the need for bananas while adding creaminess, tang, and additional protein. It creates tender baked protein pancake bowls with a soft crumb that doesn't dry out during storage. The natural acidity in Greek yogurt also reacts with the baking powder to create extra lift and fluffiness. I always use plain, full-fat Greek yogurt for the richest flavor and best texture, though low-fat versions work if that's your preference.
Eggs act as the primary binding agent, holding everything together while contributing protein and creating structure. They're responsible for that satisfying, cake-like texture that makes these baked protein pancake bowls so enjoyable. The eggs also help the bowls rise beautifully in the oven and maintain their shape once cooled. If you need an egg substitute, flax eggs work reasonably well, though the texture will be slightly denser.
Oat flour brings wholesome, whole-grain goodness and a subtle nutty flavor that complements the other ingredients perfectly. It creates a tender crumb without the heaviness of all-purpose flour and adds fiber that keeps you satisfied longer. I make my own oat flour by grinding rolled oats in a food processor for just a few pulses, which is not only economical but ensures freshness. The oat flour also helps these baked protein pancake bowls maintain moisture during meal prep storage.
Baking powder is the leavening powerhouse that gives these baked protein pancake bowls their signature fluffy rise. It creates air pockets throughout the batter that expand during baking, resulting in a light, tender texture rather than a dense, heavy one. Using the right amount is crucial—too little and your bowls will be flat and heavy, too much and they'll have a bitter, metallic taste. Always check that your baking powder is fresh for the best rise.
Vanilla extract adds warmth and depth of flavor that elevates these baked protein pancake bowls from basic to bakery-quality. It enhances the natural sweetness without adding sugar and creates an inviting aroma that fills your kitchen during baking. Pure vanilla extract is worth the investment, though imitation vanilla works in a pinch. This simple ingredient makes such a noticeable difference in the final flavor.
Milk of your choice brings everything together into a smooth, pourable batter with the perfect consistency. I use regular dairy milk, but almond milk, oat milk, or any other milk alternative works beautifully in these baked protein pancake bowls. The liquid content is crucial for achieving the right texture—too thick and your bowls will be dense, too thin and they won't hold their shape. Start with the recommended amount and adjust as needed based on your protein powder's absorption rate.
How to Make Baked Protein Pancake Bowls — Quick Overview
Making these baked protein pancake bowls is remarkably straightforward and requires just one bowl and a whisk. You'll start by preheating your oven and preparing your muffin tin with liners or cooking spray, which ensures easy release after baking. Then you'll whisk together all your wet ingredients—eggs, Greek yogurt, milk, and vanilla—until completely smooth and well combined. This creates the moisture base that keeps your baked protein pancake bowls tender and delicious.
Next, you'll add your dry ingredients directly to the wet mixture—protein powder, oat flour, baking powder, and a pinch of salt—and whisk until just combined. The batter will be thicker than traditional pancake batter but thinner than muffin batter, with a consistency similar to thick cream. This is exactly what you want for perfectly textured baked protein pancake bowls. Avoid overmixing, which can lead to tough, rubbery results.
Once your batter is ready, you'll divide it evenly among your prepared muffin cups, filling each about three-quarters full. The baked protein pancake bowls will rise beautifully in the oven, developing golden tops and fluffy interiors over about 20 to 25 minutes. You'll know they're done when a toothpick inserted in the center comes out clean and the tops spring back when lightly pressed. The entire process from start to finish takes about 35 to 40 minutes, and you'll have a full week of breakfasts ready to go.
Top Tips for Perfecting Baked Protein Pancake Bowls
Choose your protein powder wisely because not all protein powders are created equal when it comes to baking. Some absorb significantly more liquid than others, which can dramatically affect the texture of your baked protein pancake bowls. Whey protein isolate tends to absorb more moisture than whey concentrate, while plant-based proteins vary widely by brand. If your batter seems too thick, add milk one tablespoon at a time until you reach a thick but pourable consistency. The batter should slowly ribbon off your whisk rather than plop in thick globs.
Don't skip the Greek yogurt because it's truly irreplaceable in this recipe. Some readers have asked about substituting regular yogurt or sour cream, but neither provides the same protein content or tangy flavor that makes these baked protein pancake bowls special. Greek yogurt's thick consistency and high protein content are essential for achieving that perfect texture. If you absolutely must substitute, use sour cream mixed with a tablespoon of milk to thin it slightly, though your protein content will be lower.
Measure your oat flour correctly by spooning it into your measuring cup and leveling it off with a knife rather than scooping directly from the container. Scooping packs the flour, resulting in too much flour and dry, dense baked protein pancake bowls. If you're grinding your own oat flour from rolled oats, pulse them just until they reach a fine flour consistency, but not so long that they turn into oat butter. Freshly ground oat flour creates the most tender texture.
Avoid overmixing your batter once you add the dry ingredients because overworking the mixture develops gluten and creates tough, rubbery baked protein pancake bowls. Mix just until the ingredients are combined and no large flour pockets remain. A few small lumps are perfectly fine and will disappear during baking. The entire mixing process should take less than a minute once all ingredients are in the bowl.
Test for doneness using multiple indicators rather than relying solely on time. Insert a toothpick into the center of a baked protein pancake bowl—it should come out clean or with just a few moist crumbs. The tops should be golden and spring back when gently pressed, and the edges should just be pulling away from the muffin tin. Oven temperatures vary, so your baked protein pancake bowls might need anywhere from 18 to 25 minutes depending on your oven and pan material.
Let them cool completely before storing because trapping steam in your storage container creates condensation that makes your baked protein pancake bowls soggy and reduces their shelf life. Once they come out of the oven, let them cool in the pan for five minutes, then transfer to a wire rack to cool completely. This usually takes about 30 minutes, and patience here pays off with better texture and longer freshness.
Customize the sweetness to your preference because protein powders vary dramatically in sweetness levels. Some are very sweet, while others are barely sweet at all. Taste your batter before baking and adjust by adding a tablespoon of honey or maple syrup if needed. Remember that toppings will also add sweetness, so these baked protein pancake bowls are intentionally less sweet than traditional pancakes to accommodate various topping choices.
Invest in quality muffin liners or use a light coating of cooking spray because nothing is more frustrating than baked protein pancake bowls that stick to the pan. Parchment paper liners work best and release cleanly every time, plus they make cleanup effortless. If using cooking spray, make sure to coat the bottom and sides of each cup thoroughly. Silicone muffin pans also work beautifully and rarely require any additional greasing.
Variations and Flavor Twists
Chocolate lovers will adore the chocolate chip version of these baked protein pancake bowls. Simply swap vanilla protein powder for chocolate protein powder and fold in a quarter cup of mini chocolate chips into the batter before baking. The chocolate chips create pockets of melted chocolate throughout, making these taste like a decadent dessert while still being a nutritious breakfast. Top with fresh strawberries and a drizzle of nut butter for an incredible flavor combination.
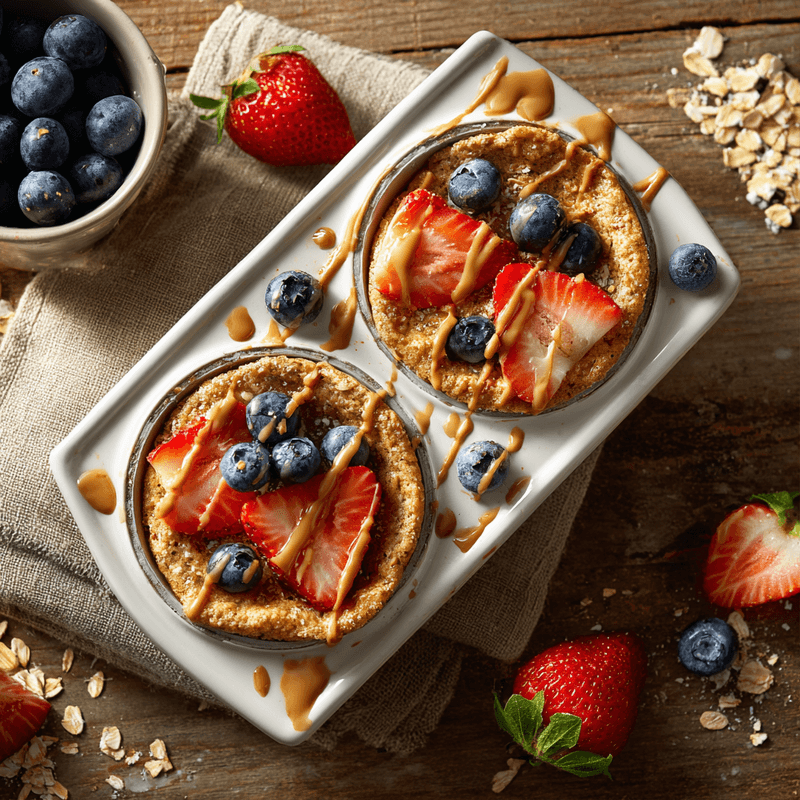
For a berry blast variation, fold fresh or frozen blueberries, raspberries, or chopped strawberries into the batter before dividing among muffin cups. Use about three-quarters of a cup of berries total, and if using frozen berries, don't thaw them first or they'll turn your batter purple. These fruit-studded baked protein pancake bowls burst with juicy berry flavor in every bite and provide additional antioxidants and fiber.
Create a cinnamon roll inspired version by adding one teaspoon of ground cinnamon to your dry ingredients and swirling a mixture of cinnamon and a touch of honey through the batter before baking. Once your baked protein pancake bowls are cooled, drizzle them with a simple glaze made from Greek yogurt mixed with vanilla extract and a bit of honey. This variation tastes like an indulgent treat but delivers all the protein and nutrition you need.
Make savory baked protein pancake bowls by omitting any sweetener and adding shredded cheese, chopped herbs, and a pinch of black pepper to the batter. Use unflavored protein powder and consider adding diced vegetables like bell peppers or spinach. These savory versions are perfect for those who prefer a non-sweet breakfast and pair beautifully with eggs and fresh vegetables for a complete meal.
Try a tropical twist by using coconut-flavored protein powder and folding in unsweetened shredded coconut and diced pineapple into the batter. These baked protein pancake bowls transport you to a sunny beach with every bite and work especially well topped with Greek yogurt and macadamia nuts. The coconut adds healthy fats and wonderful texture while keeping the recipe completely banana-free.
What to Serve with Baked Protein Pancake Bowls
Fresh berries are the classic pairing that never disappoints with these baked protein pancake bowls. Strawberries, blueberries, raspberries, and blackberries add natural sweetness, beautiful color, and extra fiber without overwhelming the protein-packed base. The juicy burst of fresh fruit complements the tender texture perfectly, and the antioxidants provide additional nutritional benefits. Macerate your berries with a tiny bit of honey for a few minutes before serving to create a naturally sweet syrup.
Nut butter adds healthy fats and additional protein while creating a luxuriously creamy contrast to the fluffy texture of the baked protein pancake bowls. Almond butter, cashew butter, or sunflower seed butter all work beautifully. Warm your nut butter in the microwave for about 15 seconds to create a drizzle-able consistency that seeps into all the nooks and crannies. This combination keeps you satisfied for hours and provides sustained energy.
Greek yogurt on the side or dolloped on top adds extra creaminess, protein, and a pleasant tang that balances the subtle sweetness of these baked protein pancake bowls. Mix your yogurt with vanilla extract and a drizzle of honey, or keep it plain if you prefer. The cooling creaminess of yogurt also makes these feel more like a complete breakfast rather than just a quick grab-and-go item.
Sliced bananas bring natural sweetness and potassium, creating an ironic but delicious topping for these banana-free baked protein pancake bowls. The soft, creamy texture of ripe bananas complements the tender crumb perfectly, and they're readily available year-round. This is proof that while you don't need bananas in the recipe itself, they still make a wonderful topping choice when you're in the mood.
A drizzle of pure maple syrup or honey adds traditional pancake sweetness for those who prefer a more indulgent breakfast. Since these baked protein pancake bowls are intentionally less sweet than traditional pancakes, a small drizzle of natural sweetener can satisfy your sweet tooth without going overboard. Warm your syrup slightly for the most luxurious experience.
Hot coffee or tea creates the perfect morning beverage pairing that turns your quick breakfast into a moment of calm before your busy day begins. The warmth of your favorite morning drink alongside these protein-rich baked protein pancake bowls provides comfort and caffeine to start your day right. This combination transforms meal prep efficiency into an actual enjoyable breakfast experience.
Storing and Reheating Tips
Refrigeration is the best option for baked protein pancake bowls you plan to eat within the week. Once completely cooled, transfer them to an airtight container, separating layers with parchment paper if stacking to prevent sticking. They'll stay fresh and delicious in the refrigerator for five to seven days, maintaining their fluffy texture and making weekday mornings incredibly easy. I like to prepare mine on Sunday evening and have perfect breakfasts ready through Friday morning.
Freezing extends the life of your baked protein pancake bowls for up to three months, making them perfect for larger batch cooking. Wrap each bowl individually in plastic wrap, then place all wrapped bowls in a freezer-safe bag or container. This individual wrapping prevents freezer burn and allows you to grab exactly the number you need without thawing the entire batch. Label your container with the date so you can track freshness.
Microwave reheating is the quickest method for busy mornings when you need breakfast in seconds. Place a refrigerated baked protein pancake bowl on a microwave-safe plate and heat for 25 to 35 seconds, or 60 to 90 seconds if frozen. The exact time depends on your microwave's power and whether the bowl is refrigerated or frozen. Heat just until warmed through—overheating can create a rubbery texture. Add a damp paper towel over the top if you find they're drying out during reheating.
Oven reheating produces the best texture, especially if you have a few extra minutes and want that fresh-baked quality. Preheat your oven to 300°F and place refrigerated baked protein pancake bowls on a baking sheet. Heat for about eight to ten minutes until warmed through, or fifteen to twenty minutes if reheating from frozen. This method restores that slightly crispy exterior while keeping the interior tender and moist, making them taste like you just baked them.
Toaster oven reheating splits the difference between microwave speed and oven quality, making it my personal favorite method for single servings. Set your toaster oven to 300°F and heat refrigerated baked protein pancake bowls for about five to seven minutes, or ten to twelve minutes if frozen. This method is energy-efficient, produces great texture, and doesn't heat up your entire kitchen. The slightly crisped edges make these taste absolutely incredible.
Maintaining moisture during storage is crucial for the best reheating results with your baked protein pancake bowls. If you notice they're becoming dry after a few days, place a small piece of bread in your storage container, which absorbs excess moisture while preventing the bowls from drying out. You can also brush them lightly with milk before reheating to restore moisture. Proper storage in truly airtight containers makes the biggest difference in maintaining that fresh-baked texture throughout the week.
Frequently Asked Questions
Can I make baked protein pancake bowls ahead of time?
Absolutely! These baked protein pancake bowls are specifically designed for meal prep and actually taste great throughout the week. Bake them on your designated meal prep day, let them cool completely, and store them properly in the refrigerator or freezer. They're one of those rare recipes that maintains quality over time rather than degrading, making them perfect for busy schedules.
What if I don't have oat flour?
You can easily make your own oat flour by grinding rolled oats in a food processor, blender, or coffee grinder until they reach a fine, flour-like consistency. One cup of rolled oats yields about one cup of oat flour. Alternatively, you can substitute all-purpose flour or whole wheat flour in equal amounts, though the texture will be slightly different and the nutritional profile will change. The oat flour version creates the most tender baked protein pancake bowls with the best flavor.
Can I use a different type of protein powder?
Yes, these baked protein pancake bowls work with most types of protein powder including whey isolate, whey concentrate, casein, and plant-based options like pea protein, brown rice protein, or blends. Keep in mind that different protein powders absorb liquid differently, so you may need to adjust the milk quantity slightly. Plant-based proteins sometimes require an extra tablespoon or two of liquid to achieve the right batter consistency.
How do I know when the baked protein pancake bowls are done?
Your baked protein pancake bowls are done when a toothpick inserted into the center comes out clean or with just a few moist crumbs, the tops are golden brown and spring back when lightly touched, and the edges are just pulling away from the muffin tin. The internal temperature should reach about 200°F if you want to be precise. Start checking around the 18-minute mark, as oven temperatures vary and you don't want to overbake them.
Can I make these without Greek yogurt?
While Greek yogurt is a key ingredient that provides protein, moisture, and the perfect texture, you can substitute sour cream mixed with a splash of milk to thin it slightly, though your protein content will be lower. Cottage cheese blended until smooth also works as a high-protein alternative. Regular yogurt is too thin and won't provide the same structure, so these baked protein pancake bowls may turn out denser if you use it.
Why are my baked protein pancake bowls dense instead of fluffy?
Dense baked protein pancake bowls usually result from one of several issues: using too much protein powder or oat flour, overmixing the batter, using expired baking powder, or adding too little liquid. Make sure you're measuring ingredients correctly by spooning and leveling rather than scooping, mix just until combined, and check that your baking powder is fresh. If your batter seems very thick, add milk one tablespoon at a time until it reaches a thick but pourable consistency similar to heavy cream.
These baked protein pancake bowls have completely transformed my morning routine and the routines of countless readers who've tried them. The combination of convenience, nutrition, and delicious flavor makes them an absolute winner for anyone looking to simplify their breakfast while still eating well. I hope you'll give them a try and discover just how easy meal prep breakfast can be!
Baked Protein Pancake Bowls
Fluffy, protein-packed pancake bowls baked in muffin tins for easy meal prep. No banana needed! Perfect for busy mornings and completely customizable.
Prep Time
10 min
Cook Time
22 min
Total Time
32 min
Servings
12 servings
Ingredients
For 12 servings
- 2 cups oat flour (or rolled oats ground into flour)
- 1 cup vanilla protein powder (whey or plant-based)
- 1 cup plain Greek yogurt (full-fat or low-fat)
- 4 large eggs, room temperature
- 3/4 cup milk of choice (dairy or non-dairy)
- 2 teaspoons pure vanilla extract
- 2 teaspoons baking powder
- 1/4 teaspoon salt
- Optional: 1-2 tablespoons honey or maple syrup for extra sweetness
Instructions
- 1
Preheat and Prepare
Preheat your oven to 350°F (175°C). Line a 12-cup muffin tin with parchment paper liners or spray thoroughly with cooking spray to prevent sticking. This ensures your baked protein pancake bowls release easily after baking.
- 2
Mix Wet Ingredients
In a large mixing bowl, whisk together the eggs, Greek yogurt, milk, and vanilla extract until completely smooth and well combined. Make sure there are no lumps of yogurt remaining. This creates the moisture base for your baked protein pancake bowls.
- 3
Add Dry Ingredients
Add the oat flour, protein powder, baking powder, and salt directly to the wet ingredients. Whisk gently until just combined, being careful not to overmix. The batter should be thick but pourable, similar to the consistency of heavy cream. If your batter seems too thick, add milk one tablespoon at a time.
- 4
Adjust Sweetness
Taste the batter and adjust sweetness if needed by stirring in honey or maple syrup. Remember that protein powder sweetness varies by brand, and you'll be adding toppings later. Mix just until any sweetener is incorporated.
- 5
Fill Muffin Cups
Divide the batter evenly among the 12 prepared muffin cups, filling each about three-quarters full. The batter will rise during baking to create perfectly portioned baked protein pancake bowls. Use a measuring cup or ice cream scoop for even portions.
- 6
Bake Until Golden
Bake in the preheated oven for 20 to 25 minutes, until the tops are golden brown and a toothpick inserted into the center comes out clean. The tops should spring back when lightly pressed, and the edges should just be pulling away from the muffin tin. Watch carefully after the 18-minute mark to avoid overbaking.
- 7
Cool in Pan
Remove the muffin tin from the oven and let the baked protein pancake bowls cool in the pan for about 5 minutes. This brief cooling period allows them to set properly and makes them easier to remove from the tin without falling apart.
- 8
Transfer to Wire Rack
Carefully remove the baked protein pancake bowls from the muffin tin and transfer them to a wire cooling rack. Let them cool completely before storing, which takes about 30 minutes. This prevents condensation in your storage container that would make them soggy.
- 9
Store or Serve
Once completely cooled, store your baked protein pancake bowls in an airtight container in the refrigerator for up to 7 days, or wrap individually and freeze for up to 3 months. To serve, reheat in the microwave for 25-35 seconds or in a 300°F oven for 8-10 minutes until warmed through.
- 10
Add Toppings
Top your warmed baked protein pancake bowls with your favorite toppings such as fresh berries, nut butter, Greek yogurt, maple syrup, sliced fruit, or chopped nuts. The neutral flavor base works beautifully with both sweet and savory toppings, making each breakfast customizable to your preferences.
Nutrition Facts
Per serving (estimated)
145 calories
Calories
14g
Carbs
13g
Protein
4g
Fat
2g
Fiber
180mg
Sodium
3g
Sugar


