Creamy Pastel Punch Recipe | Perfect Party Beverage
Learn to make the perfect creamy pastel punch with fizzy bubbles and sweet garnishes. This dreamy beverage is ideal for family gatherings and celebrations!
cookwithlucia.com/recipes/alexandra-this-pastel-party-punch-is-as-cute-as-it-is-delicious-creamy-fizzy-and-topped-with-the-sweetest-bunny-treats-its-the-kind-of-drink-that-steals-the-spotlight-at-any-easter-table-perfect-for-spring-brunches-egg-hunts-and-family-celebrations-one-sip-and-everyones-smiling-fuii-recpe-in-com-facebook
There's something truly magical about mastering the art of a perfectly balanced party punch. When you understand how to create that ideal harmony between creamy sweetness, fizzy effervescence, and visual appeal, you unlock the ability to be the star beverage creator at every family gathering. This creamy pastel punch technique isn't just about mixing ingredients—it's about understanding emulsification, carbonation timing, and flavor layering that transforms simple components into something guests remember long after the celebration ends.
The perfect pastel punch should have a silky, cloud-like texture that coats your palate gently, bubbles that dance and sparkle without overwhelming, and a sweetness that feels celebratory but never cloying. The color should be soft and inviting, like the first blush of spring flowers, making everyone reach for their glass before they've even tasted it. I know the idea of creating a layered, creamy beverage might seem intimidating—will it separate? Will the fizz go flat? Will the colors turn muddy?
But here's the beautiful truth: once you understand WHY each ingredient plays its role and HOW they interact, the process becomes not just easy but genuinely enjoyable. You'll find yourself experimenting with different flavor profiles, adjusting sweetness levels with confidence, and creating signature variations that become your trademark. This technique opens doors to dozens of celebration beverages, from baby showers to garden parties, from weekend brunches to elegant afternoon gatherings. Let me walk you through everything you need to know to create the most enchanting creamy pastel punch that will have everyone asking for your secret.
The Science Behind the Method
Understanding what happens when you combine dairy, sweeteners, and carbonated beverages is the key to punch perfection. When you mix cream or ice cream with acidic ingredients like fruit juices or sodas, you're creating what food scientists call a temporary emulsion. The fat molecules in the dairy coat your tongue, carrying flavor compounds and creating that luxurious mouthfeel we associate with premium beverages. The proteins in dairy also help stabilize the mixture, preventing immediate separation.
Carbonation adds another fascinating layer to this equation. Carbon dioxide bubbles create a tingling sensation on your palate that makes sweet drinks taste less heavy and more refreshing. The key is timing—add your fizzy components too early, and you'll lose that magical effervescence to oxidation and agitation. Add them too late or too vigorously, and you'll create an overflow situation that wastes precious ingredients. The goal is gentle incorporation that preserves maximum bubble structure.
The temperature factor plays a crucial role too. Cold ingredients maintain carbonation longer and keep dairy-based mixtures from separating. When everything is properly chilled, the fat molecules in cream move more slowly, creating a more stable suspension. This is why professional caterers always pre-chill their punch bowls and serving vessels. Understanding this science means you can adjust ratios confidently, substitute ingredients intelligently, and troubleshoot problems before they happen. When you grasp these principles, you're not just following a recipe—you're becoming a beverage architect who can create magic in a punch bowl.
Tools and Ingredients You'll Need
The beauty of creating a stunning pastel punch lies in its simplicity—you don't need specialized equipment or hard-to-find ingredients. Your most important tool is a large punch bowl or beverage dispenser, ideally holding at least 4-6 quarts. Glass is ideal because it showcases those beautiful pastel colors, but a large mixing bowl works perfectly if that's what you have. I recommend choosing a vessel with a wide mouth for easy serving and garnishing.
You'll need a long-handled spoon or ladle for gentle mixing—emphasis on gentle, because aggressive stirring releases carbonation quickly. A liquid measuring cup with a spout makes adding ingredients much easier and reduces splashing. If you're serving a crowd, an ice cream scoop becomes invaluable for portioning frozen components evenly. Some cooks love using a whisk for initial blending of non-carbonated ingredients, which creates a smoother base before adding fizz.
For ingredients, start with high-quality vanilla ice cream or frozen yogurt as your creamy base—this provides both texture and sweetness while staying cold enough to chill other ingredients. You'll want clear lemon-lime soda or ginger ale for bubbles and a light sweetness that doesn't compete with other flavors. Fruit juices or fruit punch concentrate add color and flavor depth—choose pastels like pink lemonade, white grape, or light fruit blends. Food coloring in gel form gives you control over achieving perfect pastel shades without adding liquid that dilutes flavor.
For garnishes, think about elements that float beautifully and add whimsy—fresh berries, edible flowers, colorful straws, or themed decorative elements. Sherbet or sorbet in complementary flavors can float on top, slowly melting to create flavor layers. Don't forget a large ice ring or frozen fruit cubes to keep everything cold without diluting the punch as regular ice would. Budget-conscious cooks can substitute store-brand sodas and ice cream without sacrificing quality—the technique matters more than premium labels here.
The Method, Step by Step
Creating a flawless creamy pastel punch starts hours before your guests arrive with proper preparation. Begin by placing your punch bowl in the refrigerator or freezer for at least 30 minutes—a cold vessel keeps your punch at the ideal temperature much longer. Simultaneously, ensure all your liquid ingredients are thoroughly chilled. Room temperature ingredients not only melt ice cream too quickly but also cause faster carbonation loss. If you're using fruit juice concentrate, mix it with cold water now and refrigerate it separately.
The next stage involves creating your flavor base, which happens before any carbonation enters the picture. In a large pitcher, combine your fruit juices, any liquid sweeteners, and food coloring if you're using it to achieve your desired pastel shade. Stir this mixture thoroughly until everything is completely incorporated and the color is uniform. Taste at this stage and adjust sweetness—remember that ice cream will add sweetness, so this base should be slightly less sweet than your target final flavor. This is your foundation, and getting it right means everything else falls into place beautifully.
Now comes the crucial third stage: adding your creamy element. Using an ice cream scoop, add scoops of vanilla ice cream or your chosen frozen base directly into your chilled punch bowl. Pour half of your prepared flavor base over the ice cream, using a gentle folding motion with your ladle to begin incorporating them. You'll see the ice cream starting to soften and blend, creating swirls of color and cream. This gradual approach prevents shocking the ice cream with too much liquid at once, which can cause unpleasant clumping or overly rapid melting.
The fourth stage requires patience and a light touch. Continue folding gently until you have a semi-smooth mixture with some small ice cream chunks still visible—these create textural interest and keep serving portions cold. If you're adding sherbet or sorbet for additional flavor layers, now is the time. Place small scoops across the surface where they'll float and slowly incorporate. The visual effect is stunning, with colorful islands of frozen sweetness dotting your creamy ocean.
Stage five is where the magic happens—adding carbonation. Open your chilled bottles of soda slowly to preserve maximum fizz. Pour the soda gently down the side of the bowl rather than directly onto the surface, which minimizes bubble disruption. Add about half the soda and observe how it incorporates—you should see gentle fizzing and rising bubbles throughout the mixture. Stir once or twice with the slowest, most deliberate movements possible. Many novice punch makers over-stir here and wonder why their punch goes flat.
The sixth stage involves fine-tuning and final additions. Taste your punch now, assessing sweetness, flavor intensity, and carbonation level. Add the remaining soda gradually until you reach your preferred ratio of creaminess to fizziness. Some families prefer a thicker, milkshake-like consistency, while others want something lighter and more refreshing. There's no wrong answer—adjust to your audience's preferences. Add any final flavor extracts or fruit juices at this point, remembering that a little goes a long way.
The final stage is presentation and timing. If you're using an ice ring, float it in the bowl now—it keeps everything cold while looking elegant. Arrange your garnishes thoughtfully across the surface. Fresh berries clustered in small groups, edible flowers scattered like confetti, or themed decorative elements positioned to catch the eye. Serve immediately, or within 15 minutes for optimal carbonation and texture. Provide a ladle that reaches the bottom of the bowl so each serving includes the perfect ratio of liquid to creamy components, ensuring every guest experiences the full flavor profile you've created.
Troubleshooting Guide
If your pastel punch separates into distinct layers with cream floating on top and liquid settling below, you've likely experienced temperature shock or insufficient initial blending. The fix is simple: use a whisk to gently re-incorporate everything, working from the bottom up. To prevent this in future batches, ensure all ingredients are equally cold and fold more thoroughly during the initial mixing stage. A few ice cream chunks are charming, but large unmixed portions lead to separation.
When your punch loses its fizz too quickly, becoming flat and overly sweet within minutes, you're dealing with carbonation loss from premature addition or over-stirring. Unfortunately, you can't re-carbonate, but you can rescue the batch by serving it over crushed ice, which adds textural interest and dilutes the now-concentrated sweetness. For your next attempt, add soda as the very last step before serving, and remember that each stir releases more carbon dioxide—three gentle folds maximum.
Muddy or unappealing colors happen when you've combined incompatible shades or added too much food coloring trying to compensate. If your punch looks brownish or grayish instead of pastel-perfect, embrace it as a learning moment. The flavor is likely still wonderful, so serve it anyway with confidence. For future success, stick to single-color families—all pinks, all blues, or all yellows—and remember that pastel means adding just 2-3 drops of coloring, not entire bottles. Less is genuinely more here.
Overly sweet punch that makes teeth ache signals an imbalance between your sugar sources. You can rescue this by adding more soda to dilute the sweetness, or incorporate unsweetened fruit juice like cranberry or fresh lemon juice to provide acidic balance. Some cooks add a tiny pinch of salt, which sounds counterintuitive but actually suppresses excessive sweetness perception. Going forward, taste your base before adding ice cream, and choose less-sweet ice cream varieties or frozen yogurt as alternatives.
If your punch is too thin and watery, lacking that signature creamy luxuriousness, you've used too much soda relative to your creamy base. While you can't easily thicken the current batch without more ice cream (which would increase volume dramatically), you can serve it in smaller glasses over ice and call it a punch spritzer instead. Next time, start with a higher ice cream to soda ratio—you can always thin it down, but thickening up is nearly impossible once liquids are combined.
Taking It to the Next Level
Once you've mastered the basic creamy pastel punch technique, professional-level refinements can elevate your creation from delightful to absolutely unforgettable. Consider making flavored ice cubes from matching juice or soda—as they melt, they enhance rather than dilute your punch. Freeze edible flowers or small berries into these cubes for a stunning visual effect that reveals itself gradually as ice melts. This technique keeps your punch cold and beautiful from the first glass to the last.
Layering different flavored sherbets creates a sophisticated depth that unfolds with each sip. Start with a berry sherbet base, add vanilla ice cream for creaminess, then top with citrus sherbet for brightness. As guests serve themselves and these layers mix in their glasses, they experience an evolving flavor profile that sparks conversation. You can also create an adult version alongside your family-friendly punch by infusing simple syrups with herbs like mint, basil, or lavender, then offering them as optional flavor boosters.
Texture variations add memorable dimension—try floating small meringue cookies on top, which slowly soften into sweet, marshmallow-like additions. Whipped cream rosettes piped around the bowl's edge create elegance, while a sprinkle of edible glitter or luster dust catches light beautifully. Professional caterers often rim serving glasses with colored sugar or crushed freeze-dried fruit, making each portion feel specially crafted. These touches require minimal extra effort but create maximum impact, transforming your punch station into a focal point that guests photograph and remember long after the gathering ends.
Storing Your Results
The reality of creamy pastel punch is that it's meant to be enjoyed fresh—the carbonation and optimal texture have a limited window. However, you can absolutely prepare components in advance to make day-of assembly stress-free. Mix your flavor base up to two days ahead and store it in a sealed container in the refrigerator. Pre-scoop ice cream portions onto a parchment-lined baking sheet and freeze them solid, then transfer to a freezer bag. This makes adding them to your punch quick and mess-free when guests arrive.
If you end up with leftover punch, which rarely happens but occasionally does, you have a few creative options. Pour it into popsicle molds for frozen treats that kids and adults alike will devour—the carbonation creates interesting tiny bubbles throughout. Alternatively, pour portions into ice cube trays, then use these flavored cubes in plain soda or sparkling water for quick individual servings over the next day or two. The texture won't be the same as fresh punch, but the flavor remains delicious.
For the best fresh experience, plan your punch quantities carefully based on guest count—figure roughly 6-8 ounces per person for a typical gathering where other beverages are also available. Make your punch in batches if serving a very large crowd, rather than one enormous bowl that sits out for hours. A second batch made halfway through your event will have that fresh-made sparkle and proper temperature that makes this beverage so special. Set a timer on your phone to remind yourself to prepare the second round, and you'll look like the most organized host while ensuring everyone gets the optimal experience.
Common Questions
Can I make this creamy pastel punch dairy-free for guests with dietary restrictions?
Absolutely! Substitute coconut milk-based ice cream or your preferred non-dairy frozen dessert for traditional ice cream. The technique remains identical, though coconut-based versions may have a slightly thinner consistency. Consider adding a small amount of coconut cream to enhance richness, and choose sodas carefully as some contain dairy-derived ingredients in flavorings.
Why does my punch sometimes foam excessively when I add the soda?
Excessive foaming typically results from adding carbonation to ingredients that aren't cold enough, or pouring too quickly from too high above the bowl's surface. The temperature differential and increased agitation both trigger rapid carbon dioxide release. Always pour slowly, close to the liquid surface, and ensure everything is thoroughly chilled. A little foam is normal and actually looks appealing, but volcano-like overflow means you need to slow down your pour.
Can I scale this recipe up for a wedding or large family reunion?
Yes, but I recommend making multiple smaller batches rather than one gigantic bowl. Divide your ingredients proportionally and set up two or three punch stations if needed. This approach maintains better temperature control and carbonation levels, plus it creates better flow for guests to serve themselves. Prepare your flavor bases in large containers, then assemble each bowl as the previous one gets low, ensuring consistent quality throughout your event.
What's the best way to transport this punch if I'm bringing it to someone else's gathering?
Transport your components separately and assemble on-site for optimal results. Pack your flavor base in a sealed jar, ice cream in a cooler with ice packs, and sodas in their original bottles. Bring your punch bowl if possible, or confirm the host has an appropriate vessel. This might seem less convenient, but the five minutes of assembly time yields infinitely better results than trying to transport pre-mixed punch, which will be flat, separated, and disappointing by the time you arrive.
How do I prevent my pastel colors from looking washed out or too intense?
Start with less food coloring than you think you need—you can always add more, but you can't remove it. Gel colors work better than liquid because they don't add extra moisture. Add one drop at a time to your flavor base before adding ice cream, mixing thoroughly and assessing in good lighting. Remember that vanilla ice cream will lighten your colors significantly, so your base should be slightly more saturated than your target final shade. Natural coloring from fruit juices often creates the most appealing, authentic-looking pastels.
Is there a way to add more nutritional value while keeping the fun factor?
Definitely! Use frozen yogurt instead of ice cream for added protein and probiotics. Incorporate 100% fruit juices rather than fruit punch concentrate for real fruit benefits without artificial ingredients. Add fresh fruit pieces like strawberries, blueberries, or kiwi slices which contribute vitamins, fiber, and natural sweetness. Consider using sparkling water mixed with a smaller amount of soda instead of all soda to reduce sugar while maintaining fizz. These swaps create a lighter version that still delivers on taste and presentation while offering something more wholesome.
This creamy pastel punch technique truly is one of those skills that keeps giving back. Once you understand the principles of temperature control, gentle incorporation, and proper carbonation timing, you'll find yourself adapting it for every season and occasion. The confidence you gain from mastering this method translates to other beverage creations too—from smoothies to milkshakes to coffee drinks—because the fundamentals of blending liquids, managing temperature, and balancing flavors remain constant. Your family gatherings will never be the same once you become known as the person who brings that amazing punch everyone talks about. The requests will start coming weeks before events, and you'll smile knowing that what seems like magic to others is simply your understanding of technique. So gather your ingredients, chill your bowl, and get ready to create something that brings joy to every celebration you attend.
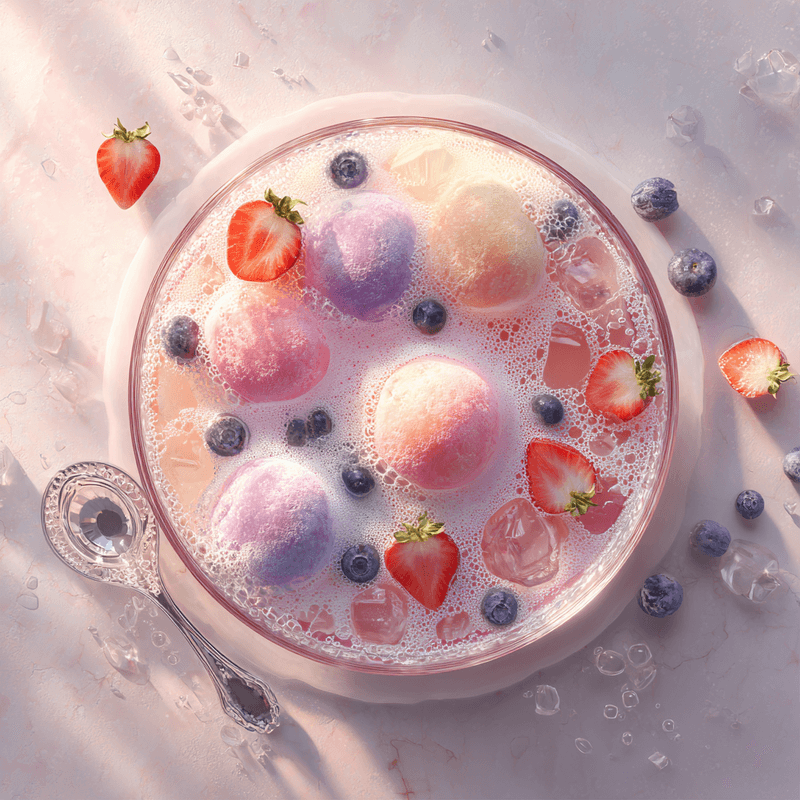
Creamy Pastel Party Punch
A dreamy, fizzy party punch with a silky cream base, sparkling bubbles, and beautiful pastel colors. Perfect for family gatherings and celebrations.
Prep Time
15 min
Cook Time
0 min
Total Time
15 min
Servings
12 servings
Ingredients
For 12 servings
- 1 quart (4 cups) vanilla ice cream, slightly softened
- 2 cups pink lemonade or fruit punch, chilled
- 1 cup white grape juice, chilled
- 2 liters lemon-lime soda or ginger ale, chilled
- 1 pint rainbow sherbet or sorbet (optional)
- 2-3 drops pink or blue gel food coloring (optional)
- 2 cups fresh strawberries, hulled and sliced
- 1 cup fresh blueberries
- 1 cup raspberries
- Edible flowers for garnish (optional)
- Ice ring or frozen fruit cubes for keeping cold
Instructions
- 1
Chill Equipment
Place your large punch bowl in the refrigerator or freezer for at least 30 minutes before assembly. Ensure all liquid ingredients including juices and sodas are thoroughly chilled in the refrigerator for at least 2 hours. Cold equipment and ingredients are essential for maintaining proper texture and carbonation.
- 2
Prepare Flavor Base
In a large pitcher, combine the pink lemonade and white grape juice. If using food coloring to achieve your desired pastel shade, add 2-3 drops and stir thoroughly until the color is completely uniform. Taste and assess the sweetness level, keeping in mind that ice cream will add additional sweetness to the final punch.
- 3
Add Ice Cream
Using an ice cream scoop, add scoops of vanilla ice cream directly into your chilled punch bowl, distributing them evenly across the bottom. Pour half of your prepared flavor base over the ice cream. Use a gentle folding motion with a ladle to begin incorporating the liquid and ice cream, working slowly to prevent excessive melting.
- 4
Create Creamy Base
Continue folding gently until you achieve a semi-smooth mixture with some small ice cream chunks still visible throughout. These chunks add textural interest and help keep the punch cold. If using rainbow sherbet, add small scoops now, placing them across the surface where they will float beautifully.
- 5
Add Carbonation
Open chilled soda bottles slowly to preserve maximum carbonation. Pour approximately half the soda gently down the side of the bowl rather than directly onto the surface to minimize bubble disruption. Stir only once or twice with slow, deliberate movements to incorporate the fizz while preserving carbonation.
- 6
Adjust and Finish
Taste the punch and assess the balance of sweetness, flavor intensity, and carbonation. Gradually add the remaining soda until you reach your preferred consistency, keeping in mind that some prefer thicker, creamier punch while others enjoy a lighter, more refreshing version. Add the remaining flavor base if needed for color or taste intensity.
- 7
Add Ice Ring
If using an ice ring or frozen fruit cubes, gently float them in the punch bowl now. These keep everything cold without diluting the flavor as they melt. An ice ring also serves as a beautiful centerpiece that maintains the punch's temperature for extended serving periods.
- 8
Garnish and Serve
Arrange fresh berries in clusters across the surface of the punch, creating visual interest and adding fresh fruit flavor. Add edible flowers if using for an elegant touch. Serve immediately using a ladle that reaches to the bottom of the bowl, ensuring each serving includes the perfect ratio of creamy and liquid components for the full flavor experience.
Nutrition Facts
Per serving (estimated)
185 calories
Calories
38g
Carbs
2g
Protein
4g
Fat
1g
Fiber
45mg
Sodium
34g
Sugar


