
21 Easy No Bake Treats for Simple Spring Gatherings
Discover 21 easy no bake treats perfect for spring gatherings. Quick, delicious desserts that require zero oven time. Sweet solutions for busy hosts!
cookwithlucia.com/recipes/21-easy-no-bake-easter-treats-for-simple-spring-gatherings
Picture this: the weather is warming up, flowers are blooming, and you're planning a beautiful spring gathering with family and friends. The last thing you want is to spend hours sweating over a hot oven when you could be enjoying the sunshine and company. That's where no bake treats become your absolute best friend in the kitchen.
I've pulled together twenty-one of the most delightful, crowd-pleasing no bake treats that are perfect for spring gatherings. These aren't just simple recipes—they're strategic choices that let you prepare stunning desserts without turning on your oven even once. Whether you're hosting a weekend brunch, a family dinner, or a casual get-together with friends, these treats deliver maximum wow factor with minimum stress.
What makes these recipes especially wonderful for spring is that they're light, refreshing, and often feature the bright flavors of the season. Many can be made a day or two ahead, which means you'll actually get to enjoy your own gathering instead of being stuck in the kitchen. From creamy, dreamy desserts to fruity delights and chocolate indulgences, there's something here for every taste preference and skill level.
Why No Bake Treats Are Perfect for Spring Gatherings
Spring gatherings call for a different approach to entertaining than other times of the year. As temperatures rise, the thought of heating up your kitchen becomes less and less appealing. No bake treats solve this problem beautifully while offering so much more than just convenience.
These desserts typically come together faster than traditional baked goods, which means less time measuring, mixing, and monitoring. You can prepare most of these treats while chatting with early arrivals or even the day before your gathering. This flexibility is invaluable when you're juggling multiple dishes or coordinating with other hosts.
The nature of no bake desserts often means they're naturally lighter and more refreshing than their oven-baked counterparts. Think creamy mousses, fruit-forward parfaits, and chilled chocolate treats that feel indulgent without being heavy. This lighter quality perfectly matches the spring mood when appetites shift toward fresher, brighter flavors.
Another beautiful advantage is that no bake treats often require less specialized equipment. You don't need a stand mixer, cookie sheets, or even mixing bowls in some cases. A spoon, a refrigerator, and simple ingredients can create magic. This accessibility makes these recipes perfect for new cooks and experienced bakers alike.
Essential Ingredients for Your No Bake Pantry
Building a well-stocked pantry for no bake treats means you can whip up something delightful at a moment's notice. The beauty of these ingredients is that most have long shelf lives, so you can keep them on hand for spontaneous gatherings or last-minute sweet cravings.
Cream cheese forms the foundation of countless no bake desserts, from cheesecake cups to fruit dips. Always opt for full-fat cream cheese for the best texture and flavor. Let it sit at room temperature for about thirty minutes before using—this makes mixing infinitely easier and prevents lumps in your final product.
Heavy whipping cream is another powerhouse ingredient that transforms simple mixtures into luxurious desserts. When whipped, it adds airiness and richness that elevates everything from chocolate mousse to layered parfaits. Keep a carton in your refrigerator, and you're always ready to create something special.
Graham crackers, vanilla wafers, and similar cookies serve as the base for many no bake crusts and layers. Crushing them into fine crumbs takes just minutes with a food processor, or you can place them in a sealed bag and crush with a rolling pin. Mix with melted butter, press into your pan, and chill—you've got an instant crust without any baking required.
Fresh and frozen fruits bring natural sweetness, beautiful colors, and seasonal freshness to your spring treats. Berries are particularly wonderful in spring—strawberries, blueberries, and raspberries all work beautifully in no bake desserts. Frozen fruits work just as well in many recipes and offer the convenience of year-round availability.
Chocolate in various forms—chips, bars, cocoa powder—appears in many of these treats. Quality matters here, so choose chocolate you'd enjoy eating on its own. For melting, chocolate chips or chopped chocolate bars work beautifully when gently melted over a double boiler or in short microwave bursts.
Sweetened condensed milk is the secret weapon in many no bake recipes, providing sweetness, creaminess, and body all in one ingredient. It has a long shelf life, so stock up when you see it on sale. This ingredient simplifies many recipes that would otherwise require lengthy cooking or tempering.
Category One: Creamy and Dreamy No Bake Delights
No bake cheesecake cups are perhaps the most elegant and versatile treat you can make without an oven. Layer crushed graham crackers in the bottom of small glasses or jars, top with a simple mixture of cream cheese, sugar, and vanilla, then finish with fresh fruit or a fruit compote. These individual servings look stunning on a dessert table and can be customized for each guest's preferences.
Chocolate mousse brings restaurant-quality sophistication to your gathering with surprisingly little effort. Melt quality chocolate, fold it into freshly whipped cream with a gentle hand to maintain airiness, and chill until set. The result is a silky, rich dessert that feels incredibly indulgent. Serve in wine glasses or small dessert cups topped with a dollop of whipped cream.
Peanut butter balls combine the irresistible pairing of peanut butter and chocolate in bite-sized perfection. Mix peanut butter with powdered sugar and butter until you can form balls, then dip in melted chocolate. These treats are endlessly customizable—add crushed pretzels for crunch, drizzle with white chocolate, or roll in chopped nuts before the chocolate sets.
Strawberry shortcake parfaits capture all the glory of traditional shortcake in an easy layered format. Crush vanilla wafers or pound cake, layer with sweetened whipped cream and fresh sliced strawberries macerated in a bit of sugar. The juices from the strawberries soak into the cake layers, creating pockets of intense flavor throughout.
Lemon cream icebox cake delivers bright, tangy refreshment perfect for spring weather. Layer lemon cookies or vanilla wafers with a mixture of whipped cream, lemon curd, and cream cheese. Let it chill overnight—the cookies soften into cake-like layers while the lemon cream sets into something magical. Slice and serve with fresh berries on the side.
Category Two: Fruit-Forward Fresh Treats
Fruit salad with honey lime dressing transforms simple fresh fruit into something special enough for entertaining. Cube a rainbow of seasonal fruits—melons, berries, grapes, and stone fruits all work beautifully. Whisk together honey, fresh lime juice, and a pinch of mint, then toss gently with the fruit. The dressing brings all the flavors together while adding a sophisticated touch.
Strawberry pretzel salad might sound unusual, but it's a beloved classic that combines sweet and salty in perfect harmony. Crush pretzels with butter and a bit of sugar for the base, spread with sweetened cream cheese, then top with strawberry gelatin studded with fresh strawberries. The layers stay distinct and beautiful, and the combination of textures is absolutely addictive.
Chocolate covered strawberries are perhaps the simplest elegant dessert imaginable. Melt good quality chocolate, dip clean dry strawberries, and let them set on parchment paper. For variety, drizzle with contrasting chocolate or roll in finely chopped nuts immediately after dipping. These look stunning arranged on a platter and disappear quickly at any gathering.
Fruit pizza on a cookie crust brings playful fun to your dessert table. Press cookie dough or crushed cookies mixed with butter into a pizza pan, spread with sweetened cream cheese, then arrange sliced fresh fruits in a beautiful pattern. A simple glaze made from melted jam brushed over the top adds shine and holds everything in place.
Watermelon cake offers a stunning, refreshing alternative for guests watching their sugar intake. Cut a whole watermelon into a cake-like cylinder, frost with whipped coconut cream, and decorate with fresh berries. This dramatic presentation photographs beautifully and provides a lighter option alongside richer desserts.
Category Three: Chocolate Lovers' No Bake Heaven
Chocolate peanut butter bars satisfy intense chocolate cravings with minimal effort. Press a mixture of crushed cookies, peanut butter, and powdered sugar into a pan, spread melted chocolate over the top, and chill until firm. Cut into squares and watch them disappear. The combination of creamy peanut butter base and snappy chocolate top creates perfect textural contrast.
No bake cookies—those classic chocolate, peanut butter, and oat combinations—are nostalgic favorites that never go out of style. Bring sugar, butter, milk, and cocoa to a boil, remove from heat, stir in peanut butter and oats, then drop by spoonfuls onto parchment. They set up as they cool, creating chewy, intensely flavored treats.
Chocolate truffles feel incredibly fancy but are surprisingly simple to make. Mix melted chocolate with heavy cream, chill until firm enough to scoop, then roll into balls and coat with cocoa powder, chopped nuts, or shredded coconut. These luxurious little bites can be made days ahead and kept refrigerated until serving time.
Oreo fluff dessert combines crushed cookies with a fluffy mixture of cream cheese, whipped cream, and sometimes pudding. Layer in a dish, chill thoroughly, and serve by the spoonful. This crowd-pleaser appeals to all ages and can be made in a large dish for casual scooping or in individual cups for more formal presentations.
Chocolate coconut balls bring tropical flavor to your no bake repertoire. Mix shredded coconut with sweetened condensed milk and vanilla, form into balls, then dip in melted chocolate. The chewy coconut interior contrasts beautifully with the chocolate shell, and these treats store exceptionally well in the refrigerator.
Category Four: Quick and Simple Crowd-Pleasers
Rice cereal treats get a spring upgrade with the addition of colorful sprinkles, dried fruit, or white chocolate drizzle. The classic combination of marshmallows, butter, and crispy rice cereal comes together in minutes. Press into a pan, let cool, cut into squares, and you've got a treat that disappears faster than you'd expect.
Pudding cups layered with cookies or fruit offer endless variation with minimal effort. Make instant pudding according to package directions, layer in clear cups with crushed cookies, whipped cream, or fresh fruit. These assemble quickly and look impressive lined up on a serving table. Try chocolate pudding with crushed cookies, vanilla with berries, or butterscotch with sliced bananas.
Energy balls made from dates, nuts, and oats provide a healthier option that still feels like a treat. Pulse everything in a food processor until it holds together, roll into balls, and refrigerate. These naturally sweet bites appeal to health-conscious guests while still satisfying sweet cravings. Add cocoa powder, shredded coconut, or mini chocolate chips for variation.
Graham cracker sandwiches filled with frosting bring nostalgic simplicity to your dessert spread. Spread your favorite frosting between two graham crackers, wrap individually, and freeze. The freezing step transforms these simple sandwiches into something special—the graham crackers soften slightly while the frosting firms up into an almost ice cream-like consistency.
Yogurt bark topped with fruit and nuts creates a refreshing, lighter dessert option. Spread thick Greek yogurt on a parchment-lined pan, top with fresh berries, a drizzle of honey, and chopped nuts, then freeze until solid. Break into irregular shards for serving. This treat feels indulgent while actually offering protein and probiotics.
Category Five: Make-Ahead Masterpieces
Icebox cake deserves special mention as the ultimate make-ahead no bake dessert. Layer cookies with whipped cream, let chill overnight, and the magic happens as you sleep—the cookies soften into cake-like layers while absorbing flavor from the cream. Try chocolate cookies with chocolate or coffee-flavored cream, or vanilla wafers with lemon or berry cream.
Banoffee pie in jars captures all the glory of the British classic in portable form. Layer crushed cookies with caramel, sliced bananas, and whipped cream in small jars. The combination of crunchy base, gooey caramel, fresh bananas, and fluffy cream creates layers of contrasting textures and complementary flavors. Make these a day ahead for flavors to meld.
Tiramisu cups bring Italian elegance to your gathering without any baking. Dip ladyfinger cookies in strong coffee, layer with a mixture of mascarpone cheese, sugar, and whipped cream, then dust with cocoa powder. The longer these sit, the better the flavors develop, making them perfect for preparing the day before your gathering.
Cheesecake parfaits with various toppings let you create a dessert bar where guests can customize their treats. Prepare the base cheesecake mixture, set out bowls of different toppings—fresh berries, chocolate chips, caramel sauce, crushed cookies—and let everyone build their perfect parfait. This interactive approach adds fun to your gathering while reducing your prep work.
Storage and Make-Ahead Tips for No Bake Treats
Understanding proper storage extends the life of your no bake treats and allows you to prepare with confidence days before your gathering. Most cream-based desserts keep beautifully for two to three days when properly covered in the refrigerator. Use plastic wrap pressed directly onto surfaces to prevent skin from forming on custards and puddings.
Chocolate-based treats generally store longer than cream-based ones, often lasting up to a week when refrigerated in airtight containers. Separate layers with parchment paper to prevent sticking. Bring chocolate desserts to cool room temperature about thirty minutes before serving for the best flavor and texture.
Freezing extends storage time significantly for many no bake treats. Cheesecake cups, energy balls, frosted graham crackers, and most chocolate treats freeze beautifully for up to three months. Wrap individual portions well to prevent freezer burn and allow for easy grab-and-go serving. Thaw in the refrigerator overnight before your gathering.
Fruit-topped desserts require special timing considerations. Prepare the base and cream components ahead, but add fresh fruit just before serving to prevent sogginess and maintain visual appeal. Cut fruit releases moisture over time, which can water down creams and soften crusts. If you must add fruit early, choose berries which hold up better than softer fruits.
Transporting no bake treats to another location requires some planning. Keep everything cold with ice packs in insulated containers. Pack layered desserts in sturdy containers that won't shift during transport. Individual servings in jars or cups travel better than large dishes that need slicing or scooping on site.
Tips for Presenting Your No Bake Treats Beautifully
Presentation transforms even simple treats into showstoppers worthy of your spring gathering. Height creates visual interest, so consider tiered serving stands, cake stands at different levels, or even inverted bowls under tablecloths to create risers. Arrange treats at varying heights for a dynamic, abundant display.
Color coordination makes your dessert table feel intentional and polished. For spring gatherings, incorporate fresh flowers that aren't edible as decoration around—but not touching—your treats. Use serving dishes in complementary colors, or stick to white dishes that let the desserts' colors shine. Fresh herb sprigs like mint add pops of green and wonderful fragrance.
Individual servings in clear glasses or jars showcase beautiful layers while making serving effortless. Guests can simply grab their dessert and go, and you avoid the need for plates and serving utensils. Mason jars, wine glasses, small tumblers, and dessert cups all work beautifully. This approach also helps with portion control and reduces waste.
Garnishes add polish that elevates simple treats into something special. Fresh mint sprigs, shaved chocolate, a dusting of powdered sugar, or a drizzle of complementary sauce takes seconds to add but makes everything look professionally finished. Add garnishes just before guests arrive so they look fresh and vibrant.
Labels help guests navigate your dessert spread, especially important if you're accommodating different dietary needs. Small tent cards or chalkboard labels listing the treat name and any relevant information—like contains nuts or dairy-free—help guests make informed choices. This thoughtful touch shows care for your guests' needs.
Customizing No Bake Treats for Dietary Needs
No bake treats often adapt more easily to dietary restrictions than traditional baked goods, making them inclusive options for diverse guest lists. Understanding simple substitutions means everyone at your gathering can enjoy something sweet.
For guests avoiding dairy, coconut cream whips beautifully when chilled overnight and separated from the liquid. Use it in place of whipped cream in most recipes. Coconut milk, almond milk, or oat milk can replace regular milk, and dairy-free cream cheese now widely available works in most recipes without adjustments.
Reducing sugar while maintaining sweetness requires strategic substitutions. Natural sweeteners like dates, maple syrup, or honey work well in no bake recipes. Date-based treats require no additional sweetener, and energy balls sweetened with dates and dried fruit satisfy sweet cravings while providing fiber and nutrients.
Gluten-free adaptations for no bake treats are often straightforward since many don't rely on flour. For recipes using cookie crumbs for crusts, simply substitute gluten-free cookies or use naturally gluten-free options like crushed nuts or shredded coconut. Always check labels on processed ingredients like graham crackers to ensure they meet gluten-free standards.
Nut allergies require careful attention to cross-contamination and hidden ingredients. Many no bake recipes naturally contain no nuts, making them safe options. For recipes that do include nuts, seeds often provide similar texture—sunflower seed butter works in place of peanut butter, and crushed seeds can replace chopped nuts for coating or mixing in.
No Bake Treats FAQ
How far in advance can I make no bake treats for my gathering?
Most no bake treats benefit from advance preparation, actually improving in flavor and texture when made a day or two ahead. Cream-based desserts like cheesecake cups, mousse, and parfaits should be made at least four hours before serving, though twenty-four hours ahead is even better. Chocolate treats, energy balls, and truffles can be prepared up to a week in advance and stored in airtight containers in the refrigerator. Always add fresh fruit, whipped cream garnishes, and delicate toppings within a few hours of serving.
What if my no bake treats are too soft or won't set properly?
Soft, unset desserts usually need more chilling time or have incorrect ratios in the recipe. Most no bake treats need at least four hours in the refrigerator, though overnight is often better for proper setting. If you've chilled adequately and the treat is still soft, you can rescue it by mixing in additional cream cheese, adding gelatin that's been bloomed and melted, or folding in more whipped cream for structure. For chocolate-based treats that won't harden, ensure you're using real chocolate rather than chocolate-flavored coatings, which have different setting properties.
Can I make these treats in hot weather without them melting?
Hot weather requires extra precautions for no bake treats since most rely on refrigeration for structure. Keep treats refrigerated until the last possible moment before serving, and consider setting your dessert table in the coolest area of your space, away from direct sunlight. For outdoor gatherings, place serving platters over bowls of ice to maintain cool temperatures. Chocolate-based treats are most vulnerable to heat, while fruit-based and yogurt-based options hold up better in warm conditions.
What are the best containers for gifting no bake treats?
Individual no bake treats make wonderful gifts when packaged thoughtfully. Small mason jars work beautifully for layered desserts like parfaits and icebox cakes. Clear plastic cups with fitted lids travel well for treats like pudding cups and mousse. For treats like truffles, balls, and bars, line small boxes or tins with parchment paper and separate layers to prevent sticking. Always include storage instructions—most no bake treats need refrigeration, so attach a note reminding recipients to keep them cold.
How do I prevent soggy crusts in no bake desserts?
Soggy crusts result from moisture migrating from wet fillings into dry cookie or crumb bases. Create a moisture barrier by brushing the crust with a thin layer of melted chocolate before adding filling—the chocolate hardens and seals the crust. Alternatively, ensure your crust has enough butter to bind tightly, which makes it more resistant to moisture absorption. For parfaits and layered desserts, add the cookie layer just a few hours before serving rather than the day before, maintaining crunch.
What if I don't have time for the full chilling period?
While proper chilling produces the best results, you can speed the process slightly by using your freezer for the first hour or two before moving treats to the refrigerator. Divide large desserts into smaller portions, which chill faster than one large dish. Spread mixtures in thinner layers when possible. However, some treats genuinely need time for chemical processes to occur—gelatin must set, cookies must soften, flavors must meld—so plan ahead whenever possible rather than rushing treats that need proper setting time.
Making Your Spring Gathering Memorable
The treats you serve are just one element of a successful spring gathering, but they're an important one that guests remember. By choosing no bake options, you free yourself from oven slavery and gain time to focus on what really matters—connecting with the people you've invited to share your table.
These twenty-one no bake treats offer something for every taste and skill level. Mix and match several options to create variety on your dessert table, or focus on perfecting one or two favorites. Either approach works beautifully as long as you're serving treats made with care and presented with love.
The beauty of spring gatherings lies in their relaxed, joyful atmosphere. Fresh air, longer days, and the renewal that comes with the season all contribute to a sense of celebration. Your desserts should enhance this feeling rather than stress you out. No bake treats deliver on this promise perfectly, giving you homemade goodness without the fuss.
Remember that your guests gather around your table for the company more than the food. A simple treat served with warmth and genuine hospitality outshines the most elaborate dessert served by a stressed, distracted host. Choose recipes that make you feel confident and happy, prepare them with care, and then set them aside to focus on enjoying your gathering.
As you plan your next spring gathering, I hope these ideas inspire you to embrace the ease and elegance of no bake treats. They prove that impressive desserts don't require complicated techniques or hours in a hot kitchen. Sometimes the simplest approaches yield the most delicious results, leaving you free to savor the sunshine, the company, and the sweet taste of spring.
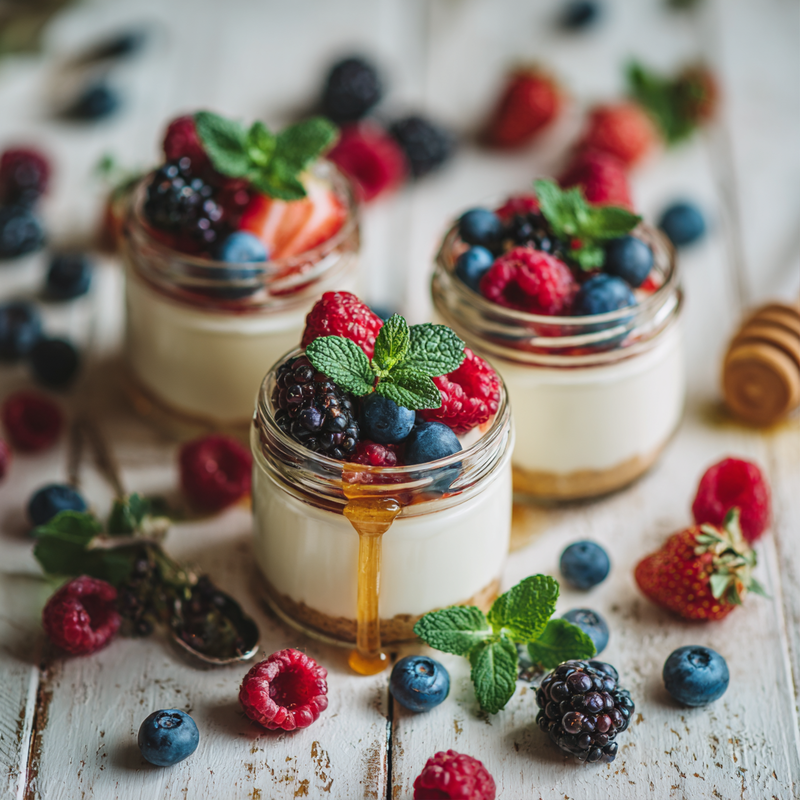
No Bake Cheesecake Cups
Individual no bake cheesecake cups with graham cracker crust and fresh berry topping. Perfect make-ahead dessert for spring gatherings.
Prep Time
20 min
Cook Time
0 min
Total Time
4h 20m
Servings
8 servings
Ingredients
For 8 servings
- 1 cup graham cracker crumbs
- 3 tablespoons unsalted butter, melted
- 16 ounces cream cheese, softened to room temperature
- 1/2 cup granulated sugar
- 1 teaspoon vanilla extract
- 1 cup heavy whipping cream, cold
- 2 cups fresh mixed berries (strawberries, blueberries, raspberries)
- 2 tablespoons honey for drizzling
Instructions
- 1
Prepare the crust
In a medium bowl, combine graham cracker crumbs with melted butter and mix until the mixture resembles wet sand. Divide the mixture evenly among 8 small glasses or jars, pressing down firmly with the back of a spoon to create a compact layer. Place in refrigerator while preparing the filling.
- 2
Beat the cream cheese
In a large bowl, beat the softened cream cheese with an electric mixer on medium speed until completely smooth and creamy, about 2 minutes. Scrape down the sides of the bowl to ensure no lumps remain. Add the sugar and vanilla extract, beating for another minute until fully incorporated and fluffy.
- 3
Whip the cream
In a separate clean bowl with clean beaters, whip the cold heavy cream on high speed until stiff peaks form, about 3 to 4 minutes. The cream should hold its shape when you lift the beaters. Be careful not to over-whip or the cream will become grainy.
- 4
Fold cream into cheese mixture
Add about one-third of the whipped cream to the cream cheese mixture and gently fold together with a spatula to lighten the mixture. Add the remaining whipped cream and fold gently until just combined and no white streaks remain. Be gentle to maintain the airiness of the whipped cream.
- 5
Fill the cups
Remove the glasses with graham cracker crust from the refrigerator. Spoon or pipe the cheesecake mixture over the crust, dividing it evenly among the 8 glasses. Smooth the tops with the back of a spoon or offset spatula for a neat appearance.
- 6
Chill the cheesecakes
Cover each glass with plastic wrap, being careful not to let it touch the cheesecake surface. Refrigerate for at least 4 hours or overnight to allow the filling to set properly. The longer chilling time allows flavors to develop and the texture to firm up beautifully.
- 7
Prepare the berries
About 30 minutes before serving, rinse and pat dry your berries. Hull and slice strawberries, leaving smaller berries like blueberries and raspberries whole. If desired, toss berries with a small amount of sugar to draw out their juices and create a natural sauce.
- 8
Finish and serve
Remove the cheesecake cups from the refrigerator and uncover. Top each cup generously with fresh berries and drizzle with honey for added sweetness and shine. Serve immediately while the cheesecake is cold and the berries are fresh.
Nutrition Facts
Per serving (estimated)
385 calories
Calories
32g
Carbs
5g
Protein
27g
Fat
2g
Fiber
240mg
Sodium
24g
Sugar


