15+ Colorful Easter Poke Cake Recipes for Spring Gatherings
Discover vibrant poke cake recipes perfect for spring celebrations. Easy, colorful desserts that wow every time. Step-by-step guide inside!
cookwithlucia.com/recipes/15-colorful-easter-poke-cake-recipes
15+ Colorful Easter Poke Cake Recipes for Spring Gatherings
There's something magical about cutting into a cake and discovering pockets of vibrant color and flavor hiding inside. Poke cakes are one of those desserts that look absolutely stunning but require minimal effort—the kind of dessert that makes everyone think you spent hours decorating when you really just poked some holes and poured. These colorful spring poke cakes are perfect for family gatherings, weekend celebrations, or any time you want to bring a little joy to the table with a dessert that's as fun to make as it is to eat.
I love how versatile poke cakes are. You start with a simple cake base, poke holes throughout, then fill those little caverns with flavored gelatin, pudding, sweetened condensed milk, or fruit sauces. The filling seeps down into every crevice, creating beautiful marbled patterns and intense pockets of flavor. Top it all with fluffy whipped cream or frosting, and you've got a showstopper that requires nothing more than a 9x13 pan and about twenty minutes of active work. Whether you're drawn to pastel rainbows, bright citrus bursts, or creamy dreamsicle vibes, there's a colorful poke cake recipe here that'll become your new go-to spring dessert.
The Genius Behind Poke Cakes
Poke cakes became popular in the 1970s when home bakers discovered that poking holes in warm cake and soaking it with flavored gelatin created an entirely new texture and flavor experience. The technique transforms an ordinary sheet cake into something special—moist, flavorful, and visually stunning. What makes poke cakes particularly brilliant is how the filling actually improves the cake's texture, keeping it incredibly moist for days and adding layers of flavor that a simple frosted cake can't match.
The method works because warm cake is porous and receptive. When you poke holes while the cake is still warm, those channels stay open and ready to absorb whatever liquid you pour over. As the cake cools, the filling sets slightly, creating distinct flavor pockets throughout. This means every single bite has cake, filling, and topping all working together. It's the ultimate marriage of textures and tastes.
For spring gatherings, colorful poke cake recipes offer another advantage: they're make-ahead friendly. You can bake, poke, fill, and frost these cakes a day or even two ahead, and they'll actually taste better as the flavors meld. This makes them ideal for busy hosts who want an impressive dessert without last-minute stress. Plus, they feed a crowd beautifully and slice cleanly, which means serving is as easy as the preparation.
Building Your Colorful Cake Base
The foundation of any great poke cake starts with choosing the right base. White or vanilla cake works beautifully because it acts as a neutral canvas for vibrant colors. A standard box mix works perfectly well here—there's absolutely no shame in using one, and the texture is actually ideal for absorbing fillings. If you prefer baking from scratch, a simple butter cake or white cake recipe will give you excellent results. The key is making sure your cake has a relatively tight crumb that won't fall apart when poked but isn't so dense that it resists absorbing the filling.
Lemon or orange-flavored cake bases add another dimension to colorful spring poke cake recipes. The citrus notes complement fruit-flavored fillings beautifully and add a brightness that feels perfectly seasonal. You might also try a vanilla cake with almond extract added—it creates a subtle nutty sweetness that pairs wonderfully with berry or tropical fillings. Whatever base you choose, avoid chocolate for these particular recipes since you want the colors to really pop against a light background.
The baking process matters too. You want to bake your cake until it's just done—a toothpick should come out with just a few moist crumbs. Overbaking creates a dry cake that won't absorb filling as well. Most 9x13 cakes bake in 25-30 minutes at 350°F, but always check a few minutes early. The cake should spring back lightly when touched and just be pulling away from the edges of the pan. Then comes the crucial step: poke while warm, but not hot. Let the cake cool for about 10-15 minutes after it comes out of the oven, then create your holes while it's still quite warm.
Fifteen Ways to Fill and Flavor
Let me walk you through fifteen stunning variations of colorful poke cake recipes that'll make your spring dessert table absolutely sing. Each one uses the same basic technique but creates completely different visual and flavor experiences.
Classic Rainbow Poke Cake uses four different gelatin colors—pink, orange, yellow, and blue. Pour each carefully into separate sections of your poked cake, creating distinct color zones that marble slightly where they meet. Top with white whipped cream for a cloud-like finish that lets the colors peek through.
Lemon Blueberry Burst starts with lemon cake, then you fill half with lemon pudding (which creates pale yellow pockets) and the other half with blueberry sauce made from fresh berries cooked down with a bit of sugar. The purple and yellow create a gorgeous spring garden effect.
Strawberry Shortcake Poke uses vanilla cake filled with strawberry gelatin, creating bright pink veins throughout. Top with stabilized whipped cream and fresh strawberry slices. It's all the flavors of classic strawberry shortcake in an easier format.
Orange Creamsicle Dream combines orange cake with orange gelatin filling and vanilla pudding mixed into the whipped topping. The result tastes exactly like those beloved frozen treats but in cake form. Use orange and white gelatin in alternating sections for extra visual appeal.
Tropical Sunset brings together pineapple, mango, and passion fruit. Use yellow and orange gelatin, then top with whipped cream mixed with coconut extract and toasted coconut flakes. It's like a vacation on a plate.
Berry Patch layers raspberry and strawberry gelatin throughout white cake, then tops with cream cheese frosting tinted the palest pink. Garnish with fresh raspberries and strawberries for a farmers market feel.
Lemon Lavender Elegance uses lemon cake with pale purple lavender-infused simple syrup as the poke filling, then white whipped cream with a few dried lavender buds sprinkled on top. It's sophisticated and floral without being overwhelming.
Pastel Checkerboard requires a bit more precision but creates stunning results. Use a small round piping tip to create organized rows of holes, then carefully fill alternating sections with pink and blue gelatin for a checkerboard pattern that reveals itself when sliced.
Coconut Lime Paradise combines lime gelatin with sweetened condensed milk mixed with coconut cream. The filling creates pale green and white marbling, and you finish it with whipped coconut cream and toasted coconut.
Cherry Vanilla Cloud uses cherry gelatin creating deep pink pockets throughout vanilla cake, then a cream cheese whipped topping that tastes like cheesecake. Fresh cherries on top complete the look.
Peachy Keen fills white cake with peach gelatin and a drizzle of peach nectar, creating soft coral colors throughout. Top with vanilla whipped cream and sliced fresh peaches when they're in season.
Rainbow Sherbet mimics the classic ice cream with orange, lime, and raspberry gelatin in distinct sections. The whipped topping gets a touch of vanilla extract, and you garnish with colorful sprinkles.
Butterfly Garden uses butterfly pea flower tea as your poke liquid (it creates natural blue color), then lemon juice drizzled on top which reacts with the blue to create purple areas. It's a science experiment and dessert in one.
Strawberry Lemonade Cooler alternates between strawberry and lemon gelatin throughout the cake, creating pink and yellow marbling that tastes just like summer lemonade stands. A lemon cream cheese frosting brings it all together.
Spring Meadow uses pale green lime gelatin, yellow lemon gelatin, and pink strawberry gelatin in random pours for an impressionist painting effect. White whipped cream with colorful edible flowers on top makes it absolutely special.
The Perfect Poke Technique
Mastering the poking technique is what separates good colorful poke cake recipes from truly spectacular ones. The tool you use matters more than you might think. The handle of a wooden spoon is classic and creates medium-sized holes that work well for gelatin. A chopstick or thick straw makes slightly smaller holes that fill nicely but don't make the cake too fragile. For very delicate, numerous holes, a plastic drinking straw works beautifully—you can even leave the little cake plugs in the straw and push them out between pokes.
The spacing and depth of your holes determines how your filling distributes. I typically poke holes about one inch apart across the entire surface of the cake. Go all the way down to the bottom of the pan, but don't jab through too aggressively or you might crack the cake. Work in steady, straight motions, pulling the tool straight up and down rather than wiggling it, which can tear the cake's structure.
Timing your filling pour is crucial. For gelatin-based fillings, prepare the gelatin according to package directions but let it cool to room temperature before pouring—if it's too hot, it'll melt any whipped topping you add later, and if it's too cool, it'll start setting before it penetrates the holes. Pour slowly and evenly, watching the liquid disappear into the holes. You might need to pour, wait a minute for absorption, then pour again. For pudding-based fillings, prepare the pudding to a slightly thinner consistency than normal so it flows into the holes more easily. Sweetened condensed milk and fruit sauce fillings are naturally the right consistency and can be poured at room temperature immediately after poking.
Making Them Spectacular
What elevates colorful poke cake recipes from simple to stunning is how you finish and present them. The topping is your final canvas. Whipped cream is traditional and light, letting the colors beneath show through. Stabilized whipped cream holds up better if your cake will sit out for a while—just add a tablespoon of instant pudding mix or a bit of gelatin to your whipped cream as it whips. This keeps it fluffy and prevents weeping.
Cream cheese frosting adds richness and tangy contrast to sweet fillings. Thin it slightly with a bit of milk or cream so it spreads easily without pulling up the cake beneath. For the most professional look, apply a thin first layer, chill it for thirty minutes, then add a thicker final layer. This crumb coat technique keeps your white topping pristine.
Garnishes transform your cake from homemade to bakery-worthy. Fresh fruit that echoes the filling flavors looks beautiful and tells guests what to expect flavor-wise. Edible flowers bring a spring garden feel—pansies, violets, and nasturtiums are all safe choices. Colorful sprinkles add whimsy, while toasted coconut or crushed cookies provide textural contrast. Consider color coordination: if your cake has pink and yellow filling, use complementary colors in your garnishes.
For truly Instagram-worthy presentation, cut the first slice before bringing the cake to the table. This reveals the interior pattern and colors, showing guests what makes this cake special. A sharp, thin knife dipped in hot water between cuts creates the cleanest slices. Wipe the knife completely clean between each cut to keep colors from muddying together on the blade.
Secrets to Poke Cake Success
After making dozens of colorful poke cake recipes, I've learned several tricks that guarantee success every time. First, always use a light-colored or glass 9x13 pan. Dark pans absorb more heat and can overbrown the bottom before the center cooks through. Metal pans conduct heat better than glass for even baking, but glass lets you see the bottom to check for doneness.
Don't skip the cooling period before poking. If the cake is too hot, the structure is too fragile and holes will collapse. Too cool, and the cake becomes resistant to absorbing filling. That sweet spot of warm-but-not-hot (about 15 minutes out of the oven) is ideal. When you're ready to poke, work from one end of the pan to the other in organized rows so you don't miss any spots.
For multi-colored fillings, use a liquid measuring cup with a pour spout for each color. This gives you control over where each color goes. If you want distinct color sections, pour carefully in zones. For a marbled effect, alternate colors as you move across the pan, or pour all colors at once in different areas and let them flow together naturally.
Refrigeration time is not optional. Your cake needs at least three hours, preferably overnight, for the filling to fully set and the flavors to meld. Cover the pan tightly with plastic wrap directly on the surface of the whipped topping to prevent it from absorbing refrigerator odors or drying out. This also prevents condensation from dripping back onto your cake.
Transport these cakes carefully if you're bringing them somewhere. Keep them cold until the last possible moment, and if it's warm out, transport with ice packs. The gelatin and whipped cream are temperature-sensitive. At your destination, keep the cake refrigerated until within thirty minutes of serving for food safety and best texture.
Adapting for Dietary Needs
Colorful poke cake recipes can be adapted for various dietary preferences without sacrificing the signature look and flavor. For gluten-free versions, use a quality gluten-free cake mix or your favorite gluten-free vanilla cake recipe. The poke technique works identically with gluten-free cakes—just be slightly gentler when poking as some gluten-free cakes can be more delicate.
Dairy-free poke cakes are absolutely achievable. Use a dairy-free cake recipe or box mix, then fill with fruit-based sauces or dairy-free pudding. For topping, coconut whipped cream works beautifully—just make sure to use full-fat coconut milk that's been chilled overnight, then whip only the solid cream portion. Stabilize it with a bit of powdered sugar and vanilla extract.
Reducing sugar is trickier but possible. Use sugar-free gelatin for your fillings, though the colors won't be quite as vibrant. Sugar-free pudding also works. The cake itself needs some sugar for structure, but you can reduce it slightly. Be aware that sugar-free versions won't keep quite as long since sugar acts as a preservative.
For those avoiding artificial colors, natural alternatives create beautiful effects. Beet juice or pomegranate juice creates pink, turmeric or saffron creates yellow, butterfly pea flower tea creates blue, and matcha or spirulina creates green. These natural colorants can be added to white gelatin or mixed into pudding fillings. The colors will be more muted than neon gelatin but often more sophisticated.
Serving and Storage
Colorful poke cake recipes are ideal for crowds because they slice cleanly and serve easily. A 9x13 pan yields 12-15 generous servings depending on how you cut it. For neater slices, run your knife under hot water and wipe it clean between each cut. The contrast between the white topping and colorful interior is part of the appeal, so make sure each slice shows off that cross-section.
Serve these cakes cold or at cool room temperature. They can sit out for about an hour without issue, but longer than that and you risk the whipped topping softening or gelatin starting to weep in warm conditions. If your gathering is outdoors or in a warm space, consider keeping the cake refrigerated and bringing out portions as needed.
Storage is simple: cover tightly and refrigerate. These cakes actually improve in the first two days as flavors develop. After three days, the cake starts to get increasingly moist from the filling, which some people love but others find too wet. The whipped topping will stay fresh for about four days if properly covered. If you've used cream cheese frosting, the cake will last up to five days.
Freezing is possible but not ideal for poke cakes with whipped cream topping, as the topping will weep when thawed. If you know you'll want to freeze portions, use cream cheese frosting instead, which freezes and thaws beautifully. Wrap individual slices in plastic wrap, then foil, and freeze for up to two months. Thaw overnight in the refrigerator.
Beyond the Basics
Once you've mastered basic colorful poke cake recipes, you can start experimenting with creative variations. Try layering different fillings—poke your holes, add one flavor, refrigerate for an hour, then poke again in different spots and add a second flavor. This creates incredibly complex flavor profiles and patterns.
Shaped poke cakes add another dimension. Use cookie cutters to cut shapes from sheet cake after it's filled and chilled, then arrange them on a platter. Each individual cake becomes a personal serving that still shows off the poke cake interior. This works especially well for smaller gatherings where you want individual presentations.
Poke cupcakes scale down the concept. Bake cupcakes, poke each one several times with a straw, then use a squeeze bottle or syringe to inject filling into each hole. Top with frosting or whipped cream. They're perfect for portion control and kid-friendly serving.
Swirled fillings create artistic effects. Pour two different colored gelatins or puddings into a large measuring cup without stirring, then pour over the poked cake in a zig-zag pattern. The colors will swirl together naturally, creating watercolor-like effects that are never quite the same twice.
Answers to Your Questions
What's the best gelatin flavor combination for vibrant colors?
For the most vibrant results in colorful poke cake recipes, use primary colored gelatins—strawberry or raspberry for pink/red, lemon or pineapple for yellow, orange for orange, lime for green, and berry blue for blue. These colors are most intense and create the best contrast against white cake. Mix and match based on the color scheme you want, remembering that where colors meet, they'll blend slightly into secondary colors.
Can I use fresh fruit instead of gelatin?
Absolutely! Fresh fruit sauces work beautifully in poke cakes. Cook down berries, stone fruits, or tropical fruits with a bit of sugar until they're syrupy, then strain to remove seeds if desired. The sauce should be thin enough to flow into holes but thick enough to not just soak the cake into mush. Fruit sauces create more subtle colors than gelatin but often more sophisticated flavors. Let them cool to room temperature before pouring.
How do I prevent the cake from getting too soggy?
The key is finding the right balance of holes and filling. Don't over-poke—holes about an inch apart is plenty. Don't over-pour—the liquid should fill the holes but not puddle on top. If you notice excess liquid pooling on the surface, blot it gently with paper towels before it soaks in further. Using gelatin that's been allowed to cool and slightly thicken also helps, as it's less likely to oversaturate the cake.
Can I make poke cakes in a bundt pan?
Bundt poke cakes are stunning! Bake your cake in a bundt pan, let it cool slightly, then use a skewer to poke holes all over from the top. Because you can't flip the cake upside down easily, you'll poke from what will be the serving top. Fill with colored glaze, thin pudding, or fruit syrup that will seep down into the holes. The filling will show as colorful streaks on the exterior. It's a different but equally impressive presentation.
What if my gelatin won't go into the holes?
This usually means either the gelatin cooled too much and started setting, or your holes weren't deep enough. If the gelatin is too thick, microwave it briefly (10-15 seconds) to reliquify it, then try again. If holes are the issue, take your poking tool and gently reopen the holes by going back through them, which will help the liquid flow. You can also use the back of a spoon to gently press and spread the gelatin across the surface.
How far ahead can I make colorful poke cake recipes?
These cakes are actually better when made ahead! Bake, fill, and frost the cake up to two days before serving. This gives the filling plenty of time to set and flavors to develop fully. Just make sure to cover it tightly so the topping doesn't dry out or absorb refrigerator odors. If you're adding fresh fruit or flower garnishes, wait until a few hours before serving to add those so they look their freshest and don't release moisture that could affect your topping.
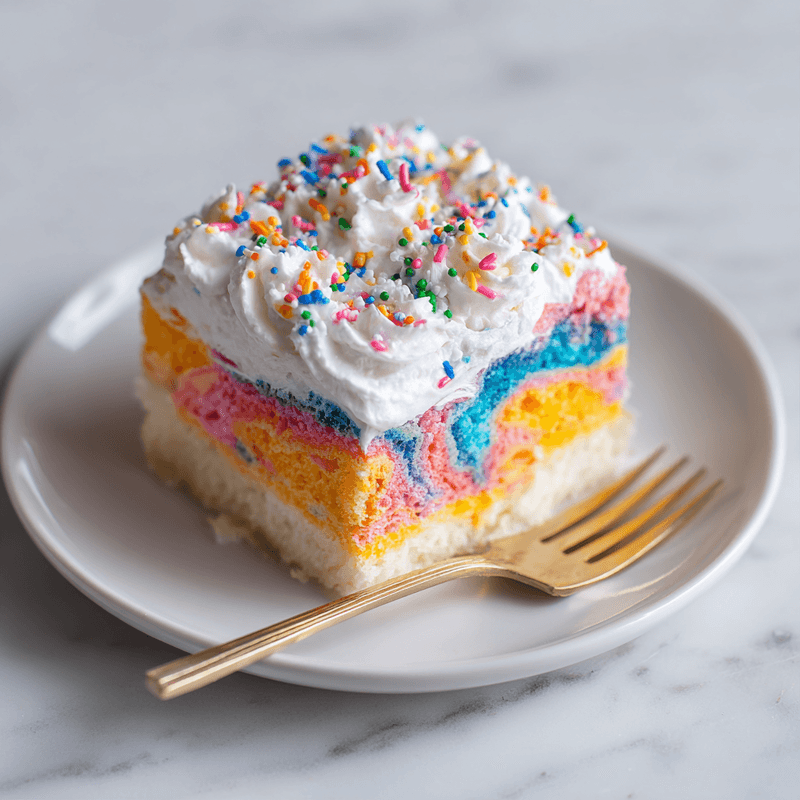
Classic Rainbow Poke Cake
A stunning vanilla cake filled with colorful gelatin creating beautiful marbled patterns throughout, topped with fluffy whipped cream. Perfect for spring gatherings and special occasions.
Prep Time
20 min
Cook Time
30 min
Total Time
3h 50m
Servings
12 servings
Ingredients
For 12 servings
- 1 box (15.25 oz) white cake mix, plus ingredients called for on box (eggs, oil, water)
- 1 package (3 oz) strawberry gelatin
- 1 package (3 oz) orange gelatin
- 1 package (3 oz) lemon gelatin
- 1 package (3 oz) berry blue gelatin
- 4 cups boiling water, divided
- 4 cups cold water, divided
- 16 oz whipped topping, thawed
- Colorful sprinkles for garnish (optional)
- Fresh berries for garnish (optional)
Instructions
- 1
Bake the cake
Preheat your oven to 350°F and grease a 9x13 inch baking pan. Prepare the white cake mix according to package directions, then pour batter into the prepared pan. Bake for 25-30 minutes until a toothpick inserted in the center comes out with just a few moist crumbs.
- 2
Cool and poke
Remove cake from oven and let it cool on a wire rack for 15 minutes—it should be warm but not hot. Using the handle of a wooden spoon or a chopstick, poke holes all over the cake about 1 inch apart, going all the way down to the bottom of the pan. Work in organized rows to ensure even coverage.
- 3
Prepare gelatin mixtures
In four separate bowls or large measuring cups, prepare each gelatin flavor by mixing each 3 oz package with 1 cup boiling water, stirring until completely dissolved. Add 1 cup cold water to each bowl and stir well. Let the gelatin mixtures cool to room temperature, about 15-20 minutes.
- 4
Pour gelatin sections
Divide the cake surface mentally into four sections. Slowly pour the strawberry gelatin over the first quarter of the cake, then pour orange over the second quarter, lemon over the third, and berry blue over the fourth. The gelatin will seep into the holes and may blend slightly where sections meet, creating beautiful color transitions.
- 5
First chill
Refrigerate the cake uncovered for at least 3 hours, or preferably overnight, to allow the gelatin to fully set inside the cake. The cake should feel firm and cool to the touch, and there should be no liquid gelatin pooling on the surface.
- 6
Add whipped topping
Once the gelatin has set completely, spread the whipped topping evenly over the entire surface of the cake using an offset spatula. Create swoops and swirls for a decorative finish, or smooth it completely flat for a clean modern look.
- 7
Garnish and final chill
If using, sprinkle colorful sprinkles over the whipped topping and arrange fresh berries decoratively on top. Cover the pan loosely with plastic wrap, making sure the wrap doesn't touch the topping. Refrigerate for at least 1 more hour before serving.
- 8
Slice and serve
When ready to serve, use a sharp knife dipped in hot water to cut clean slices. Wipe the knife clean between cuts to keep the colors distinct. Serve cold, and watch everyone's delight as they discover the colorful marbled interior. Store any leftovers covered in the refrigerator for up to 4 days.
Nutrition Facts
Per serving (estimated)
380 calories
Calories
58g
Carbs
4g
Protein
15g
Fat
0g
Fiber
320mg
Sodium
42g
Sugar


