Cheesy Taco Sticks: Master This Game-Changing Recipe
Learn the technique behind perfectly crispy, cheese-stuffed taco sticks. Simple method, incredible results for family gatherings and weeknight dinners.
cookwithlucia.com/recipes/cheesy-taco-sticks-an-organized-chaos
There's something magical about taking familiar flavors and reimagining them into something completely new. That's exactly what happens when you master the art of making cheesy taco sticks. These aren't just another appetizer—they're a revelation in handheld food, combining the satisfying crunch of perfectly fried dough with the molten, savory filling of seasoned beef and cheese. The beauty of this technique lies in its versatility: once you understand how to create these golden, crispy sticks, you can adapt the method to countless flavor combinations.
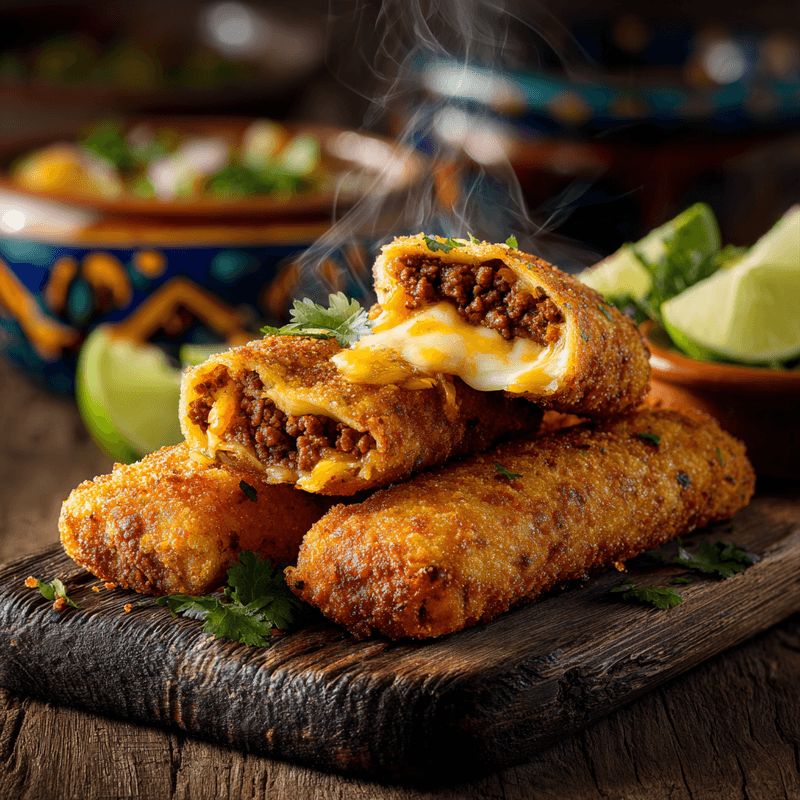
The perfect cheesy taco stick delivers a symphony of textures and tastes. Picture biting through a shattering, golden-brown exterior that gives way to stretchy, melted cheese and perfectly seasoned ground beef. The wrapper should be crisp without being greasy, sturdy enough to hold its filling but delicate enough to break cleanly with each bite. The filling needs to be flavorful enough to shine through without overwhelming, with just the right moisture balance to create that satisfying pull of melted cheese.
I know the idea of making filled, fried appetizers at home can feel intimidating. You might worry about oil temperature, soggy results, or filling that leaks everywhere. But here's what I want you to understand: this technique is far more forgiving than you think. Once you grasp the fundamental principles—proper sealing, correct oil temperature, and timing—you'll find yourself making these cheesy taco sticks with confidence for casual weeknight dinners and special family gatherings alike. The organized chaos of assembling multiple sticks becomes a satisfying rhythm, and the results are always worth the effort.
The Science Behind the Method
Understanding what happens when you fry filled pastries transforms you from someone following instructions to someone who truly knows how to cook. When you slide a properly sealed cheesy taco stick into hot oil, several things happen simultaneously. The water in the wrapper rapidly converts to steam, creating those crispy layers and causing the exterior to puff slightly. At the same time, the Maillard reaction begins—proteins and sugars on the surface undergo chemical changes that create that irresistible golden color and complex, savory flavor we associate with perfectly fried foods.
Inside your cheesy taco stick, a different transformation occurs. The cheese melts at a specific temperature range, typically between 130-180°F depending on the variety. The fat in the cheese becomes liquid, creating that stretchy, gooey texture we crave. Meanwhile, the seasoned meat releases its aromatic compounds and any residual moisture turns to steam, which gets trapped by your carefully sealed wrapper. This internal steam pressure actually helps the filling stay cohesive and prevents it from becoming dry.
The oil temperature matters tremendously because it determines the rate of these reactions. Too cool, and your wrapper absorbs excess oil before crisping, resulting in greasy, heavy sticks. Too hot, and the exterior burns before the cheese inside fully melts. The sweet spot—around 350°F—allows the exterior to crisp and brown in roughly the same time it takes the interior to reach that perfect melted state. This understanding means you can troubleshoot in real time, adjusting your heat as needed.
When you pull the concept back, this same science applies to countless cooking techniques. Whether you're making spring rolls, empanadas, or any filled, fried creation, these principles hold true. Mastering cheesy taco sticks means mastering a fundamental cooking skill that will serve you for years to come.
Tools and Ingredients You'll Need
Let's talk about what you actually need to make exceptional cheesy taco sticks. First, you'll need a heavy-bottomed pot or deep skillet for frying—something that holds heat steadily. Cast iron is ideal, but any thick-walled pot works beautifully. If you have a deep fryer, that's perfect, but don't let the lack of specialized equipment stop you. I've made countless batches in a simple Dutch oven with excellent results. A candy or deep-fry thermometer is your best friend here, though if you don't have one, the wooden spoon test (dip the handle in; if bubbles form immediately, you're ready) works in a pinch.
For the wrappers, egg roll wrappers or spring roll wrappers are your go-to options. These thin wheat-based sheets crisp beautifully and create that signature shatter when you bite through. You'll find them in the refrigerated or frozen section of most grocery stores. The key difference: egg roll wrappers are slightly thicker and create a heartier bite, while spring roll wrappers are more delicate. Either works wonderfully for cheesy taco sticks, so choose based on your texture preference.
The filling ingredients are where your creativity shines. For the classic version, you need ground beef (choose 80/20 for the best flavor and moisture balance), taco seasoning (homemade or store-bought), and cheese that melts well. Cheddar, Monterey Jack, or a Mexican cheese blend all deliver that stretchy, gooey interior we're after. Avoid pre-shredded cheese if possible—the anti-caking agents can affect melting quality. Block cheese that you shred yourself melts more smoothly and creates better texture.
You'll also need neutral oil for frying—vegetable, canola, or peanut oil all work perfectly. Plan for about 2-3 inches of oil in your pot, which typically means 4-6 cups depending on your vessel's size. A slotted spoon or spider strainer makes removing the finished sticks easy and safe. Finally, have a wire rack set over a baking sheet ready for draining—this keeps the bottoms crispy instead of sitting in pooled oil on paper towels.
The Method, Step by Step
Let's walk through the complete process of creating perfect cheesy taco sticks from start to finish. This detailed approach ensures your success, even if this is your first time attempting this technique. First, you'll prepare your filling. Brown your ground beef in a skillet over medium-high heat, breaking it into small crumbles as it cooks. This should take about 6-8 minutes. You want the meat fully cooked with no pink remaining, and you want good browning on the pieces—that caramelization adds depth of flavor. Drain excess fat, then stir in your taco seasoning and a splash of water (usually 2-3 tablespoons). Let this simmer for 2-3 minutes until the liquid reduces and the seasoning coats every piece of meat. Transfer to a bowl and let it cool to room temperature before assembling. Hot filling will melt your cheese prematurely and make the wrappers soggy.
While your filling cools, set up your assembly station. This organized approach prevents chaos and makes the process flow smoothly. Lay out your egg roll wrappers and cover them with a slightly damp towel to prevent drying. Prepare a small bowl of water or a simple flour paste (1 tablespoon flour mixed with 2 tablespoons water) for sealing. Shred your cheese and have it within easy reach. This mise en place makes assembly quick and enjoyable.
Now for the assembly technique that ensures your cheesy taco sticks hold together perfectly. Place one wrapper on your work surface with a corner pointing toward you, creating a diamond shape. Add about 2 tablespoons of seasoned beef in a horizontal line across the center, leaving 2 inches clear on each side. Top with about 2 tablespoons of shredded cheese. The amounts matter—too much filling and your wrapper won't seal or might burst during frying; too little and you'll have disappointing, mostly-empty sticks.
Here's the crucial sealing process. Fold the bottom corner up over the filling, tucking it slightly under to create a tight cylinder. Fold in the left and right corners, pressing firmly to seal. Brush the top corner with your water or flour paste, then roll the entire package forward, pressing gently to seal completely. The seal should be tight and even—any gaps will allow filling to escape during frying. Place each completed stick seam-side down on your prepared baking sheet and cover with a damp towel while you finish the remaining ones.
When you're ready to fry, heat your oil to 350°F. This temperature is critical for cheesy taco sticks—verify it with a thermometer rather than guessing. Working in batches of 3-4 sticks (don't overcrowd), carefully lower them into the oil using tongs or a slotted spoon. They'll sink initially, then float to the surface within seconds. Fry for 3-4 minutes, turning once halfway through, until they're deep golden brown on all sides. You'll see bubbling activity around each stick—that's the moisture in the wrapper turning to steam and the exterior crisping perfectly.
The moment you remove them from the oil is just as important as the cooking itself. Lift each stick with your slotted spoon, letting excess oil drip back into the pot for a few seconds. Transfer to your wire rack, not paper towels. The air circulation under the rack prevents the bottom from steaming and becoming soggy. Let them rest for 2-3 minutes before serving. This brief waiting period allows the internal temperature to equalize slightly, preventing mouth-burning molten cheese while keeping everything perfectly melted and delicious. Your cheesy taco sticks should be crispy on the outside, with cheese that stretches beautifully when you pull them apart.
Troubleshooting Guide
Even experienced cooks encounter challenges when making cheesy taco sticks, so let's address the most common issues and their solutions. If your sticks are coming out greasy and heavy rather than light and crispy, your oil temperature is too low. Oil that's not hot enough allows the wrapper to absorb excess fat before it can crisp. Increase your heat and wait for the temperature to recover between batches. Remember that adding cold items to hot oil drops the temperature, so fry in small batches and give the oil time to reheat.
When filling leaks out during frying, you're dealing with a sealing issue or overfilling problem. Check that you're brushing the wrapper edges with water or flour paste before sealing, and press firmly along all edges. Make sure your filling is completely cool before assembly—warm filling can make wrappers difficult to seal properly. If leakage persists, reduce the amount of filling slightly. A slightly less-stuffed stick that stays intact is far better than an overstuffed one that falls apart.
If the exterior browns too quickly while the cheese inside remains barely melted, your oil is too hot. Reduce the heat and let the temperature stabilize at 350°F. This golden zone allows enough time for heat to penetrate to the center before the outside burns. You can also try letting your assembled sticks come to room temperature before frying if you've been keeping them refrigerated—this reduces the internal temperature gap.
Soggy cheesy taco sticks that never achieve that satisfying crunch usually result from resting them on a flat surface after frying. Always use a wire rack for cooling. If you've already made this mistake, you can actually rescue them by placing them on a baking sheet in a 375°F oven for 5-7 minutes. The dry heat will drive out excess moisture and restore crispness. It's not quite as good as getting it right the first time, but it's absolutely effective.
Wrappers that bubble excessively and separate into layers indicate too much moisture in your filling or insufficient sealing pressure. Make sure your beef mixture isn't wet—it should be moist but not dripping with liquid. When you fold and seal, press firmly to eliminate air pockets between layers of wrapper. These air pockets expand dramatically in hot oil, causing separation and uneven texture.
Taking It to the Next Level
Once you've mastered the basic technique for cheesy taco sticks, there's a whole world of variations and refinements to explore. Consider double-frying for the ultimate crispy exterior—fry once at 325°F until just set but pale, cool completely, then fry again at 375°F until deeply golden. This restaurant technique creates incredibly crispy results that stay crunchy longer. The first fry cooks the wrapper through, while the second fry focuses purely on creating that shatteringly crisp surface.
Experiment with flavor layers in your filling. Add a thin smear of refried beans under the meat for extra richness and authenticity. Mix finely diced jalapeños or green chiles into your beef for heat. Try different cheese combinations—a mix of sharp cheddar and cream cheese creates incredible creaminess, while pepper jack adds a spicy kick. Some cooks add a sprinkle of cumin or smoked paprika directly onto the cheese before rolling for an extra flavor dimension.
For visual appeal and texture contrast, try a light coating technique. After sealing your sticks but before frying, brush them lightly with water and press crushed tortilla chips or panko breadcrumbs onto the exterior. This creates an extra-crunchy coating with additional corn flavor that complements the taco filling beautifully. It's a simple upgrade that makes your cheesy taco sticks look and taste professionally crafted.
Professional cooks often prepare these in advance for events. Assemble your sticks completely, then freeze them on a baking sheet until solid. Transfer to freezer bags and store for up to three months. Fry directly from frozen, adding an extra minute or two to the cooking time. This make-ahead approach means you can have impressive appetizers ready at a moment's notice for unexpected guests or family gatherings.
Storing Your Results
Proper storage ensures your cheesy taco sticks maintain their quality, though I'll be honest—they're always best enjoyed fresh and hot. If you do have leftovers, let them cool completely to room temperature first. Placing hot items in sealed containers creates steam that will absolutely destroy that crispy exterior you worked so hard to achieve. Once cooled, store them in an airtight container with paper towels layered between the sticks to absorb any residual moisture. They'll keep in the refrigerator for up to three days.
Reheating requires a different approach than the microwave, which will turn your crispy sticks into soggy disappointments. Instead, use your oven to restore their glory. Preheat to 375°F and arrange the sticks on a wire rack set over a baking sheet. Heat for 10-12 minutes, flipping once halfway through. The circulating hot air re-crisps the exterior while warming the filling. An air fryer works even better if you have one—375°F for 5-7 minutes produces results remarkably close to fresh-fried.
For the filling mixture before assembly, you have great storage flexibility. Cooked, seasoned beef keeps refrigerated for 3-4 days or frozen for up to three months. This means you can prepare a large batch of filling and assemble cheesy taco sticks fresh whenever the craving strikes. Just remember to bring the filling to room temperature before assembly for the best sealing results.
If you're planning to serve these at a gathering, you can hold finished sticks in a warm oven (200°F) for up to 30 minutes. Any longer and they'll start to lose their crisp texture. A better approach for parties is to fry in continuous small batches, serving them hot from the oil. The active cooking becomes part of the entertainment, and your guests enjoy each stick at its absolute peak of crispy, melty perfection.
Common Questions
Can I bake cheesy taco sticks instead of frying them?
Yes, though the texture will be different from the traditional fried version. Brush assembled sticks generously with oil, place on a parchment-lined baking sheet, and bake at 400°F for 15-18 minutes, flipping halfway through. They'll become crispy but won't achieve quite the same golden, shatteringly crisp exterior that frying produces. For better browning, brush with oil again after flipping.
What if I live at high altitude?
High altitude affects oil temperature and cooking times. Your oil may need to be 15-25 degrees lower than the standard 350°F to prevent over-browning before the filling heats through. The lower air pressure means liquids boil at lower temperatures, so your cheesy taco sticks might need an extra minute of frying time to achieve proper crispness. Watch visual cues more than timing—golden brown color and vigorous bubbling are your indicators.
Can I make these with different proteins?
Absolutely! Ground chicken, turkey, or lamb all work beautifully with appropriate seasoning adjustments. Shredded rotisserie chicken mixed with taco seasoning creates an even quicker version. For each protein, ensure it's fully cooked and cooled before assembly, and that the mixture is moist but not wet. The technique for sealing and frying remains exactly the same regardless of protein choice.
How do I scale this recipe for a large gathering?
For crowds, assembly-line production is your friend. Set up stations: one person mixing filling, one assembling sticks, one sealing, one frying. You can easily prepare 50-60 sticks in about an hour with this system. Alternatively, assemble everything a day ahead, refrigerate on parchment-lined sheets covered with damp towels, and fry just before serving. The organized approach prevents the chaos from becoming overwhelming.
Why did my wrappers turn out tough instead of crispy?
Overcooking is the usual culprit—leaving them in the oil too long drives out too much moisture, creating a hard, tough texture rather than crispy-tender. Fry only until deep golden, not dark brown. Also check that you're not rolling your wrappers too tightly during assembly, which can compact the layers and prevent proper crisping. A snug but not compressed roll is ideal.
Can I prepare the filling mixture differently for better results?
Many cooks find that adding a tablespoon of tomato paste to the beef mixture intensifies the flavor and helps bind everything together. Some mix in a few tablespoons of cream cheese with the shredded cheese for extra creaminess that doesn't leak as easily. Just ensure your total filling moisture level stays balanced—you want the mixture to hold together without being wet, which would make the wrappers soggy before frying.
Cheesy Taco Sticks
Crispy fried egg roll wrappers filled with seasoned ground beef and melted cheese, creating the perfect handheld appetizer or snack with satisfying crunch and gooey interior.
Prep Time
25 min
Cook Time
20 min
Total Time
45 min
Servings
12 sticks
Ingredients
For 12 sticks
- 1 pound ground beef (80/20)
- 3 tablespoons taco seasoning
- 3 tablespoons water
- 2 cups shredded cheddar cheese or Mexican cheese blend
- 12 egg roll wrappers
- 2 tablespoons all-purpose flour
- 3 tablespoons water (for sealing paste)
- 4-6 cups vegetable oil for frying
Instructions
- 1
Brown the beef
Heat a large skillet over medium-high heat. Add ground beef and cook for 6-8 minutes, breaking it into small crumbles with a wooden spoon. Continue cooking until no pink remains and the meat has developed good browning. Drain excess fat from the skillet.
- 2
Season the filling
Return the drained beef to the skillet and sprinkle taco seasoning over the meat. Add 3 tablespoons of water and stir well to combine. Simmer for 2-3 minutes until the liquid reduces and the seasoning evenly coats the beef. Transfer to a bowl and let cool to room temperature, about 15 minutes.
- 3
Prepare sealing paste
In a small bowl, mix together 2 tablespoons flour and 3 tablespoons water to create a smooth paste. This will act as glue to seal your wrappers. Set aside with a pastry brush or your finger for application.
- 4
Set up assembly station
Arrange your workspace with egg roll wrappers covered by a slightly damp towel, the cooled beef filling, shredded cheese, and sealing paste all within easy reach. Place a clean baking sheet nearby for holding assembled sticks.
- 5
Fill and fold
Place one wrapper on your work surface positioned as a diamond with one corner pointing toward you. Add 2 tablespoons of seasoned beef in a horizontal line across the center, leaving 2 inches clear on each side. Top with 2 tablespoons of shredded cheese. Fold the bottom corner up and over the filling, tucking it slightly under to start a tight roll.
- 6
Seal the sticks
Fold in the left and right corners toward the center, pressing firmly to seal. Brush the top corner with your flour paste. Roll the wrapper forward completely, pressing gently along the seam to seal tightly. Place seam-side down on the baking sheet and cover with a damp towel. Repeat with remaining wrappers and filling.
- 7
Heat the oil
Pour oil into a heavy-bottomed pot or Dutch oven to a depth of 2-3 inches. Heat over medium-high heat until a thermometer registers 350°F. If you don't have a thermometer, test by dipping a wooden spoon handle in the oil—if bubbles form immediately around it, the oil is ready.
- 8
Fry the sticks
Working in batches of 3-4 sticks to avoid crowding, carefully lower them into the hot oil using tongs or a slotted spoon. Fry for 3-4 minutes, turning once halfway through, until deep golden brown on all sides. The sticks will bubble actively and should float at the surface.
- 9
Drain and rest
Remove finished sticks with a slotted spoon, letting excess oil drip back into the pot for a few seconds. Transfer to a wire rack set over a baking sheet to drain. Allow the oil to return to 350°F between batches. Let the sticks rest for 2-3 minutes before serving to allow the filling to settle slightly while remaining perfectly melted.
Nutrition Facts
Per serving (estimated)
285 calories
Calories
18g
Carbs
14g
Protein
17g
Fat
1g
Fiber
420mg
Sodium
1g
Sugar


